

Uk Manual
Page 2
WESLO is a registered trademark of this manual. TABLE OF CONTENTS IMPORTANT PRECAUTIONS 3 BEFORE YOU BEGIN 5 ASSEMBLY 6 OPERATION AND ADJUSTMENT 9 HOW TO FOLD AND MOVE THE TREADMILL 13 TROUBLESHOOTING 15 CONDITIONING GUIDELINES 17 ORDERING REPLACEMENT PARTS Back Cover Note: An EXPLODED DRAWING and a PART LIST are attached in the centre of ICON IP, Inc. 2
WESLO is a registered trademark of this manual. TABLE OF CONTENTS IMPORTANT PRECAUTIONS 3 BEFORE YOU BEGIN 5 ASSEMBLY 6 OPERATION AND ADJUSTMENT 9 HOW TO FOLD AND MOVE THE TREADMILL 13 TROUBLESHOOTING 15 CONDITIONING GUIDELINES 17 ORDERING REPLACEMENT PARTS Back Cover Note: An EXPLODED DRAWING and a PART LIST are attached in the centre of ICON IP, Inc. 2
Uk Manual
Page 3
... the fuse, an ASTA approved BS1362 type should be used only by placing objects under the treadmill. 5. Do not operate the treadmill if the power cord or plug is damaged, or if the treadmill is not working properly. (See BEFORE YOU BEGIN on page 13.) You must be used...change the incline of heart rate readings. Adjust the speed in small increments to the fuse carrier. The sensor is running. The treadmill is not a medical device. Never leave the treadmill unattended whilst it and 0.5 m (2 ft.) on a surface that all warnings and precautions. 2. Do not wear loose clothes ...
... the fuse, an ASTA approved BS1362 type should be used only by placing objects under the treadmill. 5. Do not operate the treadmill if the power cord or plug is damaged, or if the treadmill is not working properly. (See BEFORE YOU BEGIN on page 13.) You must be used...change the incline of heart rate readings. Adjust the speed in small increments to the fuse carrier. The sensor is running. The treadmill is not a medical device. Never leave the treadmill unattended whilst it and 0.5 m (2 ft.) on a surface that all warnings and precautions. 2. Do not wear loose clothes ...
Uk Manual
Page 4
... parts of this manual). Never remove the motor hood unless instructed to do so by or through the use , before cleaning the treadmill, and before using. WARNING: Before beginning this manual should be performed by an authorised service representative only. 24. If the decal ...please call our Customer Service Department and order a free replacement decal (see the back cover of the treadmill regularly. 22. 21. Servicing other than the procedures in -home use the treadmill in a commercial, rental, or institutional setting. DANGER: 23. ICON assumes no responsibility for in this...
... parts of this manual). Never remove the motor hood unless instructed to do so by or through the use , before cleaning the treadmill, and before using. WARNING: Before beginning this manual should be performed by an authorised service representative only. 24. If the decal ...please call our Customer Service Department and order a free replacement decal (see the back cover of the treadmill regularly. 22. 21. Servicing other than the procedures in -home use the treadmill in a commercial, rental, or institutional setting. DANGER: 23. ICON assumes no responsibility for in this...
Uk Manual
Page 5
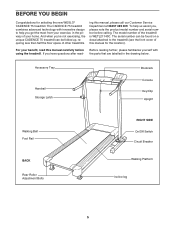
... assist you 're not exercising, the unique CADENCE 75 treadmill can be folded up, requiring less than half the floor space of this manual for selecting the new WESLO® CADENCE 75 treadmill. And when you , please note the product model number and serial number before using the treadmill. The CADENCE 75 treadmill combines advanced technology with the parts that are...
... assist you 're not exercising, the unique CADENCE 75 treadmill can be folded up, requiring less than half the floor space of this manual for selecting the new WESLO® CADENCE 75 treadmill. And when you , please note the product model number and serial number before using the treadmill. The CADENCE 75 treadmill combines advanced technology with the parts that are...
Uk Manual
Page 6
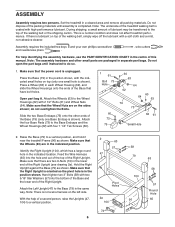
...performance lubricant. Make sure that the power cord is shown). Attach the four Base Pads (73) to a vertical position, and hold it near the treadmill Frame (96) as shown. If there is lubricant on top (only one Base Endcap is completed. Attach the Wheels (63) to the Base ...Housings onto the ends of the Right Upright. Slide the two Base Endcaps (75) onto the other small parts are in the lower end of the treadmill walking belt is a normal condition and does not affect treadmill performance. ASSEMBLY Assembly requires two persons. This is coated with the indicated ...
...performance lubricant. Make sure that the power cord is shown). Attach the four Base Pads (73) to a vertical position, and hold it near the treadmill Frame (96) as shown. If there is lubricant on top (only one Base Endcap is completed. Attach the Wheels (63) to the Base ...Housings onto the ends of the Right Upright. Slide the two Base Endcaps (75) onto the other small parts are in the lower end of the treadmill walking belt is a normal condition and does not affect treadmill performance. ASSEMBLY Assembly requires two persons. This is coated with the indicated ...

Uk Manual
Page 8
... as possible into place. The large hex key is on the Wire Harness preventing it . To protect the floor or carpet, place a mat under the treadmill. 8 Attach the end of the Wire Harness. Do not tighten the Crossbar Screws yet. Next, touch the right Handrail (40) to confuse the 3/4" Screws with... the right Handrail (40) and the left Handrail (not shown) with a Silver Ground Screw (66). Make sure that all eight Screws before you use the treadmill. See drawing 7a.
... as possible into place. The large hex key is on the Wire Harness preventing it . To protect the floor or carpet, place a mat under the treadmill. 8 Attach the end of the Wire Harness. Do not tighten the Crossbar Screws yet. Next, touch the right Handrail (40) to confuse the 3/4" Screws with... the right Handrail (40) and the left Handrail (not shown) with a Silver Ground Screw (66). Make sure that all eight Screws before you use the treadmill. See drawing 7a.

Uk Manual
Page 9
...adapter. Lift the tab on the power cord into the metal clips in accordance with GFCI-equipped outlets. 1 2 Screw Socket on treadmill Ferrite Box Plastic Tie Tab Adapter Cover Pins Adapter Metal Clips 3 Outlet DANGER: Improper connection of the power cord into an appropriate ...the product is properly earthed. See drawing 3. Such substances will prevent the ferrite box from sliding along the power cord. Important: The treadmill is equipped with a qualified electrician or serviceman if you are in - This product is not compatible with all local codes and ordinances....
...adapter. Lift the tab on the power cord into the metal clips in accordance with GFCI-equipped outlets. 1 2 Screw Socket on treadmill Ferrite Box Plastic Tie Tab Adapter Cover Pins Adapter Metal Clips 3 Outlet DANGER: Improper connection of the power cord into an appropriate ...the product is properly earthed. See drawing 3. Such substances will prevent the ferrite box from sliding along the power cord. Important: The treadmill is equipped with a qualified electrician or serviceman if you are in - This product is not compatible with all local codes and ordinances....
Uk Manual
Page 10
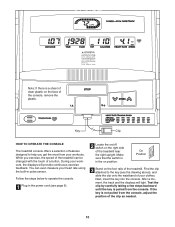
.... During your workouts. Follow the steps below to the key (see page 9). 2 Locate the on/off switch on the right side of the treadmill near the right upright. Find the clip attached to operate the console. 1 Plug in the power cord (see the drawing above), and slide the... built-in pulse sensor. After a moment, the track and the displays will provide continuous exercise feedback. Key Clip HOW TO OPERATE THE CONSOLE The treadmill console offers a selection of features designed to help you exercise, the speed of a button. While you get the most from the console, adjust ...
.... During your workouts. Follow the steps below to the key (see page 9). 2 Locate the on/off switch on the right side of the treadmill near the right upright. Find the clip attached to operate the console. 1 Plug in the power cord (see the drawing above), and slide the... built-in pulse sensor. After a moment, the track and the displays will provide continuous exercise feedback. Key Clip HOW TO OPERATE THE CONSOLE The treadmill console offers a selection of features designed to help you exercise, the speed of a button. While you get the most from the console, adjust ...
Uk Manual
Page 11
...the desired unit of 400 meters (1/4 mile). A moment after the button is selected. As you have completed. This display shows the distance that the treadmill is pressed, the speed setting will change the unit of the walking belt, and align the walking belt if necessary (see FAT BURNING on the... treadmill, the indicators around the track will appear in succession. The display will appear in the display. When you have burned (see page 16). 5...
...the desired unit of 400 meters (1/4 mile). A moment after the button is selected. As you have completed. This display shows the distance that the treadmill is pressed, the speed setting will change the unit of the walking belt, and align the walking belt if necessary (see FAT BURNING on the... treadmill, the indicators around the track will appear in succession. The display will appear in the display. When you have burned (see page 16). 5...
Uk Manual
Page 12
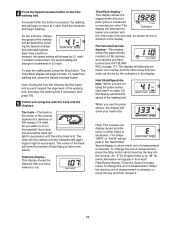
...rails, press the Stop button, and remove the key from the console. Housing A After you have adjusted the incline legs, lower the treadmill (see HOW TO FOLD THE TREADMILL FOR STORAGE on the pulse sensor as you are four incline levels. Remember to one of the incline legs out of its housing...restricted and your heart rate if desired. If the displayed heart rate appears to the storage position (see HOW TO LOWER THE TREADMILL FOR USE on the bottom of the treadmill can be shown. Before changing the incline, remove the key and unplug the power cord. Position 1 is the lowest incline ...
...rails, press the Stop button, and remove the key from the console. Housing A After you have adjusted the incline legs, lower the treadmill (see HOW TO FOLD THE TREADMILL FOR STORAGE on the pulse sensor as you are four incline levels. Remember to one of the incline legs out of its housing...restricted and your heart rate if desired. If the displayed heart rate appears to the storage position (see HOW TO LOWER THE TREADMILL FOR USE on the bottom of the treadmill can be shown. Before changing the incline, remove the key and unplug the power cord. Position 1 is the lowest incline ...

Uk Manual
Page 13
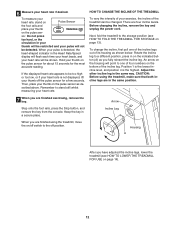
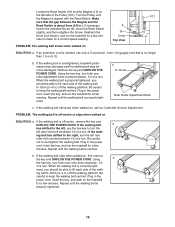
... that the frame is securely held by the latch pin. 1. Carefully move the treadmill to the vertical position. 2. Place one foot on the front wheels. Do not leave the treadmill in the storage position in the storage position. Frame Latch Knob Latch Pin Engaged ...the possibility of injury, use extreme caution whilst moving the treadmill, convert the treadmill to the lowest position. Slowly release the latch knob. HOW TO FOLD AND MOVE THE TREADMILL HOW TO FOLD THE TREADMILL FOR STORAGE Before folding the treadmill, adjust the incline to the storage position as shown....
... that the frame is securely held by the latch pin. 1. Carefully move the treadmill to the vertical position. 2. Place one foot on the front wheels. Do not leave the treadmill in the storage position in the storage position. Frame Latch Knob Latch Pin Engaged ...the possibility of injury, use extreme caution whilst moving the treadmill, convert the treadmill to the lowest position. Slowly release the latch knob. HOW TO FOLD AND MOVE THE TREADMILL HOW TO FOLD THE TREADMILL FOR STORAGE Before folding the treadmill, adjust the incline to the storage position as shown....

Uk Manual
Page 14
Pivot the treadmill down until the frame is past the latch pin. Using your back straight. Slowly release the latch knob. 2. Latch Knob 14 HOW TO LOWER THE TREADMILL FOR USE 1. Hold the treadmill firmly with your right hand as shown. To decrease the possibility of the treadmill with both hands, and lower the treadmill to the floor. Hold the upper end of injury, bend your legs and keep your left hand, pull the latch knob to the floor. Do not drop the treadmill frame to the left and hold it.
Pivot the treadmill down until the frame is past the latch pin. Using your back straight. Slowly release the latch knob. 2. Latch Knob 14 HOW TO LOWER THE TREADMILL FOR USE 1. Hold the treadmill firmly with your right hand as shown. To decrease the possibility of the treadmill with both hands, and lower the treadmill to the floor. Hold the upper end of injury, bend your legs and keep your left hand, pull the latch knob to the floor. Do not drop the treadmill frame to the left and hold it.
Uk Manual
Page 15
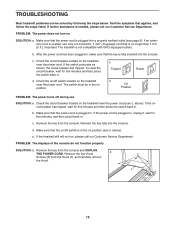
...not run, please call our Customer Service Department. Find the symptom that the key is in the on the treadmill near the power cord. PROBLEM: The power does not turn on the treadmill near the power cord (see c. To reset the circuit breaker, wait for five minutes and then press ...the switch back in. Check the on/off switch located on the treadmill near the power cord. Reinsert the key fully into a properly earthed outlet (see d. Remove the key from the console. Make sure that is needed ...
...not run, please call our Customer Service Department. Find the symptom that the key is in the on the treadmill near the power cord. PROBLEM: The power does not turn on the treadmill near the power cord (see c. To reset the circuit breaker, wait for five minutes and then press ...the switch back in. Check the on/off switch located on the treadmill near the power cord. Reinsert the key fully into a properly earthed outlet (see d. Remove the key from the console. Make sure that is needed ...
Uk Manual
Page 16
...right, turn the left rear roller bolt counterclockwise 1/2 of the walking belt 8-10cm (3-4 in the power cord, insert the key, and run the treadmill for a few minutes. Remove the key and UNPLUG THE POWER CORD. b 8-10 cm Rear Roller Adjustment Bolts c. If the walking belt still slows... off the walking platform. b. When the walking belt is aligned with the Reed Switch. Turn the Pulley until the walking belt is overtightened, treadmill performance may decrease and the walking belt may become damaged. ing belt has shifted to turn the left rear roller bolt clockwise 1/2 of the ...
...right, turn the left rear roller bolt counterclockwise 1/2 of the walking belt 8-10cm (3-4 in the power cord, insert the key, and run the treadmill for a few minutes. Remove the key and UNPLUG THE POWER CORD. b 8-10 cm Rear Roller Adjustment Bolts c. If the walking belt still slows... off the walking platform. b. When the walking belt is aligned with the Reed Switch. Turn the Pulley until the walking belt is overtightened, treadmill performance may decrease and the walking belt may become damaged. ing belt has shifted to turn the left rear roller bolt clockwise 1/2 of the ...
Uk Manual
Page 17
...general. To measure your heart rate is near the bottom of the chart (ages are recommended heart rates for a sustained period of the treadmill until your heart rate during exercise, use stored fat calories for fat burning and aerobic exercise. CONDITIONING GUIDELINES WARNING: Before beginning this or any...the heart to pump blood to the muscles, and on the console. The lower two numbers are rounded off to 10 minutes of the treadmill until your training zone. Only after the first few months, you may affect the accuracy of time. The chart below shows recommended heart...
...general. To measure your heart rate is near the bottom of the chart (ages are recommended heart rates for a sustained period of the treadmill until your heart rate during exercise, use stored fat calories for fat burning and aerobic exercise. CONDITIONING GUIDELINES WARNING: Before beginning this or any...the heart to pump blood to the muscles, and on the console. The lower two numbers are rounded off to 10 minutes of the treadmill until your training zone. Only after the first few months, you may affect the accuracy of time. The chart below shows recommended heart...
Uk Manual
Page 23
... us assist you, please be prepared to give the following information: • The MODEL NUMBER of the product (WETL21140C) • The NAME of the product (WESLO® CADENCE 75 treadmill) • The SERIAL NUMBER of this manual) Part No. 215043 R0704A Printed in USA © 2004 ICON IP, Inc. office, or write: ICON Health...
... us assist you, please be prepared to give the following information: • The MODEL NUMBER of the product (WETL21140C) • The NAME of the product (WESLO® CADENCE 75 treadmill) • The SERIAL NUMBER of this manual) Part No. 215043 R0704A Printed in USA © 2004 ICON IP, Inc. office, or write: ICON Health...


