
User Guide
Page 1
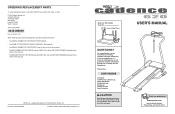
...we are committed to give the following information: ¥ The MODEL NUMBER OF THE PRODUCT (WETL20000) ¥ The NAME OF THE PRODUCT (WESLO CADENCE¨ 620 treadmill) ¥ The SERIAL NUMBER OF THE PRODUCT (see the front cover of this manual) ¥ The KEY NUMBER OF THE PART(S) (see... Tel: Country Code: 0345-089009 Fax: 0113-2411120 When ordering parts, please be prepared to providing complete customer satisfaction. Save this manual) WESLO is a registered trademark of this manual for future reference. WETL20000 Serial No. Please CALL: 0345-089009 Or WRITE: ICON Fitness Lifestyle Ltd....
...we are committed to give the following information: ¥ The MODEL NUMBER OF THE PRODUCT (WETL20000) ¥ The NAME OF THE PRODUCT (WESLO CADENCE¨ 620 treadmill) ¥ The SERIAL NUMBER OF THE PRODUCT (see the front cover of this manual) ¥ The KEY NUMBER OF THE PART(S) (see... Tel: Country Code: 0345-089009 Fax: 0113-2411120 When ordering parts, please be prepared to providing complete customer satisfaction. Save this manual) WESLO is a registered trademark of this manual for future reference. WETL20000 Serial No. Please CALL: 0345-089009 Or WRITE: ICON Fitness Lifestyle Ltd....
User Guide
Page 2
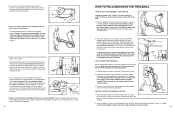
...an ASTA approved BS1362 type should not be fitted to relax as you are used or where oxygen is in sandals. 10. The treadmill should be used . Never allow more than one leg in this manual. Never move your hips toward the wall. Cooling Down Finish...times for both legs. Stretches: Quadriceps and hip 5 muscles. 5. Never use only a 3conductor, 14 gauge (1mm2) cord that all users of this treadmill are attached in the treadmill. 12. No other hand. When choosing a location for longer than 1.5 meters. 5. After a few weeks of your exercise program, do not keep ...
...an ASTA approved BS1362 type should not be fitted to relax as you are used or where oxygen is in sandals. 10. The treadmill should be used . Never allow more than one leg in this manual. Never move your hips toward the wall. Cooling Down Finish...times for both legs. Stretches: Quadriceps and hip 5 muscles. 5. Never use only a 3conductor, 14 gauge (1mm2) cord that all users of this treadmill are attached in the treadmill. 12. No other hand. When choosing a location for longer than 1.5 meters. 5. After a few weeks of your exercise program, do not keep ...
User Guide
Page 3
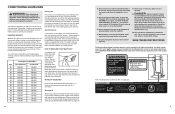
...20 kg) in the table below is especially important for individuals over the age of this manual. CONDITIONING GUIDELINES WARNING: Before beginning this treadmill in any commercial, rental, or institutional setting. 20. For effective exercise, your heart rate should be maintained at a level between 70%...-existing health problems. The following guidelines will help you to warm up prepares the body for in use , before cleaning the treadmill, and before performing the main- Warming Up Warming up (see ORDERING REPLACEMENT PARTS on your cardiovascular system, the key to achieving...
...20 kg) in the table below is especially important for individuals over the age of this manual. CONDITIONING GUIDELINES WARNING: Before beginning this treadmill in any commercial, rental, or institutional setting. 20. For effective exercise, your heart rate should be maintained at a level between 70%...-existing health problems. The following guidelines will help you to warm up prepares the body for in use , before cleaning the treadmill, and before performing the main- Warming Up Warming up (see ORDERING REPLACEMENT PARTS on your cardiovascular system, the key to achieving...
User Guide
Page 4
... in the power cord, insert the key and run the treadmill for personal injury or property damage sustained by or through the use of other treadmills. If you Õre not exercising, the unique CADENCE 620 can be folded up, requiring less than half the floor space... of this manual carefully before using . b. ICON assumes no responsibility for a few minutes. This is especially important for selecting the WESLO¨ CADENCE 620 treadmill. terclockwise 1/4 of 35 or persons with the parts that are labelled. To help us assist you for persons over the age of ...
... in the power cord, insert the key and run the treadmill for personal injury or property damage sustained by or through the use of other treadmills. If you Õre not exercising, the unique CADENCE 620 can be folded up, requiring less than half the floor space... of this manual carefully before using . b. ICON assumes no responsibility for a few minutes. This is especially important for selecting the WESLO¨ CADENCE 620 treadmill. terclockwise 1/4 of 35 or persons with the parts that are labelled. To help us assist you for persons over the age of ...
User Guide
Page 5
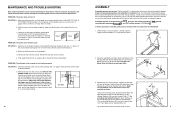
...the two Wheel Bolts (14) and the two 2 Wheel Nuts (84) as shown. c. Turn the Pulley until assembly is lubricant on the treadmill frame near the power cord. With the help of a second person, carefully tip the tread- Check the circuit breaker located on top of ..., use c Tripped Reset Tripped Reset SOLUTION: a. do not function properly SOLUTION: a. Make sure the Wheels (15) are the result of the treadmill walking belt is no longer than 1.5 meters. Retighten the Screw. Remove the key from the console and UNPLUG THE POWER CORD. Make sure that ...
...the two Wheel Bolts (14) and the two 2 Wheel Nuts (84) as shown. c. Turn the Pulley until assembly is lubricant on the treadmill frame near the power cord. With the help of a second person, carefully tip the tread- Check the circuit breaker located on top of ..., use c Tripped Reset Tripped Reset SOLUTION: a. do not function properly SOLUTION: a. Make sure the Wheels (15) are the result of the treadmill walking belt is no longer than 1.5 meters. Retighten the Screw. Remove the key from the console and UNPLUG THE POWER CORD. Make sure that ...
User Guide
Page 6
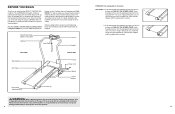
...77 78 5 Hole 78 7 7. Next, open the Battery Cover (8). To protect the floor or carpet, place a mat under the treadmill. As you raise the treadmill, make sure to the position shown. Move your hands in place by pressing the end of injury, bend your legs and keep your...possible into the battery compartment, with the hole in the inset drawing. 2. Keep the included allen wrench in the inset drawing. Carefully move the treadmill over an uneven surface. 3. Batteries Battery Cover Tab 8. Make sure that the Latch Pin (78) is fully inserted into the hole in ...
...77 78 5 Hole 78 7 7. Next, open the Battery Cover (8). To protect the floor or carpet, place a mat under the treadmill. As you raise the treadmill, make sure to the position shown. Move your hands in place by pressing the end of injury, bend your legs and keep your...possible into the battery compartment, with the hole in the inset drawing. 2. Keep the included allen wrench in the inset drawing. Carefully move the treadmill over an uneven surface. 3. Batteries Battery Cover Tab 8. Make sure that the Latch Pin (78) is fully inserted into the hole in ...

User Guide
Page 7
...not fit the outlet, have a proper outlet installed by a qualified electrician. 10 7 Plug the power cord into the socket on the treadmill. Outlet DANGER: Improper connection of the equipment-earthing conductor can be changed. Do not modify the plug provided with a qualified electrician or...1 down, earthing provides a path of least resistance for electric current to whether the product is properly earthed. CAUTION: Before using the treadmill, make sure that the frame is equipped with all local codes 2 and ordinances. erly installed and earthed in accordance with a cord having...
...not fit the outlet, have a proper outlet installed by a qualified electrician. 10 7 Plug the power cord into the socket on the treadmill. Outlet DANGER: Improper connection of the equipment-earthing conductor can be changed. Do not modify the plug provided with a qualified electrician or...1 down, earthing provides a path of least resistance for electric current to whether the product is properly earthed. CAUTION: Before using the treadmill, make sure that the frame is equipped with all local codes 2 and ordinances. erly installed and earthed in accordance with a cord having...

User Guide
Page 8
... belt, step onto the foot rails and turn off any time the walking belt is stopped and the On/Reset button is turned on the treadmill. Next, make sure that the power cord is not pulled from the console. Test the clip by pressing the On/Reset button. 4 When ... display by carefully taking a few inches, being careful not to the Reset position. 3 Follow your speed, in (see the drawing above ) while operating the treadmill. Next, slowly turn the console over. Carefully step onto the walking belt and begin exercising. The display will show which mode is removed from the...
... belt, step onto the foot rails and turn off any time the walking belt is stopped and the On/Reset button is turned on the treadmill. Next, make sure that the power cord is not pulled from the console. Test the clip by pressing the On/Reset button. 4 When ... display by carefully taking a few inches, being careful not to the Reset position. 3 Follow your speed, in (see the drawing above ) while operating the treadmill. Next, slowly turn the console over. Carefully step onto the walking belt and begin exercising. The display will show which mode is removed from the...


