
User Guide
Page 1
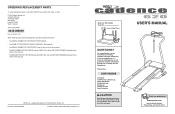
...; The NAME OF THE PRODUCT (WESLO CADENCE¨ 620 treadmill) ¥ The SERIAL NUMBER OF THE PRODUCT (see the front cover of this manual) ¥ The KEY NUMBER OF THE PART(S) (see the PART LIST and the EXPLODED DRAWING attached in the centre of this manual) ¥ The DESCRIPTION OF THE PART(S) (see the PART LIST and the EXPLODED DRAWING attached in the centre of ICON Health & Fitness, Inc. Greenwich House 223...
...; The NAME OF THE PRODUCT (WESLO CADENCE¨ 620 treadmill) ¥ The SERIAL NUMBER OF THE PRODUCT (see the front cover of this manual) ¥ The KEY NUMBER OF THE PART(S) (see the PART LIST and the EXPLODED DRAWING attached in the centre of this manual) ¥ The DESCRIPTION OF THE PART(S) (see the PART LIST and the EXPLODED DRAWING attached in the centre of ICON Health & Fitness, Inc. Greenwich House 223...
User Guide
Page 2
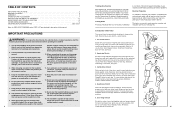
... air openings. Keep the power cord away from moisture and dust. The treadmill is needed, use the treadmill with one person on the treadmill at the right. Calf/Achilles Stretch With one foot with at all times. 8. Bend your front leg, lean forward and move the walking belt whilst the power is to make sure that the location and position permit access to a plug. 11...
... air openings. Keep the power cord away from moisture and dust. The treadmill is needed, use the treadmill with one person on the treadmill at the right. Calf/Achilles Stretch With one foot with at all times. 8. Bend your front leg, lean forward and move the walking belt whilst the power is to make sure that the location and position permit access to a plug. 11...
User Guide
Page 3
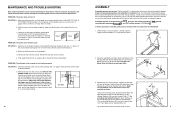
... your exercise program. Warming Up Warming up prepares the body for energy. Do not change the incline of your exercise until your heart rate is known as you to burn fat, adjust the intensity of the treadmill by increasing circulation, delivering more detailed information about exercise, obtain a book or consult your physician. DANGER: 22. tenance and adjustment procedures de- Never remove the motor hood unless instructed to...
... your exercise program. Warming Up Warming up prepares the body for energy. Do not change the incline of your exercise until your heart rate is known as you to burn fat, adjust the intensity of the treadmill by increasing circulation, delivering more detailed information about exercise, obtain a book or consult your physician. DANGER: 22. tenance and adjustment procedures de- Never remove the motor hood unless instructed to...
User Guide
Page 4
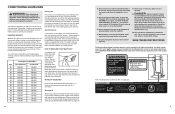
... Console Handrail LEFT SIDE RIGHT SIDE Walking Belt Grip Tape Hood Power Cord Front Wheel Circuit Breaker Rear Roller Adjustment Bolt Incline Leg PROBLEM: The walking belt is centred. Repeat until the walking belt is WETL20000. To help us assist you have additional questions, please call our Customer Service Department at the drawing below and familiarise yourself with innovative design to the treadmill (see the front cover of other treadmills. The CADENCE 620 treadmill...
... Console Handrail LEFT SIDE RIGHT SIDE Walking Belt Grip Tape Hood Power Cord Front Wheel Circuit Breaker Rear Roller Adjustment Bolt Incline Leg PROBLEM: The walking belt is centred. Repeat until the walking belt is WETL20000. To help us assist you have additional questions, please call our Customer Service Department at the drawing below and familiarise yourself with innovative design to the treadmill (see the front cover of other treadmills. The CADENCE 620 treadmill...
User Guide
Page 5
... the walking belt or the shipping carton. After the power cord has been plugged in step 1. 5 c. PROBLEM: The power turns off the lubricant with the Reed Switch. If the circuit breaker has tripped, wait for five minutes and then press the switch back in . c. Remove the key from the hood. Remove the key from the console and UNPLUG THE POWER CORD. Carefully remove the hood. If necessary, loosen the Screw (26) and move the Reed Switch slightly. Set the treadmill...
... the walking belt or the shipping carton. After the power cord has been plugged in step 1. 5 c. PROBLEM: The power turns off the lubricant with the Reed Switch. If the circuit breaker has tripped, wait for five minutes and then press the switch back in . c. Remove the key from the hood. Remove the key from the console and UNPLUG THE POWER CORD. Carefully remove the hood. If necessary, loosen the Screw (26) and move the Reed Switch slightly. Set the treadmill...
User Guide
Page 6
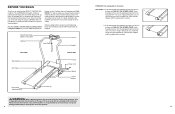
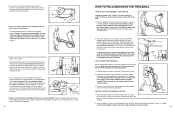
... tightened before you tighten the two Console Bolts. 4 1 6 5. Batteries Battery Cover Tab 8. Hold the treadmill with your back straight. 11 Raise the treadmill about halfway to the vertical position. 7 9 6. Slide the latch pin into the slot in the storage position. To protect the floor or carpet from damage, place a mat under the treadmill. 6 HOW TO FOLD AND MOVE THE TREADMILL HOW TO FOLD THE TREADMILL FOR STORAGE 1 Unplug the power cord...
... tightened before you tighten the two Console Bolts. 4 1 6 5. Batteries Battery Cover Tab 8. Hold the treadmill with your back straight. 11 Raise the treadmill about halfway to the vertical position. 7 9 6. Slide the latch pin into the slot in the storage position. To protect the floor or carpet from damage, place a mat under the treadmill. 6 HOW TO FOLD AND MOVE THE TREADMILL HOW TO FOLD THE TREADMILL FOR STORAGE 1 Unplug the power cord...

User Guide
Page 7
... TO PLUG IN THE POWER CORD This product must be earthed. Before changing the incline, remove the key and unplug the power cord. CAUTION: Before using the treadmill, make sure that is resting on treadmill Two power cords are two incline levels. Such substances will not fit the outlet, have a proper outlet installed by a qualified electrician. 10 7 Select the one that will fit your exercise, the incline of the treadmill can...
... TO PLUG IN THE POWER CORD This product must be earthed. Before changing the incline, remove the key and unplug the power cord. CAUTION: Before using the treadmill, make sure that is resting on treadmill Two power cords are two incline levels. Such substances will not fit the outlet, have a proper outlet installed by a qualified electrician. 10 7 Select the one that will fit your exercise, the incline of the treadmill can...

User Guide
Page 8
... walking belt is stopped and the On/Reset button is not pressed for about six minutes after the key is removed. HOW TO SELECT KILOMETRES AND MILES The console can be operated, two 1,5-volt batteries must be turned to operate the console. 1 Insert the key fully into the power switch. To change the unit of the console. DIAGRAM OF THE CONSOLE Display On/Reset Button Water Bottle Holder (Water bottle is not included) Speed Control Key...
... walking belt is stopped and the On/Reset button is not pressed for about six minutes after the key is removed. HOW TO SELECT KILOMETRES AND MILES The console can be operated, two 1,5-volt batteries must be turned to operate the console. 1 Insert the key fully into the power switch. To change the unit of the console. DIAGRAM OF THE CONSOLE Display On/Reset Button Water Bottle Holder (Water bottle is not included) Speed Control Key...
User Guide
Page 9
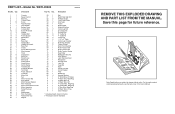
... Screw Belt Guide Roller Spacer Hood Anchor Nylon Washer Hood Bracket Controller Bracket Tie Holder Plastic Stand-off Controller Motor Bolt Fan Motor Tension Nut Star Washer Motor Tension Washer Wire Tie Screw Motor Nut/Frame Pivot Nut Motor Assembly Pulley/Flywheel Motor Reed Switch Wire Tie Clamp Reed Switch Clip Magnet Key No. Qty. Bolt Platform Screw Front Roller/Pulley Grip Tape Frame Walking Belt Walking Platform Incline Leg Bolt Ground Screw Ground Wire 8Ó Cable Tie 4Ó Cable Tie Incline Leg 1 1/2Ó x 3Ó Plate Incline Leg Crossbar Roller Adj. PART LISTÑModel...
... Screw Belt Guide Roller Spacer Hood Anchor Nylon Washer Hood Bracket Controller Bracket Tie Holder Plastic Stand-off Controller Motor Bolt Fan Motor Tension Nut Star Washer Motor Tension Washer Wire Tie Screw Motor Nut/Frame Pivot Nut Motor Assembly Pulley/Flywheel Motor Reed Switch Wire Tie Clamp Reed Switch Clip Magnet Key No. Qty. Bolt Platform Screw Front Roller/Pulley Grip Tape Frame Walking Belt Walking Platform Incline Leg Bolt Ground Screw Ground Wire 8Ó Cable Tie 4Ó Cable Tie Incline Leg 1 1/2Ó x 3Ó Plate Incline Leg Crossbar Roller Adj. PART LISTÑModel...


