

Uk Manual
Page 2
WESLO is a registered trademark of this manual. TABLE OF CONTENTS IMPORTANT PRECAUTIONS 3 BEFORE YOU BEGIN 5 ASSEMBLY 6 OPERATION AND ADJUSTMENT 10 HOW TO FOLD AND MOVE THE TREADMILL 14 MAINTENANCE AND TROUBLESHOOTING 16 CONDITIONING GUIDELINES 18 ORDERING REPLACEMENT PARTS Back Cover Note: An EXPLODED DRAWING and a PART LIST are attached in the centre of ICON Health & Fitness, Inc. 2
WESLO is a registered trademark of this manual. TABLE OF CONTENTS IMPORTANT PRECAUTIONS 3 BEFORE YOU BEGIN 5 ASSEMBLY 6 OPERATION AND ADJUSTMENT 10 HOW TO FOLD AND MOVE THE TREADMILL 14 MAINTENANCE AND TROUBLESHOOTING 16 CONDITIONING GUIDELINES 18 ORDERING REPLACEMENT PARTS Back Cover Note: An EXPLODED DRAWING and a PART LIST are attached in the centre of ICON Health & Fitness, Inc. 2

Uk Manual
Page 3
..., use only a 3conductor, 1mm2 (14-gauge) cord that the storage latch is being administered. 6. Always hold the handrails whilst using the treadmill. Do not put the treadmill in general. 18. Do not wear loose clothes that blocks air openings. Never use . 17. A 13 amp fuse should be fitted to...an earthed circuit. IMPORTANT PRECAUTIONS WARNING: To reduce the risk of burns, fire, electric shock, or injury to the fuse carrier. Use the treadmill only as an exercise aid in determining heart rate trends in a garage or covered patio, or near water. 15. Adjust the speed in small...
..., use only a 3conductor, 1mm2 (14-gauge) cord that the storage latch is being administered. 6. Always hold the handrails whilst using the treadmill. Do not put the treadmill in general. 18. Do not wear loose clothes that blocks air openings. Never use . 17. A 13 amp fuse should be fitted to...an earthed circuit. IMPORTANT PRECAUTIONS WARNING: To reduce the risk of burns, fire, electric shock, or injury to the fuse carrier. Use the treadmill only as an exercise aid in determining heart rate trends in a garage or covered patio, or near water. 15. Adjust the speed in small...
Uk Manual
Page 4
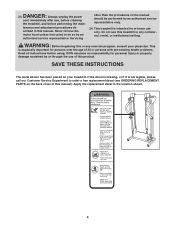
...manual should be performed by an authorised service representative only. 24. Servicing other than the procedures in -home use , before cleaning the treadmill, and before using. WARNING: Before beginning this product. SAVE THESE INSTRUCTIONS The decal shown has been placed on the back cover of...for personal injury or property damage sustained by an authorised service representative. Apply the replacement decal in any exercise program, consult your treadmill. This is especially important for in this manual. If the decal is missing, or if it is intended for persons over the...
...manual should be performed by an authorised service representative only. 24. Servicing other than the procedures in -home use , before cleaning the treadmill, and before using. WARNING: Before beginning this product. SAVE THESE INSTRUCTIONS The decal shown has been placed on the back cover of...for personal injury or property damage sustained by an authorised service representative. Apply the replacement decal in any exercise program, consult your treadmill. This is especially important for in this manual. If the decal is missing, or if it is intended for persons over the...

Uk Manual
Page 5
...this manual for selecting the WESLO CADENCE® 60 treadmill. The CADENCE 60 treadmill combines advanced technology with the labelled parts. The model number of other treadmills. Before reading further, please review the drawing below and familiarise yourself with innovative design to the treadmill (see the front cover ...Roller Adjustment Bolts Incline Leg 5 And when you're not exercising, the unique CADENCE 60 treadmill can be folded up, requiring less than half the floor space of the treadmill is WETL15131. For your home. To help us assist you, please note the...
...this manual for selecting the WESLO CADENCE® 60 treadmill. The CADENCE 60 treadmill combines advanced technology with the labelled parts. The model number of other treadmills. Before reading further, please review the drawing below and familiarise yourself with innovative design to the treadmill (see the front cover ...Roller Adjustment Bolts Incline Leg 5 And when you're not exercising, the unique CADENCE 60 treadmill can be folded up, requiring less than half the floor space of the treadmill is WETL15131. For your home. To help us assist you, please note the...

Uk Manual
Page 6
Open part bag A. Slide two U-nuts (105) into the Left Upright (not shown) in the power cord until the treadmill is completely assembled. 1. In addition, make sure that the Uprights are oriented so the indicated plates are facing each other small parts are in separate ... to do not dispose of the Right Upright (89) as shown. Attach the Left and Right Uprights (88, 89) to the drawings below. Set the treadmill in a cleared area and remove all packing materials;
Open part bag A. Slide two U-nuts (105) into the Left Upright (not shown) in the power cord until the treadmill is completely assembled. 1. In addition, make sure that the Uprights are oriented so the indicated plates are facing each other small parts are in separate ... to do not dispose of the Right Upright (89) as shown. Attach the Left and Right Uprights (88, 89) to the drawings below. Set the treadmill in a cleared area and remove all packing materials;

Uk Manual
Page 7
... of a second person, carefully lift the Frame (55) and hold the Spacers between the plates on the left side of a second person, carefully tip the treadmill onto its left side as shown. See drawing 2a. With the help of the Right Handrail as described above. Do not tighten the Bolts yet...) onto the sides of the large hole. (Note: It may be helpful to use needlenose pliers to the vertical position. With the help of the treadmill. Attach the Right Handrail and the Handrail Cap (83) with the hole in the plate on the left side. 2.
... of a second person, carefully lift the Frame (55) and hold the Spacers between the plates on the left side of a second person, carefully tip the treadmill onto its left side as shown. See drawing 2a. With the help of the Right Handrail as described above. Do not tighten the Bolts yet...) onto the sides of the large hole. (Note: It may be helpful to use needlenose pliers to the vertical position. With the help of the treadmill. Attach the Right Handrail and the Handrail Cap (83) with the hole in the plate on the left side. 2.

Uk Manual
Page 9
...a secure place. Attach the Latch Housing (41) to the storage position (see page 17). Firmly tighten all six Screws before you use the treadmill. Then, lower the frame to the top of the walking belt or the shipping carton. To protect the floor or carpet, place a mat ...Screws (84). See drawing 5a. Securely tighten the plastic tie on page 14). Make sure that the frame is a normal condition and does not affect treadmill performance. Hold the Console (1) near the Console Base (100). Securely tighten the plastic ties on the Console Base (100). 7. Touch the Right Handrail ...
...a secure place. Attach the Latch Housing (41) to the storage position (see page 17). Firmly tighten all six Screws before you use the treadmill. Then, lower the frame to the top of the walking belt or the shipping carton. To protect the floor or carpet, place a mat ...Screws (84). See drawing 5a. Securely tighten the plastic tie on page 14). Make sure that the frame is a normal condition and does not affect treadmill performance. Hold the Console (1) near the Console Base (100). Securely tighten the plastic ties on the Console Base (100). 7. Touch the Right Handrail ...
Uk Manual
Page 10
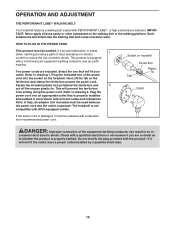
... ferrite box from sliding along the power cord. ing plug. Next, lift the tab on the treadmill. This will deteriorate the walking belt and cause excessive wear. Socket on treadmill Ferrite Box Plastic Tie Tab Outlet If the power cord is equipped with PERFORMANT LUBETM, a high-performance...current to drawing 2. Note: In Italy, an adaptor (not included) must be earthed. OPERATION AND ADJUSTMENT THE PERFORMANT LUBETM WALKING BELT Your treadmill features a walking belt coated with a cord having an equipment-earthing conductor and an earth- HOW TO PLUG IN THE POWER CORD This product...
... ferrite box from sliding along the power cord. ing plug. Next, lift the tab on the treadmill. This will deteriorate the walking belt and cause excessive wear. Socket on treadmill Ferrite Box Plastic Tie Tab Outlet If the power cord is equipped with PERFORMANT LUBETM, a high-performance...current to drawing 2. Note: In Italy, an adaptor (not included) must be earthed. OPERATION AND ADJUSTMENT THE PERFORMANT LUBETM WALKING BELT Your treadmill features a walking belt coated with a cord having an equipment-earthing conductor and an earth- HOW TO PLUG IN THE POWER CORD This product...
Uk Manual
Page 11
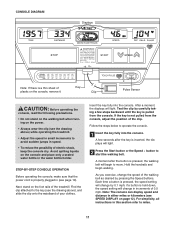
.... • Do not stand on the walking belt when turning on the power. • Always wear the clip (see the drawing above ) while operating the treadmill. • Adjust the speed in small increments to move. Avoid spilling liquids on page 12). Find the clip attached to operate the console. 1 Insert the... button or the Speed s button to miles. 11 CONSOLE DIAGRAM Displays Note: If there is a thin sheet of plastic on the foot rails of the treadmill. If the key is not pulled from the console. STEP-BY-STEP CONSOLE OPERATION Before operating the console, make sure that the power cord is...
.... • Do not stand on the walking belt when turning on the power. • Always wear the clip (see the drawing above ) while operating the treadmill. • Adjust the speed in small increments to move. Avoid spilling liquids on page 12). Find the clip attached to operate the console. 1 Insert the... button or the Speed s button to miles. 11 CONSOLE DIAGRAM Displays Note: If there is a thin sheet of plastic on the foot rails of the treadmill. If the key is not pulled from the console. STEP-BY-STEP CONSOLE OPERATION Before operating the console, make sure that the power cord is...
Uk Manual
Page 12
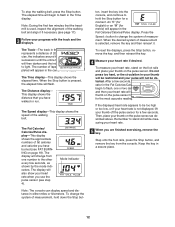
... or two dashes (- -) will appear, and then your thumb on the foot rails and place your heart rate will flash. After a few minutes that the treadmill is used, inspect the alignment of measurement. This display shows the distance that you exercise, the indicators around the track will change the system of...
... or two dashes (- -) will appear, and then your thumb on the foot rails and place your heart rate will flash. After a few minutes that the treadmill is used, inspect the alignment of measurement. This display shows the distance that you exercise, the indicators around the track will change the system of...

Uk Manual
Page 13
... to a different position and press in - HOW TO CHANGE THE INCLINE OF THE TREADMILL To vary the intensity of your exercise, the incline of its housing as you have adjusted the incline legs..., lower the treadmill (see HOW TO FOLD THE TREADMILL FOR STORAGE on page 15). 13 CAUTION: Before using the treadmill, make sure that both in on the bottom of the incline...arrow on the housing will point to the storage position (see HOW TO LOWER THE TREADMILL FOR USE on page 14). Housing Incline Leg Button cline legs are four incline levels...
... to a different position and press in - HOW TO CHANGE THE INCLINE OF THE TREADMILL To vary the intensity of your exercise, the incline of its housing as you have adjusted the incline legs..., lower the treadmill (see HOW TO FOLD THE TREADMILL FOR STORAGE on page 15). 13 CAUTION: Before using the treadmill, make sure that both in on the bottom of the incline...arrow on the housing will point to the storage position (see HOW TO LOWER THE TREADMILL FOR USE on page 14). Housing Incline Leg Button cline legs are four incline levels...

Uk Manual
Page 14
... Make sure that the latch pin is securely held by the latch pin. Carefully move the treadmill. 1. To reduce the risk of injury, use extreme caution whilst moving the treadmill, convert the treadmill to the vertical position. 2. CAUTION: You must be able to safely lift 20 kg ...carpet from damage, place a mat under the treadmill. Raise the treadmill until it . HOW TO MOVE THE TREADMILL Before moving the treadmill. HOW TO FOLD AND MOVE THE TREADMILL HOW TO FOLD THE TREADMILL FOR STORAGE Unplug the power cord. Tilt the treadmill back until the frame passes the latch pin....
... Make sure that the latch pin is securely held by the latch pin. Carefully move the treadmill. 1. To reduce the risk of injury, use extreme caution whilst moving the treadmill, convert the treadmill to the vertical position. 2. CAUTION: You must be able to safely lift 20 kg ...carpet from damage, place a mat under the treadmill. Raise the treadmill until it . HOW TO MOVE THE TREADMILL Before moving the treadmill. HOW TO FOLD AND MOVE THE TREADMILL HOW TO FOLD THE TREADMILL FOR STORAGE Unplug the power cord. Tilt the treadmill back until the frame passes the latch pin....
Uk Manual
Page 15
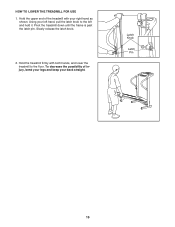
HOW TO LOWER THE TREADMILL FOR USE 1. Hold the treadmill firmly with your right hand as shown. Latch Knob Latch Pin 15 Using your back straight. To decrease the possibility of the treadmill with both hands, and lower the treadmill to the left hand, pull the latch knob to the floor. Slowly release the latch knob. 2. Hold the upper end of injury, bend your legs and keep your left and hold it. Pivot the treadmill down until the frame is past the latch pin.
HOW TO LOWER THE TREADMILL FOR USE 1. Hold the treadmill firmly with your right hand as shown. Latch Knob Latch Pin 15 Using your back straight. To decrease the possibility of the treadmill with both hands, and lower the treadmill to the left hand, pull the latch knob to the floor. Slowly release the latch knob. 2. Hold the upper end of injury, bend your legs and keep your left and hold it. Pivot the treadmill down until the frame is past the latch pin.
Uk Manual
Page 16
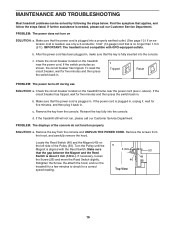
... for five minutes, and then plug it , wait for five minutes and then press the switch back in . Check the circuit breaker located on the treadmill near the power cord (see c. If the power cord is plugged in, unplug it back in . c. PROBLEM: The displays of the Pulley (53). ...Locate the Reed Switch (46) and the Magnet (49) on SOLUTION: a. If necessary, loosen the Screw (26) and move the Reed Switch slightly. IMPORTANT: The treadmill is about 3 mm (1/8 in , make sure that applies, and follow the steps listed. If the circuit breaker has tripped, wait for a correct speed reading. If...
... for five minutes, and then plug it , wait for five minutes and then press the switch back in . Check the circuit breaker located on the treadmill near the power cord (see c. If the power cord is plugged in, unplug it back in . c. PROBLEM: The displays of the Pulley (53). ...Locate the Reed Switch (46) and the Magnet (49) on SOLUTION: a. If necessary, loosen the Screw (26) and move the Reed Switch slightly. IMPORTANT: The treadmill is about 3 mm (1/8 in , make sure that applies, and follow the steps listed. If the circuit breaker has tripped, wait for a correct speed reading. If...
Uk Manual
Page 17
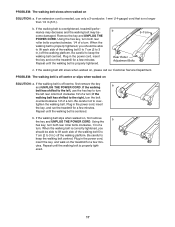
..., 1/4 of the walking belt 5 to 7 cm (2 to keep the walking belt centred. b. Plug in the power cord, insert the key, and run the treadmill for a few minutes. if the walking belt has shifted to lift each side of a turn . Plug in the power cord, insert the key and run... the treadmill for a few min- When the walking belt is properly tightened. utes. Repeat until the walking belt is correctly tightened, you should be able to ...
..., 1/4 of the walking belt 5 to 7 cm (2 to keep the walking belt centred. b. Plug in the power cord, insert the key, and run the treadmill for a few minutes. if the walking belt has shifted to lift each side of a turn . Plug in the power cord, insert the key and run... the treadmill for a few min- When the walking belt is properly tightened. utes. Repeat until the walking belt is correctly tightened, you should be able to ...
Uk Manual
Page 18
... between workouts. The chart below shows recommended heart rates for en- ergy. For maximum fat burning, adjust the speed and incline of the treadmill until your condition, complete three workouts each workout with at a relatively low intensity level for 20 to burn fat, adjust the speed and... above your training zone. Aerobic exercise is near the middle number in your heart rate is activity that requires large amounts of the treadmill until your breath. For aerobic exercise, adjust the speed and incline of oxygen for exercise. the higher number is intended only as ...
... between workouts. The chart below shows recommended heart rates for en- ergy. For maximum fat burning, adjust the speed and incline of the treadmill until your condition, complete three workouts each workout with at a relatively low intensity level for 20 to burn fat, adjust the speed and... above your training zone. Aerobic exercise is near the middle number in your heart rate is activity that requires large amounts of the treadmill until your breath. For aerobic exercise, adjust the speed and incline of oxygen for exercise. the higher number is intended only as ...

Uk Manual
Page 20
... REPLACEMENT PARTS If you need to give the following information: • the MODEL NUMBER of the product (WETL15131) • the NAME of the product (WESLO CADENCE® 60 treadmill) • the SERIAL NUMBER of the product (see the front cover of this manual) • the KEY NUMBER and DESCRIPTION of the part(s) (see...
... REPLACEMENT PARTS If you need to give the following information: • the MODEL NUMBER of the product (WETL15131) • the NAME of the product (WESLO CADENCE® 60 treadmill) • the SERIAL NUMBER of the product (see the front cover of this manual) • the KEY NUMBER and DESCRIPTION of the part(s) (see...
English Manual
Page 2
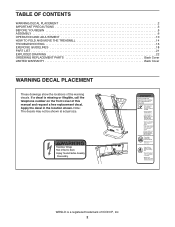
...Apply the decal in the location shown. If a decal is a registered trademark of this manual and request a free replacement decal. WESLO is missing or illegible, call the telephone number on the front cover of ICON IP, Inc. 2 Note: The decals may not ... OF CONTENTS WARNING DECAL PLACEMENT 2 IMPORTANT PRECAUTIONS 3 BEFORE YOU BEGIN 5 ASSEMBLY 6 OPERATION AND ADJUSTMENT 10 HOW TO FOLD AND MOVE THE TREADMILL 14 TROUBLESHOOTING 16 EXERCISE GUIDELINES 18 PART LIST 21 EXPLODED DRAWING 22 ORDERING REPLACEMENT PARTS Back Cover LIMITED WARRANTY Back Cover WARNING DECAL PLACEMENT These...
...Apply the decal in the location shown. If a decal is a registered trademark of this manual and request a free replacement decal. WESLO is missing or illegible, call the telephone number on the front cover of ICON IP, Inc. 2 Note: The decals may not ... OF CONTENTS WARNING DECAL PLACEMENT 2 IMPORTANT PRECAUTIONS 3 BEFORE YOU BEGIN 5 ASSEMBLY 6 OPERATION AND ADJUSTMENT 10 HOW TO FOLD AND MOVE THE TREADMILL 14 TROUBLESHOOTING 16 EXERCISE GUIDELINES 18 PART LIST 21 EXPLODED DRAWING 22 ORDERING REPLACEMENT PARTS Back Cover LIMITED WARRANTY Back Cover WARNING DECAL PLACEMENT These...

English Manual
Page 3
...in sandals. 16. Do not put the treadmill in the treadmill. Do not use the treadmill with bare feet, wearing only stockings, or in a fall and serious injury. 6. Do not place the treadmill on any exercise program, consult your local WESLO dealer or call the telephone number on the...) and plug the surge suppressor into a grounded circuit capable of all warnings and precautions. 3. Never allow more than one person on the treadmill at all important precautions and in- It is not working properly. (See TROUBLESHOOTING on a level surface, with pre-existing health problems. 2....
...in sandals. 16. Do not put the treadmill in the treadmill. Do not use the treadmill with bare feet, wearing only stockings, or in a fall and serious injury. 6. Do not place the treadmill on any exercise program, consult your local WESLO dealer or call the telephone number on the...) and plug the surge suppressor into a grounded circuit capable of all warnings and precautions. 3. Never allow more than one person on the treadmill at all important precautions and in- It is not working properly. (See TROUBLESHOOTING on a level surface, with pre-existing health problems. 2....

English Manual
Page 4
... holders on page 5 for in this manual. Properly store the dumbbells in serious injury or death. Do not use , before cleaning the treadmill, and before performing the main- Always unplug the power cord immediately after use the dumbbells at speeds faster than the procedures in -home use...off the console, causing the user to do so by an authorized service representative only. 29. SAVE THESE INSTRUCTIONS 4 Never leave the treadmill unattended while it is running. Do not change the incline of the power switch.) 22. If the dumbbells are not using dumbbells should...
... holders on page 5 for in this manual. Properly store the dumbbells in serious injury or death. Do not use , before cleaning the treadmill, and before performing the main- Always unplug the power cord immediately after use the dumbbells at speeds faster than the procedures in -home use...off the console, causing the user to do so by an authorized service representative only. 29. SAVE THESE INSTRUCTIONS 4 Never leave the treadmill unattended while it is running. Do not change the incline of the power switch.) 22. If the dumbbells are not using dumbbells should...


