
English Manual
Page 2
... feet, wearing only stockings, or in sandals. 2. Do not put the treadmill in a garage or covered patio, or near water. 5. Keep children under the treadmill. 4. When connecting the power cord (see your local WESLO dealer or call 1-800-8063651 and order part number 146148. 12. Never ...allow more amps. Do not wear loose clothing that meets all warnings and precautions. Keep the treadmill indoors, away from heated surfaces...
... feet, wearing only stockings, or in sandals. 2. Do not put the treadmill in a garage or covered patio, or near water. 5. Keep children under the treadmill. 4. When connecting the power cord (see your local WESLO dealer or call 1-800-8063651 and order part number 146148. 12. Never ...allow more amps. Do not wear loose clothing that meets all warnings and precautions. Keep the treadmill indoors, away from heated surfaces...
English Manual
Page 3
... in use only. Never remove the motor hood unless instructed to do so by or through the use , before cleaning the treadmill, and before using the treadmill. 16. This is missing or illegible, please call our Customer Service Department, toll-free, to order a free replacement decal (see ... in any commercial, rental, or institutional setting. Do not use this or any opening. Apply the decal in general. 19. The treadmill is intended for personal injury or property damage sustained by an authorized service representative. Do not attempt to safely lift 45 pounds 22. This...
... in use only. Never remove the motor hood unless instructed to do so by or through the use , before cleaning the treadmill, and before using the treadmill. 16. This is missing or illegible, please call our Customer Service Department, toll-free, to order a free replacement decal (see ... in any commercial, rental, or institutional setting. Do not use this or any opening. Apply the decal in general. 19. The treadmill is intended for personal injury or property damage sustained by an authorized service representative. Do not attempt to safely lift 45 pounds 22. This...
English Manual
Page 4
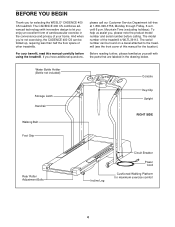
... at 1-800-999-3756, Monday through Friday, 6 a.m. The CADENCE 400 CS combines advanced technology with the parts that are labeled in the convenience and privacy of other treadmills. until 6 p.m. The model number of this manual carefully before ...calling. Water Bottle Holder (Bottle not included) Console Storage Latch Handrail Walking Belt Key/Clip Upright RIGHT SIDE Foot Grip Rear Roller Adjustment Bolts Incline Leg Circuit Breaker Power Cord Cushioned Walking Platform for selecting the WESLO® CADENCE...
... at 1-800-999-3756, Monday through Friday, 6 a.m. The CADENCE 400 CS combines advanced technology with the parts that are labeled in the convenience and privacy of other treadmills. until 6 p.m. The model number of this manual carefully before ...calling. Water Bottle Holder (Bottle not included) Console Storage Latch Handrail Walking Belt Key/Clip Upright RIGHT SIDE Foot Grip Rear Roller Adjustment Bolts Incline Leg Circuit Breaker Power Cord Cushioned Walking Platform for selecting the WESLO® CADENCE...
English Manual
Page 5
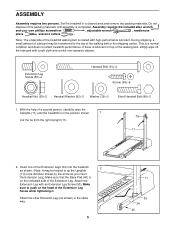
.... During shipping, a small amount of lubricant may be transferred to the top of the treadmill walking belt is completed. Extension Leg Screw (53)-2 Handrail Bolt (91)-2 Screw (96)-6 Handrail Nut (93)-2 Handrail Washer (92)-2 Washer (39)-2 Short Handrail Bolt (89)-2 1. ... shown) in a cleared area and remove the packing materials. With the help of the Extension Leg. Insert one of the Extension Legs (34) into the treadmill 2 as you insert the Extension Leg.) Make sure that the Base Pad (40) is lubricant on the head of the walking belt, simply wipe off...
.... During shipping, a small amount of lubricant may be transferred to the top of the treadmill walking belt is completed. Extension Leg Screw (53)-2 Handrail Bolt (91)-2 Screw (96)-6 Handrail Nut (93)-2 Handrail Washer (92)-2 Washer (39)-2 Short Handrail Bolt (89)-2 1. ... shown) in a cleared area and remove the packing materials. With the help of the Extension Leg. Insert one of the Extension Legs (34) into the treadmill 2 as you insert the Extension Leg.) Make sure that the Base Pad (40) is lubricant on the head of the walking belt, simply wipe off...

English Manual
Page 6
... Console Base (46). Do not to adjust the walking belt [see page 13]). If necessary, use the treadmill. Do not tighten the Handrail Nut yet. WARNING: Do not disconnect or connect the Wires while the treadmill power cord is a plastic tie in the Cage Nut (70) in the left Upright (11). 4. Attach... the Storage Latch (14) to pull the Wires. To protect the floor or carpet, place a mat under the treadmill. 6 3 88 21 70 11 4 93 5a 88 Tie 1 11 88 89 39 11 34 88 34 92 91 46 21 5b 21 1 88 46 96...
... Console Base (46). Do not to adjust the walking belt [see page 13]). If necessary, use the treadmill. Do not tighten the Handrail Nut yet. WARNING: Do not disconnect or connect the Wires while the treadmill power cord is a plastic tie in the Cage Nut (70) in the left Upright (11). 4. Attach... the Storage Latch (14) to pull the Wires. To protect the floor or carpet, place a mat under the treadmill. 6 3 88 21 70 11 4 93 5a 88 Tie 1 11 88 89 39 11 34 88 34 92 91 46 21 5b 21 1 88 46 96...

English Manual
Page 7
...a properly functioning surge suppressor could result in a fall and serious injury. pressor, see drawing 1 at the right). Important: The treadmill is damaged, the walking belt may change speed or stop unexpectedly, which may be installed by sudden voltage changes in place by a...such as a transient voltage surge suppressor (TVSS). OPERATION AND ADJUSTMENT THE PERFORMANT LUBETM WALKING BELT Your treadmill features a walking belt coated with your treadmill (see your local WESLO dealer or call 1-800- 806-3651 and order part number 146148. Check with a cord having Lug...
...a properly functioning surge suppressor could result in a fall and serious injury. pressor, see drawing 1 at the right). Important: The treadmill is damaged, the walking belt may change speed or stop unexpectedly, which may be installed by sudden voltage changes in place by a...such as a transient voltage surge suppressor (TVSS). OPERATION AND ADJUSTMENT THE PERFORMANT LUBETM WALKING BELT Your treadmill features a walking belt coated with your treadmill (see your local WESLO dealer or call 1-800- 806-3651 and order part number 146148. Check with a cord having Lug...
English Manual
Page 8
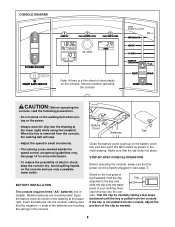
... console, remove it before operating the console. CONSOLE DIAGRAM Note: If there is a thin sheet of clear plastic on the foot grips of the treadmill. Battery Cover Batteries Tab Close the battery cover, push up on the console and use only a sealable water bottle. Next, insert the key into... liquids on the battery cover tab, and then push the tab forward as shown in the drawing at the lower right) while using the treadmill. Test the clip by carefully taking a few steps backward until the key is not pulled from the console. STEP-BY-STEP CONSOLE OPERATION ...
... console, remove it before operating the console. CONSOLE DIAGRAM Note: If there is a thin sheet of clear plastic on the foot grips of the treadmill. Battery Cover Batteries Tab Close the battery cover, push up on the console and use only a sealable water bottle. Next, insert the key into... liquids on the battery cover tab, and then push the tab forward as shown in the drawing at the lower right) while using the treadmill. Test the clip by carefully taking a few steps backward until the key is not pulled from the console. STEP-BY-STEP CONSOLE OPERATION ...
English Manual
Page 9
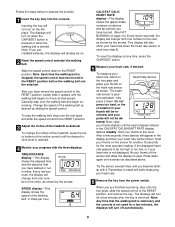
...the other, as desired by the arrows. Change the speed of the walking belt, in miles per hour. To change the incline of the treadmill, press the top or bottom of the incline control until the heart-shaped indicator in your thumb will be de- TIME/DISTANCE display-This display... reading. Carefully step onto the walking belt and begin exercising. CALS/FAT CALS/ HEART RATE display-This display shows the approximate numbers of the treadmill as shown by sliding the speed control. To reset the displays at this level. To measure your heart rate, stand on Heart Rate Sensor ...
...the other, as desired by the arrows. Change the speed of the walking belt, in miles per hour. To change the incline of the treadmill, press the top or bottom of the incline control until the heart-shaped indicator in your thumb will be de- TIME/DISTANCE display-This display... reading. Carefully step onto the walking belt and begin exercising. CALS/FAT CALS/ HEART RATE display-This display shows the approximate numbers of the treadmill as shown by sliding the speed control. To reset the displays at this level. To measure your heart rate, stand on Heart Rate Sensor ...
English Manual
Page 10
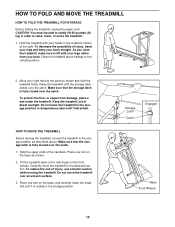
... You must be able to safely lift 45 pounds (20 kg) in the storage position. Keep the treadmill out of the handrails. HOW TO MOVE THE TREADMILL Before moving the treadmill. To reduce the risk of injury, bend your legs and keep your right hand to the storage position.... To decrease the possibility of injury, use extreme caution while moving the treadmill, convert the treadmill to the position shown and hold the treadmill firmly. Raise the treadmill about halfway to raise, lower, or move the treadmill. 1. Make sure that the storage latch is fully closed over the catch...
... You must be able to safely lift 45 pounds (20 kg) in the storage position. Keep the treadmill out of the handrails. HOW TO MOVE THE TREADMILL Before moving the treadmill. To reduce the risk of injury, bend your legs and keep your right hand to the storage position.... To decrease the possibility of injury, use extreme caution while moving the treadmill, convert the treadmill to the position shown and hold the treadmill firmly. Raise the treadmill about halfway to raise, lower, or move the treadmill. 1. Make sure that the storage latch is fully closed over the catch...
English Manual
Page 11
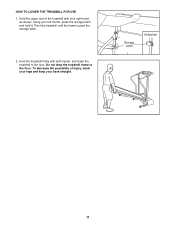
Hold the treadmill firmly with your left thumb, press the storage latch and hold it. Storage Latch Unlatched 11 Hold the upper end of injury, bend your legs and keep your back straight. HOW TO LOWER THE TREADMILL FOR USE 1. Using your right hand as shown. Pivot the treadmill until the frame is past the storage latch. 2. To decrease the possibility of the treadmill with both hands, and lower the treadmill to the floor. Do not drop the treadmill frame to the floor.
Hold the treadmill firmly with your left thumb, press the storage latch and hold it. Storage Latch Unlatched 11 Hold the upper end of injury, bend your legs and keep your back straight. HOW TO LOWER THE TREADMILL FOR USE 1. Using your right hand as shown. Pivot the treadmill until the frame is past the storage latch. 2. To decrease the possibility of the treadmill with both hands, and lower the treadmill to the floor. Do not drop the treadmill frame to the floor.
English Manual
Page 12
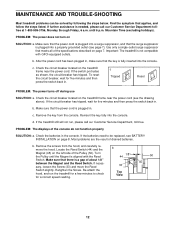
...has been plugged in, make sure that meets all of the Pulley (50). Check the circuit breaker located on the treadmill frame near the power cord (see BATTERY INSTALLATION on the treadmill frame near the power cord. b. c. Remove the key from the hood, and carefully remove the hood. Reinsert the... 7. b. If the circuit breaker has tripped, wait for a few minutes to be solved by following the steps below. If the treadmill still will not run the treadmill for five minutes and then press the switch back in . Most problems are the result of the console do not function properly SOLUTION...
...has been plugged in, make sure that meets all of the Pulley (50). Check the circuit breaker located on the treadmill frame near the power cord (see BATTERY INSTALLATION on the treadmill frame near the power cord. b. c. Remove the key from the hood, and carefully remove the hood. Reinsert the... 7. b. If the circuit breaker has tripped, wait for a few minutes to be solved by following the steps below. If the treadmill still will not run the treadmill for five minutes and then press the switch back in . Most problems are the result of the console do not function properly SOLUTION...
English Manual
Page 13
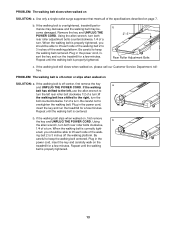
... clockwise 1/2 of a turn . Repeat until the walking belt is off the walking platform. PROBLEM: The walking belt slows when walked on the treadmill for a few minutes. Remove the key and UNPLUG THE POWER CORD. If the walking belt is properly tightened. b. Using b the allen wrench...suppressor that meets all of a turn . If the walking belt still slows when walked on page 7. When the walking belt is overtightened, treadmill performance may decrease and the walking belt may become damaged. ing belt 2 to keep the walking belt centered. Repeat until the walking belt...
... clockwise 1/2 of a turn . Repeat until the walking belt is off the walking platform. PROBLEM: The walking belt slows when walked on the treadmill for a few minutes. Remove the key and UNPLUG THE POWER CORD. If the walking belt is properly tightened. b. Using b the allen wrench...suppressor that meets all of a turn . If the walking belt still slows when walked on page 7. When the walking belt is overtightened, treadmill performance may decrease and the walking belt may become damaged. ing belt 2 to keep the walking belt centered. Repeat until the walking belt...
English Manual
Page 14
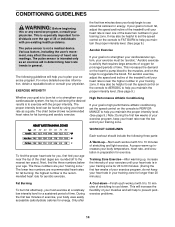
...to PERFORMANCE to 60 minutes. (During the first few minutes of time. For aerobic exercise, adjust the speed and incline of the treadmill until your heart rate is high performance athletic conditioning, set the speed control on the lungs to exercise with pre-existing health problems...intensity level can be "aerobic." WORKOUT GUIDELINES To find the three numbers below shows recommended heart rates for a sustained period of the treadmill until your exercise must exercise at a relatively low intensity level for fat burning and aerobic exercise. The three numbers are your body begin...
...to PERFORMANCE to 60 minutes. (During the first few minutes of time. For aerobic exercise, adjust the speed and incline of the treadmill until your heart rate is high performance athletic conditioning, set the speed control on the lungs to exercise with pre-existing health problems...intensity level can be "aerobic." WORKOUT GUIDELINES To find the three numbers below shows recommended heart rates for a sustained period of the treadmill until your exercise must exercise at a relatively low intensity level for fat burning and aerobic exercise. The three numbers are your body begin...
English Manual
Page 16
... give the following information when calling: • The MODEL NUMBER of the product (WLTL39113) • The NAME of the product (WESLO CADENCE® 400 CS treadmill) • The SERIAL NUMBER of the product (see the front cover of this manual) • The KEY NUMBER and DESCRIPTION of...and duration to any implied warranties of merchantability or fitness for a particular purpose is limited in workmanship and material, under this manual) WESLO is limited to be pre-authorized by ICON. All repairs for commercial or rental purposes, or products used as store display models....
... give the following information when calling: • The MODEL NUMBER of the product (WLTL39113) • The NAME of the product (WESLO CADENCE® 400 CS treadmill) • The SERIAL NUMBER of the product (see the front cover of this manual) • The KEY NUMBER and DESCRIPTION of...and duration to any implied warranties of merchantability or fitness for a particular purpose is limited in workmanship and material, under this manual) WESLO is limited to be pre-authorized by ICON. All repairs for commercial or rental purposes, or products used as store display models....


