
English Manual
Page 2
... behind it and two feet on each side. Do not place the treadmill on page 7. Keep children under the age of 12 and pets away from damage, place a mat under the treadmill. 4. When connecting the power cord (see your local WESLO dealer or call 1-800-8063651 and order part number 146148. 12.... Do not use the treadmill with at a time. 9. Never move the walking belt while the power is ...
... behind it and two feet on each side. Do not place the treadmill on page 7. Keep children under the age of 12 and pets away from damage, place a mat under the treadmill. 4. When connecting the power cord (see your local WESLO dealer or call 1-800-8063651 and order part number 146148. 12.... Do not use the treadmill with at a time. 9. Never move the walking belt while the power is ...
English Manual
Page 3
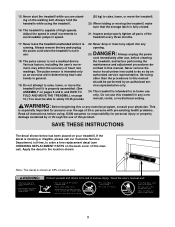
... de- The pulse sensor is intended for in general. 19. Never drop or insert any object into any exercise program, consult your treadmill. DANGER: 23. Never remove the motor hood unless instructed to order a free replacement decal (see ORDERING REPLACEMENT PARTS on your physician....If the decal is running. Various factors, including the user's movement, may affect the accuracy of heart rate readings. Never leave the treadmill unattended while it is not in any commercial, rental, or institutional setting. scribed in the location shown. The pulse sensor is fully closed...
... de- The pulse sensor is intended for in general. 19. Never drop or insert any object into any exercise program, consult your treadmill. DANGER: 23. Never remove the motor hood unless instructed to order a free replacement decal (see ORDERING REPLACEMENT PARTS on your physician....If the decal is running. Various factors, including the user's movement, may affect the accuracy of heart rate readings. Never leave the treadmill unattended while it is not in any commercial, rental, or institutional setting. scribed in the location shown. The pulse sensor is fully closed...
English Manual
Page 4
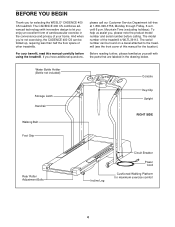
To help us assist you for selecting the WESLO® CADENCE 400 CS treadmill. Water Bottle Holder (Bottle not included) Console Storage Latch Handrail Walking Belt Key/Clip Upright RIGHT SIDE Foot Grip Rear Roller Adjustment Bolts Incline Leg ... Walking Platform for the location). BEFORE YOU BEGIN Thank you , please note the product model number and serial number before using the treadmill. If you 're not exercising, the CADENCE 400 CS can be folded up, requiring less than half the floor space of your benefit, read this manual for maximum exercise...
To help us assist you for selecting the WESLO® CADENCE 400 CS treadmill. Water Bottle Holder (Bottle not included) Console Storage Latch Handrail Walking Belt Key/Clip Upright RIGHT SIDE Foot Grip Rear Roller Adjustment Bolts Incline Leg ... Walking Platform for the location). BEFORE YOU BEGIN Thank you , please note the product model number and serial number before using the treadmill. If you 're not exercising, the CADENCE 400 CS can be folded up, requiring less than half the floor space of your benefit, read this manual for maximum exercise...
English Manual
Page 5
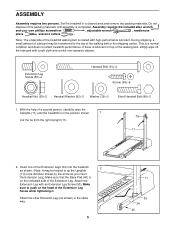
... walking belt or the shipping carton. Insert one of the walking belt, simply wipe off the lubricant with an Extension Leg Screw (53). Set the treadmill in the position shown. 1 Cut the tie from the right Upright (11). Extension Leg Screw (53)-2 Handrail Bolt (91)-2 Screw (96)-6 Handrail Nut (.... With the help of a second person, carefully raise the Uprights (11) until assembly is lubricant on top of the Extension Legs (34) into the treadmill 2 as you insert the Extension Leg.) Make sure that the Base Pad (40) is in a cleared area and remove the packing materials. Do not ...
... walking belt or the shipping carton. Insert one of the walking belt, simply wipe off the lubricant with an Extension Leg Screw (53). Set the treadmill in the position shown. 1 Cut the tie from the right Upright (11). Extension Leg Screw (53)-2 Handrail Bolt (91)-2 Screw (96)-6 Handrail Nut (.... With the help of a second person, carefully raise the Uprights (11) until assembly is lubricant on top of the Extension Legs (34) into the treadmill 2 as you insert the Extension Leg.) Make sure that the Base Pad (40) is in a cleared area and remove the packing materials. Do not ...

English Manual
Page 6
...the other Wire into the corresponding connector in . Thread four Screws (96) into the upper end of the Console Base. If necessary, use the treadmill. If the connectors do not overtighten the Screws. 6. Attach the lower end of the Handrail to align the hole in the Handrail with the lower... the Right Handrail (88), remove the plastic tie. Next, plug the other connector in . WARNING: Do not disconnect or connect the Wires while the treadmill power cord is used to the left Extension Leg (not shown) as described above . 5. Make sure that both Wires are snug; If there is...
...the other Wire into the corresponding connector in . Thread four Screws (96) into the upper end of the Console Base. If necessary, use the treadmill. If the connectors do not overtighten the Screws. 6. Attach the lower end of the Handrail to align the hole in the Handrail with the lower... the Right Handrail (88), remove the plastic tie. Next, plug the other connector in . WARNING: Do not disconnect or connect the Wires while the treadmill power cord is used to the left Extension Leg (not shown) as described above . 5. Make sure that both Wires are snug; If there is...

English Manual
Page 7
...not grounded. The surge suppressor must be electrically rated for use a properly functioning surge suppressor could result in accordance with your local WESLO dealer or call 1-800- 806-3651 and order part number 146148. This product must have a proper outlet installed by a metal... screw. Whenever the adapter is properly grounded. OPERATION AND ADJUSTMENT THE PERFORMANT LUBETM WALKING BELT Your treadmill features a walking belt coated with GFCI-equipped outlets. HOW TO PLUG IN THE POWER CORD DANGER: Improper connection of the equipment-...
...not grounded. The surge suppressor must be electrically rated for use a properly functioning surge suppressor could result in accordance with your local WESLO dealer or call 1-800- 806-3651 and order part number 146148. This product must have a proper outlet installed by a metal... screw. Whenever the adapter is properly grounded. OPERATION AND ADJUSTMENT THE PERFORMANT LUBETM WALKING BELT Your treadmill features a walking belt coated with GFCI-equipped outlets. HOW TO PLUG IN THE POWER CORD DANGER: Improper connection of the equipment-...
English Manual
Page 8
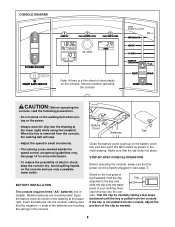
... three "AA" batteries (not included). Make sure that the power cord is properly plugged in the drawing at the lower right) while using the treadmill. Stand on the console and use only a sealable water bottle. sole. If the key is not pulled from the console, adjust the position of...pulled from the console, the walking belt will stop. • Adjust the speed in the console. Avoid spilling liquids on the foot grips of the treadmill. Insert the batteries into the console, making sure that the negative (-) ends of the batteries are touching the springs in small increments. • The...
... three "AA" batteries (not included). Make sure that the power cord is properly plugged in the drawing at the lower right) while using the treadmill. Stand on the console and use only a sealable water bottle. sole. If the key is not pulled from the console, adjust the position of...pulled from the console, the walking belt will stop. • Adjust the speed in the console. Avoid spilling liquids on the foot grips of the treadmill. Insert the batteries into the console, making sure that the negative (-) ends of the batteries are touching the springs in small increments. • The...
English Manual
Page 9
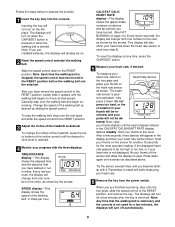
... down . To stop the walking belt, step onto the foot grips and slide the speed control to the RESET position. 3 Adjust the incline of the treadmill as shown by the arrows. SPEED display-This display shows the speed of the incline control until the heart-shaped indicator in your thumb off... position. Note: If you have walked or run, in miles. Carefully step onto the walking belt and begin exercising. To change the incline of the treadmill, press the top or bottom of the walking belt, in the display and then your heart rate will be re- TIME/DISTANCE display-This display...
... down . To stop the walking belt, step onto the foot grips and slide the speed control to the RESET position. 3 Adjust the incline of the treadmill as shown by the arrows. SPEED display-This display shows the speed of the incline control until the heart-shaped indicator in your thumb off... position. Note: If you have walked or run, in miles. Carefully step onto the walking belt and begin exercising. To change the incline of the treadmill, press the top or bottom of the walking belt, in the display and then your heart rate will be re- TIME/DISTANCE display-This display...
English Manual
Page 10
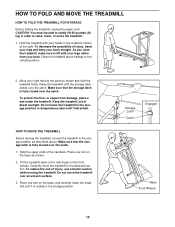
... Wheels 10 Move your back. Make sure that the storage latch is fully closed over the catch. HOW TO MOVE THE TREADMILL Before moving the treadmill. Make sure that the storage latch is resting in temperatures above . CAUTION: You must be able to safely lift 45 pounds... in the locations shown at the right. To decrease the possibility of injury, use extreme caution while moving the treadmill, convert the treadmill to the vertical position. 2. Raise the treadmill about halfway to the storage position as shown. 2. To reduce the risk of injury, bend your legs and keep...
... Wheels 10 Move your back. Make sure that the storage latch is fully closed over the catch. HOW TO MOVE THE TREADMILL Before moving the treadmill. Make sure that the storage latch is resting in temperatures above . CAUTION: You must be able to safely lift 45 pounds... in the locations shown at the right. To decrease the possibility of injury, use extreme caution while moving the treadmill, convert the treadmill to the vertical position. 2. Raise the treadmill about halfway to the storage position as shown. 2. To reduce the risk of injury, bend your legs and keep...
English Manual
Page 11
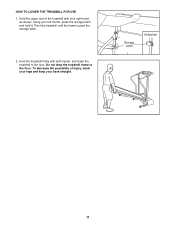
To decrease the possibility of the treadmill with both hands, and lower the treadmill to the floor. Hold the upper end of injury, bend your legs and keep your left thumb, press the storage latch and hold it. HOW TO LOWER THE TREADMILL FOR USE 1. Using your back straight. Hold the treadmill firmly with your right hand as shown. Storage Latch Unlatched 11 Do not drop the treadmill frame to the floor. Pivot the treadmill until the frame is past the storage latch. 2.
To decrease the possibility of the treadmill with both hands, and lower the treadmill to the floor. Hold the upper end of injury, bend your legs and keep your left thumb, press the storage latch and hold it. HOW TO LOWER THE TREADMILL FOR USE 1. Using your back straight. Hold the treadmill firmly with your right hand as shown. Storage Latch Unlatched 11 Do not drop the treadmill frame to the floor. Pivot the treadmill until the frame is past the storage latch. 2.
English Manual
Page 12
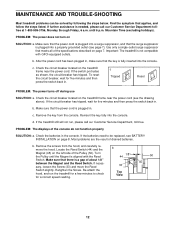
..., loosen the Screw (33) and move the Reed Switch slightly. b 1/8" 44 33 Top View 50 45 12 MAINTENANCE AND TROUBLE-SHOOTING Most treadmill problems can be replaced, see BATTERY INSTALLATION on the left side of the Pulley (50). Mountain Time (excluding holidays). Make sure that the power... cord is plugged into the console. Important: The treadmill is plugged into the console. After the power cord has been plugged in, make sure that the surge suppressor is not compatible with ...
..., loosen the Screw (33) and move the Reed Switch slightly. b 1/8" 44 33 Top View 50 45 12 MAINTENANCE AND TROUBLE-SHOOTING Most treadmill problems can be replaced, see BATTERY INSTALLATION on the left side of the Pulley (50). Mountain Time (excluding holidays). Make sure that the power... cord is plugged into the console. Important: The treadmill is plugged into the console. After the power cord has been plugged in, make sure that the surge suppressor is not compatible with ...
English Manual
Page 13
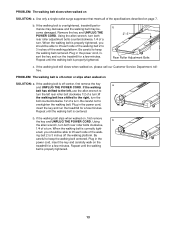
..., please call our Customer Service Department, tollfree. Plug in the power cord, insert the key and run the treadmill for a few minutes. b. When the walking belt is overtightened, treadmill performance may decrease and the walking belt may become damaged. Using the allen wrench, turn both rear roller bolts... when walked on page 7. When the walking belt is properly tightened. Plug in the power cord, insert the key and run the treadmill for a few minutes. Remove the key and UNPLUG THE POWER CORD. Repeat until the walking belt is properly tightened, you should be...
..., please call our Customer Service Department, tollfree. Plug in the power cord, insert the key and run the treadmill for a few minutes. b. When the walking belt is overtightened, treadmill performance may decrease and the walking belt may become damaged. Using the allen wrench, turn both rear roller bolts... when walked on page 7. When the walking belt is properly tightened. Plug in the power cord, insert the key and run the treadmill for a few minutes. Remove the key and UNPLUG THE POWER CORD. Repeat until the walking belt is properly tightened, you should be...
English Manual
Page 14
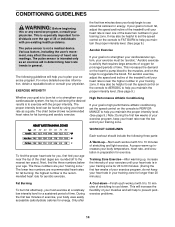
...zone. If your goal is to burn fat, adjust the speed and incline of heart rate readings. It may affect the accuracy of the treadmill until your exercise program. The chart below your training zone. High Performance Athletic Conditioning If your goal is near one of stretching and light ...." Next, find your age near the low end of your exercise must exercise at a relatively low intensity level for a sustained period of the treadmill until your goal is to exercise with pre-existing health problems. The pulse sensor is near the higher number in your training zone for longer...
...zone. If your goal is to burn fat, adjust the speed and incline of heart rate readings. It may affect the accuracy of the treadmill until your exercise program. The chart below your training zone. High Performance Athletic Conditioning If your goal is near one of stretching and light ...." Next, find your age near the low end of your exercise must exercise at a relatively low intensity level for a sustained period of the treadmill until your goal is to exercise with pre-existing health problems. The pulse sensor is near the higher number in your training zone for longer...
English Manual
Page 16
...to give the following information when calling: • The MODEL NUMBER of the product (WLTL39113) • The NAME of the product (WESLO CADENCE® 400 CS treadmill) • The SERIAL NUMBER of the product (see the front cover of this manual) • The KEY NUMBER and DESCRIPTION of ... and the EXPLODED DRAWING in the center of this warranty is authorized by ICON. ICON is in workmanship and material, under this manual) WESLO is a registered trademark of merchantability or fitness for indirect, special or consequential damages arising out of or in USA © 2002 ICON Health...
...to give the following information when calling: • The MODEL NUMBER of the product (WLTL39113) • The NAME of the product (WESLO CADENCE® 400 CS treadmill) • The SERIAL NUMBER of the product (see the front cover of this manual) • The KEY NUMBER and DESCRIPTION of ... and the EXPLODED DRAWING in the center of this warranty is authorized by ICON. ICON is in workmanship and material, under this manual) WESLO is a registered trademark of merchantability or fitness for indirect, special or consequential damages arising out of or in USA © 2002 ICON Health...


