
English Manual
Page 1
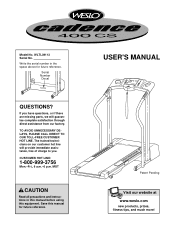
... and instructions in the space above for future reference. Patent Pending Visit our website at www.weslo.com new products, prizes, fitness tips, and much more! CUSTOMER HOT LINE: 1-800-999-3756 Mon.-Fri., 6 a.m.-6 p.m. Save this equipment. ® 400 CS Model No. TO AVOID UNNECESSARY DELAYS, PLEASE CALL DIRECT TO OUR TOLL-FREE CUSTOMER HOT LINE. WLTL39113 Serial...
... and instructions in the space above for future reference. Patent Pending Visit our website at www.weslo.com new products, prizes, fitness tips, and much more! CUSTOMER HOT LINE: 1-800-999-3756 Mon.-Fri., 6 a.m.-6 p.m. Save this equipment. ® 400 CS Model No. TO AVOID UNNECESSARY DELAYS, PLEASE CALL DIRECT TO OUR TOLL-FREE CUSTOMER HOT LINE. WLTL39113 Serial...

English Manual
Page 2
... 4 ASSEMBLY 5 OPERATION AND ADJUSTMENT 7 HOW TO FOLD AND MOVE THE TREADMILL 10 TROUBLE-SHOOTING 12 CONDITIONING GUIDELINES 14 ORDERING REPLACEMENT PARTS Back Cover LIMITED WARRANTY Back Cover Note: An EXPLODED DRAWING and a PART LIST are attached in the center of burns, fire, electric shock, or injury to persons, read the following important precautions and information before operating the treadmill. 1. To purchase a surge suppressor, see page 7), plug the power cord into...
... 4 ASSEMBLY 5 OPERATION AND ADJUSTMENT 7 HOW TO FOLD AND MOVE THE TREADMILL 10 TROUBLE-SHOOTING 12 CONDITIONING GUIDELINES 14 ORDERING REPLACEMENT PARTS Back Cover LIMITED WARRANTY Back Cover Note: An EXPLODED DRAWING and a PART LIST are attached in the center of burns, fire, electric shock, or injury to persons, read the following important precautions and information before operating the treadmill. 1. To purchase a surge suppressor, see page 7), plug the power cord into...
English Manual
Page 3
..., lower, or move the treadmill. 20. Do not attempt to order a free replacement decal (see ORDERING REPLACEMENT PARTS on the walking belt. Always unplug the power cord immediately after use only. vice representative only. 24. If the decal is not in speed. (20 kg) to avoid sudden jumps in use. 18. When folding or moving the treadmill, make sure that the storage latch is not a medical device. The pulse sensor is...
..., lower, or move the treadmill. 20. Do not attempt to order a free replacement decal (see ORDERING REPLACEMENT PARTS on the walking belt. Always unplug the power cord immediately after use only. vice representative only. 24. If the decal is not in speed. (20 kg) to avoid sudden jumps in use. 18. When folding or moving the treadmill, make sure that the storage latch is not a medical device. The pulse sensor is...
English Manual
Page 4
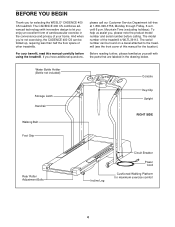
..., read this manual for maximum exercise comfort 4 until 6 p.m. Mountain Time (excluding holidays). Water Bottle Holder (Bottle not included) Console Storage Latch Handrail Walking Belt Key/Clip Upright RIGHT SIDE Foot Grip Rear Roller Adjustment Bolts Incline Leg Circuit Breaker Power Cord Cushioned Walking Platform for the location). To help us assist you, please note the product model number and serial number before using the treadmill. The CADENCE 400 CS combines advanced technology with the parts that are...
..., read this manual for maximum exercise comfort 4 until 6 p.m. Mountain Time (excluding holidays). Water Bottle Holder (Bottle not included) Console Storage Latch Handrail Walking Belt Key/Clip Upright RIGHT SIDE Foot Grip Rear Roller Adjustment Bolts Incline Leg Circuit Breaker Power Cord Cushioned Walking Platform for the location). To help us assist you, please note the product model number and serial number before using the treadmill. The CADENCE 400 CS combines advanced technology with the parts that are...
English Manual
Page 5
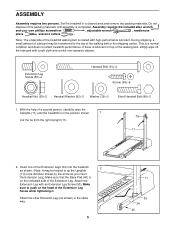
... Extension Leg Screw (53). Assembly requires the included allen wrench and your own phillips screwdriver , adjustable wrench , needlenose pliers and wire cutters . If there is coated with high-performance lubricant. With the help of the walking belt or the shipping carton. Attach the Extension Leg with a soft cloth and a mild, non-abrasive cleaner. Do not dispose of the treadmill walking belt is lubricant on...
... Extension Leg Screw (53). Assembly requires the included allen wrench and your own phillips screwdriver , adjustable wrench , needlenose pliers and wire cutters . If there is coated with high-performance lubricant. With the help of the walking belt or the shipping carton. Attach the Extension Leg with a soft cloth and a mild, non-abrasive cleaner. Do not dispose of the treadmill walking belt is lubricant on...

English Manual
Page 6
... the Right Handrail (88) to adjust the walking belt [see page 13]). WARNING: Do not disconnect or connect the Wires while the treadmill power cord is used to the Extension Leg (34) with the hole in . Thread four Screws (96) into the other Wire into the Right and Left Handrails (88, 1) and the Console Base (46). After all parts are fully inserted. Keep the...
... the Right Handrail (88) to adjust the walking belt [see page 13]). WARNING: Do not disconnect or connect the Wires while the treadmill power cord is used to the Extension Leg (34) with the hole in . Thread four Screws (96) into the other Wire into the Right and Left Handrails (88, 1) and the Console Base (46). After all parts are fully inserted. Keep the...

English Manual
Page 7
... control system is damaged, the walking belt may change speed or stop unexpectedly, which may be used only until a properly grounded outlet (drawing 1) can result in an increased risk of 450 joules. To purchase a surge sup- The surge suppressor must be connected to a permanent ground such as a properly grounded outlet box cover. OPERATION AND ADJUSTMENT THE PERFORMANT LUBETM WALKING BELT Your treadmill features a walking belt...
... control system is damaged, the walking belt may change speed or stop unexpectedly, which may be used only until a properly grounded outlet (drawing 1) can result in an increased risk of 450 joules. To purchase a surge sup- The surge suppressor must be connected to a permanent ground such as a properly grounded outlet box cover. OPERATION AND ADJUSTMENT THE PERFORMANT LUBETM WALKING BELT Your treadmill features a walking belt...
English Manual
Page 8
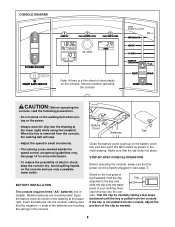
...; Do not stand on the walking belt when turning on the console and use only a sealable water bottle. BATTERY INSTALLATION The console requires three "AA" batteries (not included). Test the clip by carefully taking a few steps backward until the key is removed from the console, the walking belt will stop. • Adjust the speed in the console. When the key is pulled from the console, adjust the position of the batteries are recommended.
...; Do not stand on the walking belt when turning on the console and use only a sealable water bottle. BATTERY INSTALLATION The console requires three "AA" batteries (not included). Test the clip by carefully taking a few steps backward until the key is removed from the console, the walking belt will stop. • Adjust the speed in the console. When the key is pulled from the console, adjust the position of the batteries are recommended.
English Manual
Page 9
... reached. 4 Monitor your pulse will be moved to the RESET position. 3 Adjust the incline of the walking belt as desired by sliding the speed control. When you just installed batteries, the displays will turn on the displays. SPEED display-This display shows the speed of calories and fat calories you become familiar with the three displays. CALS/FAT CALS/ HEART RATE display-This display shows the approximate numbers of the walking belt, in miles. The heart rate sensor is stopped, the speed control must...
... reached. 4 Monitor your pulse will be moved to the RESET position. 3 Adjust the incline of the walking belt as desired by sliding the speed control. When you just installed batteries, the displays will turn on the displays. SPEED display-This display shows the speed of calories and fat calories you become familiar with the three displays. CALS/FAT CALS/ HEART RATE display-This display shows the approximate numbers of the walking belt, in miles. The heart rate sensor is stopped, the speed control must...
English Manual
Page 10
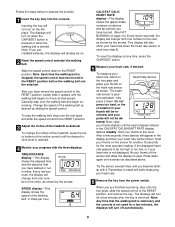
HOW TO FOLD AND MOVE THE TREADMILL HOW TO FOLD THE TREADMILL FOR STORAGE Before folding the treadmill, unplug the power cord. To decrease the possibility of direct sunlight. Keep the treadmill out of injury, bend your legs and keep your right hand to the position shown and hold the treadmill firmly. HOW TO MOVE THE TREADMILL Before moving the treadmill. Tilt the treadmill back until it is resting in...
HOW TO FOLD AND MOVE THE TREADMILL HOW TO FOLD THE TREADMILL FOR STORAGE Before folding the treadmill, unplug the power cord. To decrease the possibility of direct sunlight. Keep the treadmill out of injury, bend your legs and keep your right hand to the position shown and hold the treadmill firmly. HOW TO MOVE THE TREADMILL Before moving the treadmill. Tilt the treadmill back until it is resting in...
English Manual
Page 11
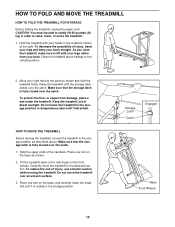
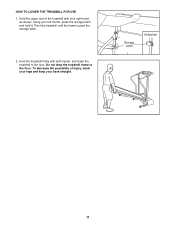
HOW TO LOWER THE TREADMILL FOR USE 1. Using your back straight. Do not drop the treadmill frame to the floor. Pivot the treadmill until the frame is past the storage latch. 2. Hold the treadmill firmly with your right hand as shown. Storage Latch Unlatched 11 Hold the upper end of injury, bend your legs and keep your left thumb, press the storage latch and hold it. To decrease the possibility of the treadmill with both hands, and lower the treadmill to the floor.
HOW TO LOWER THE TREADMILL FOR USE 1. Using your back straight. Do not drop the treadmill frame to the floor. Pivot the treadmill until the frame is past the storage latch. 2. Hold the treadmill firmly with your right hand as shown. Storage Latch Unlatched 11 Hold the upper end of injury, bend your legs and keep your left thumb, press the storage latch and hold it. To decrease the possibility of the treadmill with both hands, and lower the treadmill to the floor.
English Manual
Page 12
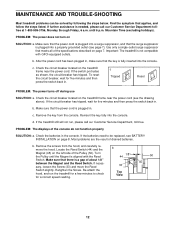
.... c Tripped Reset Tripped Reset PROBLEM: The power turns off during use SOLUTION: a. b. Remove the key from the hood, and carefully remove the hood. Reinsert the key fully into a properly grounded outlet (see BATTERY INSTALLATION on the treadmill frame near the power cord (see the drawing above). d. Check the batteries in . If the batteries need to check for five minutes and then press the switch back in the console. Turn the Pulley until 6 p.m. Retighten the Screw. b 1/8" 44...
.... c Tripped Reset Tripped Reset PROBLEM: The power turns off during use SOLUTION: a. b. Remove the key from the hood, and carefully remove the hood. Reinsert the key fully into a properly grounded outlet (see BATTERY INSTALLATION on the treadmill frame near the power cord (see the drawing above). d. Check the batteries in . If the batteries need to check for five minutes and then press the switch back in the console. Turn the Pulley until 6 p.m. Retighten the Screw. b 1/8" 44...
English Manual
Page 13
... Customer Service Department, tollfree. Use only a single-outlet surge suppressor that meets all of the walking belt 2 to keep the walking belt centered. b. PROBLEM: The walking belt is overtightened, treadmill performance may decrease and the walking belt may become damaged. ened, you should be able to the right, turn the bolt counterclockwise 1/2 of a turn . Repeat until the walking belt is properly tightened. Remove the key and UNPLUG THE POWER CORD. b 2"-3" Rear Roller Adjustment Bolts c. if the walking belt...
... Customer Service Department, tollfree. Use only a single-outlet surge suppressor that meets all of the walking belt 2 to keep the walking belt centered. b. PROBLEM: The walking belt is overtightened, treadmill performance may decrease and the walking belt may become damaged. ened, you should be able to the right, turn the bolt counterclockwise 1/2 of a turn . Repeat until the walking belt is properly tightened. Remove the key and UNPLUG THE POWER CORD. b 2"-3" Rear Roller Adjustment Bolts c. if the walking belt...
English Manual
Page 14
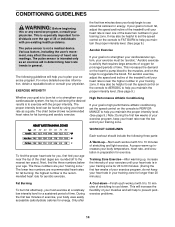
... found by using your training zone. High Performance Athletic Conditioning If your goal is high performance athletic conditioning, set the speed control on the lungs to exercise with pre-existing health problems. The pulse sensor is intended only as a guide. Training Zone Exercise-After warming up -Start each workout with 5 to cool down. CONDITIONING GUIDELINES WARNING: Before beginning this or any exercise program, consult your body temperature, heart rate, and...
... found by using your training zone. High Performance Athletic Conditioning If your goal is high performance athletic conditioning, set the speed control on the lungs to exercise with pre-existing health problems. The pulse sensor is intended only as a guide. Training Zone Exercise-After warming up -Start each workout with 5 to cool down. CONDITIONING GUIDELINES WARNING: Before beginning this or any exercise program, consult your body temperature, heart rate, and...
English Manual
Page 15
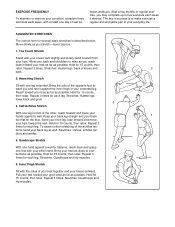
...exercise a regular and enjoyable part of rest be- Pull your feet toward your toes as far as possible. EXERCISE FREQUENCY To maintain or improve your condition, complete three workouts each week, with at least one leg extended. SUGGESTED STRETCHES The correct form...leg in front of your back leg as you and rest it against a wall for each leg. Stretches: Quadriceps and hip muscles. 5 5. Repeat 3 times. Hold for each leg... tendons, bend your extended leg. Toe Touch Stretch Stand with...back foot flat on the floor. Move slowly as well. Allow your knees outward...
...exercise a regular and enjoyable part of rest be- Pull your feet toward your toes as far as possible. EXERCISE FREQUENCY To maintain or improve your condition, complete three workouts each week, with at least one leg extended. SUGGESTED STRETCHES The correct form...leg in front of your back leg as you and rest it against a wall for each leg. Stretches: Quadriceps and hip muscles. 5 5. Repeat 3 times. Hold for each leg... tendons, bend your extended leg. Toe Touch Stretch Stand with...back foot flat on the floor. Move slowly as well. Allow your knees outward...
English Manual
Page 16
... product (WESLO CADENCE® 400 CS treadmill) • The SERIAL NUMBER of the product (see the front cover of this warranty is limited in workmanship and material, under normal use , costs of removal, installation or other rights which vary from the date of incidental or consequential damages. ICON's obligation under this manual) • The KEY NUMBER and DESCRIPTION of the desired part(s) (see the PART LIST and the...
... product (WESLO CADENCE® 400 CS treadmill) • The SERIAL NUMBER of the product (see the front cover of this warranty is limited in workmanship and material, under normal use , costs of removal, installation or other rights which vary from the date of incidental or consequential damages. ICON's obligation under this manual) • The KEY NUMBER and DESCRIPTION of the desired part(s) (see the PART LIST and the...

English Manual
Page 17
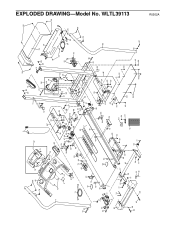
REMOVE THIS EXPLODED DRAWING AND PART LIST FROM THE MANUAL Save this EXPLODED DRAWING and PART LIST for future reference. For information about ordering replacement parts, see the back cover of the User's Manual. 34 Note: Specifications are subject to change without notice.
REMOVE THIS EXPLODED DRAWING AND PART LIST FROM THE MANUAL Save this EXPLODED DRAWING and PART LIST for future reference. For information about ordering replacement parts, see the back cover of the User's Manual. 34 Note: Specifications are subject to change without notice.
English Manual
Page 18
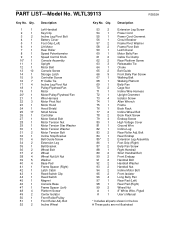
...Lift Motor Rear Roller Speed Potentiometer Speed Control Knob Console Assembly Upright Motor Belt Console Screw Storage Latch Controller Screw 8" Cable Tie Incline Leg Pivot Nut Pulley/Flywheel/Fan Motor Motor/Pulley/Flywheel/Fan Wire Harness Motor Pivot Nut Motor Hood Hood Shield Small Screw Controller Motor Swivel Bolt Motor Tension Nut Motor Tension Star Washer Motor Tension Washer Motor Tension Bolt Incline Stop Bracket Belt Guide Screw Extension Leg Belt Bracket Wheel Bolt Wheel Wheel Nut/Lift Nut Washer Base Pad Frame Spacer (Right) Latch Catch Reed Switch Clip Reed Switch Magnet Console...
...Lift Motor Rear Roller Speed Potentiometer Speed Control Knob Console Assembly Upright Motor Belt Console Screw Storage Latch Controller Screw 8" Cable Tie Incline Leg Pivot Nut Pulley/Flywheel/Fan Motor Motor/Pulley/Flywheel/Fan Wire Harness Motor Pivot Nut Motor Hood Hood Shield Small Screw Controller Motor Swivel Bolt Motor Tension Nut Motor Tension Star Washer Motor Tension Washer Motor Tension Bolt Incline Stop Bracket Belt Guide Screw Extension Leg Belt Bracket Wheel Bolt Wheel Wheel Nut/Lift Nut Washer Base Pad Frame Spacer (Right) Latch Catch Reed Switch Clip Reed Switch Magnet Console...
English Manual
Page 19
... 87 3 16 52 77 66 63 33 61 66 60 66 66 66 40 66 96 92 91 25 25 25 96 R0502A EXPLODED DRAWING-Model No. WLTL39113
... 87 3 16 52 77 66 63 33 61 66 60 66 66 66 40 66 96 92 91 25 25 25 96 R0502A EXPLODED DRAWING-Model No. WLTL39113


