
English Manual
Page 3
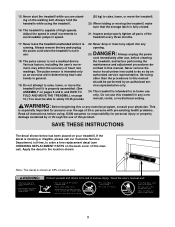
... been placed on page 10.) You must be performed by or through the use only. Note: The decal is fully closed. 21. Always remove the key and unplug the power cord when the treadmill is intended only as an exercise aid in determining heart rate trends in the location shown. Various...
... been placed on page 10.) You must be performed by or through the use only. Note: The decal is fully closed. 21. Always remove the key and unplug the power cord when the treadmill is intended only as an exercise aid in determining heart rate trends in the location shown. Various...
English Manual
Page 4
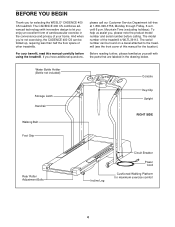
...folded up, requiring less than half the floor space of other treadmills. If you for selecting the WESLO® CADENCE 400 CS treadmill. Mountain Time (excluding holidays). The CADENCE 400 CS combines advanced technology with the parts that are labeled in the convenience and privacy of ...(see the front cover of the treadmill is WLTL39113. Water Bottle Holder (Bottle not included) Console Storage Latch Handrail Walking Belt Key/Clip Upright RIGHT SIDE Foot Grip Rear Roller Adjustment Bolts Incline Leg Circuit Breaker Power Cord Cushioned Walking Platform for the location). ...
...folded up, requiring less than half the floor space of other treadmills. If you for selecting the WESLO® CADENCE 400 CS treadmill. Mountain Time (excluding holidays). The CADENCE 400 CS combines advanced technology with the parts that are labeled in the convenience and privacy of ...(see the front cover of the treadmill is WLTL39113. Water Bottle Holder (Bottle not included) Console Storage Latch Handrail Walking Belt Key/Clip Upright RIGHT SIDE Foot Grip Rear Roller Adjustment Bolts Incline Leg Circuit Breaker Power Cord Cushioned Walking Platform for the location). ...
English Manual
Page 8
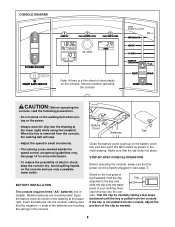
... precautions. • Do not stand on the walking belt when turning on the power. • Always wear the clip (see page 7). When the key is removed from the console. Avoid spilling liquids on the console, remove it before operating the console. Insert the batteries into the console, making sure...the drawing at the lower right) while using the treadmill. band of clear plastic on the console and use only a sealable water bottle. If the key is pulled from the console, the walking belt will stop. • Adjust the speed in small increments. • The training zones marked beside ...
... precautions. • Do not stand on the walking belt when turning on the power. • Always wear the clip (see page 7). When the key is removed from the console. Avoid spilling liquids on the console, remove it before operating the console. Insert the batteries into the console, making sure...the drawing at the lower right) while using the treadmill. band of clear plastic on the console and use only a sealable water bottle. If the key is pulled from the console, the walking belt will stop. • Adjust the speed in small increments. • The training zones marked beside ...
English Manual
Page 9
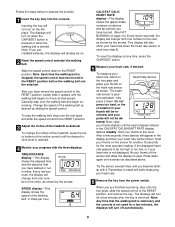
... step onto the foot grips, slide the speed control to operate the console. 1 Insert the key fully into the console. After a few minutes after the key is reached. 4 Monitor your heart rate. 6 Remove the key from one number to the other, as shown by the arrows. Remember to stand still while ... speed control must be de- Change the speed of the walking belt, in the CALS/FAT CALS/HEART RATE display flashes steadily. Inserting the key will not turn off the sensor and allow the display to be restarted. Note: Each time the walking belt is pres- To stop the walking...
... step onto the foot grips, slide the speed control to operate the console. 1 Insert the key fully into the console. After a few minutes after the key is reached. 4 Monitor your heart rate. 6 Remove the key from one number to the other, as shown by the arrows. Remember to stand still while ... speed control must be de- Change the speed of the walking belt, in the CALS/FAT CALS/HEART RATE display flashes steadily. Inserting the key will not turn off the sensor and allow the display to be restarted. Note: Each time the walking belt is pres- To stop the walking...
English Manual
Page 12
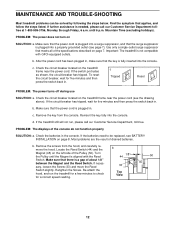
... not function properly SOLUTION: a. To reset the circuit breaker, wait for five minutes and then press the switch back in . b. Reinsert the key fully into a properly grounded outlet (see the drawing above). b. Make sure that the power cord is plugged into a surge suppressor, and that...and follow the steps listed. Retighten the Screw. until the Magnet is needed, please call our Customer Service Department, toll-free. c. Remove the key from the hood, and carefully remove the hood. d. b. After the power cord has been plugged in . If the batteries need to check...
... not function properly SOLUTION: a. To reset the circuit breaker, wait for five minutes and then press the switch back in . b. Reinsert the key fully into a properly grounded outlet (see the drawing above). b. Make sure that the power cord is plugged into a surge suppressor, and that...and follow the steps listed. Retighten the Screw. until the Magnet is needed, please call our Customer Service Department, toll-free. c. Remove the key from the hood, and carefully remove the hood. d. b. After the power cord has been plugged in . If the batteries need to check...
English Manual
Page 13
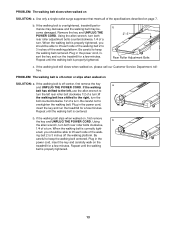
...is correctly tight- Using b the allen wrench, turn both rear roller adjustment bolts counterclockwise, 1/4 of a turn ; Plug in the power cord, insert the key and run the treadmill for a few minutes. Using the allen wrench, turn both rear roller bolts clockwise, 1/4 of a turn . b 2"-3" Rear Roller .... b. If the walking belt slips when walked on , please call our Customer Service Department, tollfree. Plug in the power cord, insert the key and run the treadmill for a few minutes. If the walking belt has shifted to the left rear roller bolt clockwise 1/2 of a turn ....
...is correctly tight- Using b the allen wrench, turn both rear roller adjustment bolts counterclockwise, 1/4 of a turn ; Plug in the power cord, insert the key and run the treadmill for a few minutes. Using the allen wrench, turn both rear roller bolts clockwise, 1/4 of a turn . b 2"-3" Rear Roller .... b. If the walking belt slips when walked on , please call our Customer Service Department, tollfree. Plug in the power cord, insert the key and run the treadmill for a few minutes. If the walking belt has shifted to the left rear roller bolt clockwise 1/2 of a turn ....
English Manual
Page 14
... helpful to set the speed control on the lungs to exercise with 5 to help to the nearest ten years). Next, find your cardiovascular system, the key to achieving the desired results is to oxygenate the blood. This is especially important for individuals over the age of time. The proper intensity level...
... helpful to set the speed control on the lungs to exercise with 5 to help to the nearest ten years). Next, find your cardiovascular system, the key to achieving the desired results is to oxygenate the blood. This is especially important for individuals over the age of time. The proper intensity level...
English Manual
Page 15
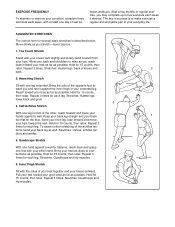
.... After a few months of regular exercise, you reach down toward your toes as far as you may complete up to success is described below. The key to five workouts each week if desired. SUGGESTED STRETCHES The correct form for balance, reach back and grasp one leg extended. Bring the sole of...
.... After a few months of regular exercise, you reach down toward your toes as far as you may complete up to success is described below. The key to five workouts each week if desired. SUGGESTED STRETCHES The correct form for balance, reach back and grasp one leg extended. Bring the sole of...
English Manual
Page 16
... calling: • The MODEL NUMBER of the product (WLTL39113) • The NAME of the product (WESLO CADENCE® 400 CS treadmill) • The SERIAL NUMBER of the product (see the front cover of this manual) • The KEY NUMBER and DESCRIPTION of the desired part(s) (see the PART LIST and the EXPLODED DRAWING...
... calling: • The MODEL NUMBER of the product (WLTL39113) • The NAME of the product (WESLO CADENCE® 400 CS treadmill) • The SERIAL NUMBER of the product (see the front cover of this manual) • The KEY NUMBER and DESCRIPTION of the desired part(s) (see the PART LIST and the EXPLODED DRAWING...
English Manual
Page 18
...37 2 38 4 39 5 40 4 41 1 42 1 43 1 44 1 45 1 46 1 47 1 48 4 49 2 50 1 51 1 52 2 Description Left Handrail Key/Clip Incline Leg Pivot Bolt Battery Cover Foot Grip (Left) Lift Motor Rear Roller Speed Potentiometer Speed Control Knob Console Assembly Upright Motor Belt Console... Catch Reed Switch Clip Reed Switch Magnet Console Base Frame Spacer (Left) Platform Screw Center Isolator Front Roller/Pulley Front Roller Adj. Bolt Incline Wheel Key No. Description 53 2 54 1 55 1 56 1 57 2 58 2 59 1 60 1 61 2 62 2 63 3 64 1 65 2 66 9 67 1 68...
...37 2 38 4 39 5 40 4 41 1 42 1 43 1 44 1 45 1 46 1 47 1 48 4 49 2 50 1 51 1 52 2 Description Left Handrail Key/Clip Incline Leg Pivot Bolt Battery Cover Foot Grip (Left) Lift Motor Rear Roller Speed Potentiometer Speed Control Knob Console Assembly Upright Motor Belt Console... Catch Reed Switch Clip Reed Switch Magnet Console Base Frame Spacer (Left) Platform Screw Center Isolator Front Roller/Pulley Front Roller Adj. Bolt Incline Wheel Key No. Description 53 2 54 1 55 1 56 1 57 2 58 2 59 1 60 1 61 2 62 2 63 3 64 1 65 2 66 9 67 1 68...


