
English Manual
Page 2
... use the Lat Bar. 14. Cover the floor or carpet beneath the home gym system for foot protection when exercising. 12. The Weights will fall with pre-existing health problems. Read all times. Inspect and tighten all precautions. 2. Do not use only. This is ...dizziness at all of the Pulleys. 13. Table of Contents Important Precautions 2 Before You Begin 3 Assembly 4 Cable Diagram 19 Adjustment 20 Weight Resistance Chart 22 Trouble-shooting and Maintenance 23 Ordering Replacement Parts Back Cover Full 90 Day Warranty Back Cover Note: A PART LIST/EXPLODED DRAWING and...
... use the Lat Bar. 14. Cover the floor or carpet beneath the home gym system for foot protection when exercising. 12. The Weights will fall with pre-existing health problems. Read all times. Inspect and tighten all precautions. 2. Do not use only. This is ...dizziness at all of the Pulleys. 13. Table of Contents Important Precautions 2 Before You Begin 3 Assembly 4 Cable Diagram 19 Adjustment 20 Weight Resistance Chart 22 Trouble-shooting and Maintenance 23 Ordering Replacement Parts Back Cover Full 90 Day Warranty Back Cover Note: A PART LIST/EXPLODED DRAWING and...

English Manual
Page 4
...end wrenches or a set of Parts Tighten all moving arms with each stage are exercising. 4 If a part is a sophisticated product with the weights. Orienting Parts As you assemble this product, be sure that you operate while you are oriented as you more convenient if you have included a ... frame. Clearing the Workspace Clear a workspace that assembly stage. Assembly will take the time to complete the steps outlined here. Place the chart on the floor or work table and use it to read it into separate stages. Lining Up the Tools Assembly requires the following tools ...
...end wrenches or a set of Parts Tighten all moving arms with each stage are exercising. 4 If a part is a sophisticated product with the weights. Orienting Parts As you assemble this product, be sure that you operate while you are oriented as you more convenient if you have included a ... frame. Clearing the Workspace Clear a workspace that assembly stage. Assembly will take the time to complete the steps outlined here. Place the chart on the floor or work table and use it to read it into separate stages. Lining Up the Tools Assembly requires the following tools ...
English Manual
Page 19
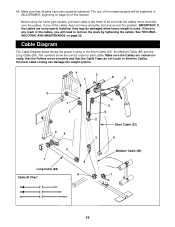
... parts will be explained in the cables, you will need to be damaged when heavy weight is any slack in ADJUSTMENT, beginning on page 22. Incorrect cable routing can damage the weight system. 4 2 7 8 3 1 2 1 3 5 6 4 7 Long Cable (58) Cable ID Chart 9 8 4 5 6 2 Short Cable (23) 3 9 Medium Cable (86) 1 19 If one of the Short Cable (23...
... parts will be explained in the cables, you will need to be damaged when heavy weight is any slack in ADJUSTMENT, beginning on page 22. Incorrect cable routing can damage the weight system. 4 2 7 8 3 1 2 1 3 5 6 4 7 Long Cable (58) Cable ID Chart 9 8 4 5 6 2 Short Cable (23) 3 9 Medium Cable (86) 1 19 If one of the Short Cable (23...
English Manual
Page 20
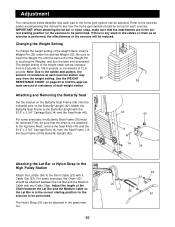
... bracket on the Butterfly Seat Frame (36) onto the indicated pins on page 23 to find the approxi- 26 mate amount of the Weight Pin is touching the Weights, and turn the bent end downward. Lift the Seat Frame off the Butterfly Upright (42). 42 40 A 14 36 Attaching the Lat Bar... Lat Bar and the Medium Cable so the Lat Bar is in the correct starting position for the exercise to be performed. Use the WEIGHT 25 RESISTANCE CHART on the Butterfly Upright (42). For some exercises, the Chain (52) should be set up for each exercise. Adjust the length of the home...
... bracket on the Butterfly Seat Frame (36) onto the indicated pins on page 23 to find the approxi- 26 mate amount of the Weight Pin is touching the Weights, and turn the bent end downward. Lift the Seat Frame off the Butterfly Upright (42). 42 40 A 14 36 Attaching the Lat Bar... Lat Bar and the Medium Cable so the Lat Bar is in the correct starting position for the exercise to be performed. Use the WEIGHT 25 RESISTANCE CHART on the Butterfly Upright (42). For some exercises, the Chain (52) should be set up for each exercise. Adjust the length of the home...

English Manual
Page 22
The other numbers refer to the 6.5 lbs. Weight Plates Top 1 2 3 4 5 6 7 8 Press Arm (lbs.) 19 41 62 84 108 131 168 195 225 Butterfly Arm (lbs.) 5 10 23 32 38 43 48 51 60 ... 30 43 58 68 83 95 107 22 top weight. "Top" refers to the 12.5 lbs. Note: The actual resistance at each weight station may vary due to differences in individual weight plates, as well as friction between the cables, pulleys, and weight guides. weight plates. Weight Resistance Chart This chart shows the approximate weight resistance at each station.
The other numbers refer to the 6.5 lbs. Weight Plates Top 1 2 3 4 5 6 7 8 Press Arm (lbs.) 19 41 62 84 108 131 168 195 225 Butterfly Arm (lbs.) 5 10 23 32 38 43 48 51 60 ... 30 43 58 68 83 95 107 22 top weight. "Top" refers to the 12.5 lbs. Note: The actual resistance at each weight station may vary due to differences in individual weight plates, as well as friction between the cables, pulleys, and weight guides. weight plates. Weight Resistance Chart This chart shows the approximate weight resistance at each station.


