
English Manual
Page 1
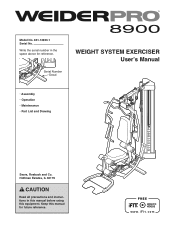
Serial Number Decal WEIGHT SYSTEM EXERCISER Userʼs Manual • Assembly • Operation • Maintenance • Part List and Drawing Sears, Roebuck and Co. Hoffman Estates, IL 60179 CAUTION Read all precautions and instructions in the space above for future reference. Keep this equipment. Model No. 831.14923.1 Serial No. Write the serial number in this manual before using this manual for reference.
Serial Number Decal WEIGHT SYSTEM EXERCISER Userʼs Manual • Assembly • Operation • Maintenance • Part List and Drawing Sears, Roebuck and Co. Hoffman Estates, IL 60179 CAUTION Read all precautions and instructions in the space above for future reference. Keep this equipment. Model No. 831.14923.1 Serial No. Write the serial number in this manual before using this manual for reference.
English Manual
Page 2
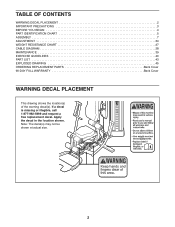
... CHART 5 ASSEMBLY 7 ADJUSTMENT 34 WEIGHT RESISTANCE CHART 37 CABLE DIAGRAM 38 MAINTENANCE 39 EXERCISE GUIDELINES 40 PART LIST 43 EXPLODED DRAWING 45 ORDERING REPLACEMENT PARTS Back Cover 90-DAY FULL WARRANTY Back Cover WARNING DECAL PLACEMENT This drawing shows the location(s) of the warning decal(s). If a decal is missing or ...
... CHART 5 ASSEMBLY 7 ADJUSTMENT 34 WEIGHT RESISTANCE CHART 37 CABLE DIAGRAM 38 MAINTENANCE 39 EXERCISE GUIDELINES 40 PART LIST 43 EXPLODED DRAWING 45 ORDERING REPLACEMENT PARTS Back Cover 90-DAY FULL WARRANTY Back Cover WARNING DECAL PLACEMENT This drawing shows the location(s) of the warning decal(s). If a decal is missing or ...

English Manual
Page 3
... are on page 36). 13. Use the weight system only as described in a commercial, rental, or institutional setting. 5. Before beginning any worn parts immediately. 8. Never release the arms, leg lever, lat bar, handle, ankle strap, or double strap while weights are exercising, stop immediately and ... system to protect the floor or carpet. Do not use the weight system. 7. Place the weight system on the pulleys at all parts regularly. Make sure that the cables remain on a level surface, with pre-existing health problems. 10. Wear appropriate exercise clothes while ...
... are on page 36). 13. Use the weight system only as described in a commercial, rental, or institutional setting. 5. Before beginning any worn parts immediately. 8. Never release the arms, leg lever, lat bar, handle, ankle strap, or double strap while weights are exercising, stop immediately and ... system to protect the floor or carpet. Do not use the weight system. 7. Place the weight system on the pulleys at all parts regularly. Make sure that the cables remain on a level surface, with pre-existing health problems. 10. Wear appropriate exercise clothes while ...
English Manual
Page 4
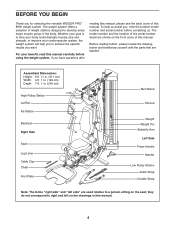
..., read this manual. 4 The model number and the location of this manual. Before reading further, please review the drawing below and familiarize yourself with the parts that are shown on the front cover of the serial number decal are labeled. BEFORE YOU BEGIN Thank you have questions after reading this manual...: 7 ft. 1 in this manual carefully before contacting us. they do not correspond to right and left on the seat; If you for selecting the versatile WEIDER PRO™ 8900 weight system.
..., read this manual. 4 The model number and the location of this manual. Before reading further, please review the drawing below and familiarize yourself with the parts that are shown on the front cover of the serial number decal are labeled. BEFORE YOU BEGIN Thank you have questions after reading this manual...: 7 ft. 1 in this manual carefully before contacting us. they do not correspond to right and left on the seat; If you for selecting the versatile WEIDER PRO™ 8900 weight system.
English Manual
Page 5
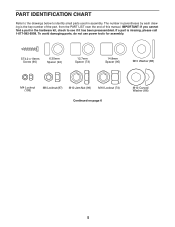
... M10 Curved Washer (86) 5 IMPORTANT: If you cannot find a part in the hardware kit, check to identify small parts used in parentheses by each drawing is missing, please call 1-877-992-5999. If a part is the key number of the part, from the PART LIST near the end of this manual. The number in... assembly. To avoid damaging parts, do not use power tools for assembly. PART IDENTIFICATION CHART Refer to the drawings below to see if it...
... M10 Curved Washer (86) 5 IMPORTANT: If you cannot find a part in the hardware kit, check to identify small parts used in parentheses by each drawing is missing, please call 1-877-992-5999. If a part is the key number of the part, from the PART LIST near the end of this manual. The number in... assembly. To avoid damaging parts, do not use power tools for assembly. PART IDENTIFICATION CHART Refer to the drawings below to see if it...
English Manual
Page 7
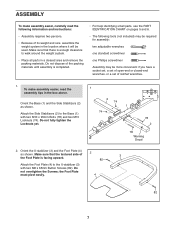
Attach the Side Stabilizers (2) to walk around the weight system. • Place all parts in a cleared area and remove the packing materials. Orient the U-stabilizer (3) and the Foot Plate (4) as shown. the Foot Plate must pivot easily. 4 ...the Base (1) and the Side Stabilizers (2) as shown. Do not dispose of the packing materials until assembly is completed. • For help identifying small parts, use the PART IDENTIFICATION CHART on pages 5 and 6. • The following information and instructions: • Assembly requires two persons. • Because of its weight and ...
Attach the Side Stabilizers (2) to walk around the weight system. • Place all parts in a cleared area and remove the packing materials. Orient the U-stabilizer (3) and the Foot Plate (4) as shown. the Foot Plate must pivot easily. 4 ...the Base (1) and the Side Stabilizers (2) as shown. Do not dispose of the packing materials until assembly is completed. • For help identifying small parts, use the PART IDENTIFICATION CHART on pages 5 and 6. • The following information and instructions: • Assembly requires two persons. • Because of its weight and ...
English Manual
Page 33
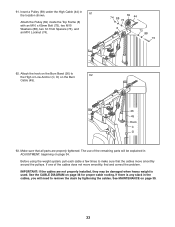
If one of the remaining parts will need to remove the slack by tightening the cables. See the CABLE DIAGRAM on page 39. 33 If there is any slack in the ... correct the problem. See MAINTENANCE on page 38 for proper cable routing. Attach the hook on the Burn Band (26) to make sure that all parts are not properly installed, they may be explained in the location shown. 61 Attach the Pulley (69) inside the Top Frame (6) with an M10 x 65mm...
If one of the remaining parts will need to remove the slack by tightening the cables. See the CABLE DIAGRAM on page 39. 33 If there is any slack in the ... correct the problem. See MAINTENANCE on page 38 for proper cable routing. Attach the hook on the Burn Band (26) to make sure that all parts are not properly installed, they may be explained in the location shown. 61 Attach the Pulley (69) inside the Top Frame (6) with an M10 x 65mm...
English Manual
Page 34
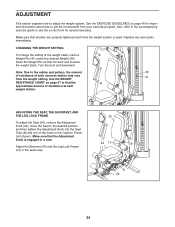
Note: Due to get the most benefit from the weight setting. Replace any worn parts immediately. ADJUSTING THE SEAT, THE BACKREST, AND THE LEG LOCK FRAME To adjust the Seat (24), remove the Adjustment Knob (29), move the Seat to ... SETTING To change the setting of the weight stack, insert a Weight Pin (41) under the desired Weight (30). Insert the Weight Pin so that all parts are properly tightened each time the weight system is engaged in a hole. Use the WEIGHT 41 RESISTANCE CHART on page 40 for several exercises. See...
Note: Due to get the most benefit from the weight setting. Replace any worn parts immediately. ADJUSTING THE SEAT, THE BACKREST, AND THE LEG LOCK FRAME To adjust the Seat (24), remove the Adjustment Knob (29), move the Seat to ... SETTING To change the setting of the weight stack, insert a Weight Pin (41) under the desired Weight (30). Insert the Weight Pin so that all parts are properly tightened each time the weight system is engaged in a hole. Use the WEIGHT 41 RESISTANCE CHART on page 40 for several exercises. See...
English Manual
Page 39
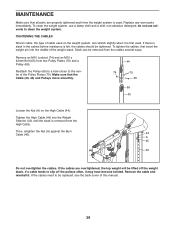
...against the Burn Cable (45). 44 A 45 32 Do not overtighten the cables. If the cables need to clean the weight system. Replace any worn parts immediately. Remove the cable and reinstall it may have become twisted. To clean the weight system, use solvents to be removed from the cables several... pin into the Weight Selector (32) until the slack is felt, the cables should be lifted off the pulleys often, it . Make sure that all parts are overtightened, the top weight will be tightened. do not use a damp cloth and a mild, non-abrasive detergent; Reattach the Pulley (69) to a ...
...against the Burn Cable (45). 44 A 45 32 Do not overtighten the cables. If the cables need to clean the weight system. Replace any worn parts immediately. Remove the cable and reinstall it may have become twisted. To clean the weight system, use solvents to be removed from the cables several... pin into the Weight Selector (32) until the slack is felt, the cables should be lifted off the pulleys often, it . Make sure that all parts are overtightened, the top weight will be tightened. do not use a damp cloth and a mild, non-abrasive detergent; Reattach the Pulley (69) to a ...
English Manual
Page 40
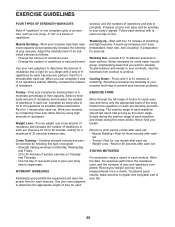
.... Perform the repetitions in each workout. Exhale during the exertion stage of each set. To achieve good results, make exercise a regular and enjoyable part of your body time to 30 minutes, resting for 1 minute after each set. When you perform. Exercise for 20 to regenerate. Rest for ...the appropriate length of time for each EXERCISE FORM Move through the full range of motion for each exercise and move only the appropriate parts of the body. Working Out-Include 6 to workout. Select exercises for each exercise. The exertion stage of each repetition should last about...
.... Perform the repetitions in each workout. Exhale during the exertion stage of each set. To achieve good results, make exercise a regular and enjoyable part of your body time to 30 minutes, resting for 1 minute after each set. When you perform. Exercise for 20 to regenerate. Rest for ...the appropriate length of time for each EXERCISE FORM Move through the full range of motion for each exercise and move only the appropriate parts of the body. Working Out-Include 6 to workout. Select exercises for each exercise. The exertion stage of each repetition should last about...
English Manual
Page 41
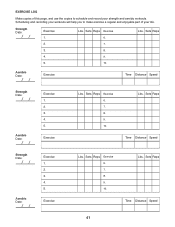
... 1. 2. 3. 4. 5. Lbs. Exercise Lbs. Lbs. Sets Reps Exercise 6. 7. 8. 9. 10. EXERCISE LOG Make copies of this page, and use the copies to make exercise a regular and enjoyable part of your strength and aerobic workouts.
... 1. 2. 3. 4. 5. Lbs. Exercise Lbs. Lbs. Sets Reps Exercise 6. 7. 8. 9. 10. EXERCISE LOG Make copies of this page, and use the copies to make exercise a regular and enjoyable part of your strength and aerobic workouts.
English Manual
Page 43
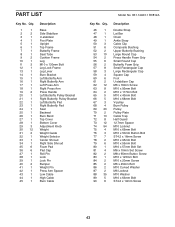
PART LIST Key No. Qty. 46 1 47 1 48 1 49 1 50 3 51 6 52 2 53 10 54 2 55 6 56 2 57 8 58 3 59 4 60 6 61 2 62 12 63 8 64 2 ...
PART LIST Key No. Qty. 46 1 47 1 48 1 49 1 50 3 51 6 52 2 53 10 54 2 55 6 56 2 57 8 58 3 59 4 60 6 61 2 62 12 63 8 64 2 ...
English Manual
Page 44
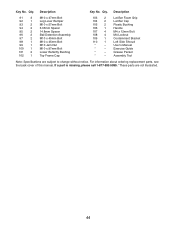
... missing, please call 1-877-992-5999. *These parts are subject to change without notice. Key No. Lat Bar Foam Grip Lat Bar Cap Plastic Bushing Handle M4 x 12mm Bolt M4 Locknut Containment Bracket ... M10 Jam Nut M10 x 97mm Bolt Lower Butterfly Bushing Top Frame Cap 103 2 104 2 105 2 106 1 107 4 108 4 109 1 110 1 * - * - * - * - For information about ordering replacement parts, see the back cover of this manual.
... missing, please call 1-877-992-5999. *These parts are subject to change without notice. Key No. Lat Bar Foam Grip Lat Bar Cap Plastic Bushing Handle M4 x 12mm Bolt M4 Locknut Containment Bracket ... M10 Jam Nut M10 x 97mm Bolt Lower Butterfly Bushing Top Frame Cap 103 2 104 2 105 2 106 1 107 4 108 4 109 1 110 1 * - * - * - * - For information about ordering replacement parts, see the back cover of this manual.

English Manual
Page 48
...items like garage door openers and water heaters. 1-800-4-MY-HOME® (1-800-469-4663) Call anytime, day or night (U.S.A. For the replacement parts, accessories, and user's manuals that you may also have other rights which vary from state to do-it-yourself. For Sears professional installation of ...who sold it! This warranty gives you specific legal rights, and you need to state. Sears, Roebuck and Co., Hoffman Estates, IL 60179 Part No. 331524 R0812A Printed in material or workmanship within 90 days of the date of home appliances and items like vacuums, lawn equipment, and ...
...items like garage door openers and water heaters. 1-800-4-MY-HOME® (1-800-469-4663) Call anytime, day or night (U.S.A. For the replacement parts, accessories, and user's manuals that you may also have other rights which vary from state to do-it-yourself. For Sears professional installation of ...who sold it! This warranty gives you specific legal rights, and you need to state. Sears, Roebuck and Co., Hoffman Estates, IL 60179 Part No. 331524 R0812A Printed in material or workmanship within 90 days of the date of home appliances and items like vacuums, lawn equipment, and ...


