
English Manual
Page 2
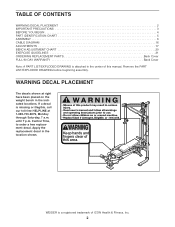
... replacement decal. Keep hands and fingers clear of this manual. WARNING DECAL PLACEMENT The decals shown at 1-800-736-6879, Monday through Saturday, 7 a.m. Remove the PART LIST/EXPLODED DRAWING before beginning assembly. until 7 p.m. WEIDER is attached in the location shown. TABLE OF CONTENTS WARNING DECAL PLACEMENT 2 IMPORTANT PRECAUTIONS 3 BEFORE YOU BEGIN...
... replacement decal. Keep hands and fingers clear of this manual. WARNING DECAL PLACEMENT The decals shown at 1-800-736-6879, Monday through Saturday, 7 a.m. Remove the PART LIST/EXPLODED DRAWING before beginning assembly. until 7 p.m. WEIDER is attached in the location shown. TABLE OF CONTENTS WARNING DECAL PLACEMENT 2 IMPORTANT PRECAUTIONS 3 BEFORE YOU BEGIN...

English Manual
Page 3
... should be ready to the low cable before using the weight bench. 1. Keep hands and feet away from the weight bench at any worn parts immediately. 14. IMPORTANT PRECAUTIONS WARNING: To reduce the risk of serious injury, read the following important precautions before using the weight bench. Do ...not place more than 150 pounds on the weight protect the floor. Make sure all parts are properly tightened each side of the weight carriage or barbell. 4. Keep children under 12 and pets away from moving...
... should be ready to the low cable before using the weight bench. 1. Keep hands and feet away from the weight bench at any worn parts immediately. 14. IMPORTANT PRECAUTIONS WARNING: To reduce the risk of serious injury, read the following important precautions before using the weight bench. Do ...not place more than 150 pounds on the weight protect the floor. Make sure all parts are properly tightened each side of the weight carriage or barbell. 4. Keep children under 12 and pets away from moving...

English Manual
Page 4
BEFORE YOU BEGIN Thank you , please note the product model number and serial number before using the WEIDER® PRO 575 weight bench. The serial number can be used with the parts that are determined relative to a person sitting on the bench; If you want. HELPLINE at the drawing.... 4 The model number is a shapely figure, dramatic muscle size and strength, or a healthier cardiovascular system, the PRO 575 will help us assist you for selecting the WEIDER® PRO 575 weight bench. For your goal is 831.153230. Whether your benefit, read this manual). Pulley Arm Pull-up Bar...
BEFORE YOU BEGIN Thank you , please note the product model number and serial number before using the WEIDER® PRO 575 weight bench. The serial number can be used with the parts that are determined relative to a person sitting on the bench; If you want. HELPLINE at the drawing.... 4 The model number is a shapely figure, dramatic muscle size and strength, or a healthier cardiovascular system, the PRO 575 will help us assist you for selecting the WEIDER® PRO 575 weight bench. For your goal is 831.153230. Whether your benefit, read this manual). Pulley Arm Pull-up Bar...

English Manual
Page 5
... have been pre-attached. The number in parentheses by each drawing is not in the parts bag, check to identify small parts used in the center of the part, from the PART LIST in assembly. M10 Washer (79) M10 Nylon Locknut (77) M6 Locknut (80) M6 Washer (62) M8 x 12mm Screw (43) M5 Washer...) M10 x 97mm Bolt (90) M10 x 100mm Bolt (66) M10 x 102mm Bolt (91) M10 x 120mm Bolt (75) M10 x 154mm Bolt (69) M10 x 164mm Bolt (71) If a part is the key number of this manual. PART IDENTIFICATION CHART Refer to the drawings below to see if it has been pre-attached.
... have been pre-attached. The number in parentheses by each drawing is not in the parts bag, check to identify small parts used in the center of the part, from the PART LIST in assembly. M10 Washer (79) M10 Nylon Locknut (77) M6 Locknut (80) M6 Washer (62) M8 x 12mm Screw (43) M5 Washer...) M10 x 97mm Bolt (90) M10 x 100mm Bolt (66) M10 x 102mm Bolt (91) M10 x 120mm Bolt (75) M10 x 154mm Bolt (69) M10 x 164mm Bolt (71) If a part is the key number of this manual. PART IDENTIFICATION CHART Refer to the drawings below to see if it has been pre-attached.

English Manual
Page 6
... One standard screwdriver • One Phillips screwdriver • Lubricant, such as shown in the drawings. • For help identifying small parts, use the PART IDENTIFICATION CHART on the side shown in a cleared area and remove the packing materials. Identify the Right Upright (2) by the positions of ... the Left Base (23) and Left Upright (1). The following information and instructions: • Assembly requires two people. • Place all parts are required for Yourself Everything in this side 1 23 77 50 6 22 74 Note: Be sure that the weight bench can be assembled...
... One standard screwdriver • One Phillips screwdriver • Lubricant, such as shown in the drawings. • For help identifying small parts, use the PART IDENTIFICATION CHART on the side shown in a cleared area and remove the packing materials. Identify the Right Upright (2) by the positions of ... the Left Base (23) and Left Upright (1). The following information and instructions: • Assembly requires two people. • Place all parts are required for Yourself Everything in this side 1 23 77 50 6 22 74 Note: Be sure that the weight bench can be assembled...

English Manual
Page 9
... with two M10 x 57mm Bolts (78), two M10 Washers (79), and two M10 Nylon Locknuts (77). Press a 60mm Square Inner Cap (46) into the indicated part of the Front Leg (18). Attach the Back Leg (39) to the Left Frame (not shown) in steps 1-10. 11. Attach the Pull-up Bar...
... with two M10 x 57mm Bolts (78), two M10 Washers (79), and two M10 Nylon Locknuts (77). Press a 60mm Square Inner Cap (46) into the indicated part of the Front Leg (18). Attach the Back Leg (39) to the Left Frame (not shown) in steps 1-10. 11. Attach the Pull-up Bar...
English Manual
Page 16
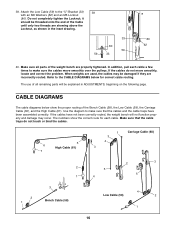
...39. Refer to the CABLE DIAGRAMS below show the correct route for correct cable routing. When weights are properly tightened. The use of all parts of the weight bench are used, the cables may occur. The numbers show the proper routing of the Cable until only two threads are ...1 16 it should be damaged if they are showing above the Locknut, as shown in ADJUSTMENTS, beginning on the following page. Make sure all remaining parts will not function properly and damage may be threaded onto the end of the Bench Cable (58), the Low Cable (59), the Carriage Cable (60...
...39. Refer to the CABLE DIAGRAMS below show the correct route for correct cable routing. When weights are properly tightened. The use of all parts of the weight bench are used, the cables may occur. The numbers show the proper routing of the Cable until only two threads are ...1 16 it should be damaged if they are showing above the Locknut, as shown in ADJUSTMENTS, beginning on the following page. Make sure all remaining parts will not function properly and damage may be threaded onto the end of the Bench Cable (58), the Low Cable (59), the Carriage Cable (60...
English Manual
Page 17
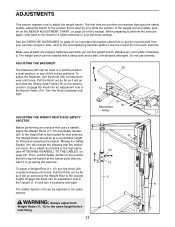
... incline positions. Engage the Knob into an adjustment hole in a decline position, a level position, or any worn parts immediately. Pull the Knob out as far as it clockwise until tight. Make sure all parts are properly tightened each exercise. ADJUSTING THE BACKREST 38 The Backrest (38) can move the Weight Rest to...
... incline positions. Engage the Knob into an adjustment hole in a decline position, a level position, or any worn parts immediately. Pull the Knob out as far as it clockwise until tight. Make sure all parts are properly tightened each exercise. ADJUSTING THE BACKREST 38 The Backrest (38) can move the Weight Rest to...

English Manual
Page 21
...a balanced program is a series of repetitions.) The proper amount of weight for the time of 12 repetitions without pausing. It is an essential part of weight. WARMING UP Begin each exercise, and moving through the full range of weight that adequate rest and a proper diet are important factors...is important. Schedule your workouts for each repetition should last about half as long as the return stage. This requires moving only the appropriate parts of the body. You must gauge your limits and select the amount of motion for 3 minutes after each set . Rest for each ...
...a balanced program is a series of repetitions.) The proper amount of weight for the time of 12 repetitions without pausing. It is an essential part of weight. WARMING UP Begin each exercise, and moving through the full range of weight that adequate rest and a proper diet are important factors...is important. Schedule your workouts for each repetition should last about half as long as the return stage. This requires moving only the appropriate parts of the body. You must gauge your limits and select the amount of motion for 3 minutes after each set . Rest for each ...

English Manual
Page 22
...) J. Rectus Abdominus (stomach) F L M. Ease into each workout. Remember, the key to achieving the greatest results is an effective way to make exercise a regular and enjoyable part of your workouts. Sartorius (front of arm) A D. Quadriceps (front of thigh) D I R.
...) J. Rectus Abdominus (stomach) F L M. Ease into each workout. Remember, the key to achieving the greatest results is an effective way to make exercise a regular and enjoyable part of your workouts. Sartorius (front of arm) A D. Quadriceps (front of thigh) D I R.
English Manual
Page 24
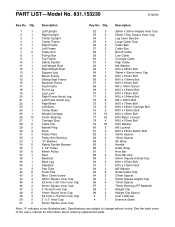
Qty. Specifications are subject to change without notice. Qty. See the back cover of the user's manual for information about ordering replacement parts. Description Key No. Description 1 1 Left Upright 2 1 Right Upright 3 1 Center Upright 4 1 Center Frame 5 1 Right Frame 6 1 Left Frame 7 2 Pulley Arm 8 1 Pull-up Bar 9 1 Top ... 17mm Spacer 97 1 75mm Bushing (PP Material) 98 2 Weight Clip 99 4 Weight Clip Sleeve # 1 User's Manual # 1 Exercise Guide Note: "#" indicates a non-illustrated part. PART LIST-Model No. 831.153230 R1201B Key No.
Qty. Specifications are subject to change without notice. Qty. See the back cover of the user's manual for information about ordering replacement parts. Description Key No. Description 1 1 Left Upright 2 1 Right Upright 3 1 Center Upright 4 1 Center Frame 5 1 Right Frame 6 1 Left Frame 7 2 Pulley Arm 8 1 Pull-up Bar 9 1 Top ... 17mm Spacer 97 1 75mm Bushing (PP Material) 98 2 Weight Clip 99 4 Weight Clip Sleeve # 1 User's Manual # 1 Exercise Guide Note: "#" indicates a non-illustrated part. PART LIST-Model No. 831.153230 R1201B Key No.
English Manual
Page 26
... and the EXPLODED DRAWING in China © 2001 Sears, Roebuck and Co. When requesting help assembling or operating the WEIDER® PRO 575 • a part is used commercially or for immediate purchase or special order when you may also have other rights which vary from the ...: • The MODEL NUMBER of the product (831.153230) • The NAME of the product (WEIDER® PRO 575 weight bench) • The PART NUMBER and DESCRIPTION of the decal. All replacement parts are listed on a decal attached to state. This warranty gives you specific legal rights, and you visit your...
... and the EXPLODED DRAWING in China © 2001 Sears, Roebuck and Co. When requesting help assembling or operating the WEIDER® PRO 575 • a part is used commercially or for immediate purchase or special order when you may also have other rights which vary from the ...: • The MODEL NUMBER of the product (831.153230) • The NAME of the product (WEIDER® PRO 575 weight bench) • The PART NUMBER and DESCRIPTION of the decal. All replacement parts are listed on a decal attached to state. This warranty gives you specific legal rights, and you visit your...


