

English Manual
Page 2
Remove the PART IDENTIFICATION CHART and the PART LIST/EXPLODED DRAWING before beginning assembly. 2 TABLE OF CONTENTS IMPORTANT PRECAUTIONS 3 WARNING DECAL PLACEMENT 4 BEFORE YOU BEGIN 5 ASSEMBLY 6 ADJUSTING THE WEIDER PRO 545 14 EXERCISE GUIDELINES 17 ORDERING REPLACEMENT PARTS Back Cover FULL 90 DAY WARRANTY Back Cover Note: A PART IDENTIFICATION CHART and a PART LIST/EXPLODED DRAWING are attached to the center of this manual.
Remove the PART IDENTIFICATION CHART and the PART LIST/EXPLODED DRAWING before beginning assembly. 2 TABLE OF CONTENTS IMPORTANT PRECAUTIONS 3 WARNING DECAL PLACEMENT 4 BEFORE YOU BEGIN 5 ASSEMBLY 6 ADJUSTING THE WEIDER PRO 545 14 EXERCISE GUIDELINES 17 ORDERING REPLACEMENT PARTS Back Cover FULL 90 DAY WARRANTY Back Cover Note: A PART IDENTIFICATION CHART and a PART LIST/EXPLODED DRAWING are attached to the center of this manual.
English Manual
Page 6
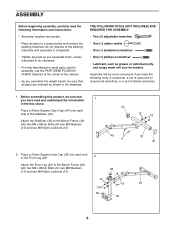
...manual. • As you have the following information and instructions: • Assembly requires two people. • Place all parts as grease or petroleum jelly, and soapy water will be needed. Assembly will also be more convenient if you have read the following tools: A socket... a 50mm Square Inner Cap (36) into each side of ratchet wrenches. 1. THE FOLLOWING TOOLS (NOT INCLUDED) ARE REQUIRED FOR ASSEMBLY: • Two (2) adjustable wrenches • One (1) rubber mallet • One (1) standard screwdriver • One (1) phillips screwdriver • Lubricant, such...
...manual. • As you have the following information and instructions: • Assembly requires two people. • Place all parts as grease or petroleum jelly, and soapy water will be needed. Assembly will also be more convenient if you have read the following tools: A socket... a 50mm Square Inner Cap (36) into each side of ratchet wrenches. 1. THE FOLLOWING TOOLS (NOT INCLUDED) ARE REQUIRED FOR ASSEMBLY: • Two (2) adjustable wrenches • One (1) rubber mallet • One (1) standard screwdriver • One (1) phillips screwdriver • Lubricant, such...
English Manual
Page 9
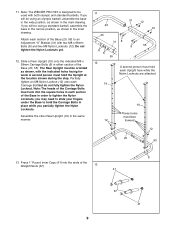
... Base in the main drawing. Assemble the other Rear Upright (19) in the same manner. 11 31 12 20 12 20 31 8 8 55 8 8 55 12 A second person must hold the Carriage Bolts in each Carriage Bolt but do not fully tighten the Nylon Locknut. Note: The WEIDER PRO 545 is designed to an Adjustment...
... Base in the main drawing. Assemble the other Rear Upright (19) in the same manner. 11 31 12 20 12 20 31 8 8 55 8 8 55 12 A second person must hold the Carriage Bolts in each Carriage Bolt but do not fully tighten the Nylon Locknut. Note: The WEIDER PRO 545 is designed to an Adjustment...

English Manual
Page 10
.... 16 41 52 53 55 53 6 53 54 Align these holes 10 14. Press two 60mm Square Bushings (53) into the Carriage Stop (54). Assemble the other Front Upright (18) in the same manner. 15 18 12 A second person must be aligned with the drilled hole in each Upright here...Rear Upright 14 (19). Press a 60mm Square Bushing (53) into a Weight Carriage (52). Be sure that the Weight Rests are attached 18 20 6 12 16. Assemble the other Weight Carriage (52) in either section of the Carriage Bolts must hold the Carriage Bolts in place while you partially tighten the Nylon...
.... 16 41 52 53 55 53 6 53 54 Align these holes 10 14. Press two 60mm Square Bushings (53) into the Carriage Stop (54). Assemble the other Front Upright (18) in the same manner. 15 18 12 A second person must be aligned with the drilled hole in each Upright here...Rear Upright 14 (19). Press a 60mm Square Bushing (53) into a Weight Carriage (52). Be sure that the Weight Rests are attached 18 20 6 12 16. Assemble the other Weight Carriage (52) in either section of the Carriage Bolts must hold the Carriage Bolts in place while you partially tighten the Nylon...
English Manual
Page 11
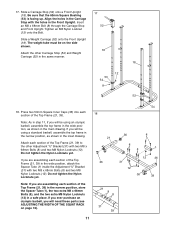
... 68mm Bolts (8) and two M8 Nylon Locknuts (12). 17. Align the holes in a safe place. If you ever purchase an olympic barbell, you are assembling each section of the Top Frame (21, 39) in the inset drawing. Insert an M8 x 68mm Bolt (8) through the Carriage Stop and Front Upright. ...The weight tube must be using an olympic barbell, assemble the top frame in the wide position, as shown in the wide position, attach the 36 Spacer Tube (1) inside the Adjustment "U" Bracket (31) with...
... 68mm Bolts (8) and two M8 Nylon Locknuts (12). 17. Align the holes in a safe place. If you ever purchase an olympic barbell, you are assembling each section of the Top Frame (21, 39) in the inset drawing. Insert an M8 x 68mm Bolt (8) through the Carriage Stop and Front Upright. ...The weight tube must be using an olympic barbell, assemble the top frame in the wide position, as shown in the wide position, attach the 36 Spacer Tube (1) inside the Adjustment "U" Bracket (31) with...

English Manual
Page 12
... attached on the out- Attach a "U" Bracket (30) to the other "U" Bracket (not shown) in steps 11-19. 20. 19. The Cable Trap should be rout- Assemble the other Pulley to Top Frame B (39) with two M8 x 68mm Bolts (8), two M8 Washers (13), and two M8 Nylon Locknuts (12).
... attached on the out- Attach a "U" Bracket (30) to the other "U" Bracket (not shown) in steps 11-19. 20. 19. The Cable Trap should be rout- Assemble the other Pulley to Top Frame B (39) with two M8 x 68mm Bolts (8), two M8 Washers (13), and two M8 Nylon Locknuts (12).
English Manual
Page 16
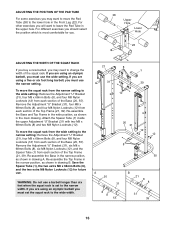
... wide setting: Remove the Adjustment "U" Bracket (31), four M8 x 68mm Bolts (8), and four M8 Nylon Locknuts (12) from each section of the squat rack. Re-assemble the Base in the narrow position, as shown in the upper hole. ADJUSTING THE POSITION OF THE PAD TUBE For some exercises you may need... the Top Frame (21, 39). If you are using a five or six foot long barbell, you must use . Re-assemble the Top Frame in the narrow position, as shown in drawing B. Re-assemble the Base and Top Frame in the wide position, as shown in the main drawing. Remove the Adjustment "U" Bracket...
... wide setting: Remove the Adjustment "U" Bracket (31), four M8 x 68mm Bolts (8), and four M8 Nylon Locknuts (12) from each section of the squat rack. Re-assemble the Base in the narrow position, as shown in the upper hole. ADJUSTING THE POSITION OF THE PAD TUBE For some exercises you may need... the Top Frame (21, 39). If you are using a five or six foot long barbell, you must use . Re-assemble the Top Frame in the narrow position, as shown in drawing B. Re-assemble the Base and Top Frame in the wide position, as shown in the main drawing. Remove the Adjustment "U" Bracket...

English Manual
Page 24
...warranty does not apply when the WEIGHT BENCH EXERCISER is missing • or you visit your WEIDER® PRO 545 are available for rental purposes. When requesting help assembling or operating the WEIDER® PRO 545 • a part is used commercially or for immediate purchase or special order when you need... telephone, call the following information: • The MODEL NUMBER of the product (831.150471). • The NAME of the product (WEIDER® PRO 545 Weight Bench). • The PART NUMBER of the PART (see the PART LIST and the EXPLODED DRAWING at the center of this manual...
...warranty does not apply when the WEIGHT BENCH EXERCISER is missing • or you visit your WEIDER® PRO 545 are available for rental purposes. When requesting help assembling or operating the WEIDER® PRO 545 • a part is used commercially or for immediate purchase or special order when you need... telephone, call the following information: • The MODEL NUMBER of the product (831.150471). • The NAME of the product (WEIDER® PRO 545 Weight Bench). • The PART NUMBER of the PART (see the PART LIST and the EXPLODED DRAWING at the center of this manual...


