
English Manual
Page 1
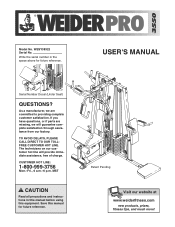
As a manufacturer, we are missing, we will provide immediate assistance, free of charge. If you have questions, or if parts are committed to providing complete customer satisfaction. CUSTOMER HOT LINE: 1-800-999-3756 Mon.-Fri., 6 a.m.-6 p.m. Save this equipment. Model No. USER'S MANUAL Serial Number Decal (...
As a manufacturer, we are missing, we will provide immediate assistance, free of charge. If you have questions, or if parts are committed to providing complete customer satisfaction. CUSTOMER HOT LINE: 1-800-999-3756 Mon.-Fri., 6 a.m.-6 p.m. Save this equipment. Model No. USER'S MANUAL Serial Number Decal (...

English Manual
Page 2
Remove the PART IDENTIFICATION CHART and the PART LIST/EXPLODED DRAWING before beginning assembly. WEIDER is a registered trademark of this manual. TABLE OF CONTENTS IMPORTANT PRECAUTIONS 3 BEFORE YOU BEGIN 4 ASSEMBLY 5 ADJUSTMENTS 22 WEIGHT RESISTANCE CHART 24 TROUBLESHOOTING 25 CABLE DIAGRAMS 26 ORDERING REPLACEMENT PARTS Back Cover LIMITED WARRANTY Back Cover Note: A PART IDENTIFICATION CHART and a PART LIST/EXPLODED DRAWING are attached in the center of ICON Health & Fitness, Inc. 2
Remove the PART IDENTIFICATION CHART and the PART LIST/EXPLODED DRAWING before beginning assembly. WEIDER is a registered trademark of this manual. TABLE OF CONTENTS IMPORTANT PRECAUTIONS 3 BEFORE YOU BEGIN 4 ASSEMBLY 5 ADJUSTMENTS 22 WEIGHT RESISTANCE CHART 24 TROUBLESHOOTING 25 CABLE DIAGRAMS 26 ORDERING REPLACEMENT PARTS Back Cover LIMITED WARRANTY Back Cover Note: A PART IDENTIFICATION CHART and a PART LIST/EXPLODED DRAWING are attached in the center of ICON Health & Fitness, Inc. 2
English Manual
Page 3
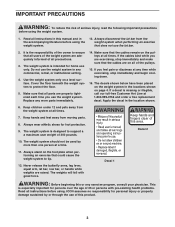
... adequately informed of 300 pounds. Make sure that the cables remain on page 4. Keep children under 12 and pets away from moving parts. 8. It is the responsibility of the owner to tip. 12. Use the weight system only on the foot plate when performing an exercise that could ... bar. 2. The weights will fall with pre-existing health problems. Read all precautions. 3. Keep hands and feet away from the weight system at any worn parts immediately. 14. Always disconnect the lat bar from the weight system when performing an exercise that the cables are raised.
... adequately informed of 300 pounds. Make sure that the cables remain on page 4. Keep children under 12 and pets away from moving parts. 8. It is the responsibility of the owner to tip. 12. Use the weight system only on the foot plate when performing an exercise that could ... bar. 2. The weights will fall with pre-existing health problems. Read all precautions. 3. Keep hands and feet away from the weight system at any worn parts immediately. 14. Always disconnect the lat bar from the weight system when performing an exercise that the cables are raised.
English Manual
Page 4
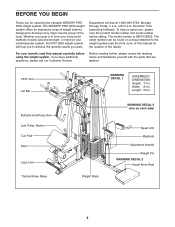
... with the parts that are labeled. Department toll-free at 1-800-999-3756, Monday through Friday, 6 a.m. until 6 p.m. To help you to the weight system (see the front cover of the body. For your benefit, read this manual for selecting the versatile WEIDER® PRO 3550 weight system....2 Squat Knee Rest 4 The model number is to develop every major muscle group of this manual carefully before calling. The WEIDER® PRO 3550 weight system offers an impressive array of weight stations designed to tone your body, build dramatic muscle size and strength, or improve...
... with the parts that are labeled. Department toll-free at 1-800-999-3756, Monday through Friday, 6 a.m. until 6 p.m. To help you to the weight system (see the front cover of the body. For your benefit, read this manual for selecting the versatile WEIDER® PRO 3550 weight system....2 Squat Knee Rest 4 The model number is to develop every major muscle group of this manual carefully before calling. The WEIDER® PRO 3550 weight system offers an impressive array of weight stations designed to tone your body, build dramatic muscle size and strength, or improve...
English Manual
Page 5
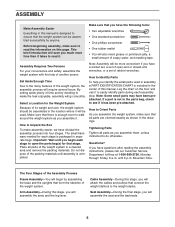
...the leg lever. Questions? By setting aside plenty of its weight and size, the weight system should be assembled successfully by anyone. How to Orient Parts As you have the following tools: • Two adjustable wrenches • One standard screwdriver • One phillips screwdriver • One rubber mallet ...• You will attach the cables and pulleys that stage. The small hardware needed for each stage to Identify Parts To help of soapy water, and masking tape. How to open -end or closed-end wrenches, or a set of ratchet wrenches. Cable ...
...the leg lever. Questions? By setting aside plenty of its weight and size, the weight system should be assembled successfully by anyone. How to Orient Parts As you have the following tools: • Two adjustable wrenches • One standard screwdriver • One phillips screwdriver • One rubber mallet ...• You will attach the cables and pulleys that stage. The small hardware needed for each stage to Identify Parts To help of soapy water, and masking tape. How to open -end or closed-end wrenches, or a set of ratchet wrenches. Cable ...

English Manual
Page 6
... the Squat Knee Rest to the Long Base (120) with a 3/8" x 3 1/4" Bolt (96) and a 3/8" Nylon Locknut (87). Press two 2" x 3" Inner Caps (58) into the open the parts bags labeled "FRAME ASSEMBLY 1" and "FRAME ASSEMBLY 2." FRAME ASSEMBLY 1 1.
... the Squat Knee Rest to the Long Base (120) with a 3/8" x 3 1/4" Bolt (96) and a 3/8" Nylon Locknut (87). Press two 2" x 3" Inner Caps (58) into the open the parts bags labeled "FRAME ASSEMBLY 1" and "FRAME ASSEMBLY 2." FRAME ASSEMBLY 1 1.

English Manual
Page 10
... Butterfly Top Frame (7) to the Butterfly Top Frame (7) with two 5/16" x 3 3/4" Bolts (92), two 5/16" Washers (90), and two 5/16" Nylon Locknuts (86). Open the parts bag labeled "ARM ASSEMBLY." Attach the Butterfly Frame (47) to the Butterfly Upright (3) with the Bolt and a 3/8" Nylon Locknut (87). Press a 1" Round Inner Cap (29...
... Butterfly Top Frame (7) to the Butterfly Top Frame (7) with two 5/16" x 3 3/4" Bolts (92), two 5/16" Washers (90), and two 5/16" Nylon Locknuts (86). Open the parts bag labeled "ARM ASSEMBLY." Attach the Butterfly Frame (47) to the Butterfly Upright (3) with the Bolt and a 3/8" Nylon Locknut (87). Press a 1" Round Inner Cap (29...

English Manual
Page 11
...) with a 5/16" x 2 1/2" Bolt (59), two 5/16" Washers (90), and a 5/16" Nylon Locknut (86). 11 101 30 86 113 5 90 59 6 74 Locate and open the parts bags labeled "CABLE ASSEMBLY" and "PULLEYS." Attach the Right Butterfly Arm (26) to the Butterfly Frame (47) with soapy water. Wet the Left VKR Arm...
...) with a 5/16" x 2 1/2" Bolt (59), two 5/16" Washers (90), and a 5/16" Nylon Locknut (86). 11 101 30 86 113 5 90 59 6 74 Locate and open the parts bags labeled "CABLE ASSEMBLY" and "PULLEYS." Attach the Right Butterfly Arm (26) to the Butterfly Frame (47) with soapy water. Wet the Left VKR Arm...

English Manual
Page 19
... Pad Tube as shown. Hold the Weight Tube (43) and the Top Weight (45) a few inches over a 4 1/2" Pulley 49 (119). 48. Locate and open the parts bag labeled "SEAT ASSEMBLY." et on the Top Frame (6) with a 3/8" x 2" Bolt (100) and a 3/8" Nylon Locknut (87). 49. Tighten a 1/2" Nut (118) halfway onto the end of...
... Pad Tube as shown. Hold the Weight Tube (43) and the Top Weight (45) a few inches over a 4 1/2" Pulley 49 (119). 48. Locate and open the parts bag labeled "SEAT ASSEMBLY." et on the Top Frame (6) with a 3/8" x 2" Bolt (100) and a 3/8" Nylon Locknut (87). 49. Tighten a 1/2" Nut (118) halfway onto the end of...

English Manual
Page 21
... a 3/8" Washer (91), and a 3/8" Nylon Locknut (87). If there is any slack in this step. 56 87 91 107 91 32 87 57. Tighten all parts have been properly tightened. Unscrew the Adjustment Knob (115) and remove it . Reattach the Adjustment Knob to the Curl Frame (12) with four 1/4" x 3/4" Screws (...routing. Turn the Squat Backrest (35) so that the cables move smoothly, find and correct the problem. Make sure that all of the remaining parts will need to remove the slack by tightening the cables. Next, pull the Knob and slide the Squat Bracket (37) down onto the Squat...
... a 3/8" Washer (91), and a 3/8" Nylon Locknut (87). If there is any slack in this step. 56 87 91 107 91 32 87 57. Tighten all parts have been properly tightened. Unscrew the Adjustment Knob (115) and remove it . Reattach the Adjustment Knob to the Curl Frame (12) with four 1/4" x 3/4" Screws (...routing. Turn the Squat Backrest (35) so that the cables move smoothly, find and correct the problem. Make sure that all of the remaining parts will need to remove the slack by tightening the cables. Next, pull the Knob and slide the Squat Bracket (37) down onto the Squat...
English Manual
Page 22
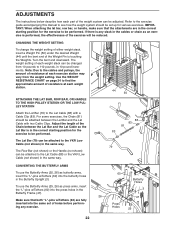
ADJUSTMENTS The instructions below describe how each part of holes before performing any slack in the cables or chain as butterfly arms, insert the "L"-pins w/Tethers (60) into the butterfly holes in the ...
ADJUSTMENTS The instructions below describe how each part of holes before performing any slack in the cables or chain as butterfly arms, insert the "L"-pins w/Tethers (60) into the butterfly holes in the ...

English Manual
Page 25
...drawing 1. See drawing 3. Reattach the Pulley and the Cable Trap between a set of holes closer to be replaced, see ORDERING REPLACEMENT PARTS on the end of the Pulley Plates with the Bolt and Nylon Locknut. Do not overtighten the cables. Reattach the Pulley and Cable ... Bolt (100), 2 Cable Trap (68), and 3 1/2" Pulley (78) from the Pulley Plates (63). If a cable slips off the weight stacks. Replace any worn parts immediately. The weight system can be tightened. Do not use solvents. To tighten the cables, first insert the weight pins into the centers of the...
...drawing 1. See drawing 3. Reattach the Pulley and the Cable Trap between a set of holes closer to be replaced, see ORDERING REPLACEMENT PARTS on the end of the Pulley Plates with the Bolt and Nylon Locknut. Do not overtighten the cables. Reattach the Pulley and Cable ... Bolt (100), 2 Cable Trap (68), and 3 1/2" Pulley (78) from the Pulley Plates (63). If a cable slips off the weight stacks. Replace any worn parts immediately. The weight system can be tightened. Do not use solvents. To tighten the cables, first insert the weight pins into the centers of the...

English Manual
Page 28
WESY38322 R1102B 1/2" Washer (1) 3/8" Washer (91) 5/16" Washer (90) 1/4" Washer (97) 1/2" Spacer (89) 3/4" Spacer (124) 1/2" Nut (118) 3/8" Nylon Locknut (87) 3/8" Nylon Jamnut (113) 5/16" Nylon Locknut (86) 1/4" Nylon Locknut (34) Cable Clip (83) 4 1/2" Pulley (119) (Not shown to scale) "V" Pulley (55) (Not shown to scale) 3 1/2" Pulley (78) (Not shown to scale) 5/16" x 3 1/2" Bolt (94) 3/8" x 3 3/4" Bolt (122) 5/16" x 3 3/4" Bolt (92) 3/8" x 6 1/2" Bolt (95) PART IDENTIFICATION CHART-Model No.
WESY38322 R1102B 1/2" Washer (1) 3/8" Washer (91) 5/16" Washer (90) 1/4" Washer (97) 1/2" Spacer (89) 3/4" Spacer (124) 1/2" Nut (118) 3/8" Nylon Locknut (87) 3/8" Nylon Jamnut (113) 5/16" Nylon Locknut (86) 1/4" Nylon Locknut (34) Cable Clip (83) 4 1/2" Pulley (119) (Not shown to scale) "V" Pulley (55) (Not shown to scale) 3 1/2" Pulley (78) (Not shown to scale) 5/16" x 3 1/2" Bolt (94) 3/8" x 3 3/4" Bolt (122) 5/16" x 3 3/4" Bolt (92) 3/8" x 6 1/2" Bolt (95) PART IDENTIFICATION CHART-Model No.
English Manual
Page 31
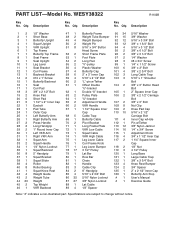
... 1/2" Nut 4 1/2" Pulley Long Base Large Cable Trap 3/8" x 3 3/4" Bolt Knee Rest Bumper 3/4" Spacer 2" x 2 1/2" Inner Cap Butterfly Arm Stop User's Manual Exercise Guide Note: "#" indicates a non-illustrated part. WESY38322 R1102B Key No. Description Key No. Specifications are subject to change without notice. Qty. Qty...
... 1/2" Nut 4 1/2" Pulley Long Base Large Cable Trap 3/8" x 3 3/4" Bolt Knee Rest Bumper 3/4" Spacer 2" x 2 1/2" Inner Cap Butterfly Arm Stop User's Manual Exercise Guide Note: "#" indicates a non-illustrated part. WESY38322 R1102B Key No. Description Key No. Specifications are subject to change without notice. Qty. Qty...
English Manual
Page 33
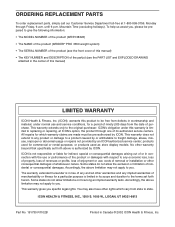
... or damage to a product caused by ICON. Some states do not allow limitations on how long an implied warranty lasts. ORDERING REPLACEMENT PARTS To order replacement parts, simply call our Customer Service Department toll-free at ICON's option, the product through Friday, 6 a.m. To help us assist you ...product (WESY38322) • The NAME of the product (WEIDER® PRO 3550 weight system) • The SERIAL NUMBER of the product (see the front cover of this manual) • The KEY NUMBER and DESCRIPTION of the part(s) (see the PART LIST and EXPLODED DRAWING attached in the center of this ...
... or damage to a product caused by ICON. Some states do not allow limitations on how long an implied warranty lasts. ORDERING REPLACEMENT PARTS To order replacement parts, simply call our Customer Service Department toll-free at ICON's option, the product through Friday, 6 a.m. To help us assist you ...product (WESY38322) • The NAME of the product (WEIDER® PRO 3550 weight system) • The SERIAL NUMBER of the product (see the front cover of this manual) • The KEY NUMBER and DESCRIPTION of the part(s) (see the PART LIST and EXPLODED DRAWING attached in the center of this ...


