
English Manual
Page 2
TABLE OF CONTENTS IMPORTANT PRECAUTIONS 3 BEFORE YOU BEGIN 4 PART IDENTIFICATION CHART 5 ASSEMBLY 7 ADJUSTMENT 18 WEIGHT RESISTANCE CHART 19 TROUBLE-SHOOTING AND MAINTENANCE 20 CABLE DIAGRAM 21 PART LIST 22 EXPLODED DRAWING 23 ORDERING REPLACEMENT PARTS Back Cover LIMITED WARRANTY Back Cover WEIDER is a registered trademark of ICON Health & Fitness, Inc. 2
TABLE OF CONTENTS IMPORTANT PRECAUTIONS 3 BEFORE YOU BEGIN 4 PART IDENTIFICATION CHART 5 ASSEMBLY 7 ADJUSTMENT 18 WEIGHT RESISTANCE CHART 19 TROUBLE-SHOOTING AND MAINTENANCE 20 CABLE DIAGRAM 21 PART LIST 22 EXPLODED DRAWING 23 ORDERING REPLACEMENT PARTS Back Cover LIMITED WARRANTY Back Cover WEIDER is a registered trademark of ICON Health & Fitness, Inc. 2
English Manual
Page 3
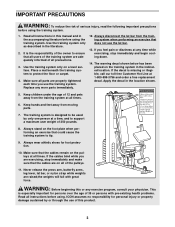
...down. 14. Never release the press arm, butterfly arms, leg lever, lat bar, or nylon strap while weights are on the foot plate when performing an exercise that the cables are raised;the weights will fall with pre-existing health problems. Read all of the pulleys. 11. If you use the lat...immediately and make sure that could cause the training system to tip. 9. If the decal is the responsibility of the owner to support a maximum user weight of this product. 3 If the cables bind while you are properly tightened each time you feel pain or dizziness at 1-800-999-3756 and order...
...down. 14. Never release the press arm, butterfly arms, leg lever, lat bar, or nylon strap while weights are on the foot plate when performing an exercise that the cables are raised;the weights will fall with pre-existing health problems. Read all of the pulleys. 11. If you use the lat...immediately and make sure that could cause the training system to tip. 9. If the decal is the responsibility of the owner to support a maximum user weight of this product. 3 If the cables bind while you are properly tightened each time you feel pain or dizziness at 1-800-999-3756 and order...
English Manual
Page 4
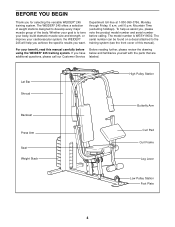
... the product model number and serial number before Before reading further, please review the drawing using the WEIDER® 245 training system. Lat Bar Shroud Backrest Press Arm Seat Weight Stack High Pulley Station Butterfly Arm Curl Pad Curl Frame Leg Lever Low Pulley Station Foot Plate 4... For your cardiovascular system, the WEIDER® 245 will help us assist you want. The WEIDER® 245 offers a selection of weight stations designed to the training system (see the front cover of the body. BEFORE YOU BEGIN...
... the product model number and serial number before Before reading further, please review the drawing using the WEIDER® 245 training system. Lat Bar Shroud Backrest Press Arm Seat Weight Stack High Pulley Station Butterfly Arm Curl Pad Curl Frame Leg Lever Low Pulley Station Foot Plate 4... For your cardiovascular system, the WEIDER® 245 will help us assist you want. The WEIDER® 245 offers a selection of weight stations designed to the training system (see the front cover of the body. BEFORE YOU BEGIN...
English Manual
Page 7
..., we have been pre-attached. By setting aside plenty of time and by assembling the base and the uprights that form the skeleton of its weight and size, the training system should be assembled in the parts bag, check to see if it to do otherwise. Select a Location for the Training...
..., we have been pre-attached. By setting aside plenty of time and by assembling the base and the uprights that form the skeleton of its weight and size, the training system should be assembled in the parts bag, check to see if it to do otherwise. Select a Location for the Training...
English Manual
Page 8
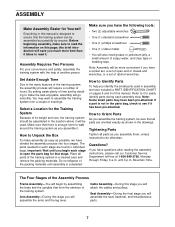
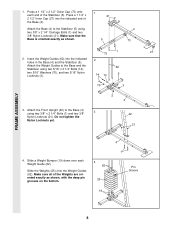
... into the indicated end of the Base (4). Do not tighten the Nylon Locknuts yet. 3 4 42 21 4. Slide a Weight Bumper (19) down over each end of the Weights are oriented exactly as shown. 1 21 5 4 73 1 73 27 2. FRAME ASSEMBLY 1. Make sure all of the Stabilizer...62 Stabilizer using two 5/16" x 3 1/4" Bolts (14), two 5/16" Washers (70), and two 5/16" Nylon Locknuts (3). 14 70 5 70 3 3. Slide the Weights (25) onto the Weight Guides (62). Press a 1 1/2" x 2 1/2" Inner Cap (27) into the indicated 2 holes in the Base (4) and the Stabilizer (5). Press a 1 1/2" x ...
... into the indicated end of the Base (4). Do not tighten the Nylon Locknuts yet. 3 4 42 21 4. Slide a Weight Bumper (19) down over each end of the Weights are oriented exactly as shown. 1 21 5 4 73 1 73 27 2. FRAME ASSEMBLY 1. Make sure all of the Stabilizer...62 Stabilizer using two 5/16" x 3 1/4" Bolts (14), two 5/16" Washers (70), and two 5/16" Nylon Locknuts (3). 14 70 5 70 3 3. Slide the Weights (25) onto the Weight Guides (62). Press a 1 1/2" x 2 1/2" Inner Cap (27) into the indicated 2 holes in the Base (4) and the Stabilizer (5). Press a 1 1/2" x ...
English Manual
Page 9
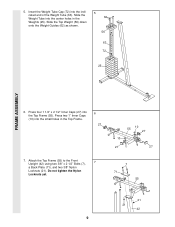
...two 1" Inner Caps (10) into the center holes in the Top Frame. 6 27 7. Press four 1 1/2" x 2 1/2" Inner Caps (27) into the indicated end of the Weight Tube (63). Do not tighten the Nylon Locknuts yet. 10 55 27 10 27 27 7 71 55 21 21 42 9 Attach the Top Frame (55...) to the Front Upright (42) using two 3/8" x 2 1/2" Bolts (7), 7 a Back Plate (71), and two 3/8" Nylon Locknuts (21). Insert the Weight Tube Cap (72) into the Top Frame (55). Slide the Top Weight (56) down onto the Weight Guides (62) as shown. 5 62 56 63 72 25 FRAME ASSEMBLY 6.
...two 1" Inner Caps (10) into the center holes in the Top Frame. 6 27 7. Press four 1 1/2" x 2 1/2" Inner Caps (27) into the indicated end of the Weight Tube (63). Do not tighten the Nylon Locknuts yet. 10 55 27 10 27 27 7 71 55 21 21 42 9 Attach the Top Frame (55...) to the Front Upright (42) using two 3/8" x 2 1/2" Bolts (7), 7 a Back Plate (71), and two 3/8" Nylon Locknuts (21). Insert the Weight Tube Cap (72) into the Top Frame (55). Slide the Top Weight (56) down onto the Weight Guides (62) as shown. 5 62 56 63 72 25 FRAME ASSEMBLY 6.
English Manual
Page 10
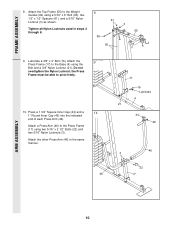
... (49) into the indicated end of each Press Arm (46). Attach a Press Arm (46) to pivot freely. 10. Attach the 9 Press Frame (17) to the Weight Guides (62) using the Bolt and a 3/8" Nylon Locknut (21). Tighten all Nylon Locknuts used in the same manner. 46 17 16 Lubricate 4 21 44 49...
... (49) into the indicated end of each Press Arm (46). Attach a Press Arm (46) to pivot freely. 10. Attach the 9 Press Frame (17) to the Weight Guides (62) using the Bolt and a 3/8" Nylon Locknut (21). Tighten all Nylon Locknuts used in the same manner. 46 17 16 Lubricate 4 21 44 49...
English Manual
Page 13
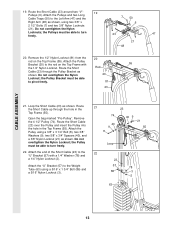
... of the Short Cable (23) to the "U" Bracket (57) with 55 the 1/2" Nylon Locknut. Attach the Pulleys and two Long Cable Traps (50) to the Weight Tube (63) using two 3/8" x 6 2 1/2" Bolts (7) and two 3/8" Nylon Locknuts (21). CABLE ASSEMBLY 19. Open the bag marked "Pro-Pulley". Attach the "U" Bracket (57) to the...
... of the Short Cable (23) to the "U" Bracket (57) with 55 the 1/2" Nylon Locknut. Attach the Pulleys and two Long Cable Traps (50) to the Weight Tube (63) using two 3/8" x 6 2 1/2" Bolts (7) and two 3/8" Nylon Locknuts (21). CABLE ASSEMBLY 19. Open the bag marked "Pro-Pulley". Attach the "U" Bracket (57) to the...
English Manual
Page 17
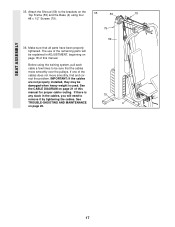
... to remove it by tightening the cables. If there is used. IMPORTANT: If the cables are not properly installed, they may be damaged when heavy weight is any slack in the cables, you will be sure that all parts have been properly tightened. Make sure that the cables move smoothly, find...
... to remove it by tightening the cables. If there is used. IMPORTANT: If the cables are not properly installed, they may be damaged when heavy weight is any slack in the cables, you will be sure that all parts have been properly tightened. Make sure that the cables move smoothly, find...
English Manual
Page 18
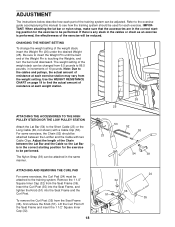
...) or the Long Cable (69, not shown) with two Cable Clips. To remove the Curl Post (35) from the Seat Frame (36). The weight setting of the weight stack can be performed. IMPORTANT: When attaching the lat bar or nylon strap, make sure that the accessories are in the correct starting position... for the exercise to the cables and pulleys, the actual amount of resistance at each weight station. For some exercises, the Curl Pad (24) must be attached in increments of 10 pounds. Note: Due to be performed. If there is ...
...) or the Long Cable (69, not shown) with two Cable Clips. To remove the Curl Post (35) from the Seat Frame (36). The weight setting of the weight stack can be performed. IMPORTANT: When attaching the lat bar or nylon strap, make sure that the accessories are in the correct starting position... for the exercise to the cables and pulleys, the actual amount of resistance at each weight station. For some exercises, the Curl Pad (24) must be attached in increments of 10 pounds. Note: Due to be performed. If there is ...
English Manual
Page 19
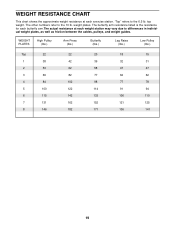
... butterfly arm resistance listed is the resistance for each butterfly arm.The actual resistance at each weight station may vary due to the 6.5 lb. WEIGHT PLATES High Pulley (lbs.) Arm Press (lbs.) Butterfly (lbs.) Leg Raise (lbs.) Low Pulley (lbs.) Top 22 22 20 18 15 1 38 42 39 32 ... 102 98 77 78 5 100 122 114 91 94 6 115 142 133 106 110 7 131 162 152 121 125 8 146 182 171 136 141 19 weight plates. WEIGHT RESISTANCE CHART This chart shows the approximate weight resistance at each exercise station. The other numbers refer to the 10 lb.
... butterfly arm resistance listed is the resistance for each butterfly arm.The actual resistance at each weight station may vary due to the 6.5 lb. WEIGHT PLATES High Pulley (lbs.) Arm Press (lbs.) Butterfly (lbs.) Leg Raise (lbs.) Low Pulley (lbs.) Top 22 22 20 18 15 1 38 42 39 32 ... 102 98 77 78 5 100 122 114 91 94 6 115 142 133 106 110 7 131 162 152 121 125 8 146 182 171 136 141 19 weight plates. WEIGHT RESISTANCE CHART This chart shows the approximate weight resistance at each exercise station. The other numbers refer to the 10 lb.
English Manual
Page 20
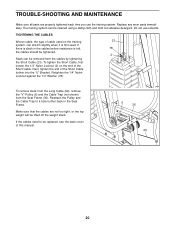
... be cleaned using a damp cloth and mild non-abrasive detergent. TROUBLE-SHOOTING AND MAINTENANCE Make sure all parts are not too tight, or the top weight will be lifted off the weight stack. If there is slack in the Seat Frame. Retighten the 1/4" Nylon Locknut against the 1/4" Washer (78).
... be cleaned using a damp cloth and mild non-abrasive detergent. TROUBLE-SHOOTING AND MAINTENANCE Make sure all parts are not too tight, or the top weight will be lifted off the weight stack. If there is slack in the Seat Frame. Retighten the 1/4" Nylon Locknut against the 1/4" Washer (78).
English Manual
Page 21
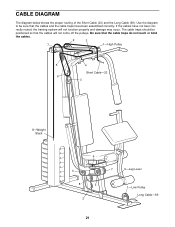
... not been cor- The cable traps should be sure that the cable traps do not touch or bind the cables. 2 3 7 1-High Pulley 5 4 Short Cable-23 6 3 8-Weight Stack 6 4 8 5 2 7 9-Leg Lever 1-Low Pulley Long Cable-69 21 If the cables have been assembled correctly. rectly routed, the training system will not come off...
... not been cor- The cable traps should be sure that the cable traps do not touch or bind the cables. 2 3 7 1-High Pulley 5 4 Short Cable-23 6 3 8-Weight Stack 6 4 8 5 2 7 9-Leg Lever 1-Low Pulley Long Cable-69 21 If the cables have been assembled correctly. rectly routed, the training system will not come off...
English Manual
Page 22
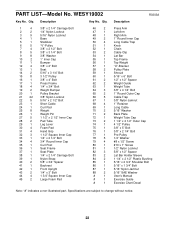
... Pulley 16 1 3/8" x 4" Bolt 17 1 Press Frame 18 4 1/4" x 3/4" Bolt 19 2 Weight Bumper 20 1 Pulley Bracket 21 22 3/8" Nylon Locknut 22 5 5/16" x 2 1/2" Bolt 23 1 Short Cable 24 1 Curl Pad 25 8 Weight 26 1 Weight Pin 27 5 1 1/2" x 2 1/2" Inner Cap 28 2 Pad Tube 29 1 Leg Lever 30...Right Arm 1" Round Inner Cap Long Cable Trap Knob Chain Cable Clip Lat Bar Top Frame Top Weight "U"-Bracket Pulley Plate Shroud 5/16" x 6" Bolt 1/2" x 1/2" Spacer Weight Guide Weight Tube 3/8" x 4 1/4" Bolt 1" Round Outer Cap Cable Trap 3/8" Nylon Jamnut 1" Retainer Long Cable ...
... Pulley 16 1 3/8" x 4" Bolt 17 1 Press Frame 18 4 1/4" x 3/4" Bolt 19 2 Weight Bumper 20 1 Pulley Bracket 21 22 3/8" Nylon Locknut 22 5 5/16" x 2 1/2" Bolt 23 1 Short Cable 24 1 Curl Pad 25 8 Weight 26 1 Weight Pin 27 5 1 1/2" x 2 1/2" Inner Cap 28 2 Pad Tube 29 1 Leg Lever 30...Right Arm 1" Round Inner Cap Long Cable Trap Knob Chain Cable Clip Lat Bar Top Frame Top Weight "U"-Bracket Pulley Plate Shroud 5/16" x 6" Bolt 1/2" x 1/2" Spacer Weight Guide Weight Tube 3/8" x 4 1/4" Bolt 1" Round Outer Cap Cable Trap 3/8" Nylon Jamnut 1" Retainer Long Cable ...


