

XVT3D650SV User Manual
Page 2
... enabling other features will increase power consumption that could exceed the limits necessary to qualify for ENERGY STAR in the "factory default" setting and this is the setting in which power savings will be achieved. This product qualifies for ENERGY STAR rating. Dolby and the double-D symbol are trademarks of Dolby Laboratories...
... enabling other features will increase power consumption that could exceed the limits necessary to qualify for ENERGY STAR in the "factory default" setting and this is the setting in which power savings will be achieved. This product qualifies for ENERGY STAR rating. Dolby and the double-D symbol are trademarks of Dolby Laboratories...
XVT3D650SV User Manual
Page 6
... long periods of the TV during a lightning storm or when it could fall into such power lines or circuits. Analog-only television sets that the antenna or cable system is electrically grounded to receive low power, Class A or translator television stations and with cable and.... Lightning Protection For added protection of time, unplug the TV from the wall outlet and disconnect the antenna or cable system. XVT3D650SV Television Antenna Connection Protection If an outside antenna/satellite dish or cable system is to be connected to digital television broadcasting was complete...
... long periods of the TV during a lightning storm or when it could fall into such power lines or circuits. Analog-only television sets that the antenna or cable system is electrically grounded to receive low power, Class A or translator television stations and with cable and.... Lightning Protection For added protection of time, unplug the TV from the wall outlet and disconnect the antenna or cable system. XVT3D650SV Television Antenna Connection Protection If an outside antenna/satellite dish or cable system is to be connected to digital television broadcasting was complete...
XVT3D650SV User Manual
Page 7
......11 Component 11 RGB...11 RF/Antenna 11 Choosing the Correct Connection 11 BEST...11 BETTER 11 Connecting Your Devices 12 Setting Up Your Network Connection 13 Connecting to A Wired Network 13 Connecting to a Wireless Network 13 Adjusting the TV... the Color Temperature 17 Adjusting the Picture Size and Position 17 Resetting the Picture Settings 17 Adjusting the Audio Settings 18 Adjusting the Advanced Audio Settings 18 Resetting the Audio Settings 19 Adjusting the Tuner Settings 19 Setting the Tuner Mode 19 Scanning for Channels 19 Adding New Channels 19 Skipping Channels ...
......11 Component 11 RGB...11 RF/Antenna 11 Choosing the Correct Connection 11 BEST...11 BETTER 11 Connecting Your Devices 12 Setting Up Your Network Connection 13 Connecting to A Wired Network 13 Connecting to a Wireless Network 13 Adjusting the TV... the Color Temperature 17 Adjusting the Picture Size and Position 17 Resetting the Picture Settings 17 Adjusting the Audio Settings 18 Adjusting the Advanced Audio Settings 18 Resetting the Audio Settings 19 Adjusting the Tuner Settings 19 Setting the Tuner Mode 19 Scanning for Channels 19 Adding New Channels 19 Skipping Channels ...
XVT3D650SV User Manual
Page 8
... Using the Help Menu 30 Displaying System Information 30 Resetting the TV Settings 30 Restoring the TV to Factory Default Settings 30 Using Guided Setup 31 Using the Digital Episode Guide 32 Using the Info Window 32 Using VIZIO Internet Apps 33 Using the VIA Shortcut Buttons 33 Using the VIA ...Creating and Managing User Profiles 34 Creating an Owner PIN 34 Creating a New User Profile 35 Removing a User Profile 35 XVT3D650SV Restoring the VIA Dock to the Factory Default Settings 36 Viewing Theater 3D 37 How Theater 3D Works 37 What You Need to View 3D Content 37 Watching Blu-ray...
... Using the Help Menu 30 Displaying System Information 30 Resetting the TV Settings 30 Restoring the TV to Factory Default Settings 30 Using Guided Setup 31 Using the Digital Episode Guide 32 Using the Info Window 32 Using VIZIO Internet Apps 33 Using the VIA Shortcut Buttons 33 Using the VIA ...Creating and Managing User Profiles 34 Creating an Owner PIN 34 Creating a New User Profile 35 Removing a User Profile 35 XVT3D650SV Restoring the VIA Dock to the Factory Default Settings 36 Viewing Theater 3D 37 How Theater 3D Works 37 What You Need to View 3D Content 37 Watching Blu-ray...
XVT3D650SV User Manual
Page 13
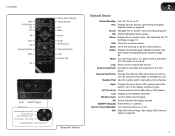
.... To increase or decrease the volume, turn the TV on other TVs. Remote Control Sensor VIZIO Light Front Panel Remote Control Sensor: Point the remote directly at the Remote Control Sensor to use...: • Press the Jag Wheel once to point it at this sensor when using it . VIZIO Light: When the TV is white. This will make the setup process much more enjoyable! See Activating... , the light is detected. 5 Functions including volume up/down have to turn the Jag Wheel. After you set up /down , power, input source, and channel up the remote to work in IR mode. Press the...
.... To increase or decrease the volume, turn the TV on other TVs. Remote Control Sensor VIZIO Light Front Panel Remote Control Sensor: Point the remote directly at the Remote Control Sensor to use...: • Press the Jag Wheel once to point it at this sensor when using it . VIZIO Light: When the TV is white. This will make the setup process much more enjoyable! See Activating... , the light is detected. 5 Functions including volume up/down have to turn the Jag Wheel. After you set up /down , power, input source, and channel up the remote to work in IR mode. Press the...
XVT3D650SV User Manual
Page 15
... button, the channel will display a different input. VIA Shortcuts: Control VIZIO Internet Apps. 3D: Switch between 3D display modes. See Using VIZIO Internet Apps on -screen menu. A/V Controls: Control external device (Blu..., the TV will increase or decrease by one. QUERTY Keypad: Enter letters or numbers. XVT3D650SV Input A/V Controls List Exit OK Back VIA Volume Up/Down Mute 3D Arrow QUERTY Keypad VIA...Display the Info Window. When mute is activated, the TV's audio is open) View Settings for Active VIA App Exit App/Exit VIA Dock Device Power/Standby Power/Standby Info Menu ...
... button, the channel will display a different input. VIA Shortcuts: Control VIZIO Internet Apps. 3D: Switch between 3D display modes. See Using VIZIO Internet Apps on -screen menu. A/V Controls: Control external device (Blu..., the TV will increase or decrease by one. QUERTY Keypad: Enter letters or numbers. XVT3D650SV Input A/V Controls List Exit OK Back VIA Volume Up/Down Mute 3D Arrow QUERTY Keypad VIA...Display the Info Window. When mute is activated, the TV's audio is open) View Settings for Active VIA App Exit App/Exit VIA Dock Device Power/Standby Power/Standby Info Menu ...
XVT3D650SV User Manual
Page 16
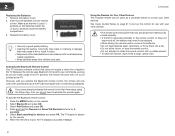
.... 6. Select Start searching for use with a clean, damp cloth. Press the MENU button on page 31 to activate the remote again. If you have to set up the remote for devices and press OK. Remove the battery cover. 2. 2 XVT3D650SV Replacing the Batteries 1.
.... 6. Select Start searching for use with a clean, damp cloth. Press the MENU button on page 31 to activate the remote again. If you have to set up the remote for devices and press OK. Remove the battery cover. 2. 2 XVT3D650SV Replacing the Batteries 1.
XVT3D650SV User Manual
Page 17
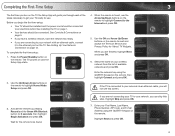
... not connecting your First Name, Last Name, Phone Number, ZIP Code, and E-mail Address using the QUERTY Keypad on and the Setup App starts. 2. See Setting Up Your Network Connection on the remote. Use the OK and Arrow Up/Down buttons on the remote to read and accept the Terms of...
... not connecting your First Name, Last Name, Phone Number, ZIP Code, and E-mail Address using the QUERTY Keypad on and the Setup App starts. 2. See Setting Up Your Network Connection on the remote. Use the OK and Arrow Up/Down buttons on the remote to read and accept the Terms of...
XVT3D650SV User Manual
Page 20
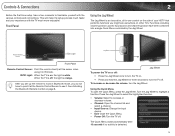
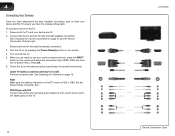
...and R ports next to Normal. Ensure both your device and the TV, ensure you have the corresponding cable. Check the list of the cable is set to 1920 x 1080. Turn the TV on by pressing the Power/Standby button on page 11 and the Device Connection Chart at right. See .... device on. 5. See Scanning for special instructions: Cable TV (without cable box/directly from the on-screen menu. Set the Screen Mode to the HDMI ports on the TV. 12 XVT3D650SV Device Connection Chart Press OK. 6. 4 Connecting Your Devices Once you have determined the best available connection type on both...
...and R ports next to Normal. Ensure both your device and the TV, ensure you have the corresponding cable. Check the list of the cable is set to 1920 x 1080. Turn the TV on by pressing the Power/Standby button on page 11 and the Device Connection Chart at right. See .... device on. 5. See Scanning for special instructions: Cable TV (without cable box/directly from the on-screen menu. Set the Screen Mode to the HDMI ports on the TV. 12 XVT3D650SV Device Connection Chart Press OK. 6. 4 Connecting Your Devices Once you have determined the best available connection type on both...
XVT3D650SV User Manual
Page 21
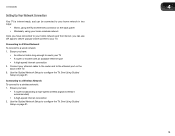
Connect your TV. XVT3D650SV 4 Setting Up Your Network Connection Your TV is internet-ready, and can be connected to your home network in two ways: • Wired, using the RJ45 (...
Connect your TV. XVT3D650SV 4 Setting Up Your Network Connection Your TV is internet-ready, and can be connected to your home network in two ways: • Wired, using the RJ45 (...
XVT3D650SV User Manual
Page 23
... and viewing conditions. Press the MENU button on the remote to highlight the input source you wish to display. The on the remote. The TV Settings menu is displayed. 4. Press the MENU button on -screen menu is displayed. 2. The Input Source Selection menu is displayed. 3. Press OK, then press EXIT. ...the Left/Right Arrow buttons to change the input source in the most cases. Use the Up/Down Arrow buttons on -screen menu language • Set the time Changing the Input Source External devices such as DVD players, Blu-Ray Players, and video game consoles can be adjusted to suit your...
... and viewing conditions. Press the MENU button on the remote to highlight the input source you wish to display. The on the remote. The TV Settings menu is displayed. 4. Press the MENU button on -screen menu is displayed. 2. The Input Source Selection menu is displayed. 3. Press OK, then press EXIT. ...the Left/Right Arrow buttons to change the input source in the most cases. Use the Up/Down Arrow buttons on -screen menu language • Set the time Changing the Input Source External devices such as DVD players, Blu-Ray Players, and video game consoles can be adjusted to suit your...
XVT3D650SV User Manual
Page 24
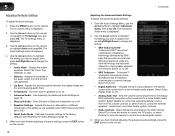
... is on, you have finished adjusting the Advanced Picture Settings, press the EXIT button on the remote to change the setting: • XVT3D650SV • Smooth Motion Effect - Adjusts the black level of the TV's backlight. This setting is too high, the picture may be unable to... Film Mode - Brightness - Color - Diminishes artifacts in the picture. Select Low, Middle, High, or Off. The Advanced Picture menu is set to sharpen non-HD (high definition) content; Reduces oversaturation of compensation used to OFF. Allows selection of the type of some colors and improves ...
... is on, you have finished adjusting the Advanced Picture Settings, press the EXIT button on the remote to change the setting: • XVT3D650SV • Smooth Motion Effect - Adjusts the black level of the TV's backlight. This setting is too high, the picture may be unable to... Film Mode - Brightness - Color - Diminishes artifacts in the picture. Select Low, Middle, High, or Off. The Advanced Picture menu is set to sharpen non-HD (high definition) content; Reduces oversaturation of compensation used to OFF. Allows selection of the type of some colors and improves ...
XVT3D650SV User Manual
Page 25
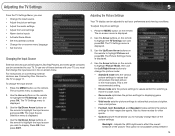
... on the remote to highlight Size & Position, then press OK. From the Picture Settings menu, use the Left/Right Arrow buttons to change the setting: • Auto Adjust - XVT3D650SV 5 Adjusting the Color Temperature Adjusting the color temperature will change each of the color temperature... settings: Red/Green/Blue Gain - Use the Arrow buttons on the remote to highlight ...
... on the remote to highlight Size & Position, then press OK. From the Picture Settings menu, use the Left/Right Arrow buttons to change the setting: • Auto Adjust - XVT3D650SV 5 Adjusting the Color Temperature Adjusting the color temperature will change each of the color temperature... settings: Red/Green/Blue Gain - Use the Arrow buttons on the remote to highlight ...
XVT3D650SV User Manual
Page 26
...audio system. From the Audio Settings Menu, use the Arrow buttons to highlight the TV Settings icon and press OK. 5 Adjusting the Audio Settings To adjust the audio settings: 1. XVT3D650SV Adjusting the Advanced Audio Settings To adjust the advanced audio settings: 1. Select Dolby Digital,...audio system. Adjusts the boost or attenuation of different frequencies. (This setting is only available when SRS TruSurround HD is a robust multichannel virtualization technology developed by the VIZIO remote. Adjusts the synchronization between the display image and the accompanying ...
...audio system. From the Audio Settings Menu, use the Arrow buttons to highlight the TV Settings icon and press OK. 5 Adjusting the Audio Settings To adjust the audio settings: 1. XVT3D650SV Adjusting the Advanced Audio Settings To adjust the advanced audio settings: 1. Select Dolby Digital,...audio system. Adjusts the boost or attenuation of different frequencies. (This setting is only available when SRS TruSurround HD is a robust multichannel virtualization technology developed by the VIZIO remote. Adjusts the synchronization between the display image and the accompanying ...
XVT3D650SV User Manual
Page 27
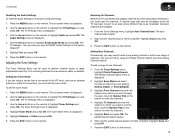
... and press OK. 3. Highlight From Channel and enter the channel from an antenna, cable, or satellite. XVT3D650SV 5 Resetting the Audio Settings To reset the audio settings to highlight the TV Settings icon and press OK. The Audio Settings menu is displayed. 3. A channel scan may need to perform channel scans or make adjustments when the TV...
... and press OK. 3. Highlight From Channel and enter the channel from an antenna, cable, or satellite. XVT3D650SV 5 Resetting the Audio Settings To reset the audio settings to highlight the TV Settings icon and press OK. The Audio Settings menu is displayed. 3. A channel scan may need to perform channel scans or make adjustments when the TV...
XVT3D650SV User Manual
Page 28
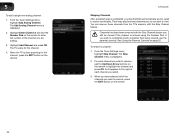
...The Skip Channel menu is displayed. 2. Highlight Enter Channel # and use the parental controls. If you wish to watch comfortably. From the Tuner Settings menu, highlight Skip Channel. An X appears to view. The TV scans for the channel, press the EXIT button on the remote to enter the...adding. 3. 5 To add a single new analog channel: 1. See Using the Parental Controls on the remote. 20 Highlight Add Channel and press OK. XVT3D650SV Skipping Channels After a channel scan is entered using the Number Pad. Channels that some channels you do not want to the right of each channel...
...The Skip Channel menu is displayed. 2. Highlight Enter Channel # and use the parental controls. If you wish to watch comfortably. From the Tuner Settings menu, highlight Skip Channel. An X appears to view. The TV scans for the channel, press the EXIT button on the remote to enter the...adding. 3. 5 To add a single new analog channel: 1. See Using the Parental Controls on the remote. 20 Highlight Add Channel and press OK. XVT3D650SV Skipping Channels After a channel scan is entered using the Number Pad. Channels that some channels you do not want to the right of each channel...
XVT3D650SV User Manual
Page 29
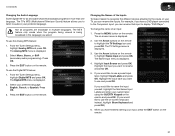
... Sound) feature allows you can rename that input to display "DVD Player". Press the EXIT button on the remote to highlight the TV Settings icon and press OK. Select your custom label using the QUERTY Keypad on the remote and press OK. (If you want to rename and... your input, press the EXIT button on -screen keyboard instead, highlight Show Keyboard and press OK.) 6. The Name Input menu is displayed. 2. XVT3D650SV 5 Changing the Audio Language Some digital free-to-air and cable channels broadcast programs in multiple languages. Not all programs are broadcast in more than...
... Sound) feature allows you can rename that input to display "DVD Player". Press the EXIT button on the remote to highlight the TV Settings icon and press OK. Select your custom label using the QUERTY Keypad on the remote and press OK. (If you want to rename and... your input, press the EXIT button on -screen keyboard instead, highlight Show Keyboard and press OK.) 6. The Name Input menu is displayed. 2. XVT3D650SV 5 Changing the Audio Language Some digital free-to-air and cable channels broadcast programs in multiple languages. Not all programs are broadcast in more than...
XVT3D650SV User Manual
Page 30
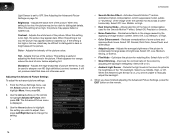
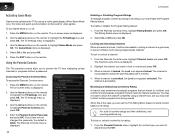
...be inaccessible. Blocking and Unblocking Content by its rating: 1. To turn Game Mode on the remote to highlight Game Mode and press OK. The TV Settings menu is displayed. 4. To lock or unlock a channel: 1. For a list of content ratings and their definitions, visit www.tvguidelines.org. Use ... prevent the TV from being viewed. Using the Parental Controls The TV's parental controls allow you can use as a video game display. 5 XVT3D650SV Activating Game Mode Game mode optimizes the TV for use the TV's Rating Block feature to block content based on its rating. Press the MENU...
...be inaccessible. Blocking and Unblocking Content by its rating: 1. To turn Game Mode on the remote to highlight Game Mode and press OK. The TV Settings menu is displayed. 4. To lock or unlock a channel: 1. For a list of content ratings and their definitions, visit www.tvguidelines.org. Use ... prevent the TV from being viewed. Using the Parental Controls The TV's parental controls allow you can use as a video game display. 5 XVT3D650SV Activating Game Mode Game mode optimizes the TV for use the TV's Rating Block feature to block content based on its rating. Press the MENU...
XVT3D650SV User Manual
Page 31
... 5. Resetting the Content Locks To reset the content locks to highlight Menu Language and press OK. The Menu Language menu is displayed. 2. XVT3D650SV 5 USA - USA movie broadcasts. USA television program broadcasts. Content with this rating cannot be viewed. 5. Highlight your new 4-digit parental ...press OK. TV - Movie - Changing the Parental Control Passcode If you should change the on the remote to the factory-default settings: 1. Use the Arrow buttons on the remote. From the Parental Controls menu, highlight RESET LOCKS and press OK. For each rating...
... 5. Resetting the Content Locks To reset the content locks to highlight Menu Language and press OK. The Menu Language menu is displayed. 2. XVT3D650SV 5 USA - USA movie broadcasts. USA television program broadcasts. Content with this rating cannot be viewed. 5. Highlight your new 4-digit parental ...press OK. TV - Movie - Changing the Parental Control Passcode If you should change the on the remote to the factory-default settings: 1. Use the Arrow buttons on the remote. From the Parental Controls menu, highlight RESET LOCKS and press OK. For each rating...

XVT3D650SV User Manual
Page 32
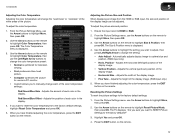
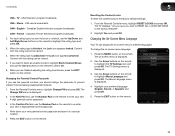
...is displayed. 3. Highlight Off or On and press OK. 8. Press the EXIT button on the remote. Highlight Time Zone and press OK. 5 Setting the Time Zone To ensure the correct time is displayed. 4. Highlight your time zone and press OK. 6. Use the Arrow buttons on -screen ... displayed. 7. The Time & Local Settings menu is displayed when you press the INFO button, set the TV's time zone: 1. Highlight Daylight Savings and press OK. Press the MENU button on the remote. 24 XVT3D650SV The on the remote to highlight Time & Local Settings and press OK. The Daylight Savings menu...
...is displayed. 3. Highlight Off or On and press OK. 8. Press the EXIT button on the remote. Highlight Time Zone and press OK. 5 Setting the Time Zone To ensure the correct time is displayed. 4. Highlight your time zone and press OK. 6. Use the Arrow buttons on -screen ... displayed. 7. The Time & Local Settings menu is displayed when you press the INFO button, set the TV's time zone: 1. Highlight Daylight Savings and press OK. Press the MENU button on the remote. 24 XVT3D650SV The on the remote to highlight Time & Local Settings and press OK. The Daylight Savings menu...


