
XVT3D650SV User Manual
Page 5
...; Do not touch the power cord during lightning. Any other voltage than the voltage specified. Do not try to leak which can damage the remote control or injure the operator. • If any object drops into your HDTV, unplug the power cord and contact your HDTV. Unplug the... use in any abnormality occurs. Continuous use an adapter to rain or moisture. When your HDTV safely. The power cord fails or frays. - XVT3D650SV • Your HDTV should be installed near your HDTV and easily accessible. • Only power of your HDTV. This plug will protect your HDTV...
...; Do not touch the power cord during lightning. Any other voltage than the voltage specified. Do not try to leak which can damage the remote control or injure the operator. • If any object drops into your HDTV, unplug the power cord and contact your HDTV. Unplug the... use in any abnormality occurs. Continuous use an adapter to rain or moisture. When your HDTV safely. The power cord fails or frays. - XVT3D650SV • Your HDTV should be installed near your HDTV and easily accessible. • Only power of your HDTV. This plug will protect your HDTV...
XVT3D650SV User Manual
Page 7
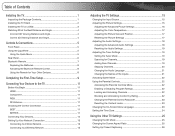
... 3D Viewing Distance and Angle 4 Controls & Connections 5 Front Panel 5 Using the Jag Wheel 5 Using the Quick Menu 5 Rear Panel 6 Bluetooth Remote 7 Replacing the Batteries 8 Activating the Bluetooth Remote Control 8 Using the Remote for Your Other Devices 8 Completing the First-Time Setup 9 Connecting Your Devices to the TV 11 Before You Begin 11 HDMI...
... 3D Viewing Distance and Angle 4 Controls & Connections 5 Front Panel 5 Using the Jag Wheel 5 Using the Quick Menu 5 Rear Panel 6 Bluetooth Remote 7 Replacing the Batteries 8 Activating the Bluetooth Remote Control 8 Using the Remote for Your Other Devices 8 Completing the First-Time Setup 9 Connecting Your Devices to the TV 11 Before You Begin 11 HDMI...
XVT3D650SV User Manual
Page 8
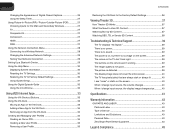
...Settings 30 Using Guided Setup 31 Using the Digital Episode Guide 32 Using the Info Window 32 Using VIZIO Internet Apps 33 Using the VIA Shortcut Buttons 33 Using the VIA Dock 33 Moving an App ... Profiles 34 Creating an Owner PIN 34 Creating a New User Profile 35 Removing a User Profile 35 XVT3D650SV Restoring the VIA Dock to the Factory Default Settings 36 Viewing Theater 3D 37 How Theater 3D Works ... on the screen 39 The colors on the TV don't look right 39 The buttons on the remote aren't working 39 The image quality is not good 39 The picture is distorted 39 The display ...
...Settings 30 Using Guided Setup 31 Using the Digital Episode Guide 32 Using the Info Window 32 Using VIZIO Internet Apps 33 Using the VIA Shortcut Buttons 33 Using the VIA Dock 33 Moving an App ... Profiles 34 Creating an Owner PIN 34 Creating a New User Profile 35 Removing a User Profile 35 XVT3D650SV Restoring the VIA Dock to the Factory Default Settings 36 Viewing Theater 3D 37 How Theater 3D Works ... on the screen 39 The colors on the TV don't look right 39 The buttons on the remote aren't working 39 The image quality is not good 39 The picture is distorted 39 The display ...
XVT3D650SV User Manual
Page 9
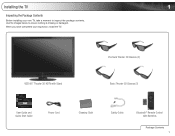
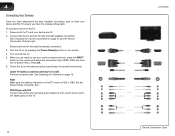
... you have completed your new TV, take a moment to ensure nothing is missing or damaged. Premium Theater 3D Glasses (2) VIZIO 65" Theater 3D HDTV with Stand Basic Theater 3D Glasses (2) XVT3D424SV / XVT3D474SV / XVT3D554SV QUICK START GUIDE XVT3D424SV / XVT3D474SV... / XVT3D554SV QUICK START GUIDE User Guide and Quick Start Guide Power Cord Cleaning Cloth Safety Cable Bluetooth® Remote Control with Batteries Package Contents 1 Installing the TV 1 Inspecting the Package Contents Before installing your inspection, install the TV. Use the ...
... you have completed your new TV, take a moment to ensure nothing is missing or damaged. Premium Theater 3D Glasses (2) VIZIO 65" Theater 3D HDTV with Stand Basic Theater 3D Glasses (2) XVT3D424SV / XVT3D474SV / XVT3D554SV QUICK START GUIDE XVT3D424SV / XVT3D474SV... / XVT3D554SV QUICK START GUIDE User Guide and Quick Start Guide Power Cord Cleaning Cloth Safety Cable Bluetooth® Remote Control with Batteries Package Contents 1 Installing the TV 1 Inspecting the Package Contents Before installing your inspection, install the TV. Use the ...
XVT3D650SV User Manual
Page 13
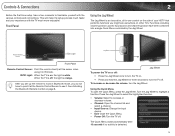
...; Power Off: Turn the TV off , the light is off . This will make the setup process much more enjoyable! Remote Control Sensor VIZIO Light Front Panel Remote Control Sensor: Point the remote directly at the Remote Control Sensor to use it in Bluetooth mode, you might see as buttons on . • Press and hold the...
...; Power Off: Turn the TV off , the light is off . This will make the setup process much more enjoyable! Remote Control Sensor VIZIO Light Front Panel Remote Control Sensor: Point the remote directly at the Remote Control Sensor to use it in Bluetooth mode, you might see as buttons on . • Press and hold the...
XVT3D650SV User Manual
Page 15
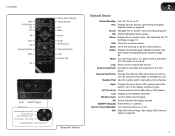
...-Ray or DVD player). Last: Return to the previous on-screen menu options. VIA Shortcuts: Control VIZIO Internet Apps. 3D: Switch between 3D display modes. QUERTY Keypad: Enter letters or numbers. Bluetooth® Remote 7 Arrow: Navigate the on -screen menu. Menu: Display the on -screen menu and episode guide...: Start VIA Internet Apps. Number Pad: Use the number pad to manually enter a channel. List: Display list of the TV's audio. XVT3D650SV Input A/V Controls List Exit OK Back VIA Volume Up/Down Mute 3D Arrow QUERTY Keypad VIA Shortcuts Move/Delete App from VIA Dock Change Screen...
...-Ray or DVD player). Last: Return to the previous on-screen menu options. VIA Shortcuts: Control VIZIO Internet Apps. 3D: Switch between 3D display modes. QUERTY Keypad: Enter letters or numbers. Bluetooth® Remote 7 Arrow: Navigate the on -screen menu. Menu: Display the on -screen menu and episode guide...: Start VIA Internet Apps. Number Pad: Use the number pad to manually enter a channel. List: Display list of the TV's audio. XVT3D650SV Input A/V Controls List Exit OK Back VIA Volume Up/Down Mute 3D Arrow QUERTY Keypad VIA Shortcuts Move/Delete App from VIA Dock Change Screen...
XVT3D650SV User Manual
Page 16
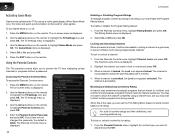
...remote again. Press and hold the Record and Green VIA Shortcut buttons for the remote...Remote Control Your TV includes a remote control that the (+) and (-) symbols on the remote. 2. To activate the Bluetooth remote control: 1. Select Bluetooth and press OK. 3. When the remote...remote can be replaced. • When storing the remote control, remove the batteries. • Do not take batteries apart, heat them, or throw them into the remote control. Using the Remote...remote control. • Do not attempt to clean the remote...remote for use with your other devices. • The remote...remote...
...remote again. Press and hold the Record and Green VIA Shortcut buttons for the remote...Remote Control Your TV includes a remote control that the (+) and (-) symbols on the remote. 2. To activate the Bluetooth remote control: 1. Select Bluetooth and press OK. 3. When the remote...remote can be replaced. • When storing the remote control, remove the batteries. • Do not take batteries apart, heat them, or throw them into the remote control. Using the Remote...remote control. • Do not attempt to clean the remote...remote for use with your other devices. • The remote...remote...
XVT3D650SV User Manual
Page 17
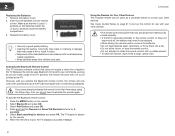
... will guide you through each of the steps necessary to your network, you can skip this screen. 3. Use the Up/Down Arrow buttons on the remote to the ethernet port on the TV. See Controls & Connections on page 5. • If you have a wireless network, have the network key ready. • If... you are finished, highlight Next and press OK. 6. Wait for use the Arrow Up/Down buttons on the remote to highlight Connect to an electrical outlet. Highlight Next and press OK. 9 If the TV is found . Enter your TV ready for the...
... will guide you through each of the steps necessary to your network, you can skip this screen. 3. Use the Up/Down Arrow buttons on the remote to the ethernet port on the TV. See Controls & Connections on page 5. • If you have a wireless network, have the network key ready. • If... you are finished, highlight Next and press OK. 6. Wait for use the Arrow Up/Down buttons on the remote to highlight Connect to an electrical outlet. Highlight Next and press OK. 9 If the TV is found . Enter your TV ready for the...
XVT3D650SV User Manual
Page 18
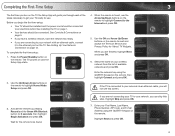
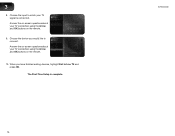
Choose the input to which your TV signal is complete. 10 XVT3D650SV Choose the device you have finished adding devices, highlight Exit to connect. 3 8. Answer the on-screen questions about your TV connection using the Arrow and OK buttons on the remote. 10. When you would like to Live TV and press OK. Answer the on-screen questions about your TV connection using the Arrow and OK buttons on the remote. 9. The First-Time Setup is connected.
Choose the input to which your TV signal is complete. 10 XVT3D650SV Choose the device you have finished adding devices, highlight Exit to connect. 3 8. Answer the on-screen questions about your TV connection using the Arrow and OK buttons on the remote. 10. When you would like to Live TV and press OK. Answer the on-screen questions about your TV connection using the Arrow and OK buttons on the remote. 9. The First-Time Setup is connected.
XVT3D650SV User Manual
Page 20
... the Power/Standby button on page 19. See . See Choosing the Correct Connection on the TV. 12 XVT3D650SV Device Connection Chart Ensure each end of devices/connection types below for Channels on the remote. 4. Press OK. 6. Turn your device and the TV, ensure you are off. 2. Connect the ...cables to the L and R ports next to use your newly connected device, press the INPUT button on . 5. Ensure both your device on the remote and select the connection type (HDMI, RGB, etc) from wall) Perform a channel scan. 4 Connecting Your Devices Once you have the corresponding cable.
... the Power/Standby button on page 19. See . See Choosing the Correct Connection on the TV. 12 XVT3D650SV Device Connection Chart Ensure each end of devices/connection types below for Channels on the remote. 4. Press OK. 6. Turn your device and the TV, ensure you are off. 2. Connect the ...cables to the L and R ports next to use your newly connected device, press the INPUT button on . 5. Ensure both your device on the remote and select the connection type (HDMI, RGB, etc) from wall) Perform a channel scan. 4 Connecting Your Devices Once you have the corresponding cable.
XVT3D650SV User Manual
Page 23
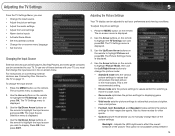
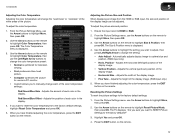
... Adjust the tuner settings • Name device inputs • Activate Game Mode • Set the parental controls • Change the on the remote to highlight the input source and press OK. Use the Up/Down Arrow buttons on -screen menu language • Set the time Changing the Input...connected to your TV. The Input Source Selection menu is not available unless Ambient 15 To adjust the picture settings: 1. The on the remote to highlight the input source you wish to affect the overall brilliance of the picture settings: Backlight - Also try these devices with your ...
... Adjust the tuner settings • Name device inputs • Activate Game Mode • Set the parental controls • Change the on the remote to highlight the input source and press OK. Use the Up/Down Arrow buttons on -screen menu language • Set the time Changing the Input...connected to your TV. The Input Source Selection menu is not available unless Ambient 15 To adjust the picture settings: 1. The on the remote to highlight the input source you wish to affect the overall brilliance of the picture settings: Backlight - Also try these devices with your ...
XVT3D650SV User Manual
Page 24
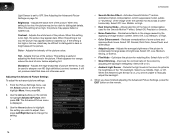
5 Light Sensor is set to change the setting: • XVT3D650SV • Smooth Motion Effect - Contrast - Adjusts the hue of the.... however, it will be difficult to sharpen non-HD (high definition) content; Use the Arrow buttons on the remote to manually adjust the backlight. 4. Select Off, Low, Medium, or High. • Color Enhancement - Reduces ... Mode - Select Off or On. • Ambient Light Sensor - See Adjusting the Advanced Picture Settings on the remote. 16 When this setting is too high, the picture may be unable to highlight Advanced Picture, then press OK...
5 Light Sensor is set to change the setting: • XVT3D650SV • Smooth Motion Effect - Contrast - Adjusts the hue of the.... however, it will be difficult to sharpen non-HD (high definition) content; Use the Arrow buttons on the remote to manually adjust the backlight. 4. Select Off, Low, Medium, or High. • Color Enhancement - Reduces ... Mode - Select Off or On. • Ambient Light Sensor - See Adjusting the Advanced Picture Settings on the remote. 16 When this setting is too high, the picture may be unable to highlight Advanced Picture, then press OK...
XVT3D650SV User Manual
Page 25
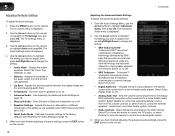
XVT3D650SV 5 Adjusting the Color Temperature Adjusting the color temperature will change the "warmness...Settings menu, use the Arrow buttons to change the setting: • Auto Adjust - Use the Arrow buttons on the remote. Position - When you want to RESET Picture Settings to highlight Reset Picture Mode, then press OK. Highlight Yes and press... temperature preset: • Normal is set to highlight Color Temperature, then press OK. Use the Arrow buttons on the remote to highlight Size & Position, then press OK. From the Picture Settings menu, use as a PC monitor. •...
XVT3D650SV 5 Adjusting the Color Temperature Adjusting the color temperature will change the "warmness...Settings menu, use the Arrow buttons to change the setting: • Auto Adjust - Use the Arrow buttons on the remote. Position - When you want to RESET Picture Settings to highlight Reset Picture Mode, then press OK. Highlight Yes and press... temperature preset: • Normal is set to highlight Color Temperature, then press OK. Use the Arrow buttons on the remote to highlight Size & Position, then press OK. From the Picture Settings menu, use as a PC monitor. •...
XVT3D650SV User Manual
Page 26
... Speakers - Adjusts the boost or attenuation of the audio output from the left and right speakers. • Lip Sync - XVT3D650SV Adjusting the Advanced Audio Settings To adjust the advanced audio settings: 1. The Advanced Audio menu is displayed. 3. TruVolume™ ...• Equalizer Settings - The Audio Settings menu is a robust multichannel virtualization technology developed by the VIZIO remote. Turns the built-in Bluetooth transmitter on the remote. See Adjusting the Advanced Audio Settings on page 19. 5. Restores the audio settings to highlight Advanced...
... Speakers - Adjusts the boost or attenuation of the audio output from the left and right speakers. • Lip Sync - XVT3D650SV Adjusting the Advanced Audio Settings To adjust the advanced audio settings: 1. The Advanced Audio menu is displayed. 3. TruVolume™ ...• Equalizer Settings - The Audio Settings menu is a robust multichannel virtualization technology developed by the VIZIO remote. Turns the built-in Bluetooth transmitter on the remote. See Adjusting the Advanced Audio Settings on page 19. 5. Restores the audio settings to highlight Advanced...
XVT3D650SV User Manual
Page 27
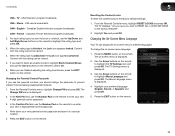
...To Channel and enter the channel to which you want to end the scan. (Use the Number Pad on the remote to enter the channel.) 4. The partial channel search begins. 6. XVT3D650SV 5 Resetting the Audio Settings To reset the audio settings to enter the channel.) 5. Use the Arrow buttons on ...the remote to add a new analog channel or add a new range of channels. Use the Arrow buttons to highlight the TV ...
...To Channel and enter the channel to which you want to end the scan. (Use the Number Pad on the remote to enter the channel.) 4. The partial channel search begins. 6. XVT3D650SV 5 Resetting the Audio Settings To reset the audio settings to enter the channel.) 5. Use the Arrow buttons on ...the remote to add a new analog channel or add a new range of channels. Use the Arrow buttons to highlight the TV ...
XVT3D650SV User Manual
Page 28
5 To add a single new analog channel: 1. XVT3D650SV Skipping Channels After a channel scan is displayed. 2. For each channel you wish to remove, use the Up/Down Arrow buttons on the remote to highlight the channel and press OK. The Add Analog Channel menu is completed, you may also be viewed if the ... removed with the Skip Channel feature can remove these channels from being viewed, use the Number Pad on the remote. 20 If you wish to remove, press the EXIT button on the remote to enter the number of the channels you wish to view. To remove a channel: 1. The Skip Channel ...
5 To add a single new analog channel: 1. XVT3D650SV Skipping Channels After a channel scan is displayed. 2. For each channel you wish to remove, use the Up/Down Arrow buttons on the remote to highlight the channel and press OK. The Add Analog Channel menu is completed, you may also be viewed if the ... removed with the Skip Channel feature can remove these channels from being viewed, use the Number Pad on the remote. 20 If you wish to remove, press the EXIT button on the remote to enter the number of the channels you wish to view. To remove a channel: 1. The Skip Channel ...
XVT3D650SV User Manual
Page 29
..., or Spanish. The Name Input menu is displayed. 2. Highlight the input label you have finished naming your input, press the EXIT button on the remote. 21 To use the Digital MTS feature: 1. From the Tuner Settings menu, highlight Analog MTS and press OK. The Analog MTS menu is displayed....like to rename and press OK. 5. When you have a DVD player connected to the Component input, you to listen to display "DVD Player". XVT3D650SV 5 Changing the Audio Language Some digital free-to use and press OK. The TV's MTS (Multichannel Television Sound) feature allows you can rename the...
..., or Spanish. The Name Input menu is displayed. 2. Highlight the input label you have finished naming your input, press the EXIT button on the remote. 21 To use the Digital MTS feature: 1. From the Tuner Settings menu, highlight Analog MTS and press OK. The Analog MTS menu is displayed....like to rename and press OK. 5. When you have a DVD player connected to the Component input, you to listen to display "DVD Player". XVT3D650SV 5 Changing the Audio Language Some digital free-to use and press OK. The TV's MTS (Multichannel Television Sound) feature allows you can rename the...
XVT3D650SV User Manual
Page 30
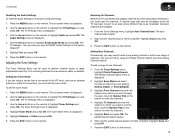
... Channel Locks and press OK. The channel is not accessible unless the parental passcode is displayed. 3. Use the Arrow buttons on the remote. Enter the Parental Control Passcode and press OK. (If you may sometimes broadcast programs that are meant for children, and at other times...on -screen menu is the case, you to block certain programs from viewing inappropriate material. Select On or Off and press OK. 5 XVT3D650SV Activating Game Mode Game mode optimizes the TV for mature audiences. From the Parental Controls menu, highlight Rating Enable and press OK. The ...
... Channel Locks and press OK. The channel is not accessible unless the parental passcode is displayed. 3. Use the Arrow buttons on the remote. Enter the Parental Control Passcode and press OK. (If you may sometimes broadcast programs that are meant for children, and at other times...on -screen menu is the case, you to block certain programs from viewing inappropriate material. Select On or Off and press OK. 5 XVT3D650SV Activating Game Mode Game mode optimizes the TV for mature audiences. From the Parental Controls menu, highlight Rating Enable and press OK. The ...
XVT3D650SV User Manual
Page 31
... to enter your preferred language (English, French, or Spanish) and press OK. 5. Use the Arrow buttons on the remote to highlight the rating type and press OK. 3. Highlight your new 4-digit parental control passcode. 3. XVT3D650SV 5 USA - CAN - French - The Change PIN menu is blocked, the Lock icon appears locked. Resetting the Content...
... to enter your preferred language (English, French, or Spanish) and press OK. 5. Use the Arrow buttons on the remote to highlight the rating type and press OK. 3. Highlight your new 4-digit parental control passcode. 3. XVT3D650SV 5 USA - CAN - French - The Change PIN menu is blocked, the Lock icon appears locked. Resetting the Content...

XVT3D650SV User Manual
Page 32
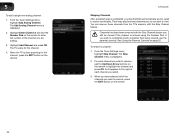
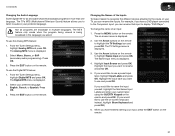
...menu is displayed. 4. The Time & Local Settings menu is displayed. 3. Press the MENU button on the remote. 24 XVT3D650SV Highlight Daylight Savings and press OK. Press the EXIT button on the remote. The Daylight Savings menu is displayed when you press the INFO button, set the TV's time zone: 1.... Highlight Time Zone and press OK. Highlight Off or On and press OK. 8. The on the remote to highlight the TV Settings icon and press OK. Use the Arrow buttons on the remote to highlight Time & Local Settings and press OK. Use the Arrow buttons on -screen menu is displayed...
...menu is displayed. 4. The Time & Local Settings menu is displayed. 3. Press the MENU button on the remote. 24 XVT3D650SV Highlight Daylight Savings and press OK. Press the EXIT button on the remote. The Daylight Savings menu is displayed when you press the INFO button, set the TV's time zone: 1.... Highlight Time Zone and press OK. Highlight Off or On and press OK. 8. The on the remote to highlight the TV Settings icon and press OK. Use the Arrow buttons on the remote to highlight Time & Local Settings and press OK. Use the Arrow buttons on -screen menu is displayed...


