

XVT3D424SV User Manual
Page 6
... the power cord and contact your HDTV is dropped and the housing is dropped or damaged in any of the marked voltage can damage the remote control or injure the operator. • If any way. - Pulling on the power cord may expose you to high voltages, electric shock, and other hazards...
... the power cord and contact your HDTV is dropped and the housing is dropped or damaged in any of the marked voltage can damage the remote control or injure the operator. • If any way. - Pulling on the power cord may expose you to high voltages, electric shock, and other hazards...

XVT3D424SV User Manual
Page 9
... Stand...1 Installing the TV on a Wall...3 Chapter 2: Controls and Connections 4 Using the Jag Wheel Control...6 Using the Quick Menu...6 Remote Control Buttons...8 Replacing the Batteries...9 Activating the Bluetooth Remote Control 9 Using the Remote for Your Other Devices 10 Chapter 3: Completing the First-Time Setup 11 Chapter 4: Connecting Your Devices to the TV 14...
... Stand...1 Installing the TV on a Wall...3 Chapter 2: Controls and Connections 4 Using the Jag Wheel Control...6 Using the Quick Menu...6 Remote Control Buttons...8 Replacing the Batteries...9 Activating the Bluetooth Remote Control 9 Using the Remote for Your Other Devices 10 Chapter 3: Completing the First-Time Setup 11 Chapter 4: Connecting Your Devices to the TV 14...
XVT3D424SV User Manual
Page 11
... Default Settings 47 Chapter 7: Viewing 3D Content 48 What You Need to View 3D Content 48 How VIZIO 3D Works...49 Watching Full HD 3D Content...50 Watching SBS, TB, or Sensio 3D Content 50 ...no sound 51 The screen is black...52 The colors do not display correctly 52 When I cannot access VIZIO Internet Apps, or my Apps are not working correctly 53 The TV displays, "No RGB Signal. Power ...be turned off 53 The Jag Wheel is displayed as two separate images 53 I press buttons on the remote, nothing happens 52 The picture quality seems low...52 The display has dots (pixels) that do not ...
... Default Settings 47 Chapter 7: Viewing 3D Content 48 What You Need to View 3D Content 48 How VIZIO 3D Works...49 Watching Full HD 3D Content...50 Watching SBS, TB, or Sensio 3D Content 50 ...no sound 51 The screen is black...52 The colors do not display correctly 52 When I cannot access VIZIO Internet Apps, or my Apps are not working correctly 53 The TV displays, "No RGB Signal. Power ...be turned off 53 The Jag Wheel is displayed as two separate images 53 I press buttons on the remote, nothing happens 52 The picture quality seems low...52 The display has dots (pixels) that do not ...

XVT3D424SV User Manual
Page 12
... carton designed to be useful if your device needs to protect it from damage. Bluetooth® Remote Control (with batteries) VIZIO 3D HDTV with Stand Cleaning Cloth Power Cord XVT3D424SV / XVT3D474SV / XVT3D554SV QUICK START GUIDE XVT3D424SV / XVT3D474SV / XVT3D554SV QUICK START GUIDE Quick Start Guide and User Guide Safety Cable Package Contents Save the carton...
... carton designed to be useful if your device needs to protect it from damage. Bluetooth® Remote Control (with batteries) VIZIO 3D HDTV with Stand Cleaning Cloth Power Cord XVT3D424SV / XVT3D474SV / XVT3D554SV QUICK START GUIDE XVT3D424SV / XVT3D474SV / XVT3D554SV QUICK START GUIDE Quick Start Guide and User Guide Safety Cable Package Contents Save the carton...
XVT3D424SV User Manual
Page 16
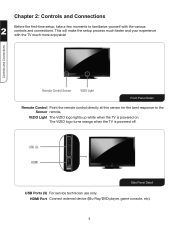
...Chapter 2: Controls and Connections Before the first-time setup, take a few moments to the Sensor remote. VIZIO Light The VIZIO logo lights up white when the TV is powered off. The VIZIO logo turns orange when the TV is powered on. HDMI Port Connect external device (Blu-Ray/DVD...4 USB (3) HDMI Side Panel Detail USB Ports (3) For service technician use only. Controls and Connections Remote Control Sensor VIZIO Light Front Panel Detail Remote Control Point the remote control directly at this sensor for the best response to familiarize yourself with the TV much more enjoyable!...
...Chapter 2: Controls and Connections Before the first-time setup, take a few moments to the Sensor remote. VIZIO Light The VIZIO logo lights up white when the TV is powered off. The VIZIO logo turns orange when the TV is powered on. HDMI Port Connect external device (Blu-Ray/DVD...4 USB (3) HDMI Side Panel Detail USB Ports (3) For service technician use only. Controls and Connections Remote Control Sensor VIZIO Light Front Panel Detail Remote Control Point the remote control directly at this sensor for the best response to familiarize yourself with the TV much more enjoyable!...

XVT3D424SV User Manual
Page 19
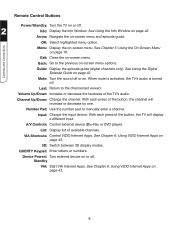
Device Power/Standby Input A/V Controls Power/Standby 2 List Info Exit Menu Controls and Connections OK Arrow Back VIA Volume Up/Down Mute Guide VIA Shortcuts Channel Up/Down Last Number Pad 3D Arrow QUERTY Keypad VIA Shortcuts Move/Delete App from VIA Dock Change Screen Size (when VIA Sidebar is open) View Settings for Active VIA App Exit App/Exit VIA Dock Bluetooth® Remote Control Buttons (See opposite page for button descriptions.) 7
Device Power/Standby Input A/V Controls Power/Standby 2 List Info Exit Menu Controls and Connections OK Arrow Back VIA Volume Up/Down Mute Guide VIA Shortcuts Channel Up/Down Last Number Pad 3D Arrow QUERTY Keypad VIA Shortcuts Move/Delete App from VIA Dock Change Screen Size (when VIA Sidebar is open) View Settings for Active VIA App Exit App/Exit VIA Dock Bluetooth® Remote Control Buttons (See opposite page for button descriptions.) 7
XVT3D424SV User Manual
Page 20
... page 42. Last: Return to manually enter a channel. A/V Controls: Control external device (Blu-Ray or DVD player). See Chapter 6: Using VIZIO Internet Apps on -screen menu. OK: Select highlighted menu option. Exit: Close the on page 43. 3D: Switch between 3D display modes. ... Volume Up/Down: Increase or decrease the loudness of available channels. VIA Shortcuts: Control VIZIO Internet Apps. Device Power/: Turn external device on or off. 2 Info: Display the Info Window. Remote Control Buttons Power/Standby: Turn the TV on or off. Input: Change the input ...
... page 42. Last: Return to manually enter a channel. A/V Controls: Control external device (Blu-Ray or DVD player). See Chapter 6: Using VIZIO Internet Apps on -screen menu. OK: Select highlighted menu option. Exit: Close the on page 43. 3D: Switch between 3D display modes. ... Volume Up/Down: Increase or decrease the loudness of available channels. VIA Shortcuts: Control VIZIO Internet Apps. Device Power/: Turn external device on or off. 2 Info: Display the Info Window. Remote Control Buttons Power/Standby: Turn the TV on or off. Input: Change the input ...

XVT3D424SV User Manual
Page 21
... setup using the Setup App, then you are within range of sight to activate the remote again. Because the remote uses Bluetooth to search for the remote. 6. However, until you activate the Bluetooth remote control, the remote will work when pointed directly at the TV. Select Start searching for five seconds. 5.... Make sure that does not require a direct line of the TV (30 feet), the remote will only work even if it is found, the TV displays a success message. 9 If you have to the TV. Insert two AA batteries into...
... setup using the Setup App, then you are within range of sight to activate the remote again. Because the remote uses Bluetooth to search for the remote. 6. However, until you activate the Bluetooth remote control, the remote will work when pointed directly at the TV. Select Start searching for five seconds. 5.... Make sure that does not require a direct line of the TV (30 feet), the remote will only work even if it is found, the TV displays a success message. 9 If you have to the TV. Insert two AA batteries into...
XVT3D424SV User Manual
Page 22
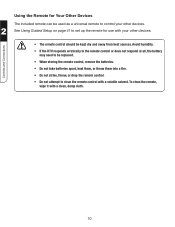
... devices. 2 See Using Guided Setup on page 41 to clean the remote control with a clean, damp cloth. 10 Using the Remote for use with your other devices. Avoid humidity. • If the DTV responds erratically to the remote control or does not respond at all, the battery may need to ...be replaced. • When storing the remote control, remove the batteries. • Do not take batteries apart, heat them, or throw them into...
... devices. 2 See Using Guided Setup on page 41 to clean the remote control with a clean, damp cloth. 10 Using the Remote for use with your other devices. Avoid humidity. • If the DTV responds erratically to the remote control or does not respond at all, the battery may need to ...be replaced. • When storing the remote control, remove the batteries. • Do not take batteries apart, heat them, or throw them into...

XVT3D424SV User Manual
Page 23
...the first-time setup: • Your TV should be connected. Activate the remote by pressing Record and the Green VIA Shortcut button for the remote to the Internet and press OK. 11 The TV powers on the remote. When the remote is found . 3. Before you are connecting to your TV ready for ...use the Arrow Up/Down buttons on page 1. • Your devices should be found , use . See Chapter 1: Installing the TV on the remote to highlight Connect to be installed. Press the Power/Standby button on and the Setup App starts. Wait for 5 seconds, then highlight Begin Activation and...
...the first-time setup: • Your TV should be connected. Activate the remote by pressing Record and the Green VIA Shortcut button for the remote to the Internet and press OK. 11 The TV powers on the remote. When the remote is found . 3. Before you are connecting to your TV ready for ...use the Arrow Up/Down buttons on page 1. • Your devices should be found , use . See Chapter 1: Installing the TV on the remote to highlight Connect to be installed. Press the Power/Standby button on and the Setup App starts. Wait for 5 seconds, then highlight Begin Activation and...

XVT3D424SV User Manual
Page 24
... from the list of Service and Privacy Policy for Yahoo! Highlight Next and press OK. 7. Enter the network key using the QUERTY Keypad on the remote. First-Time Setup 6. Enter your TV signal is connected to which your First Name, Last Name, Phone Number, ZIP Code, and E-mail Address using... the QUERTY Keypad on the remote. 12 Choose the input to your TV connection using the Arrows and OK button on the remote, then highlight Connect and press OK. Use the OK and Arrow Up/Down buttons on -screen questions...
... from the list of Service and Privacy Policy for Yahoo! Highlight Next and press OK. 7. Enter the network key using the QUERTY Keypad on the remote. First-Time Setup 6. Enter your TV signal is connected to which your First Name, Last Name, Phone Number, ZIP Code, and E-mail Address using... the QUERTY Keypad on the remote. 12 Choose the input to your TV connection using the Arrows and OK button on the remote, then highlight Connect and press OK. Use the OK and Arrow Up/Down buttons on -screen questions...

XVT3D424SV User Manual
Page 25
When you would like to Live TV and press OK. 3 13 First-Time Setup 8. Answer the on-screen questions about your TV connection using the Arrows and OK button on the remote. 9. Choose the device you have finished adding devices, highlight Exit to connect.
When you would like to Live TV and press OK. 3 13 First-Time Setup 8. Answer the on-screen questions about your TV connection using the Arrows and OK button on the remote. 9. Choose the device you have finished adding devices, highlight Exit to connect.
XVT3D424SV User Manual
Page 28
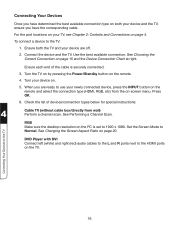
... Device Connection Chart at right. See Choosing the Correct Connection on page 20. When you are off. 2. RGB Make sure the desktop resolution on the remote and select the connection type (HDMI, RGB, etc) from wall) Perform a channel scan. Set the Screen Mode to the TV 16 To connect a device to... use your device on the remote. 4. DVD Player with DVI Connect left (white) and right (red) audio cables to the L and R ports next to 1920 x 1080. For the port locations on...
... Device Connection Chart at right. See Choosing the Correct Connection on page 20. When you are off. 2. RGB Make sure the desktop resolution on the remote and select the connection type (HDMI, RGB, etc) from wall) Perform a channel scan. Set the Screen Mode to the TV 16 To connect a device to... use your device on the remote. 4. DVD Player with DVI Connect left (white) and right (red) audio cables to the L and R ports next to 1920 x 1080. For the port locations on...

XVT3D424SV User Manual
Page 31
... on -screen menu by pressing the VIA button and selecting HDTV Settings from the VIA Dock, then pressing OK. The menu closes. The on the remote. If viewing 3D content, highlight 3D and press OK. 4. Select the 3D mode to match the 3D format of the content. To open the on... the remote. From this menu, you can: • Change the 3D mode • Change the screen aspect radio • Set up closed captioning • Activate the sleep...
... on -screen menu by pressing the VIA button and selecting HDTV Settings from the VIA Dock, then pressing OK. The menu closes. The on the remote. If viewing 3D content, highlight 3D and press OK. 4. Select the 3D mode to match the 3D format of the content. To open the on... the remote. From this menu, you can: • Change the 3D mode • Change the screen aspect radio • Set up closed captioning • Activate the sleep...
XVT3D424SV User Manual
Page 32
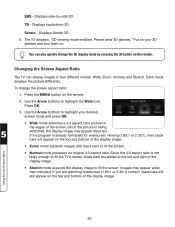
... side-by pressing the 3D button on . Displays top/bottom 3D. Use the Arrow buttons to highlight your 3D glasses and turn them on the remote. Put on your desired screen mode and press OK: • Wide mode stretches a 4:3 aspect ratio picture to fill the screen. You can display images in... the On-Screen Menu 20 If the program is already formatted for widescreen viewing (1.85:1 or 2.35:1), then black bars will still appear on the remote. 2. SBS - Displays Sensio 3D. 5.
... side-by pressing the 3D button on . Displays top/bottom 3D. Use the Arrow buttons to highlight your 3D glasses and turn them on the remote. Put on your desired screen mode and press OK: • Wide mode stretches a 4:3 aspect ratio picture to fill the screen. You can display images in... the On-Screen Menu 20 If the program is already formatted for widescreen viewing (1.85:1 or 2.35:1), then black bars will still appear on the remote. 2. SBS - Displays Sensio 3D. 5.
XVT3D424SV User Manual
Page 33
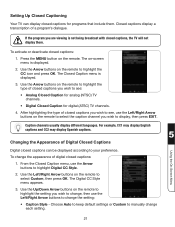
...not being broadcast with closed captions, the TV will not display them . Caption channels usually display different languages. Press the MENU button on the remote to change the setting: • Caption Style - The Digital CC Style menu appears. 3. If the program you are viewing is displayed. 2.... Use the Left/Right Arrow buttons on the remote to select the caption channel you wish to display, then press EXIT. Choose Auto to keep default settings or Custom to manually change the ...
...not being broadcast with closed captions, the TV will not display them . Caption channels usually display different languages. Press the MENU button on the remote to change the setting: • Caption Style - The Digital CC Style menu appears. 3. If the program you are viewing is displayed. 2.... Use the Left/Right Arrow buttons on the remote to select the caption channel you wish to display, then press EXIT. Choose Auto to keep default settings or Custom to manually change the ...

XVT3D424SV User Manual
Page 34
... 4. To use the sleep timer: 1. The Sleep Timer menu is 5 displayed. 4. Use the Up/Down Arrow buttons on the remote to highlight Timer and press OK. The on the remote. Using the On-Screen Menu 22 When you want the TV to highlight the Sleep Timer icon and press OK. Using...appearance of the closed captions, press the EXIT button on -screen menu is displayed. 2. Press the MENU button on the remote to turn the TV off . Use the Arrow buttons on the remote. The Timers menu is displayed. 3. Change the color of the text. • BG Color - Adjust the size ...
... 4. To use the sleep timer: 1. The Sleep Timer menu is 5 displayed. 4. Use the Up/Down Arrow buttons on the remote to highlight Timer and press OK. The on the remote. Using the On-Screen Menu 22 When you want the TV to highlight the Sleep Timer icon and press OK. Using...appearance of the closed captions, press the EXIT button on -screen menu is displayed. 2. Press the MENU button on the remote to turn the TV off . Use the Arrow buttons on the remote. The Timers menu is displayed. 3. Change the color of the text. • BG Color - Adjust the size ...
XVT3D424SV User Manual
Page 35
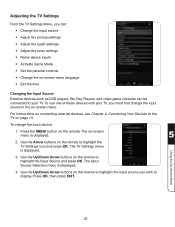
...the input device: 1. Press OK, then press EXIT. For instructions on connecting external devices, see Chapter 4: Connecting Your Devices to the TV on the remote to highlight the TV Settings icon and press OK. The TV Settings menu is displayed. 4. The Input Source Selection menu is displayed. 3. Use the...• Adjust the tuner settings • Name device inputs • Activate Game Mode • Set the parental controls • Change the on the remote to highlight the Input Source and press OK. To change the input source in the on-screen menu. Adjusting the TV Settings From the TV...
...the input device: 1. Press OK, then press EXIT. For instructions on connecting external devices, see Chapter 4: Connecting Your Devices to the TV on the remote to highlight the TV Settings icon and press OK. The TV Settings menu is displayed. 4. The Input Source Selection menu is displayed. 3. Use the...• Adjust the tuner settings • Name device inputs • Activate Game Mode • Set the parental controls • Change the on the remote to highlight the Input Source and press OK. To change the input source in the on-screen menu. Adjusting the TV Settings From the TV...

XVT3D424SV User Manual
Page 36
... Your TV display can be difficult to distinguish in the most cases. Press the MENU button on the remote to highlight the TV Settings icon and press OK. Use the Arrow buttons on the remote. The Picture Settings menu is useful in adjusting the flesh tones in the picture. Also try these... on page 25. If the setting is too low, the picture may be adjusted to OFF. Tint - See Adjusting the Advanced Picture Settings on the remote to values that will produce the best picture in dark or bright areas of the picture settings: Backlight - Adjusts the hue of color before adjusting...
... Your TV display can be difficult to distinguish in the most cases. Press the MENU button on the remote to highlight the TV Settings icon and press OK. Use the Arrow buttons on the remote. The Picture Settings menu is useful in adjusting the flesh tones in the picture. Also try these... on page 25. If the setting is too low, the picture may be adjusted to OFF. Tint - See Adjusting the Advanced Picture Settings on the remote to values that will produce the best picture in dark or bright areas of the picture settings: Backlight - Adjusts the hue of color before adjusting...

XVT3D424SV User Manual
Page 37
... film. however, it will be used for the Smooth Motion™ effect. Use the Arrow buttons on the remote to sharpen non-HD (high definition) content; The Advanced Picture menu is on the remote. 25 Use the Arrow buttons to highlight the setting you have finished adjusting the Advanced Picture Settings, press...
... film. however, it will be used for the Smooth Motion™ effect. Use the Arrow buttons on the remote to sharpen non-HD (high definition) content; The Advanced Picture menu is on the remote. 25 Use the Arrow buttons to highlight the setting you have finished adjusting the Advanced Picture Settings, press...


