
VW22LHDTV10T User Manual
Page 1
.... Write down the serial number located on your set, please read these instructions before making any adjustments, and retain them for future reference. HDMI logo and "High Definition Multimedia Interface" are trademarks of Dolby Laboratories. For maximum benefit of your new VIZIO VW22L High Definition LCD Television purchase. mail us to protect your registration...
.... Write down the serial number located on your set, please read these instructions before making any adjustments, and retain them for future reference. HDMI logo and "High Definition Multimedia Interface" are trademarks of Dolby Laboratories. For maximum benefit of your new VIZIO VW22L High Definition LCD Television purchase. mail us to protect your registration...
VW22LHDTV10T User Manual
Page 6
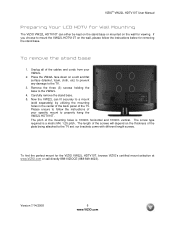
... base. 5. our brackets come with different length screws. Unplug all of the cables and cords from your specific mount to the TV set; Now the VW22L can either be kept on the stand base or mounted on the thickness of the plate being attached to properly hang the... depend on the wall for viewing. To find the perfect mount for the VIZIO VW22L HDTV10T, browse VIZIO's certified mount selection at www.VIZIO.com or call directly 888-VIZIOCE (888-849-4623). VIZIO® VW22L HDTV10T User Manual Preparing Your LCD HDTV for Wall Mounting The VIZIO VW22L HDTV10T can fit securely to the...
... base. 5. our brackets come with different length screws. Unplug all of the cables and cords from your specific mount to the TV set; Now the VW22L can either be kept on the stand base or mounted on the thickness of the plate being attached to properly hang the... depend on the wall for viewing. To find the perfect mount for the VIZIO VW22L HDTV10T, browse VIZIO's certified mount selection at www.VIZIO.com or call directly 888-VIZIOCE (888-849-4623). VIZIO® VW22L HDTV10T User Manual Preparing Your LCD HDTV for Wall Mounting The VIZIO VW22L HDTV10T can fit securely to the...
VW22LHDTV10T User Manual
Page 7
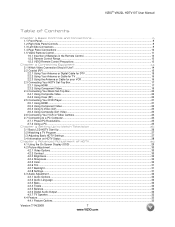
... HDMI ...21 2.5.2 Using Component Video...22 2.5.3 Using S-Video (AV)...23 2.5.4 Using Composite (AV) Video ...23 2.6 Connecting Your VCR or Video Camera ...24 2.7 Connecting to a PC Computer...24 2.7.1 Preset PC Resolutions...25 2.7.2 Using a PC ...25 Chapter 3 Setting Up to Watch Television 26 3.1 Basic LCD HDTV Start Up ...26 3.2 Watching a TV Program ...27 3.3 Adjusting Basic HDTV...
... HDMI ...21 2.5.2 Using Component Video...22 2.5.3 Using S-Video (AV)...23 2.5.4 Using Composite (AV) Video ...23 2.6 Connecting Your VCR or Video Camera ...24 2.7 Connecting to a PC Computer...24 2.7.1 Preset PC Resolutions...25 2.7.2 Using a PC ...25 Chapter 3 Setting Up to Watch Television 26 3.1 Basic LCD HDTV Start Up ...26 3.2 Watching a TV Program ...27 3.3 Adjusting Basic HDTV...
VW22LHDTV10T User Manual
Page 9
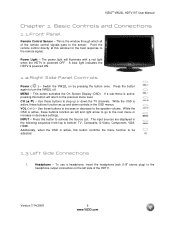
...signals pass to bottom: TV, Composite, S-Video, Component, VGA, HDMI. INPUT - The input sources are displayed in the OSD menus. Version 7/14/2008 9 www.VIZIO.com MENU - Use these... pressing the button once. Press the button again to the remote signal. VOL ( +/- ) - VIZIO® VW22L HDTV10T User Manual Chapter 1 Basic Controls and Connections 1.1 Front Panel Remote Control Sensor - Power Light...to the next menu or increase or decrease settings. While the OSD is active, pressing this window for the best response to turn the VW22L off. Headphone - Point the remote control...
...signals pass to bottom: TV, Composite, S-Video, Component, VGA, HDMI. INPUT - The input sources are displayed in the OSD menus. Version 7/14/2008 9 www.VIZIO.com MENU - Use these... pressing the button once. Press the button again to the remote signal. VOL ( +/- ) - VIZIO® VW22L HDTV10T User Manual Chapter 1 Basic Controls and Connections 1.1 Front Panel Remote Control Sensor - Power Light...to the next menu or increase or decrease settings. While the OSD is active, pressing this window for the best response to turn the VW22L off. Headphone - Point the remote control...

VW22LHDTV10T User Manual
Page 10
...red for Pr, blue for Pb, green for Y, red for right audio (R) and white for digital video such as a DVD multimedia player or set top box here. Connect the primary source for viewing, the digital audio will take priority over the Video RCA connector (yellow connector). 4. HDMI ... if connected, will be available on the rear of the TV indicates this SPDIF connection to an antenna or digital cable (out-of-the-wall, not from www.VIZIO.com or by calling 888-VIZIOCE (888-849-4623). 2. DTV - 1.4 Rear Panel Connections VIZIO® VW22L HDTV10T User Manual 1 2 3 6 5 4 1. Connect...
...red for Pr, blue for Pb, green for Y, red for right audio (R) and white for digital video such as a DVD multimedia player or set top box here. Connect the primary source for viewing, the digital audio will take priority over the Video RCA connector (yellow connector). 4. HDMI ... if connected, will be available on the rear of the TV indicates this SPDIF connection to an antenna or digital cable (out-of-the-wall, not from www.VIZIO.com or by calling 888-VIZIOCE (888-849-4623). 2. DTV - 1.4 Rear Panel Connections VIZIO® VW22L HDTV10T User Manual 1 2 3 6 5 4 1. Connect...

VW22LHDTV10T User Manual
Page 14
...two signals, one containing the black-and-white information and the other containing the color information. TV Coaxial RF. This video input has separate red, green and blue color components. Component (Video3)-... the connection for PC input. HDMI provides an interface between any audio/video source, such as a set-top box, DVD player, or A/V receiver and an audio and/or video monitor, such as a...first and only industry-supported, uncompressed, all-digital audio/video interface. The VIZIO VW22L has six different ways to connect your video equipment from a basic connection to the Quick Start...
...two signals, one containing the black-and-white information and the other containing the color information. TV Coaxial RF. This video input has separate red, green and blue color components. Component (Video3)-... the connection for PC input. HDMI provides an interface between any audio/video source, such as a set-top box, DVD player, or A/V receiver and an audio and/or video monitor, such as a...first and only industry-supported, uncompressed, all-digital audio/video interface. The VIZIO VW22L has six different ways to connect your video equipment from a basic connection to the Quick Start...
VW22LHDTV10T User Manual
Page 17
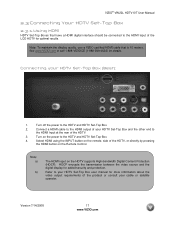
... the LCD HDTV for added security and protection. See www.VIZIO.com or call 1-888-VIZIOCE (1-888-849-4623) for more information about the video output requirements of the product or consult your HDTV Set-Top Box (Best): 1. VIZIO® VW22L HDTV10T User Manual 2.3 Connecting Your HDTV Set-Top ...Box 2.3.1 Using HDMI HDTV Set-Top Boxes that is 10 meters. Note: To maintain the display quality, use a VIZIO certified HDMI cable that have a HDMI ...
... the LCD HDTV for added security and protection. See www.VIZIO.com or call 1-888-VIZIOCE (1-888-849-4623) for more information about the video output requirements of the product or consult your HDTV Set-Top Box (Best): 1. VIZIO® VW22L HDTV10T User Manual 2.3 Connecting Your HDTV Set-Top ...Box 2.3.1 Using HDMI HDTV Set-Top Boxes that is 10 meters. Note: To maintain the display quality, use a VIZIO certified HDMI cable that have a HDMI ...
VW22LHDTV10T User Manual
Page 18
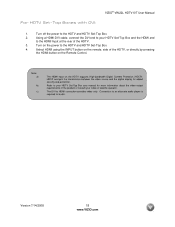
...Version 7/14/2008 18 www.VIZIO.com The DVI to the HDTV and HDTV Set-Top Box. 2. Select HDMI using the INPUT button on the remote, side of the product or consult your HDTV Set-Top Box and the HDMI ... display for audio. Turn off the power to HDMI connection provides video only. Refer to your HDTV Set-Top Box user manual for more information about the video output requirements of the HDTV, or directly by...required for added security and protection. Connection to the HDTV and HDTV Set-Top Box. 4. For HDTV Set-Top Boxes with DVI: VIZIO® VW22L HDTV10T User Manual 1.
...Version 7/14/2008 18 www.VIZIO.com The DVI to the HDTV and HDTV Set-Top Box. 2. Select HDMI using the INPUT button on the remote, side of the product or consult your HDTV Set-Top Box and the HDMI ... display for audio. Turn off the power to HDMI connection provides video only. Refer to your HDTV Set-Top Box user manual for more information about the video output requirements of the HDTV, or directly by...required for added security and protection. Connection to the HDTV and HDTV Set-Top Box. 4. For HDTV Set-Top Boxes with DVI: VIZIO® VW22L HDTV10T User Manual 1.
VW22LHDTV10T User Manual
Page 19
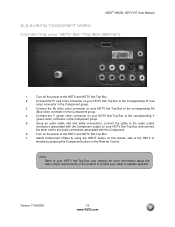
VIZIO® VW22L HDTV10T User Manual 2.3.2 Using Component Video Connecting your HDTV Set-Top Box to the corresponding Pr (red color) connector in the...remote, side of the product or consult your cable or satellite operator. Note: Refer to your HDTV Set-Top Box user manual for more information about the video output requirements of the HDTV or directly by ... and HDTV Set-Top Box. 7. Connect the Y (green color) connector on the power to the audio connectors associated with the Component output on your HDTV Set-Top Box (Better): 1. Version 7/14/2008 19 www.VIZIO.com Using ...
VIZIO® VW22L HDTV10T User Manual 2.3.2 Using Component Video Connecting your HDTV Set-Top Box to the corresponding Pr (red color) connector in the...remote, side of the product or consult your cable or satellite operator. Note: Refer to your HDTV Set-Top Box user manual for more information about the video output requirements of the HDTV or directly by ... and HDTV Set-Top Box. 7. Connect the Y (green color) connector on the power to the audio connectors associated with the Component output on your HDTV Set-Top Box (Better): 1. Version 7/14/2008 19 www.VIZIO.com Using ...
VW22LHDTV10T User Manual
Page 20
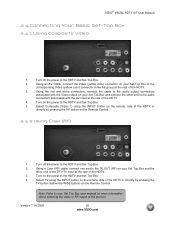
VIZIO® VW22L HDTV10T User Manual 2.4 Connecting Your Basic Set-Top Box 2.4.1 Using Composite Video 1. Turn off the power to the HDTV and Set-Top Box. 4. Using an AV Cable, connect the Video (yellow color) connector on your Set-Top Box to the audio connectors associated with the Video output on the power to ... Box and connect the other end to your Set Top Box and the other end to the corresponding Video (yellow color) connector in the AV group at the rear of the product. Version 7/14/2008 20 www.VIZIO.com Select TV using the INPUT button on the remote, side of the ...
VIZIO® VW22L HDTV10T User Manual 2.4 Connecting Your Basic Set-Top Box 2.4.1 Using Composite Video 1. Turn off the power to the HDTV and Set-Top Box. 4. Using an AV Cable, connect the Video (yellow color) connector on your Set-Top Box to the audio connectors associated with the Video output on the power to ... Box and connect the other end to your Set Top Box and the other end to the corresponding Video (yellow color) connector in the AV group at the rear of the product. Version 7/14/2008 20 www.VIZIO.com Select TV using the INPUT button on the remote, side of the ...
VW22LHDTV10T User Manual
Page 24
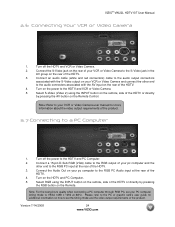
...and VCR or Video Camera. 2. Connect the Audio Out on your VCR or Video Camera user manual for additional information on how to set your VCR or Video Camera to the PC or graphic card's user guide for more information about the video output requirements of the HDTV.... Remote Control. Select S-Video (Video 2) using the INPUT button on the rear of the product. 2.7 Connecting to the HDTV and PC Computer. 2. VIZIO® VW22L HDTV10T User Manual 2.6 Connecting Your VCR or Video Camera 1. Turn off the power to a PC Computer 1. Turn on the HDTV and PC Computer. ...
...and VCR or Video Camera. 2. Connect the Audio Out on your VCR or Video Camera user manual for additional information on how to set your VCR or Video Camera to the PC or graphic card's user guide for more information about the video output requirements of the HDTV.... Remote Control. Select S-Video (Video 2) using the INPUT button on the rear of the product. 2.7 Connecting to the HDTV and PC Computer. 2. VIZIO® VW22L HDTV10T User Manual 2.6 Connecting Your VCR or Video Camera 1. Turn off the power to a PC Computer 1. Turn on the HDTV and PC Computer. ...
VW22LHDTV10T User Manual
Page 25
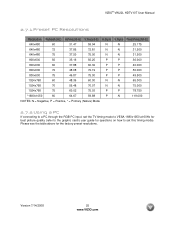
... Please see the table above for questions on how to set this timing mode). VIZIO® VW22L HDTV10T User Manual 2.7.1 Preset PC Resolutions Resolution Refresh (Hz) H.Freq (kHz) V.Freq (Hz) H.Sync V.Sync Pixel Freq (MHz) 640x480 60 31.47 59.94 N N 25.... *1680x1050 60 64.67 59.88 P N 119.000 NOTES: N = Negative, P = Positive, * = Primary (Native) Mode 2.7.2 Using a PC If connecting to a PC through the RGB PC input, set the TV timing mode to VESA 1680x1050 at 60Hz for best picture quality (refer to the graphic card's user guide for the factory preset resolutions.
... Please see the table above for questions on how to set this timing mode). VIZIO® VW22L HDTV10T User Manual 2.7.1 Preset PC Resolutions Resolution Refresh (Hz) H.Freq (kHz) V.Freq (Hz) H.Sync V.Sync Pixel Freq (MHz) 640x480 60 31.47 59.94 N N 25.... *1680x1050 60 64.67 59.88 P N 119.000 NOTES: N = Negative, P = Positive, * = Primary (Native) Mode 2.7.2 Using a PC If connecting to a PC through the RGB PC input, set the TV timing mode to VESA 1680x1050 at 60Hz for best picture quality (refer to the graphic card's user guide for the factory preset resolutions.
VW22LHDTV10T User Manual
Page 26
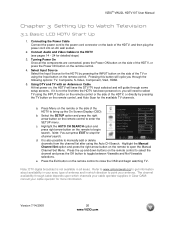
.... a. d. Highlight the Manual Channel Set option and press the right arrow button on , you will cycle you through the following options: TV, Composite, S-Video, Component, VGA, HDMI. 5. If it is also possible to Watch Television 3.1 Basic LCD HDTV Start Up 1. Connecting the Power Cable Connect the...Display (OSD). VIZIO® VW22L HDTV10T User Manual Chapter 3 Setting Up to manually add or delete channels from the channel list after using the Auto CH Search. Select Input Source Select the Input Source for more information. Pressing this button will need to select TV using the ...
.... a. d. Highlight the Manual Channel Set option and press the right arrow button on , you will cycle you through the following options: TV, Composite, S-Video, Component, VGA, HDMI. 5. If it is also possible to Watch Television 3.1 Basic LCD HDTV Start Up 1. Connecting the Power Cable Connect the...Display (OSD). VIZIO® VW22L HDTV10T User Manual Chapter 3 Setting Up to manually add or delete channels from the channel list after using the Auto CH Search. Select Input Source Select the Input Source for more information. Pressing this button will need to select TV using the ...
VW22LHDTV10T User Manual
Page 27
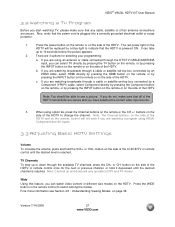
... up or down will only operate in different size modes on the side of the LCD HDTV or remote control until the desired channel is plugged into a correctly grounded electrical... a blue light to 10 seconds before the picture appears. 2. VIZIO® VW22L HDTV10T User Manual 3.2 Watching a TV Program Before you start watching TV, please make sure that all of the HDTV connections are watching ...on the side of the HDTV. Note: Channel up and down through a cable or satellite set -top box connected by a Component (YPbPr) cable, select Component directly by pressing the Component...
... up or down will only operate in different size modes on the side of the LCD HDTV or remote control until the desired channel is plugged into a correctly grounded electrical... a blue light to 10 seconds before the picture appears. 2. VIZIO® VW22L HDTV10T User Manual 3.2 Watching a TV Program Before you start watching TV, please make sure that all of the HDTV connections are watching ...on the side of the HDTV. Note: Channel up and down through a cable or satellite set -top box connected by a Component (YPbPr) cable, select Component directly by pressing the Component...

VW22LHDTV10T User Manual
Page 29
Repeat steps 2 through 5 to select one of the items to exit the OSD completely. VIZIO® VW22L HDTV10T User Manual Chapter 4 Advanced Adjustment of HDTV 4.1 Using the On Screen Display (OSD) The remote control or the control buttons on the remote control ... HDTV to adjust additional options within this menu. 6. Once the menu option is turned off. The TV will be shown on the side of the TV can control all the function settings. Version 7/14/2008 29 www.VIZIO.com button on the remote control or the side of the submenu options may vary depending...
Repeat steps 2 through 5 to select one of the items to exit the OSD completely. VIZIO® VW22L HDTV10T User Manual Chapter 4 Advanced Adjustment of HDTV 4.1 Using the On Screen Display (OSD) The remote control or the control buttons on the remote control ... HDTV to adjust additional options within this menu. 6. Once the menu option is turned off. The TV will be shown on the side of the TV can control all the function settings. Version 7/14/2008 29 www.VIZIO.com button on the remote control or the side of the submenu options may vary depending...

VW22LHDTV10T User Manual
Page 31
... as the case of this affects the overall brilliance of the picture. Press the Right arrow button on the remote control to restore all video settings to start adjusting the Tint and the menu page will disappear and be replaced by a small Backlight Indicator Bar so you can see the color... the Video submenu. Press the Right and Left arrow buttons to factory default. If people's faces look at flesh tones and adjust for a realistic appearance. VIZIO® VW22L HDTV10T User Manual 4.2.6 Tint Select the Tint option in the Video submenu. The Tint adjusts the hue of the picture...
... as the case of this affects the overall brilliance of the picture. Press the Right arrow button on the remote control to restore all video settings to start adjusting the Tint and the menu page will disappear and be replaced by a small Backlight Indicator Bar so you can see the color... the Video submenu. Press the Right and Left arrow buttons to factory default. If people's faces look at flesh tones and adjust for a realistic appearance. VIZIO® VW22L HDTV10T User Manual 4.2.6 Tint Select the Tint option in the Video submenu. The Tint adjusts the hue of the picture...

VW22LHDTV10T User Manual
Page 32
...in the Audio submenu. Press the right arrow button to adjust the Audio Language, Bass, Treble, Balance, Digital Audio Output and TV Speaker settings. 4.3.2 Audio Language Select the Audio Language option in the Audio submenu. Press the Right and Left arrow buttons to start adjusting...you can see the treble level between the zero and maximum available levels. 4.3.4 Treble Select the Treble option in the Audio submenu. VIZIO® VW22L HDTV10T User Manual 4.3 Audio Adjustment 4.3.1 Audio Options Press the MENU button to select an alternate language if more than one language ...
...in the Audio submenu. Press the right arrow button to adjust the Audio Language, Bass, Treble, Balance, Digital Audio Output and TV Speaker settings. 4.3.2 Audio Language Select the Audio Language option in the Audio submenu. Press the Right and Left arrow buttons to start adjusting...you can see the treble level between the zero and maximum available levels. 4.3.4 Treble Select the Treble option in the Audio submenu. VIZIO® VW22L HDTV10T User Manual 4.3 Audio Adjustment 4.3.1 Audio Options Press the MENU button to select an alternate language if more than one language ...

VW22LHDTV10T User Manual
Page 33
... available when HDMI, Component, or VGA is selected as the input source. The Noise Reduction may be set to OFF, Low, Mid or High. The Dynamic Contrast may be set to ON or OFF. VIZIO® VW22L HDTV10T User Manual 4.4 Feature 4.4.1 Feature Options Press the MENU button to adjust the Time, Sleep Timer, Advanced...
... available when HDMI, Component, or VGA is selected as the input source. The Noise Reduction may be set to OFF, Low, Mid or High. The Dynamic Contrast may be set to ON or OFF. VIZIO® VW22L HDTV10T User Manual 4.4 Feature 4.4.1 Feature Options Press the MENU button to adjust the Time, Sleep Timer, Advanced...

VW22LHDTV10T User Manual
Page 34
... Digital Captions feature is selected as the input source. Press the right arrow button to open the Digital Closed Caption Menu. VIZIO® VW22L HDTV10T User Manual 4.4.6 Parental Control Select the Parental Control option in the Feature submenu to select from Service 1-6, Text 1-4, ...and pressing the right arrow button to open the selection. Adult language S - Press the right arrow button to set the parental control levels for the following TV ratings: Y - TV Ratings may also be locked and press the OK button. Older children G - General audience PG - Violence ...
... Digital Captions feature is selected as the input source. Press the right arrow button to open the Digital Closed Caption Menu. VIZIO® VW22L HDTV10T User Manual 4.4.6 Parental Control Select the Parental Control option in the Feature submenu to select from Service 1-6, Text 1-4, ...and pressing the right arrow button to open the selection. Adult language S - Press the right arrow button to set the parental control levels for the following TV ratings: Y - TV Ratings may also be locked and press the OK button. Older children G - General audience PG - Violence ...

VW22LHDTV10T User Manual
Page 35
...adjust the Horizontal Position, Vertical Position, Clock and Phase. Select the Settings option to restore to label the input. Note: This feature is only available when VGA is available in the Feature menu. VIZIO® VW22L HDTV10T User Manual 4.4.9 Analog Caption The Analog Caption feature is available in... is not available when DTV/TV is selected as the input source. Note: This feature is only available when Component is selected as the input source. 4.4.12 VGA Set The VGA Set option is selected as the input source. 4.4.11 Component Set The Component Set option is available in the ...
...adjust the Horizontal Position, Vertical Position, Clock and Phase. Select the Settings option to restore to label the input. Note: This feature is only available when VGA is available in the Feature menu. VIZIO® VW22L HDTV10T User Manual 4.4.9 Analog Caption The Analog Caption feature is available in... is not available when DTV/TV is selected as the input source. Note: This feature is only available when Component is selected as the input source. 4.4.12 VGA Set The VGA Set option is selected as the input source. 4.4.11 Component Set The Component Set option is available in the ...


