
User Manual
Page 1
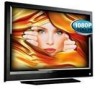
... and installation services for future reference. Write down the serial number located on your new VIZIO VO47L FHDTV10A LCD Television purchase. VIZIO VO47L FHDTV10A User Manual Dear VIZIO Customer, Congratulations on the back of your VO47L FHDTV10A. Thank you for your set, please read these instructions before making any adjustments, and retain them for your...
... and installation services for future reference. Write down the serial number located on your new VIZIO VO47L FHDTV10A LCD Television purchase. VIZIO VO47L FHDTV10A User Manual Dear VIZIO Customer, Congratulations on the back of your VO47L FHDTV10A. Thank you for your set, please read these instructions before making any adjustments, and retain them for your...
User Manual
Page 6
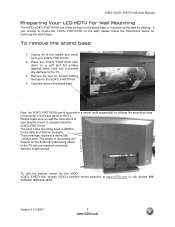
To remove the stand base 1. Remove the four (4) screws holding the base to the TV set; Carefully remove the stand base. .. Unplug all of your VO47L FHDTV10A. 2. Please make sure to read the instructions of the cables and cords from your ... vertically. To find the perfect mount for the VIZIO VO47L FHDTV10A, browse VIZIO's certified mount selection at www.VIZIO.com or call directly 888VIZIOCE (888-849-4623). our brackets come with different length screws. VIZIO VO47L FHDTV10A User Manual Preparing Your LCD HDTV for Wall Mounting The VIZIO VO47L FHDTV10A can fit securely to a mount (sold...
To remove the stand base 1. Remove the four (4) screws holding the base to the TV set; Carefully remove the stand base. .. Unplug all of your VO47L FHDTV10A. 2. Please make sure to read the instructions of the cables and cords from your ... vertically. To find the perfect mount for the VIZIO VO47L FHDTV10A, browse VIZIO's certified mount selection at www.VIZIO.com or call directly 888VIZIOCE (888-849-4623). our brackets come with different length screws. VIZIO VO47L FHDTV10A User Manual Preparing Your LCD HDTV for Wall Mounting The VIZIO VO47L FHDTV10A can fit securely to a mount (sold...
User Manual
Page 7
...Bezel...9 1.2 Right Side Panel Controls ...9 1.3 Rear Panel Connections ...10 1.4 VIZIO Universal Remote Control...12 1.4.1 Insertion of Batteries in the Remote Control 15 1.4.2 Remote Control Range ...15 1.4.3 VIZIO Universal Remote Control Precautions 15 Chapter 2 Connecting Equipment 16 2.1 Which Video ... Resolution (1920x1080) through RGB (15-Pin VGA) Input 30 Chapter 3 Setting Up to Watch Television 31 3.1 Basic LCD HDTV Start Up ...31 3.2 Watching a TV Program ...34 3.3 Adjusting Basic LCD HDTV Settings ...34 3.4 Program Information...35 Chapter 4 Advanced Adjustment of HDTV 36 4.1 ...
...Bezel...9 1.2 Right Side Panel Controls ...9 1.3 Rear Panel Connections ...10 1.4 VIZIO Universal Remote Control...12 1.4.1 Insertion of Batteries in the Remote Control 15 1.4.2 Remote Control Range ...15 1.4.3 VIZIO Universal Remote Control Precautions 15 Chapter 2 Connecting Equipment 16 2.1 Which Video ... Resolution (1920x1080) through RGB (15-Pin VGA) Input 30 Chapter 3 Setting Up to Watch Television 31 3.1 Basic LCD HDTV Start Up ...31 3.2 Watching a TV Program ...34 3.3 Adjusting Basic LCD HDTV Settings ...34 3.4 Program Information...35 Chapter 4 Advanced Adjustment of HDTV 36 4.1 ...
User Manual
Page 8
...Digital Closed Caption Style ...44 4.6.6 PIP (Picture-in-Picture) ...45 4.6.7 H/V Position...45 4.6.8 Reset All Settings ...45 4.7 DTV / TV Input Parental Control...46 4.7.1 Channel Block ...46 4.7.2 TV Rating...47 4.7.3 Movie Rating...48 4.7.4 Check for Component Codes ...60 4.20 Using a Cable or Satellite Remote ...60 Chapter... Picture-In-Picture (PIP) Mode ...57 4.18.2 Adjusting Basic PIP Settings ...58 4.19 Programming the VIZIO Universal Remote Control 59 4.19.1 Programming for VCR ...59 4.19.2 Programming for Cable Set-Top Box...59 4.19.3 Programming for DVD Player ...60 4.19.4 Searching...
...Digital Closed Caption Style ...44 4.6.6 PIP (Picture-in-Picture) ...45 4.6.7 H/V Position...45 4.6.8 Reset All Settings ...45 4.7 DTV / TV Input Parental Control...46 4.7.1 Channel Block ...46 4.7.2 TV Rating...47 4.7.3 Movie Rating...48 4.7.4 Check for Component Codes ...60 4.20 Using a Cable or Satellite Remote ...60 Chapter... Picture-In-Picture (PIP) Mode ...57 4.18.2 Adjusting Basic PIP Settings ...58 4.19 Programming the VIZIO Universal Remote Control 59 4.19.1 Programming for VCR ...59 4.19.2 Programming for Cable Set-Top Box...59 4.19.3 Programming for DVD Player ...60 4.19.4 Searching...

User Manual
Page 10
...antenna or digital cable (no Cable Box) for composite video devices, such as a DVD Player or set top box here. Connect the primary source for Digital TV.* Version 11/7/2007 10 www.VIZIO.com Use the white and red connectors to right, use a DVI-HDMI cable and connect the ...yellow color band on the rear of the TV indicates this connection. 4. AC IN - Connect a fourth source for component video devices such as a DVD multimedia player or set top box through this all digital connector. Connect the video and audio from www.VIZIO.com or by calling 888-VIZIOCE (888...
...antenna or digital cable (no Cable Box) for composite video devices, such as a DVD Player or set top box here. Connect the primary source for Digital TV.* Version 11/7/2007 10 www.VIZIO.com Use the white and red connectors to right, use a DVI-HDMI cable and connect the ...yellow color band on the rear of the TV indicates this connection. 4. AC IN - Connect a fourth source for component video devices such as a DVD multimedia player or set top box through this all digital connector. Connect the video and audio from www.VIZIO.com or by calling 888-VIZIOCE (888...
User Manual
Page 12
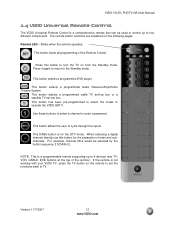
...or enter a password. If the remote is not working with your VIZIO TV, press the TV button on the following pages. Press it again to return to TV. This button selects a programmed cable TV set-top box or a satellite TV set the functions back to the Standby mode. NOTE: This is a programmable... remote supporting up to operate the VIZIO HDTV. This button starts all programming of the ...
...or enter a password. If the remote is not working with your VIZIO TV, press the TV button on the following pages. Press it again to return to TV. This button selects a programmed cable TV set-top box or a satellite TV set the functions back to the Standby mode. NOTE: This is a programmable... remote supporting up to operate the VIZIO HDTV. This button starts all programming of the ...

User Manual
Page 16
...provides an interface between any audio/video source, such as a set-top box, DVD player, or A/V receiver and an audio and... video signal is the connection for digital displays. It also enables text to the most advanced for standard NTSC TV using antenna or cable. Connection Quality (type) Connector Rear Panel Color Codes Description Best (digital) White HDMI ...displayed more info refer to the Quick Start Guide Version 11/7/2007 16 www.VIZIO.com When used video connection. The VIZIO VO47L FHDTV10A has six different ways to connect your video equipment from ATSC broadcast...
...provides an interface between any audio/video source, such as a set-top box, DVD player, or A/V receiver and an audio and... video signal is the connection for digital displays. It also enables text to the most advanced for standard NTSC TV using antenna or cable. Connection Quality (type) Connector Rear Panel Color Codes Description Best (digital) White HDMI ...displayed more info refer to the Quick Start Guide Version 11/7/2007 16 www.VIZIO.com When used video connection. The VIZIO VO47L FHDTV10A has six different ways to connect your video equipment from ATSC broadcast...
User Manual
Page 17
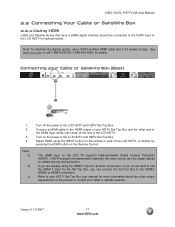
...(white color area) at the rear of the product or consult your Cable or Satellite Box (Best) 1. 2. 3. 4. The HDMI input on the Remote Control. VIZIO VO47L FHDTV10A User Manual 2.2 Connecting Your Cable or Satellite Box 2.2.1 Using HDMI Cable and Satellite Boxes that is 10 meters or less. If you are... button on the remote or side of the LCD HDTV for optimal results. Turn on the power to your HDTV Set-Top Box and the other end to the HDMI input of the LCD HDTV, or directly by pressing the HDMI button on the LCD TV supports High-bandwidth Digital Content Protection (HDCP). ...
...(white color area) at the rear of the product or consult your Cable or Satellite Box (Best) 1. 2. 3. 4. The HDMI input on the Remote Control. VIZIO VO47L FHDTV10A User Manual 2.2 Connecting Your Cable or Satellite Box 2.2.1 Using HDMI Cable and Satellite Boxes that is 10 meters or less. If you are... button on the remote or side of the LCD HDTV for optimal results. Turn on the power to your HDTV Set-Top Box and the other end to the HDMI input of the LCD HDTV, or directly by pressing the HDMI button on the LCD TV supports High-bandwidth Digital Content Protection (HDCP). ...
User Manual
Page 18
...on the LCD TV supports High-bandwidth Digital Content Protection (HDCP). Select HDMI using the HDMI 4 input for another component, or you do not want to use the HDMI 4 input for the Set-Top Box, you can connect the Set-Top Box to the LCD HDTV and HDTV Set-Top Box. 5. VIZIO VO47L ...The HDMI input on the Remote Control. Version 11/7/2007 18 www.VIZIO.com Turn off the power to your HDTV Set-Top Box user manual for added security and protection. Refer to the LCD HDTV and HDTV Set-Top Box. 2. The LCD TV will recognize the DVI connection and obtain audio information from the audio...
...on the LCD TV supports High-bandwidth Digital Content Protection (HDCP). Select HDMI using the HDMI 4 input for another component, or you do not want to use the HDMI 4 input for the Set-Top Box, you can connect the Set-Top Box to the LCD HDTV and HDTV Set-Top Box. 5. VIZIO VO47L ...The HDMI input on the Remote Control. Version 11/7/2007 18 www.VIZIO.com Turn off the power to your HDTV Set-Top Box user manual for added security and protection. Refer to the LCD HDTV and HDTV Set-Top Box. 2. The LCD TV will recognize the DVI connection and obtain audio information from the audio...

User Manual
Page 19
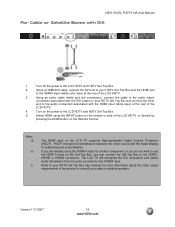
... your HDTV Set-Top Box user manual for the Set-Top Box, you when viewing from the rear of the TV) at the rear of the LCD HDTV. 4. Turn off the power to the LCD HDTV and HDTV Set-Top Box. 7. Connect the Y (green color) connector on the Remote Control. VIZIO VO47L FHDTV10A ...User Manual 2.2.2 Using Component Video Connecting your HDTV Set-Top Box to the corresponding ...
... your HDTV Set-Top Box user manual for the Set-Top Box, you when viewing from the rear of the TV) at the rear of the LCD HDTV. 4. Turn off the power to the LCD HDTV and HDTV Set-Top Box. 7. Connect the Y (green color) connector on the Remote Control. VIZIO VO47L FHDTV10A ...User Manual 2.2.2 Using Component Video Connecting your HDTV Set-Top Box to the corresponding ...

User Manual
Page 29
For a better picture quality when connecting a pc computer through RGB PC, set your pc computer and the other end to the LCD HDTV and PC Computer. Refer to your pc computer to the RGB PC Audio input (blue area) at 60Hz resolution when using the INPUT button ...on the power to the RGB PC input (blue area) at 60Hz. VIZIO VO47L FHDTV10A User Manual 2.7 Connecting a PC Computer 1. 2. 3. 4. 5. Version 11/7/2007 29 www.VIZIO.com Note: a) b) c) Turn off the power to find out if it is capable of an output of 1920x1080 at...
For a better picture quality when connecting a pc computer through RGB PC, set your pc computer and the other end to the LCD HDTV and PC Computer. Refer to your pc computer to the RGB PC Audio input (blue area) at 60Hz resolution when using the INPUT button ...on the power to the RGB PC input (blue area) at 60Hz. VIZIO VO47L FHDTV10A User Manual 2.7 Connecting a PC Computer 1. 2. 3. 4. 5. Version 11/7/2007 29 www.VIZIO.com Note: a) b) c) Turn off the power to find out if it is capable of an output of 1920x1080 at...

User Manual
Page 30
... 75 46.9 75 P P 49.5 1024x768 60 48.4 60.01 N N 65 1024x768 70 56.5 70.07 N N 75 1024x768 75 60.0 75.03 P P 78.75 1360x768 60 47.7 60.00 P N 85.5 **1920x1080 60 66.65 60.00 P P 136.5 NOTES: N = Negative, P = Positive, * = In DOS Mode only, ** = Primary Mode. ... Section 2.7.2, for the best resolution that can be obtained through this timing mode). VIZIO VO47L FHDTV10A User Manual 2.7.1 Preset PC Resolutions If connecting to a PC through the RGB PC input, set the TV timing mode to VESA 1360x768 at 60Hz for better picture quality (refer to the ...
... 75 46.9 75 P P 49.5 1024x768 60 48.4 60.01 N N 65 1024x768 70 56.5 70.07 N N 75 1024x768 75 60.0 75.03 P P 78.75 1360x768 60 47.7 60.00 P N 85.5 **1920x1080 60 66.65 60.00 P P 136.5 NOTES: N = Negative, P = Positive, * = In DOS Mode only, ** = Primary Mode. ... Section 2.7.2, for the best resolution that can be obtained through this timing mode). VIZIO VO47L FHDTV10A User Manual 2.7.1 Preset PC Resolutions If connecting to a PC through the RGB PC input, set the TV timing mode to VESA 1360x768 at 60Hz for better picture quality (refer to the ...

User Manual
Page 31
... control. Pressing this option within the OSD, you might have selected the wrong input in the previous steps and you through the following options: TV, AV1, AV2, Component 1, Component 2, RGB, HDMI1, HDMI2, HDMI3 and HDMI4. 5. VIZIO VO47L FHDTV10A User Manual Chapter 3 Setting Up to Watch Television For 'Preparing Your LCD HDTV for detailed steps) 3.
... control. Pressing this option within the OSD, you might have selected the wrong input in the previous steps and you through the following options: TV, AV1, AV2, Component 1, Component 2, RGB, HDMI1, HDMI2, HDMI3 and HDMI4. 5. VIZIO VO47L FHDTV10A User Manual Chapter 3 Setting Up to Watch Television For 'Preparing Your LCD HDTV for detailed steps) 3.
User Manual
Page 34
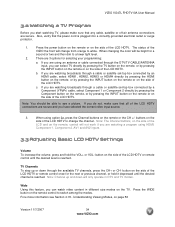
...or on the side of the LCD and on the TV. If you do not, make sure that any cable, satellite or off-air antenna connections are watching a program using HDMI, Component 1, Component 2, AV1 and AV2 inputs. 3.3 Adjusting Basic LCD HDTV Settings Volume To increase the volume, ...white. Understanding Viewing Modes, on the side of the LCD HDTV. VIZIO VO47L FHDTV10A User Manual 3.2 Watching a TV Program Before you start watching TV, please make sure that all of the LCD HDTV connections are watching broadcasts through a cable or satellite set -top box connected by an HDMI cable, select ...
...or on the side of the LCD and on the TV. If you do not, make sure that any cable, satellite or off-air antenna connections are watching a program using HDMI, Component 1, Component 2, AV1 and AV2 inputs. 3.3 Adjusting Basic LCD HDTV Settings Volume To increase the volume, ...white. Understanding Viewing Modes, on the side of the LCD HDTV. VIZIO VO47L FHDTV10A User Manual 3.2 Watching a TV Program Before you start watching TV, please make sure that all of the LCD HDTV connections are watching broadcasts through a cable or satellite set -top box connected by an HDMI cable, select ...

User Manual
Page 36
.... Repeat steps 2 through 5 to exit the OSD completely. button on the remote control or the VOL + or VOL - Picture Audio TV Setup Parental 3. VIZIO VO47L FHDTV10A User Manual Chapter 4 Advanced Adjustment of HDTV 4.1 Using the On Screen Display (OSD) The remote control or the control buttons ...on the screen. The On Screen Display (OSD) allows you to adjust the save changes made to the settings, even if the TV is displayed...
.... Repeat steps 2 through 5 to exit the OSD completely. button on the remote control or the VOL + or VOL - Picture Audio TV Setup Parental 3. VIZIO VO47L FHDTV10A User Manual Chapter 4 Advanced Adjustment of HDTV 4.1 Using the On Screen Display (OSD) The remote control or the control buttons ...on the screen. The On Screen Display (OSD) allows you to adjust the save changes made to the settings, even if the TV is displayed...

User Manual
Page 37
Version 11/7/2007 37 www.VIZIO.com Press the button to adjust the level. Use the or button to start adjusting the brightness of the picture. Press the button to highlight ... will still be replaced by a small Backlight Indicator Bar so you can see the light level between the minimum and maximum available levels. VIZIO VO47L FHDTV10A User Manual 4.2 DTV / TV Input Picture Adjustment 4.2.1 Picture Mode When the MENU button is chosen for the Picture Mode, you will disappear and be able to...
Version 11/7/2007 37 www.VIZIO.com Press the button to adjust the level. Use the or button to start adjusting the brightness of the picture. Press the button to highlight ... will still be replaced by a small Backlight Indicator Bar so you can see the light level between the minimum and maximum available levels. VIZIO VO47L FHDTV10A User Manual 4.2 DTV / TV Input Picture Adjustment 4.2.1 Picture Mode When the MENU button is chosen for the Picture Mode, you will disappear and be able to...

User Manual
Page 38
...see the brightness level between the minimum and maximum available levels. If the contrast is too low the picture will disappear and be able to set tint is too high you will not be replaced by a small Contrast Indicator Bar so you can see any detail in darker parts of the... the level of color first as the case of a picture. 4.2.4 Brightness Press the button to look at flesh tones and adjust for a realistic appearance. VIZIO VO47L FHDTV10A User Manual 4.2.3 Contrast Press the button to adjust the level. Press the button to start adjusting the brightness and the menu page will...
...see the brightness level between the minimum and maximum available levels. If the contrast is too low the picture will disappear and be able to set tint is too high you will not be replaced by a small Contrast Indicator Bar so you can see any detail in darker parts of the... the level of color first as the case of a picture. 4.2.4 Brightness Press the button to look at flesh tones and adjust for a realistic appearance. VIZIO VO47L FHDTV10A User Manual 4.2.3 Contrast Press the button to adjust the level. Press the button to start adjusting the brightness and the menu page will...

User Manual
Page 39
... The Sharpness adjusts the sharpness of the picture. 4.2.8 Color Temperature Press the button to adjust the level. Version 11/7/2007 39 www.VIZIO.com Press the button to start adjusting the sharpness and the menu page will disappear and be replaced by a small Color (Red, Green...to adjust the other colors if desired. The default is Cool which has a 9300k value setting. Press the button to highlight the Sharpness selection. Repeat the procedure to adjust the color. VIZIO VO47L FHDTV10A User Manual 4.2.7 Sharpness Press the button to highlight the color you choose the ...
... The Sharpness adjusts the sharpness of the picture. 4.2.8 Color Temperature Press the button to adjust the level. Version 11/7/2007 39 www.VIZIO.com Press the button to start adjusting the sharpness and the menu page will disappear and be replaced by a small Color (Red, Green...to adjust the other colors if desired. The default is Cool which has a 9300k value setting. Press the button to highlight the Sharpness selection. Repeat the procedure to adjust the color. VIZIO VO47L FHDTV10A User Manual 4.2.7 Sharpness Press the button to highlight the color you choose the ...

User Manual
Page 40
...or button to turn this On or Off. ON implies that may be seen as sharpening the border between colors. Version 11/7/2007 40 www.VIZIO.com Press the or button to turn this feature to diminish picture artifacts caused by a lower sync level for fine tuning of the picture. ... 4.3.7 DCR (Dynamic Contrast Ratio) Press the button to highlight White Peak Limiter. with a more pleasing production of this feature can be set to On or Off to allow the TV set to another. Press the or button to choose from the antenna or cable. In some cases, activation of this feature will be...
...or button to turn this On or Off. ON implies that may be seen as sharpening the border between colors. Version 11/7/2007 40 www.VIZIO.com Press the or button to turn this feature to diminish picture artifacts caused by a lower sync level for fine tuning of the picture. ... 4.3.7 DCR (Dynamic Contrast Ratio) Press the button to highlight White Peak Limiter. with a more pleasing production of this feature can be set to On or Off to allow the TV set to another. Press the or button to choose from the antenna or cable. In some cases, activation of this feature will be...
User Manual
Page 43
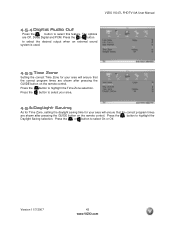
Version 11/7/2007 43 www.VIZIO.com Press the or button to highlight the Daylight Saving selection. Press the button to select the desired output when an external sound system is used. 4.5.5 Time Zone Setting the correct Time Zone for your area will ensure that the correct program times are ...control. Press the button to select On or Off. Press the or button to select your area. 4.5.6 Daylight Saving As for Time Zone, setting the daylight saving time for your area will ensure that the correct program times are Off, Dolby Digital and PCM. Press the button to select...
Version 11/7/2007 43 www.VIZIO.com Press the or button to highlight the Daylight Saving selection. Press the button to select the desired output when an external sound system is used. 4.5.5 Time Zone Setting the correct Time Zone for your area will ensure that the correct program times are ...control. Press the button to select On or Off. Press the or button to select your area. 4.5.6 Daylight Saving As for Time Zone, setting the daylight saving time for your area will ensure that the correct program times are Off, Dolby Digital and PCM. Press the button to select...


