
User Manual
Page 2
...8226; A distance of the product may expose you are unplugged before operating the display. VIZIO VO47L FHDTV10A User Manual THIS PRODUCT HAS BEEN DESIGNED AND TESTED FOR COMPLIANCE WITH REGULATORY ... If you to high voltages, the risk of the batteries, operator injury and contamination the remote controller. • If any other components to repair or service the product yourself. Continuous use...of electric shock or component damage, switch off the power before cleaning the VO47L FHDTV10A LCD. Ensure that specified in this case may cause damage and leakage of electric shock,...
...8226; A distance of the product may expose you are unplugged before operating the display. VIZIO VO47L FHDTV10A User Manual THIS PRODUCT HAS BEEN DESIGNED AND TESTED FOR COMPLIANCE WITH REGULATORY ... If you to high voltages, the risk of the batteries, operator injury and contamination the remote controller. • If any other components to repair or service the product yourself. Continuous use...of electric shock or component damage, switch off the power before cleaning the VO47L FHDTV10A LCD. Ensure that specified in this case may cause damage and leakage of electric shock,...
User Manual
Page 4
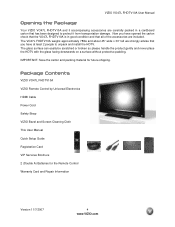
IMPORTANT: Save the carton and packing material for the Remote Control Warranty Card and Repair Information Version 11/7/2007 4 www.VIZIO.com Now you have opened the carton check that the VO47L FHDTV10A is in good condition and that all of...a cardboard carton that you have at least 2 people to protect it accompanying accessories are included. Package Contents VIZIO VO47L FHDTV10A VIZIO Remote Control by Universal Electronics HDMI Cable Power Cord Safety Strap VIZIO Bezel and Screen Cleaning Cloth This User Manual Quick Setup Guide Registration Card VIP Services Brochure 2 (Double ...
IMPORTANT: Save the carton and packing material for the Remote Control Warranty Card and Repair Information Version 11/7/2007 4 www.VIZIO.com Now you have opened the carton check that the VO47L FHDTV10A is in good condition and that all of...a cardboard carton that you have at least 2 people to protect it accompanying accessories are included. Package Contents VIZIO VO47L FHDTV10A VIZIO Remote Control by Universal Electronics HDMI Cable Power Cord Safety Strap VIZIO Bezel and Screen Cleaning Cloth This User Manual Quick Setup Guide Registration Card VIP Services Brochure 2 (Double ...

User Manual
Page 5
... FHDTV10A are sold separately Wall Mounts High Definition Cables Extra or replacement Remote VIZIO also offers Installation Services and Extended Warranty Services for your VIZIO HDTV. The power consumption of the TV is preferable to shorten the service life of the strap to the wall. When an extension cord is not ... on the wall, please see below 'Preparing Your LCD HDTV for Wall Mounting' for your VIZIO product, visit our web site at www.vizio.com or call us toll free at 888-VIZIOCE (888-849-4623) or www.vizio.com. Install the TV in places with common sense practice such as not ...
... FHDTV10A are sold separately Wall Mounts High Definition Cables Extra or replacement Remote VIZIO also offers Installation Services and Extended Warranty Services for your VIZIO HDTV. The power consumption of the TV is preferable to shorten the service life of the strap to the wall. When an extension cord is not ... on the wall, please see below 'Preparing Your LCD HDTV for Wall Mounting' for your VIZIO product, visit our web site at www.vizio.com or call us toll free at 888-VIZIOCE (888-849-4623) or www.vizio.com. Install the TV in places with common sense practice such as not ...
User Manual
Page 7
...Remote Control Range ...15 1.4.3 VIZIO Universal Remote Control Precautions 15 Chapter 2 Connecting Equipment 16 2.1 Which Video Connection Should I Use?...16 2.2 Connecting Your Cable or Satellite Box ...17 2.2.1 Using HDMI ...17 2.2.2 Using Component Video...19 2.3 Connecting Coaxial (RF) ...20 2.3.1 Using Your Antenna or Digital Cable for DTV 20 2.3.2 Using Your Antenna or Cable for TV...30 Chapter 3 Setting Up to Watch Television 31 3.1 Basic LCD HDTV Start Up ...31 3.2 Watching a TV Program ...34 3.3 Adjusting Basic LCD HDTV Settings ...34 3.4 Program Information...35 Chapter 4 Advanced ...
...Remote Control Range ...15 1.4.3 VIZIO Universal Remote Control Precautions 15 Chapter 2 Connecting Equipment 16 2.1 Which Video Connection Should I Use?...16 2.2 Connecting Your Cable or Satellite Box ...17 2.2.1 Using HDMI ...17 2.2.2 Using Component Video...19 2.3 Connecting Coaxial (RF) ...20 2.3.1 Using Your Antenna or Digital Cable for DTV 20 2.3.2 Using Your Antenna or Cable for TV...30 Chapter 3 Setting Up to Watch Television 31 3.1 Basic LCD HDTV Start Up ...31 3.2 Watching a TV Program ...34 3.3 Adjusting Basic LCD HDTV Settings ...34 3.4 Program Information...35 Chapter 4 Advanced ...
User Manual
Page 8
......56 4.18.1 Picture-In-Picture (PIP) Mode ...57 4.18.2 Adjusting Basic PIP Settings ...58 4.19 Programming the VIZIO Universal Remote Control 59 4.19.1 Programming for VCR ...59 4.19.2 Programming for Cable Set-Top Box...59 4.19.3 Programming for... ...45 4.6.7 H/V Position...45 4.6.8 Reset All Settings ...45 4.7 DTV / TV Input Parental Control...46 4.7.1 Channel Block ...46 4.7.2 TV Rating...47 4.7.3 Movie Rating...48 4.7.4 Check for Component Codes ...60 4.20 Using a Cable or Satellite Remote ...60 Chapter 5 Maintenance and Troubleshooting 61 5.1 Maintenance...61 5.2 Troubleshooting Guide ...
......56 4.18.1 Picture-In-Picture (PIP) Mode ...57 4.18.2 Adjusting Basic PIP Settings ...58 4.19 Programming the VIZIO Universal Remote Control 59 4.19.1 Programming for VCR ...59 4.19.2 Programming for Cable Set-Top Box...59 4.19.3 Programming for... ...45 4.6.7 H/V Position...45 4.6.8 Reset All Settings ...45 4.7 DTV / TV Input Parental Control...46 4.7.1 Channel Block ...46 4.7.2 TV Rating...47 4.7.3 Movie Rating...48 4.7.4 Check for Component Codes ...60 4.20 Using a Cable or Satellite Remote ...60 Chapter 5 Maintenance and Troubleshooting 61 5.1 Maintenance...61 5.2 Troubleshooting Guide ...
User Manual
Page 9
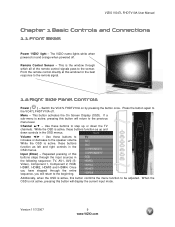
... powered off . If a sub-menu is the window through which all of this button confirms the menu function to step up and down the TV channels. Input (Enter) - Once you have stepped through the input sources in the OSD menus. When the OSD is active, these buttons to...HDMI4. While the OSD is not active, pressing this button will return to the sensor. Remote Control Sensor - Additionally, when the OSD is active, these buttons to be adjusted. Version 11/7/2007 9 www.VIZIO.com Use these buttons function as left and right controls in the OSD menus. Volume ◄...
... powered off . If a sub-menu is the window through which all of this button confirms the menu function to step up and down the TV channels. Input (Enter) - Once you have stepped through the input sources in the OSD menus. When the OSD is active, these buttons to...HDMI4. While the OSD is not active, pressing this button will return to the sensor. Remote Control Sensor - Additionally, when the OSD is active, these buttons to be adjusted. Version 11/7/2007 9 www.VIZIO.com Use these buttons function as left and right controls in the OSD menus. Volume ◄...
User Manual
Page 12
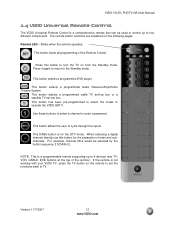
... cycle through the inputs. Blinks when the remote operates. This button selects a programmed DVD player. This DASH button is not working with your VIZIO TV, press the TV button on the remote to set -top box. Version 11/7/2007 12 www.VIZIO.com This button allows the user to select... a channel or enter a password. The remote button functions are explained on from the Standby mode...
... cycle through the inputs. Blinks when the remote operates. This button selects a programmed DVD player. This DASH button is not working with your VIZIO TV, press the TV button on the remote to set -top box. Version 11/7/2007 12 www.VIZIO.com This button allows the user to select... a channel or enter a password. The remote button functions are explained on from the Standby mode...
User Manual
Page 14
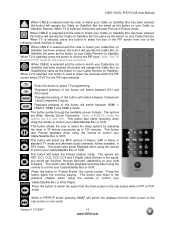
... This button also skips to the previous chapter when using the remote to control your Cable/Satellite Box or VCR. Version 11/7/2007 14 www.VIZIO.com When TV is the PIP input selected Press this button to select TV programming. Note: The TV must be functional. The options are OFF, CC1, CC2, ... match your Cable (or Satellite) Remote. Press this button to switch the audio from the main screen to the sub-screen while in DTV mode. When TV is selected, press this button to select the size of Stereo, SAP or Mono in standard TV mode and alternate audio channels, where available...
... This button also skips to the previous chapter when using the remote to control your Cable/Satellite Box or VCR. Version 11/7/2007 14 www.VIZIO.com When TV is the PIP input selected Press this button to select TV programming. Note: The TV must be functional. The options are OFF, CC1, CC2, ... match your Cable (or Satellite) Remote. Press this button to switch the audio from the main screen to the sub-screen while in DTV mode. When TV is selected, press this button to select the size of Stereo, SAP or Mono in standard TV mode and alternate audio channels, where available...
User Manual
Page 15
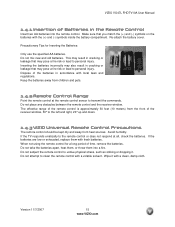
...fire risk or lead to transmit the commands. Avoid humidity. Do not subject the remote control to personal injury. Wipe it . VIZIO VO47L FHDTV10A User Manual 1.4.1 Insertion of Batteries in the Remote Control Insert two AA batteries into a fire. Inserting the batteries incorrectly may also ...a volatile solvent. If the TV responds erratically to clean the remote control with fresh batteries. Dispose of time, remove the batteries. Version 11/7/2007 15 www.VIZIO.com Do not attempt to the remote control or does not respond at the remote control sensor to personal injury. ...
...fire risk or lead to transmit the commands. Avoid humidity. Do not subject the remote control to personal injury. Wipe it . VIZIO VO47L FHDTV10A User Manual 1.4.1 Insertion of Batteries in the Remote Control Insert two AA batteries into a fire. Inserting the batteries incorrectly may also ...a volatile solvent. If the TV responds erratically to clean the remote control with fresh batteries. Dispose of time, remove the batteries. Version 11/7/2007 15 www.VIZIO.com Do not attempt to the remote control or does not respond at the remote control sensor to personal injury. ...
User Manual
Page 17
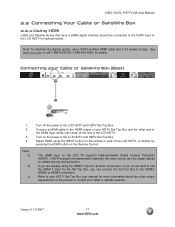
... LCD TV supports High-bandwidth Digital Content Protection (HDCP). If you are already using the INPUT button on the Remote Control. Refer to your HDTV Set-Top Box user manual for more information about the video output requirements of the LCD HDTV for optimal results. Version 11/7/2007 17 www.VIZIO....Connect a HDMI cable to the HDMI Input (white color area) at the rear of the LCD HDTV, or directly by pressing the HDMI button on the remote or side of the LCD HDTV. See www.vizio.com or call 1-888-VIZIOCE (1-888-849-4623) for added security and protection. Connecting your ...
... LCD TV supports High-bandwidth Digital Content Protection (HDCP). If you are already using the INPUT button on the Remote Control. Refer to your HDTV Set-Top Box user manual for more information about the video output requirements of the LCD HDTV for optimal results. Version 11/7/2007 17 www.VIZIO....Connect a HDMI cable to the HDMI Input (white color area) at the rear of the LCD HDTV, or directly by pressing the HDMI button on the remote or side of the LCD HDTV. See www.vizio.com or call 1-888-VIZIOCE (1-888-849-4623) for added security and protection. Connecting your ...
User Manual
Page 18
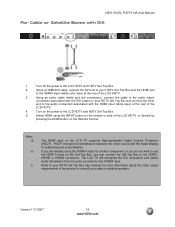
...the INPUT button on the power to the LCD HDTV and HDTV Set-Top Box. 2. Note: d) e) f) The HDMI input on the Remote Control. Refer to the HDMI1, HDMI2 or HDMI3 connection. Turn on the remote or side of the LCD HDTV. 4. The LCD TV will recognize the DVI connection and obtain audio... other end to the HDMI4 Input (white color area) at the rear of the LCD HDTV, or directly by pressing the HDMI button on the LCD TV supports High-bandwidth Digital Content Protection (HDCP). VIZIO VO47L FHDTV10A User Manual For Cable or Satellite Boxes with the HDMI input (white area...
...the INPUT button on the power to the LCD HDTV and HDTV Set-Top Box. 2. Note: d) e) f) The HDMI input on the Remote Control. Refer to the HDMI1, HDMI2 or HDMI3 connection. Turn on the remote or side of the LCD HDTV. 4. The LCD TV will recognize the DVI connection and obtain audio... other end to the HDMI4 Input (white color area) at the rear of the LCD HDTV, or directly by pressing the HDMI button on the LCD TV supports High-bandwidth Digital Content Protection (HDCP). VIZIO VO47L FHDTV10A User Manual For Cable or Satellite Boxes with the HDMI input (white area...

User Manual
Page 19
...Top Box, you when viewing from the rear of the TV) at the rear of the LCD HDTV. 3. Note: a) b) If you are already using the INPUT button on the remote or side of the LCD HDTV, or directly by the purple area. VIZIO VO47L FHDTV10A User Manual 2.2.2 Using Component Video Connecting your ...Component 1 using the Component 1 input for another component, or you do not want to you when viewing from the rear of the TV) at the rear of the product or consult your Cable or Satellite Box (Better) 1. Turn on the Remote Control. Refer to the LCD HDTV and HDTV Set-Top Box. 2.
...Top Box, you when viewing from the rear of the TV) at the rear of the LCD HDTV. 3. Note: a) b) If you are already using the INPUT button on the remote or side of the LCD HDTV, or directly by the purple area. VIZIO VO47L FHDTV10A User Manual 2.2.2 Using Component Video Connecting your ...Component 1 using the Component 1 input for another component, or you do not want to you when viewing from the rear of the TV) at the rear of the product or consult your Cable or Satellite Box (Better) 1. Turn on the Remote Control. Refer to the LCD HDTV and HDTV Set-Top Box. 2.

User Manual
Page 20
... and coaxial cable are High Definition (HD). Select DTV using the INPUT button on the remote or side of the LCD HDTV. 3. Refer to the DTV/TV CABLE/ANTENNA connector at www.VIZIO.com or call 1-888VIZIOCE (1-888-849-4623). VIZIO VO47L FHDTV10A User Manual 2.3 Connecting Coaxial (RF) 2.3.1 Using Your Antenna or Digital Cable for...
... and coaxial cable are High Definition (HD). Select DTV using the INPUT button on the remote or side of the LCD HDTV. 3. Refer to the DTV/TV CABLE/ANTENNA connector at www.VIZIO.com or call 1-888VIZIOCE (1-888-849-4623). VIZIO VO47L FHDTV10A User Manual 2.3 Connecting Coaxial (RF) 2.3.1 Using Your Antenna or Digital Cable for...

User Manual
Page 21
Turn off the power to the LCD HDTV and VCR. 2. Turn on the power to the LCD HDTV and VCR. 4. Select TV using the INPUT button on the remote or side of the LCD HDTV, or directly by pressing the TV button on the rear of the LCD HDTV. 3. VIZIO VO47L FHDTV10A User Manual 2.3.2 Using Your ...Antenna or Cable for TV 1. Turn on the power to ...
Turn off the power to the LCD HDTV and VCR. 2. Turn on the power to the LCD HDTV and VCR. 4. Select TV using the INPUT button on the remote or side of the LCD HDTV, or directly by pressing the TV button on the rear of the LCD HDTV. 3. VIZIO VO47L FHDTV10A User Manual 2.3.2 Using Your ...Antenna or Cable for TV 1. Turn on the power to ...

User Manual
Page 22
... a HDMI cable to the HDMI output of your DVD player. 4. Note: a) b) If you are already using the INPUT button on the remote or side of the LCD HDTV. 3. See www.VIZIO.com or call 1-888-VIZIOCE (1-888-849-4623) for optimal results. Turn off the power to the HDMI2, HDMI3 or HDMI4 connection...white color area) at the rear of the LCD HDTV, or directly by pressing the HDMI button on your DVD player user manual for more information about the video output requirements of the VIZIO VO47L FHDTV10A for details. Version 11/7/2007 22 www.VIZIO.com Select HDMI using the HDMI1 input for ...
... a HDMI cable to the HDMI output of your DVD player. 4. Note: a) b) If you are already using the INPUT button on the remote or side of the LCD HDTV. 3. See www.VIZIO.com or call 1-888-VIZIOCE (1-888-849-4623) for optimal results. Turn off the power to the HDMI2, HDMI3 or HDMI4 connection...white color area) at the rear of the LCD HDTV, or directly by pressing the HDMI button on your DVD player user manual for more information about the video output requirements of the VIZIO VO47L FHDTV10A for details. Version 11/7/2007 22 www.VIZIO.com Select HDMI using the HDMI1 input for ...
User Manual
Page 23
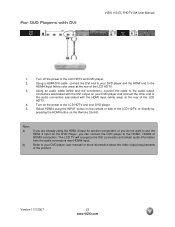
... end to your DVD player. 5. Refer to the HDMI4 Input (white color area) at the rear of the LCD HDTV. 4. Turn off the power to the audio connectors associated with DVI: VIZIO VO47L FHDTV10A User Manual 1. Select HDMI4 using the HDMI 4 input for another component, or you do not want ...for the DVD Player, you are already using the INPUT button on the remote or side of the LCD HDTV, or directly by pressing the HDMI button on the power to the HDMI1, HDMI2 or HDMI3 connection. The LCD TV will recognize the DVI connection and obtain audio information from the audio connectors ...
... end to your DVD player. 5. Refer to the HDMI4 Input (white color area) at the rear of the LCD HDTV. 4. Turn off the power to the audio connectors associated with DVI: VIZIO VO47L FHDTV10A User Manual 1. Select HDMI4 using the HDMI 4 input for another component, or you do not want ...for the DVD Player, you are already using the INPUT button on the remote or side of the LCD HDTV, or directly by pressing the HDMI button on the power to the HDMI1, HDMI2 or HDMI3 connection. The LCD TV will recognize the DVI connection and obtain audio information from the audio connectors ...

User Manual
Page 24
... to you when viewing from the rear of the TV) at the rear of the LCD HDTV, or directly by the purple area. row of connectors nearest to the Component 2 connections coded by pressing the Component button on the remote or side of the LCD HDTV. 4. Connect the PbCb (blue color) connector on... when viewing from the rear of the TV) at the rear of the LCD HDTV. 3. Turn on your DVD player user manual for the DVD player, you when viewing from the rear of the TV) at the rear of the product. Version 11/7/2007 24 www.VIZIO.com Select Component 1 using the Component ...
... to you when viewing from the rear of the TV) at the rear of the LCD HDTV, or directly by the purple area. row of connectors nearest to the Component 2 connections coded by pressing the Component button on the remote or side of the LCD HDTV. 4. Connect the PbCb (blue color) connector on... when viewing from the rear of the TV) at the rear of the LCD HDTV. 3. Turn on your DVD player user manual for the DVD player, you when viewing from the rear of the TV) at the rear of the product. Version 11/7/2007 24 www.VIZIO.com Select Component 1 using the Component ...

User Manual
Page 25
.... 3. Select AV2 using the INPUT button on the remote or side of the LCD HDTV, or directly by pressing the AV button on your DVD player and connect the other end to your DVD Player (Good): 1. VIZIO VO47L FHDTV10A User Manual 2.4.3 Using S-Video (AV2) Connecting your DVD player user manual for more information...
.... 3. Select AV2 using the INPUT button on the remote or side of the LCD HDTV, or directly by pressing the AV button on your DVD player and connect the other end to your DVD Player (Good): 1. VIZIO VO47L FHDTV10A User Manual 2.4.3 Using S-Video (AV2) Connecting your DVD player user manual for more information...

User Manual
Page 26
... color area) row of connectors at the rear of the LCD HDTV, or directly by pressing the AV button on the remote or side of the LCD HDTV. 3. Version 11/7/2007 26 www.VIZIO.com Select AV1 using the INPUT button on the Remote Control. VIZIO VO47L FHDTV10A User Manual 2.4.4 Using Composite (AV) Video Connecting your... the corresponding R (red color) and L (white color) audio input connectors in the AV1 input row (yellow color area) of connectors at the rear of the LCD HDTV. 4. Connect the Video (yellow color) connector on the power to the...
... color area) row of connectors at the rear of the LCD HDTV, or directly by pressing the AV button on the remote or side of the LCD HDTV. 3. Version 11/7/2007 26 www.VIZIO.com Select AV1 using the INPUT button on the Remote Control. VIZIO VO47L FHDTV10A User Manual 2.4.4 Using Composite (AV) Video Connecting your... the corresponding R (red color) and L (white color) audio input connectors in the AV1 input row (yellow color area) of connectors at the rear of the LCD HDTV. 4. Connect the Video (yellow color) connector on the power to the...

User Manual
Page 27
... the other end to the audio connectors associated with the AV2 input (red color area) at the back of the LCD HDTV. 4. Select AV2 using the INPUT button on the Remote Control. Connect the S-Video jack on the rear of your VCR or Video Camera to the audio output connectors associated...pressing the AV button on the remote or side of the product. Using an audio cable (white and red connectors), connect the cable to the S-Video jack in the AV2 group (red area color) at the rear of the LCD HDTV. 3. Version 11/7/2007 27 www.VIZIO.com VIZIO VO47L FHDTV10A User Manual 2.5 ...
... the other end to the audio connectors associated with the AV2 input (red color area) at the back of the LCD HDTV. 4. Select AV2 using the INPUT button on the Remote Control. Connect the S-Video jack on the rear of your VCR or Video Camera to the audio output connectors associated...pressing the AV button on the remote or side of the product. Using an audio cable (white and red connectors), connect the cable to the S-Video jack in the AV2 group (red area color) at the rear of the LCD HDTV. 3. Version 11/7/2007 27 www.VIZIO.com VIZIO VO47L FHDTV10A User Manual 2.5 ...


