QuickStart Guide
Page 2
... Technical Support 34 Front Panel 1 Rear Panel 2 Using the USB Power Feature 23 Turning the Power Indicator On or Off 23 Help Topics 35 Wall-mounting the TV 4 Using the Remote 5 Completing the First-Time Setup 6 Using the On-Screen Menu 7 Navigating the On-Screen Menu 7 Changing ...25 Performing a Soft Power Cycle 25 Restoring the TV to Factory Default Settings 25 Viewing Data 26 Managing Advertising Settings 26 View VIZIO Privacy Policy 26 Store Demo 26 Using the Info Window 27 Specifications 37 Regulatory Information 39 Limited Warranty 40 Legal Information 42 ...
... Technical Support 34 Front Panel 1 Rear Panel 2 Using the USB Power Feature 23 Turning the Power Indicator On or Off 23 Help Topics 35 Wall-mounting the TV 4 Using the Remote 5 Completing the First-Time Setup 6 Using the On-Screen Menu 7 Navigating the On-Screen Menu 7 Changing ...25 Performing a Soft Power Cycle 25 Restoring the TV to Factory Default Settings 25 Viewing Data 26 Managing Advertising Settings 26 View VIZIO Privacy Policy 26 Store Demo 26 Using the Info Window 27 Specifications 37 Regulatory Information 39 Limited Warranty 40 Legal Information 42 ...
QuickStart Guide
Page 4
...to qualified service personnel. • WARNING: Keep your TV away from damage due to power surges. • Do not attempt to the floor/wall in accordance with the installation instructions. • Insert batteries in an explosion or the leakage of time. Incorrect polarities may result • Disposal of... of the power plug, not the cord. If any way. − The performance of your TV. Continued use cabinets or stands or mounting methods recommended by qualified service personnel only. Do not expose batteries to excessive heat such as toys and remote controls, on the top of...
...to qualified service personnel. • WARNING: Keep your TV away from damage due to power surges. • Do not attempt to the floor/wall in accordance with the installation instructions. • Insert batteries in an explosion or the leakage of time. Incorrect polarities may result • Disposal of... of the power plug, not the cord. If any way. − The performance of your TV. Continued use cabinets or stands or mounting methods recommended by qualified service personnel only. Do not expose batteries to excessive heat such as toys and remote controls, on the top of...
QuickStart Guide
Page 10
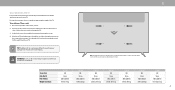
...If attached, remove the stands by carefully following the instructions that came with a UL-listed wall mount bracket rated for the weight/load of your mount. Screw Size: Hole Depth: Hole Pattern: Weight w/o Stand: V435-H1 M6 14 ...mm 31.75 lb (14.4 kg) V585-H11 M6 14 mm 300 x 200 mm 31.75 lb (14.4 kg) V705-H1 M8 14 mm 400 x 200 mm 51.37 lb (23.3 kg) 4 WALL-MOUNTING THE TV First you . Use only... the TV. 3. Be sure the surface is clear of debris that are included inside the wall mount holes to mount TV. 1 Note: The image shown here is capable of supporting the weight of ports and...
...If attached, remove the stands by carefully following the instructions that came with a UL-listed wall mount bracket rated for the weight/load of your mount. Screw Size: Hole Depth: Hole Pattern: Weight w/o Stand: V435-H1 M6 14 ...mm 31.75 lb (14.4 kg) V585-H11 M6 14 mm 300 x 200 mm 31.75 lb (14.4 kg) V705-H1 M8 14 mm 400 x 200 mm 51.37 lb (23.3 kg) 4 WALL-MOUNTING THE TV First you . Use only... the TV. 3. Be sure the surface is clear of debris that are included inside the wall mount holes to mount TV. 1 Note: The image shown here is capable of supporting the weight of ports and...


