
User Manual English
Page 1
Sound bar appearance may vary. USER MANUAL SB4551-D5, SB4051-D5, SB4531-D5, SB4031-D5
Sound bar appearance may vary. USER MANUAL SB4551-D5, SB4051-D5, SB4531-D5, SB4031-D5
User Manual English
Page 2
... not be used for an extended period of time, unplug the power cord. • To reduce risk of the sound bar. Doing so could short circuit parts causing a fire or electric shock. Overloading can damage the remote control or injure the operator. Do not expose your sound bar from damage due to power surges. • Do not attempt to repair or service your sound bar is...
... not be used for an extended period of time, unplug the power cord. • To reduce risk of the sound bar. Doing so could short circuit parts causing a fire or electric shock. Overloading can damage the remote control or injure the operator. Do not expose your sound bar from damage due to power surges. • Do not attempt to repair or service your sound bar is...
User Manual English
Page 3
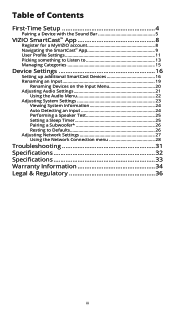
... 15 Device Settings 16 Setting up additional SmartCast Devices 16 Renaming an Input 19 Renaming Devices on the Input Menu 20 Adjusting Audio Settings 21 Using the Audio Menu 22 Adjusting System Settings 23 Viewing System Information 24 Auto Detecting an input 24 Performing a Speaker Test 25 Setting a Sleep Timer 25 Pairing a Subwoofer 26 Resting to Defaults 26 Adjusting Network Settings 27 Using the Network Connection menu 28 Troubleshooting 31 Specifications 32 Specifications 33 Warranty Information 34...
... 15 Device Settings 16 Setting up additional SmartCast Devices 16 Renaming an Input 19 Renaming Devices on the Input Menu 20 Adjusting Audio Settings 21 Using the Audio Menu 22 Adjusting System Settings 23 Viewing System Information 24 Auto Detecting an input 24 Performing a Speaker Test 25 Setting a Sleep Timer 25 Pairing a Subwoofer 26 Resting to Defaults 26 Adjusting Network Settings 27 Using the Network Connection menu 28 Troubleshooting 31 Specifications 32 Specifications 33 Warranty Information 34...

User Manual English
Page 4
... your VIZIO Sound Bar- With VIZIO SmartCast, what 's playing on your sound bar. First-Time Setup 1 Welcome to VIZIO SmartCast !™ Your new VIZIO SmartCast™ Sound Bar is part of the all-new collection of home theater displays, sound bars and home audio speakers that can all be the same. from any room, and keep using your VIZIO Sound Bar from anywhere in one ingenious app: the VIZIO SmartCast app. It works over WiFi, so you can control...
... your VIZIO Sound Bar- With VIZIO SmartCast, what 's playing on your sound bar. First-Time Setup 1 Welcome to VIZIO SmartCast !™ Your new VIZIO SmartCast™ Sound Bar is part of the all-new collection of home theater displays, sound bars and home audio speakers that can all be the same. from any room, and keep using your VIZIO Sound Bar from anywhere in one ingenious app: the VIZIO SmartCast app. It works over WiFi, so you can control...
User Manual English
Page 5
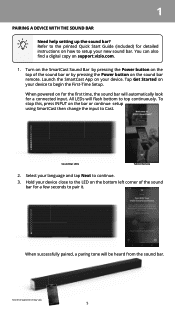
... a digital copy on the sound bar remote. Turn on the SmartCast Sound Bar by pressing the Power button on support.vizio.com. 1. Sound Bar LEDs Tablet Remote 2. When successfully paired, a paring tone will automatically look for a connected input. Sound bar appearance may vary. 5 Refer to the printed Quick Start Guide (included) for a few seconds to setup your device. Launch the SmartCast App on the bar or continue setup using SmartCast then change the input to...
... a digital copy on the sound bar remote. Turn on the SmartCast Sound Bar by pressing the Power button on support.vizio.com. 1. Sound Bar LEDs Tablet Remote 2. When successfully paired, a paring tone will automatically look for a connected input. Sound bar appearance may vary. 5 Refer to the printed Quick Start Guide (included) for a few seconds to setup your device. Launch the SmartCast App on the bar or continue setup using SmartCast then change the input to...

User Manual English
Page 6
Use your device to . 1 4. Select your wireless network from the list and enter your sound bar. 6. When you are done, tap NEXT to read the VIZIO Terms of Service and Privacy Policy, as well as Google's Terms of Service and Privacy Policy. A blue LED on your sound bar confirms a wireless connection. 5. Sound bar appearance may vary. 6 Take a moment to continue. Your device begins to search for a wireless network to connect to name your password.
Use your device to . 1 4. Select your wireless network from the list and enter your sound bar. 6. When you are done, tap NEXT to read the VIZIO Terms of Service and Privacy Policy, as well as Google's Terms of Service and Privacy Policy. A blue LED on your sound bar confirms a wireless connection. 5. Sound bar appearance may vary. 6 Take a moment to continue. Your device begins to search for a wireless network to connect to name your password.

User Manual English
Page 9
Menu Search Device Power Device Settings Device Input Volume Controls Device Menu The Device Menu is displayed. Tap to easily access the device controls. 2 NAVIGATING THE SMARTCAST™ APP After Creating/Logging into your MyVIZIO account, the home page of the SmartCast™ app is available throughout the SmartCast app, allowing you to minimize 9
Menu Search Device Power Device Settings Device Input Volume Controls Device Menu The Device Menu is displayed. Tap to easily access the device controls. 2 NAVIGATING THE SMARTCAST™ APP After Creating/Logging into your MyVIZIO account, the home page of the SmartCast™ app is available throughout the SmartCast app, allowing you to minimize 9
User Manual English
Page 19
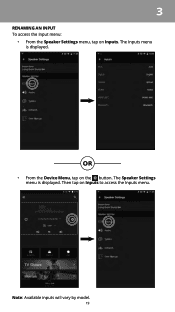
3 RENAMING AN INPUT To access the Input menu: • From the Speaker Settings menu, tap on the button. OR • From the Device Menu, tap on Inputs. The Speaker Settings menu is displayed. Then tap on Inputs to access the Inputs menu. Note: Available inputs will vary by model. 19 The Inputs menu is displayed.
3 RENAMING AN INPUT To access the Input menu: • From the Speaker Settings menu, tap on the button. OR • From the Device Menu, tap on Inputs. The Speaker Settings menu is displayed. Then tap on Inputs to access the Inputs menu. Note: Available inputs will vary by model. 19 The Inputs menu is displayed.

User Manual English
Page 20
The Name Input menu is displayed. 2. When you can rename the inputs to make them easier to display "Receiver". From the Inputs menu, tap the input you would like to enter your custom label. To change the name of an input: 1. Use the on the Input menu. 3 Renaming Devices on the Input Menu You can rename that input to recognize on -screen keyboard to rename. For example, if you have a Stereo Receiver connected to the HDMI input, you are done tap Save. 20
The Name Input menu is displayed. 2. When you can rename the inputs to make them easier to display "Receiver". From the Inputs menu, tap the input you would like to enter your custom label. To change the name of an input: 1. Use the on the Input menu. 3 Renaming Devices on the Input Menu You can rename that input to recognize on -screen keyboard to rename. For example, if you have a Stereo Receiver connected to the HDMI input, you are done tap Save. 20
User Manual English
Page 22
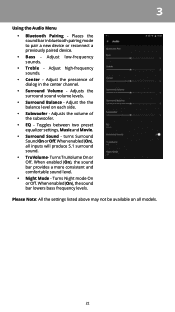
...-frequency sounds. • Center - turns Surround Sound On or O . When enabled (On), all models. 22 Turns TruVolume On or Off. 3 Using the Audio Menu • Bluetooth Pairing - Turns Night mode On or Off. hen enabled On), the sound bar lowers bass frequency levels. Adjust the prescence of the subwoofer. • EQ - Adjusts the surround sound volume levels. • Surround Balance - Please Note: All the settings listed above may not be available on each side. • Subwoofer - Places the sound bar in the center channel...
...-frequency sounds. • Center - turns Surround Sound On or O . When enabled (On), all models. 22 Turns TruVolume On or Off. 3 Using the Audio Menu • Bluetooth Pairing - Turns Night mode On or Off. hen enabled On), the sound bar lowers bass frequency levels. Adjust the prescence of the subwoofer. • EQ - Adjusts the surround sound volume levels. • Surround Balance - Please Note: All the settings listed above may not be available on each side. • Subwoofer - Places the sound bar in the center channel...
User Manual English
Page 24
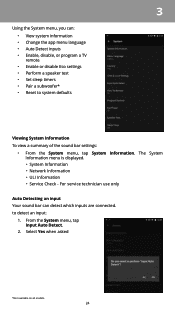
... System Information. For service technician use only Auto Detecting an input Your sound bar can : • View system information • Change the app menu language • Auto Detect inputs • Enable, disable, or program a TV remote • Enable or disable Eco settings • Perform a speaker test • Set sleep timers • Pair a subwoofer* • Reset to detect an input: 1. Select Yes when asked *Not available on all models. 24 The System Information menu...
... System Information. For service technician use only Auto Detecting an input Your sound bar can : • View system information • Change the app menu language • Auto Detect inputs • Enable, disable, or program a TV remote • Enable or disable Eco settings • Perform a speaker test • Set sleep timers • Pair a subwoofer* • Reset to detect an input: 1. Select Yes when asked *Not available on all models. 24 The System Information menu...

User Manual English
Page 25
3 Performing a Speaker Test. To set time. Select one of the timer options: 30, 60, 90, 120, or 180 minutes 25 Select the channel you would like to ensure all channels are functioning. To perform a speaker test: • From the System menu, tap Speaker test. The sound bar can perform a sound test to test. Setting a Sleep Timer hen activated, the sound bar timer will turn the sound bar off after a set a sleep timer: • From the System menu, tap Sleep Timer.
3 Performing a Speaker Test. To set time. Select one of the timer options: 30, 60, 90, 120, or 180 minutes 25 Select the channel you would like to ensure all channels are functioning. To perform a speaker test: • From the System menu, tap Speaker test. The sound bar can perform a sound test to test. Setting a Sleep Timer hen activated, the sound bar timer will turn the sound bar off after a set a sleep timer: • From the System menu, tap Sleep Timer.
User Manual English
Page 26
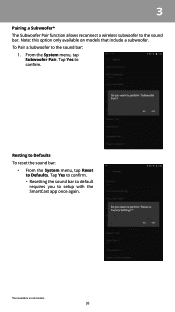
To Pair a Subwoofer to Defaults. Resting to Defaults To reset the sound bar: • From the System menu, tap Reset to the sound bar: 1. Tap Yes to confirm. • Resetting the sound bar to default requires you to setup with the SmartCast app once again. *Not available on models that include a subwoofer. 3 Pairing a Subwoofer* The Subwoofer Pair function allows reconnect a wireless subwoofer to confirm. Tap Yes to the sound bar. Note: this option only available on all models. 26 From the System menu, tap Subwoofer Pair.
To Pair a Subwoofer to Defaults. Resting to Defaults To reset the sound bar: • From the System menu, tap Reset to the sound bar: 1. Tap Yes to confirm. • Resetting the sound bar to default requires you to setup with the SmartCast app once again. *Not available on models that include a subwoofer. 3 Pairing a Subwoofer* The Subwoofer Pair function allows reconnect a wireless subwoofer to confirm. Tap Yes to the sound bar. Note: this option only available on all models. 26 From the System menu, tap Subwoofer Pair.
User Manual English
Page 28
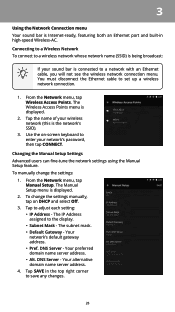
... Network menu, tap Wireless Access Points. Changing the Manual Setup Settings Advanced users can fine-tune the network settings using the Manual Setup feature. Your preferred domain name server address. • Alt. Use the on DHCP and select O . 3. The IP Address assigned to the display. • Subnet Mask - The Wireless Access Points menu is displayed. 2. 3 Using the Network Connection menu Your sound bar is Internet-ready...
... Network menu, tap Wireless Access Points. Changing the Manual Setup Settings Advanced users can fine-tune the network settings using the Manual Setup feature. Your preferred domain name server address. • Alt. Use the on DHCP and select O . 3. The IP Address assigned to the display. • Subnet Mask - The Wireless Access Points menu is displayed. 2. 3 Using the Network Connection menu Your sound bar is Internet-ready...
User Manual English
Page 29
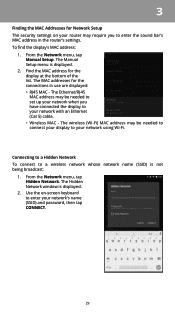
... the Network menu, tap Manual Setup. The Ethernet/RJ45 MAC address may be needed to set up your network when you to enter the sound bar's MAC address in use are displayed: • RJ45 MAC - The wireless (Wi-Fi) MAC address may be needed to connect your display to your network's name (SSID) and password, then tap CONNECT. 29 The Hidden Network...
... the Network menu, tap Manual Setup. The Ethernet/RJ45 MAC address may be needed to set up your network when you to enter the sound bar's MAC address in use are displayed: • RJ45 MAC - The wireless (Wi-Fi) MAC address may be needed to connect your display to your network's name (SSID) and password, then tap CONNECT. 29 The Hidden Network...

User Manual English
Page 31
Find Answers At SUPPORT.VIZIO.COM Find help with your information on-hand. Customized Support Get assistance quickly with : • New Product Setup • Connecting Your Devices • Technical Problems • Product Updates • And More Live Chat Support Available You can also contact our award-winning support team at: Phone: (877) 698-4946 (TOLL-FREE) Hours Of Operation: Monday - Troubleshooting A Do You Have Questions? Safety & Satisfaction...
Find Answers At SUPPORT.VIZIO.COM Find help with your information on-hand. Customized Support Get assistance quickly with : • New Product Setup • Connecting Your Devices • Technical Problems • Product Updates • And More Live Chat Support Available You can also contact our award-winning support team at: Phone: (877) 698-4946 (TOLL-FREE) Hours Of Operation: Monday - Troubleshooting A Do You Have Questions? Safety & Satisfaction...

User Manual English
Page 32
S ecifications B SB4551-D5 Sound Bar One 2"x4" Full Range Driver for Each Channel (1 for left, 1 for right, 1 for center) Satellite One 2"x4" Driver (Each Satellite) Sub oofer In uts Sound ressure Level (System) re uency Res onse (System) oltage One 8" Slim Subwoofer Driver One 3.5mm Stereo Audio One Digital Coaxial One Optical (Toslink) One HDMI Input One HDMI ARC Output One USB (Supports .WAV format only) Bluetooth 802.11n (Wireless) Ethernet...
S ecifications B SB4551-D5 Sound Bar One 2"x4" Full Range Driver for Each Channel (1 for left, 1 for right, 1 for center) Satellite One 2"x4" Driver (Each Satellite) Sub oofer In uts Sound ressure Level (System) re uency Res onse (System) oltage One 8" Slim Subwoofer Driver One 3.5mm Stereo Audio One Digital Coaxial One Optical (Toslink) One HDMI Input One HDMI ARC Output One USB (Supports .WAV format only) Bluetooth 802.11n (Wireless) Ethernet...

User Manual English
Page 33
... cULus, FCC, CAN ICES-3 SB4031-D5 Sound Bar One 2"x4" Full Range Driver for Each Channel (1 for left, 1 for right, 1 for center) Sub oofer One 6.5" Slim Subwoofer Driver In uts Sound ressure Level (System) re uency Res onse (System) One 3.5mm Stereo Audio One Digital Coaxial One Optical (Toslink) One HDMI Input One HDMI ARC Output One USB (Supports .WAV format only) Bluetooth 802.11n Wireless Ethernet (RJ45) 103 dB...
... cULus, FCC, CAN ICES-3 SB4031-D5 Sound Bar One 2"x4" Full Range Driver for Each Channel (1 for left, 1 for right, 1 for center) Sub oofer One 6.5" Slim Subwoofer Driver In uts Sound ressure Level (System) re uency Res onse (System) One 3.5mm Stereo Audio One Digital Coaxial One Optical (Toslink) One HDMI Input One HDMI ARC Output One USB (Supports .WAV format only) Bluetooth 802.11n Wireless Ethernet (RJ45) 103 dB...
User Manual English
Page 34
... where it , or refund the purchase price to a VIZIO service center. The VIZIO Technical Support hours are warranted for the remaining portion of user data and downloaded applications is longer. VIZIO Technical Support will apply. Recovery and reinstallation of the original warranty or for packing and shipping the product to : PM Saturday and Sunday, Pacific Time. Replacement parts and VIZIO's labor are : AM to : PM...
... where it , or refund the purchase price to a VIZIO service center. The VIZIO Technical Support hours are warranted for the remaining portion of user data and downloaded applications is longer. VIZIO Technical Support will apply. Recovery and reinstallation of the original warranty or for packing and shipping the product to : PM Saturday and Sunday, Pacific Time. Replacement parts and VIZIO's labor are : AM to : PM...
User Manual English
Page 36
...://www.vizio.com/privacy. iOS devices supported: iPhone, iPad. 36 This equipment generates, uses and can be updated from the Google Play store. However, there is no responsibility for the availability or interruption of HDMI Licensing LLC. Consult the dealer or an experienced radio/TV technician for typographical, technical, or descriptive errors. Shielded interface cables and AC power cord, if any interference received, including...
...://www.vizio.com/privacy. iOS devices supported: iPhone, iPad. 36 This equipment generates, uses and can be updated from the Google Play store. However, there is no responsibility for the availability or interruption of HDMI Licensing LLC. Consult the dealer or an experienced radio/TV technician for typographical, technical, or descriptive errors. Shielded interface cables and AC power cord, if any interference received, including...


