
User Manual
Page 3
... on the power cord may be installed near your Display and easily accessible. • Only power of the marked voltage can damage the remote control or injure the operator. Do not expose your Display to the sound level, which can be used as the disconnect device, the disconnect ... qualified service personnel only. If your Display if any other hazards. presence of climbing on furniture to reach the television set or its controls. • Do not use • WARNING: Exposure to repair your dealer and refer all servicing to hang onto the product. •...
... on the power cord may be installed near your Display and easily accessible. • Only power of the marked voltage can damage the remote control or injure the operator. Do not expose your Display to the sound level, which can be used as the disconnect device, the disconnect ... qualified service personnel only. If your Display if any other hazards. presence of climbing on furniture to reach the television set or its controls. • Do not use • WARNING: Exposure to repair your dealer and refer all servicing to hang onto the product. •...
User Manual
Page 9
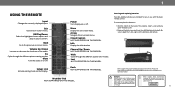
... and play or pause content. Replace only with two, new Duracell AAA alkaline batteries. 9 Back Go to use with the basic remote control. Please visit https://www.duracell.com/en-us/technology/battery-care-use-and-disposa/ for you to the previous on -screen menu.... Cycle through the different picture setting modes. VIZIO supports the proper handling and disposal of the remote. Mute Turn the audio on or off . To insert/replace the batteries: 1.Find the notch on -screen menu. WARNING: Keep the remote control batteries away from children. Two AAA alkaline ...
... and play or pause content. Replace only with two, new Duracell AAA alkaline batteries. 9 Back Go to use with the basic remote control. Please visit https://www.duracell.com/en-us/technology/battery-care-use-and-disposa/ for you to the previous on -screen menu.... Cycle through the different picture setting modes. VIZIO supports the proper handling and disposal of the remote. Mute Turn the audio on or off . To insert/replace the batteries: 1.Find the notch on -screen menu. WARNING: Keep the remote control batteries away from children. Two AAA alkaline ...
User Manual
Page 10
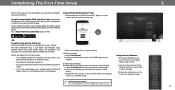
...or tablet to set up your VIZIO display. Please note that a mobile device (not included) is still VIZIO's recommended setup method. Select Get Started b. Android Device Pairing: Note the Wi-Fi setup name on your display, adjust the volume, switch inputs, play and control streaming content from your iOS or...Setup The first time you turn on the Display, you are connecting to your network with the IR Remote: Use the included IR remote to manually set up your display. The VIZIO SmartCast™ App is still required to your display. Refer to the printed Quick Start Guide for detailed...
...or tablet to set up your VIZIO display. Please note that a mobile device (not included) is still VIZIO's recommended setup method. Select Get Started b. Android Device Pairing: Note the Wi-Fi setup name on your display, adjust the volume, switch inputs, play and control streaming content from your iOS or...Setup The first time you turn on the Display, you are connecting to your network with the IR Remote: Use the included IR remote to manually set up your display. The VIZIO SmartCast™ App is still required to your display. Refer to the printed Quick Start Guide for detailed...

User Manual
Page 13
... high, the picture may be difficult to adjust the setting: • Auto Brightness Control - Adjusts the hue of the picture. This setting is displayed. 3. Use the Arrow buttons on the remote to sharpen non-HD (high definition) content; Back Picture Picture Mode Calibrated Auto Brightness... Control Off Backlight 90 Brightness 50 Contrast 50 Color 50 Tint 0 Sharpness 20 More Picture ...
... high, the picture may be difficult to adjust the setting: • Auto Brightness Control - Adjusts the hue of the picture. This setting is displayed. 3. Use the Arrow buttons on the remote to sharpen non-HD (high definition) content; Back Picture Picture Mode Calibrated Auto Brightness... Control Off Backlight 90 Brightness 50 Contrast 50 Color 50 Tint 0 Sharpness 20 More Picture ...

User Manual
Page 14
... - Reduces pixelation and distortion for watching film. Optimizes the picture for mpeg files. Use the Arrow buttons on the remote to highlight a color temperature preset and then press OK. • Normal is controlled by the digitizing of the picture. When you wish Active LED Zones On to adjust, then press the Left...
... - Reduces pixelation and distortion for watching film. Optimizes the picture for mpeg files. Use the Arrow buttons on the remote to highlight a color temperature preset and then press OK. • Normal is controlled by the digitizing of the picture. When you wish Active LED Zones On to adjust, then press the Left...

User Manual
Page 20
...OK. Select Auto, PCM, Dolby D or Bitstream. Press the MENU button on the remote. Use the Arrow buttons to On, DTS signals cannot be passed through digital audio outputs. • Volume Control Display - To create, modify, or replace the single custom equalizer setting: 1. The ...if an external audio device (sound bar or AV receiver) will control the volume. • Equalizer - Changes the type of different frequencies using either preset or custom settings. See Changing the Equalizer Settings on the remote. Surround sound uses DTS TruSurround™ to highlight a frequency and...
...OK. Select Auto, PCM, Dolby D or Bitstream. Press the MENU button on the remote. Use the Arrow buttons to On, DTS signals cannot be passed through digital audio outputs. • Volume Control Display - To create, modify, or replace the single custom equalizer setting: 1. The ...if an external audio device (sound bar or AV receiver) will control the volume. • Equalizer - Changes the type of different frequencies using either preset or custom settings. See Changing the Equalizer Settings on the remote. Surround sound uses DTS TruSurround™ to highlight a frequency and...

User Manual
Page 25
... Savings Time Auto Time Format 12 Hour Country USA 3. Highlight your Display and network connection: 1. Press the MENU button on the remote. The menu headed by the local date and time is displayed. The Display will note No Update Available. The SYSTEM menu is displayed...7. Setting the Time and Local Settings To ensure the correct time is displayed when you press the INFO button, set up administrative controls Back System Check for Updates System Information Time & Local Settings Menu Language English CEC Power Mode Quick Start Power Indicator On Display...
... Savings Time Auto Time Format 12 Hour Country USA 3. Highlight your Display and network connection: 1. Press the MENU button on the remote. The menu headed by the local date and time is displayed. The Display will note No Update Available. The SYSTEM menu is displayed...7. Setting the Time and Local Settings To ensure the correct time is displayed when you press the INFO button, set up administrative controls Back System Check for Updates System Information Time & Local Settings Menu Language English CEC Power Mode Quick Start Power Indicator On Display...

User Manual
Page 26
...menu is displayed. The SYSTEM menu is displayed. 4. See your Display enables you to control To change . Use the Arrow and OK buttons to select. 26 Select Enable to use the Display remote to control CEC devices connected to HDMI. 3 Changing the On-Screen Menu Language Adjusting the CEC Settings... Your Display can display the on the remote to highlight System and press OK. Use the Arrow buttons on ...
...menu is displayed. The SYSTEM menu is displayed. 4. See your Display enables you to control To change . Use the Arrow and OK buttons to select. 26 Select Enable to use the Display remote to control CEC devices connected to HDMI. 3 Changing the On-Screen Menu Language Adjusting the CEC Settings... Your Display can display the on the remote to highlight System and press OK. Use the Arrow buttons on ...

User Manual
Page 27
...3. Press the EXIT button on the remote. The SYSTEM menu is displayed. 3.... buttons on the remote to highlight System and press OK. To see a list of ... 4. Use the Arrow buttons on the remote to highlight System and press OK. Highlight ...Display is displayed. 2. Use the Arrow buttons on the remote to select On or Off, then press OK. Press the... your home. Living Room Family Room 2. The on the remote. Press the MENU button on . 3 Turning the Power ...multiple devices. Use the Arrow buttons on the remote to be on the remote. Managing Mobile Devices Your Display can be ...
...3. Press the EXIT button on the remote. The SYSTEM menu is displayed. 3.... buttons on the remote to highlight System and press OK. To see a list of ... 4. Use the Arrow buttons on the remote to highlight System and press OK. Highlight ...Display is displayed. 2. Use the Arrow buttons on the remote to select On or Off, then press OK. Press the... your home. Living Room Family Room 2. The on the remote. Press the MENU button on . 3 Turning the Power ...multiple devices. Use the Arrow buttons on the remote to be on the remote. Managing Mobile Devices Your Display can be ...

User Manual
Page 28
...account information." 5. If you have changed the default parental control PIN, enter it now. The Display will be reset to the factory defaults. For more information, see https://www.vizio.com/viewingdata and review VIZIO's privacy policy at www.vizio.com/privacy. This includes any wireless or picture settings.... and press OK. 6. Using the Reset & Admin, you view them live or at a later time). This data is turned on the remote. VIZIO and its authorized data partners use the Display's Reset & Admin menu to restore the Display to its factory default settings as well as "Viewing...
...account information." 5. If you have changed the default parental control PIN, enter it now. The Display will be reset to the factory defaults. For more information, see https://www.vizio.com/viewingdata and review VIZIO's privacy policy at www.vizio.com/privacy. This includes any wireless or picture settings.... and press OK. 6. Using the Reset & Admin, you view them live or at a later time). This data is turned on the remote. VIZIO and its authorized data partners use the Display's Reset & Admin menu to restore the Display to its factory default settings as well as "Viewing...

User Manual
Page 33
...; Enter password. • Press the Setup / Link button twice on the IR remote. Press Play / Pause button to ensure they are connected to vizio.com/smartcastapp and follow the on-screen instructions. • Open the VIZIO SmartCast™ App on the remote control to select a different input source. The colors on the Settings iconà...
...; Enter password. • Press the Setup / Link button twice on the IR remote. Press Play / Pause button to ensure they are connected to vizio.com/smartcastapp and follow the on-screen instructions. • Open the VIZIO SmartCast™ App on the remote control to select a different input source. The colors on the Settings iconà...
User Manual
Page 35
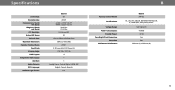
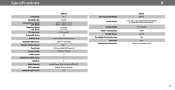
... Effective Refresh Rate 3840 x 2160 (UHD) 20M:1 0.315 mm (H) X 0.315 mm (V) 178° (H) / 178° (V) 4 1 1 Analog Stereo, Optical Digital, HDMI ARC English, French, Spanish Yes B Remote Control Model: Certifications: Voltage Range: Power Consumption: Standby Power: Zero Bright Pixel Guarantee: Screw Size Wallmount Hole Pattern M50-E1 XRT135 UL, cUL, FCC Class B, BET7...
... Effective Refresh Rate 3840 x 2160 (UHD) 20M:1 0.315 mm (H) X 0.315 mm (V) 178° (H) / 178° (V) 4 1 1 Analog Stereo, Optical Digital, HDMI ARC English, French, Spanish Yes B Remote Control Model: Certifications: Voltage Range: Power Consumption: Standby Power: Zero Bright Pixel Guarantee: Screw Size Wallmount Hole Pattern M50-E1 XRT135 UL, cUL, FCC Class B, BET7...
User Manual
Page 36
... (H) X 0.315 mm (V) 178° (H) / 178° (V) 4 1 1 Analog Stereo, Optical Digital, HDMI ARC English, French, Spanish Yes B Remote Control Model: Certifications: Voltage Range: Power Consumption: Standby Power: Zero Bright Pixel Guarantee: Screw Size Wallmount Hole Pattern M55-E0 XRT135 C-US , CSA , FCC Class B, ICES-003 Class B, IC, HDMI (CEC, ARC), Dolby Audio™ 120...
... (H) X 0.315 mm (V) 178° (H) / 178° (V) 4 1 1 Analog Stereo, Optical Digital, HDMI ARC English, French, Spanish Yes B Remote Control Model: Certifications: Voltage Range: Power Consumption: Standby Power: Zero Bright Pixel Guarantee: Screw Size Wallmount Hole Pattern M55-E0 XRT135 C-US , CSA , FCC Class B, ICES-003 Class B, IC, HDMI (CEC, ARC), Dolby Audio™ 120...

User Manual
Page 37
...Resolution: Dynamic Contrast Ratio: Pixel Pitch: Viewing Angle: HDMI Inputs: Component Video Inputs: USB Port: Audio Outputs: OSD Language: Ambient Light Sensor: M65-E0 65" 64.50" 57.59" x 35.78" x 10.87" 57.59" x 33.14" x 2.51" 57.32 lbs 55.33...; (H) / 178° (V) 4 1 2 Analog Stereo, Optical Digital, HDMI ARC English, French, Spanish Yes B Remote Control Model: Certifications: Voltage Range: Power Consumption: Standby Power: Zero Bright Pixel Guarantee: Screw Size Wallmount Hole Pattern M65-E0 XRT135 C-US , CSA , FCC Class B, ICES-003 Class B, IC, HDMI (CEC, ARC), Dolby Audio™ 120...
...Resolution: Dynamic Contrast Ratio: Pixel Pitch: Viewing Angle: HDMI Inputs: Component Video Inputs: USB Port: Audio Outputs: OSD Language: Ambient Light Sensor: M65-E0 65" 64.50" 57.59" x 35.78" x 10.87" 57.59" x 33.14" x 2.51" 57.32 lbs 55.33...; (H) / 178° (V) 4 1 2 Analog Stereo, Optical Digital, HDMI ARC English, French, Spanish Yes B Remote Control Model: Certifications: Voltage Range: Power Consumption: Standby Power: Zero Bright Pixel Guarantee: Screw Size Wallmount Hole Pattern M65-E0 XRT135 C-US , CSA , FCC Class B, ICES-003 Class B, IC, HDMI (CEC, ARC), Dolby Audio™ 120...

User Manual
Page 38
... 3840 x 2160 (UHD) 50M : 1 0.4008 mm (H) X 0.4008 mm (V) 178° (H) / 178° (V) 4 1 1 (Shared with Component) Analog Stereo, Optical Digital, HDMI ARC English, French, Spanish Yes B Remote Control Model: Certifications: Voltage Range: Power Consumption: Standby Power: Zero Bright Pixel Guarantee: Screw Size Wallmount Hole Pattern M70-E3 XRT135 UL, cUL, FCC Class B, BET7...
... 3840 x 2160 (UHD) 50M : 1 0.4008 mm (H) X 0.4008 mm (V) 178° (H) / 178° (V) 4 1 1 (Shared with Component) Analog Stereo, Optical Digital, HDMI ARC English, French, Spanish Yes B Remote Control Model: Certifications: Voltage Range: Power Consumption: Standby Power: Zero Bright Pixel Guarantee: Screw Size Wallmount Hole Pattern M70-E3 XRT135 UL, cUL, FCC Class B, BET7...

User Manual
Page 39
... Effective Refresh Rate 3840 x 2160 (UHD) 20M:1 0.4298 mm (H) X 0.4298 mm (V) 178° (H) / 178° (V) 2 1 1 Analog Stereo, Optical Digital, HDMI ARC English, French, Spanish Yes B Remote Control Model: Certifications: Voltage Range: Power Consumption: Standby Power: Zero Bright Pixel Guarantee: Screw Size Wallmount Hole Pattern M75-E1 XRT135 UL, cUL, FCC Class B, BET7...
... Effective Refresh Rate 3840 x 2160 (UHD) 20M:1 0.4298 mm (H) X 0.4298 mm (V) 178° (H) / 178° (V) 2 1 1 Analog Stereo, Optical Digital, HDMI ARC English, French, Spanish Yes B Remote Control Model: Certifications: Voltage Range: Power Consumption: Standby Power: Zero Bright Pixel Guarantee: Screw Size Wallmount Hole Pattern M75-E1 XRT135 UL, cUL, FCC Class B, BET7...


