
M550VSE User Manual
Page 1
USER GUIDE MOMDODEELLSS // E3D320VX // ME3D44270V0XVSE // ME3D54750V0XVSE M650VSE INSTALLING YOUR new TV CONTROLS & CONNECTIONS CONNECTING YOUR DEVICES USING THE ON-SCREEN MENU USING THE USB MEDIA PLAYER USING VIZIO INTERNET APPS TROUBLESHOOTING & SUPPORT Help, SPECs, warranty & LEGAL
USER GUIDE MOMDODEELLSS // E3D320VX // ME3D44270V0XVSE // ME3D54750V0XVSE M650VSE INSTALLING YOUR new TV CONTROLS & CONNECTIONS CONNECTING YOUR DEVICES USING THE ON-SCREEN MENU USING THE USB MEDIA PLAYER USING VIZIO INTERNET APPS TROUBLESHOOTING & SUPPORT Help, SPECs, warranty & LEGAL
M550VSE User Manual
Page 3
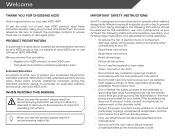
...• Do not defeat the safety purpose of the polarized or grounding-type plug. Important Safety Instructions Your TV is intended to alert you either: • Register your VIZIO product at (877) 878-4946. The wide blade or the third prong are no missing or damaged parts... registration card Extended Warranties For peace of electric shock or component damage, switch off the power before operating your TV. To purchase an extended warranty service plan, visit www.VIZIO.com. Misuse may result in accordance with the manufacturer's instructions. • Do not install near water. &#...
...• Do not defeat the safety purpose of the polarized or grounding-type plug. Important Safety Instructions Your TV is intended to alert you either: • Register your VIZIO product at (877) 878-4946. The wide blade or the third prong are no missing or damaged parts... registration card Extended Warranties For peace of electric shock or component damage, switch off the power before operating your TV. To purchase an extended warranty service plan, visit www.VIZIO.com. Misuse may result in accordance with the manufacturer's instructions. • Do not install near water. &#...
M550VSE User Manual
Page 4
...voltage specified. The manufacturer's warranty does not cover user abuse or improper installations. • The power cord must be used for your TV. Overloading can be replaced when using different voltage than the specified voltage may form in any objects on the label. Servicing is required...electric shock. • Do not touch the power cord during a lightning storm or when it from moisture. To ensure reliable operation of your TV. For more information, contact your dealer. • When connected to a power outlet, power is required, contact your dealer and refer all ...
...voltage specified. The manufacturer's warranty does not cover user abuse or improper installations. • The power cord must be used for your TV. Overloading can be replaced when using different voltage than the specified voltage may form in any objects on the label. Servicing is required...electric shock. • Do not touch the power cord during a lightning storm or when it from moisture. To ensure reliable operation of your TV. For more information, contact your dealer. • When connected to a power outlet, power is required, contact your dealer and refer all ...

M550VSE User Manual
Page 5
... presence of uninsulated DANGEROUS VOLTAGE within the product's enclosure that the power cord and any of the following occurs, contact the dealer: - Operating your TV in environments with liquids, such as vases, shall be used as sunshine, fire or the like. • If any other moisture. - The power... no objects filled with heavy dust or high humidity may be exposed to rain or other cables are for repair. The performance of your TV changes substantially. • This apparatus shall not be of sufficient magnitude to constitute a risk of electric shock, do not touch the connector...
... presence of uninsulated DANGEROUS VOLTAGE within the product's enclosure that the power cord and any of the following occurs, contact the dealer: - Operating your TV in environments with liquids, such as vases, shall be used as sunshine, fire or the like. • If any other moisture. - The power... no objects filled with heavy dust or high humidity may be exposed to rain or other cables are for repair. The performance of your TV changes substantially. • This apparatus shall not be of sufficient magnitude to constitute a risk of electric shock, do not touch the connector...
M550VSE User Manual
Page 6
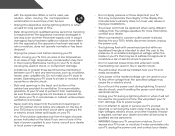
... sure that the antenna or cable system is left unattended or unused for long periods of time, unplug the TV from the wall outlet and disconnect the antenna or cable system. Ground Clamp Antenna Lead In Wire Electric Service Equipment Antenna Discharge Unit (NEC Section ... 810 of the National Electrical Code, ANSI/NFPSA 70, provides information with regard to proper grounding of the mast and supporting structure, grounding of the TV during a lightning storm or when it could fall into such power lines or circuits.
... sure that the antenna or cable system is left unattended or unused for long periods of time, unplug the TV from the wall outlet and disconnect the antenna or cable system. Ground Clamp Antenna Lead In Wire Electric Service Equipment Antenna Discharge Unit (NEC Section ... 810 of the National Electrical Code, ANSI/NFPSA 70, provides information with regard to proper grounding of the mast and supporting structure, grounding of the TV during a lightning storm or when it could fall into such power lines or circuits.

M550VSE User Manual
Page 7
...Up Closed Captioning 28 Changing the Appearance of Contents Installing the TV 3 Inspecting the Package Contents 3 Installing the TV 3 Installing the TV Stand (M470VSE 4 Installing the TV Stand (M550VSE 7 Installing the TV Stand (M650VSE 10 Installing the TV on a Wall 14 Controls and Connections 15 Rear Panel 15...(Best 24 Connecting to a Wireless Network 35 Changing the Advanced Network Settings 36 Testing Your Network Connection 36 Changing the TV Settings 37 Changing the Input Source 37 Setting the Tuner Mode 37 Scanning for Channels 37 Adding New Channels 38 Skipping ...
...Up Closed Captioning 28 Changing the Appearance of Contents Installing the TV 3 Inspecting the Package Contents 3 Installing the TV 3 Installing the TV Stand (M470VSE 4 Installing the TV Stand (M550VSE 7 Installing the TV Stand (M650VSE 10 Installing the TV on a Wall 14 Controls and Connections 15 Rear Panel 15...(Best 24 Connecting to a Wireless Network 35 Changing the Advanced Network Settings 36 Testing Your Network Connection 36 Changing the TV Settings 37 Changing the Input Source 37 Setting the Tuner Mode 37 Scanning for Channels 37 Adding New Channels 38 Skipping ...

M550VSE User Manual
Page 8
... Menu Language 42 Setting the Time Zone 43 Adjusting the CEC Settings 43 Turning the VIZIO Logo On or Off 44 Using the Help Menu 44 Displaying System Information 45 Resetting the TV Settings 45 Restoring the TV to Factory Default Settings 45 Using Guided Setup 46 Using the Info Window 47 Limited... 60 Legal & Compliance 61 Using the USB Media Player 48 Using the USB Media Player 48 Connecting a USB Thumb Drive to the TV 48 Playing USB Media 48 Using VIZIO Internet Apps 51 Using the VIA Shortcut Buttons 51 Using the VIA Dock 51 Moving an App on the VIA Dock 51...
... Menu Language 42 Setting the Time Zone 43 Adjusting the CEC Settings 43 Turning the VIZIO Logo On or Off 44 Using the Help Menu 44 Displaying System Information 45 Resetting the TV Settings 45 Restoring the TV to Factory Default Settings 45 Using Guided Setup 46 Using the Info Window 47 Limited... 60 Legal & Compliance 61 Using the USB Media Player 48 Using the USB Media Player 48 Connecting a USB Thumb Drive to the TV 48 Playing USB Media 48 Using VIZIO Internet Apps 51 Using the VIA Shortcut Buttons 51 Using the VIA Dock 51 Moving an App on the VIA Dock 51...

M550VSE User Manual
Page 9
..., or otherwise improperly moved • If an earthquake occurs and the TV is missing or damaged. 4 x M4 14mm Screws 4 x M4 8mm Screws For M470VSE 4 x M5 16mm Screws 5 x M5 8mm Screws For M550VSE VIZIO HDTV with Stand Remote Control with Full Keyboard and Batteries Quick Start Guide... Package Contents 4 x M5 16mm Screws 4 x M5 8mm Screws 5 x M4 8mm Screws For M650VSE Installing the TV After removing the TV from falling over.
..., or otherwise improperly moved • If an earthquake occurs and the TV is missing or damaged. 4 x M4 14mm Screws 4 x M4 8mm Screws For M470VSE 4 x M5 16mm Screws 5 x M5 8mm Screws For M550VSE VIZIO HDTV with Stand Remote Control with Full Keyboard and Batteries Quick Start Guide... Package Contents 4 x M5 16mm Screws 4 x M5 8mm Screws 5 x M4 8mm Screws For M650VSE Installing the TV After removing the TV from falling over.

M550VSE User Manual
Page 10
Then slide the neck piece downward into the center holes as shown. 4 1 installing the TV Stand (M470VSE) 1 2 Place the base upside down resting on a ledge. Attach the neck piece by tightening the four (4) included M4 8mm Pan Head Screws into place.
Then slide the neck piece downward into the center holes as shown. 4 1 installing the TV Stand (M470VSE) 1 2 Place the base upside down resting on a ledge. Attach the neck piece by tightening the four (4) included M4 8mm Pan Head Screws into place.
M550VSE User Manual
Page 11
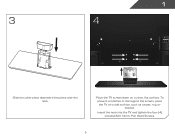
To prevent scratches or damage to the screen, place the TV on a clean, flat surface. 1 3 4 Slide the collar piece downward into the TV and tighten the four (4) included M4 14mm Pan HeaTdhisSPcrordeucwt Ssol.d Separately 5 Place the TV screen-down on a soft surface, such as carpet, rug, or blanket. Insert the neck into place over the neck.
To prevent scratches or damage to the screen, place the TV on a clean, flat surface. 1 3 4 Slide the collar piece downward into the TV and tighten the four (4) included M4 14mm Pan HeaTdhisSPcrordeucwt Ssol.d Separately 5 Place the TV screen-down on a soft surface, such as carpet, rug, or blanket. Insert the neck into place over the neck.

M550VSE User Manual
Page 12
1 5 6 Slide the base cover into place. Place the TV on a stable, level surface. 6
1 5 6 Slide the base cover into place. Place the TV on a stable, level surface. 6
M550VSE User Manual
Page 13
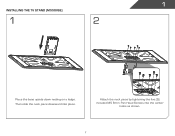
1 installing the TV Stand (M550VSE) 1 2 Place the base upside down resting on a ledge. Then slide the neck piece downward into the center holes as shown. 7 Attach the neck piece by tightening the five (5) included M5 8mm Pan Head Screws into place.
1 installing the TV Stand (M550VSE) 1 2 Place the base upside down resting on a ledge. Then slide the neck piece downward into the center holes as shown. 7 Attach the neck piece by tightening the five (5) included M5 8mm Pan Head Screws into place.

M550VSE User Manual
Page 14
1 3 4 Slide the collar piece downward into the TV and tighten the four (4) included M5 16mm Pan HeaTdhisSPcrordeucwt Ssol.d Separately 8 To prevent scratches or damage to the screen, place the TV on a clean, flat surface. Place the TV screen-down on a soft surface, such as carpet, rug, or blanket. Insert the neck into place over the neck.
1 3 4 Slide the collar piece downward into the TV and tighten the four (4) included M5 16mm Pan HeaTdhisSPcrordeucwt Ssol.d Separately 8 To prevent scratches or damage to the screen, place the TV on a clean, flat surface. Place the TV screen-down on a soft surface, such as carpet, rug, or blanket. Insert the neck into place over the neck.

M550VSE User Manual
Page 15
1 5 6 Slide the base cover into place. Place the TV on a stable, level surface. 9
1 5 6 Slide the base cover into place. Place the TV on a stable, level surface. 9

M550VSE User Manual
Page 16
Then slide the neck piece downward into the edge with the appropriate notch pieces. First slide the base bracket into place. installing the TV Stand (M650VSE) 1 2 B 1 A Place the base upside down resting on a ledge. Next rest the entire base bracket into the cover. 10
Then slide the neck piece downward into the edge with the appropriate notch pieces. First slide the base bracket into place. installing the TV Stand (M650VSE) 1 2 B 1 A Place the base upside down resting on a ledge. Next rest the entire base bracket into the cover. 10

M550VSE User Manual
Page 18
To prevent scratches or damage to the screen, place the TV on a clean, flat surface. 1 5 6 Slide the collar piece downward into place over the neck. Place the TV screen-down on a soft surface, such as carpet, rug, or blanket. Align the base with the TV and tighten the four (4) included M5 16mm phillips screws. 12
To prevent scratches or damage to the screen, place the TV on a clean, flat surface. 1 5 6 Slide the collar piece downward into place over the neck. Place the TV screen-down on a soft surface, such as carpet, rug, or blanket. Align the base with the TV and tighten the four (4) included M5 16mm phillips screws. 12

M550VSE User Manual
Page 19
1 7 8 Slide the base cover into place. Place the TV on a stable, level surface. 13
1 7 8 Slide the base cover into place. Place the TV on a stable, level surface. 13

M550VSE User Manual
Page 20
...Mount Screw Location - Disconnect any cables connected to the wall, carefully following the instructions that came with your TV. 2. Attach your TV and wall mount to your mount. M470VSE M550VSE M650VSE Screw Size: M6 Screw Length: 12mm Screw Pitch: 1.0mm Hole Pattern: 300mm (V) x 400mm (H) ...you have determined that can begin the installation. M650VSE Specifications for your TV on a wall: 1. M550VSE Wall Mount Screw Location - Installing the TV on a Wall To mount your TV, you can scratch or damage the TV. 3. See Appendix B - Remove the base by loosening and ...
...Mount Screw Location - Disconnect any cables connected to the wall, carefully following the instructions that came with your TV. 2. Attach your TV and wall mount to your mount. M470VSE M550VSE M650VSE Screw Size: M6 Screw Length: 12mm Screw Pitch: 1.0mm Hole Pattern: 300mm (V) x 400mm (H) ...you have determined that can begin the installation. M650VSE Specifications for your TV on a wall: 1. M550VSE Wall Mount Screw Location - Installing the TV on a Wall To mount your TV, you can scratch or damage the TV. 3. See Appendix B - Remove the base by loosening and ...

M550VSE User Manual
Page 22
VIA - VOLUME UP/DOWN - Change input source. 16 2 VIA CH+ CHVOL+ VOLINPUT Side Panel Open the on . Side Panel POWER - Change the channel. CHANNEL UP/DOWN - INPUT - Turn TV off or on -screen menu. Increase or decrease volume level.
VIA - VOLUME UP/DOWN - Change input source. 16 2 VIA CH+ CHVOL+ VOLINPUT Side Panel Open the on . Side Panel POWER - Change the channel. CHANNEL UP/DOWN - INPUT - Turn TV off or on -screen menu. Increase or decrease volume level.
M550VSE User Manual
Page 24
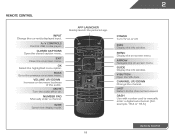
.... Number Pad Manually enter a channel. Last Return to the previous on-screen menu. Volume Up/Down Increase or decrease loudness of the audio. Power Turn TV on or off or on -screen menu. Info Display the info window. Channel Up/Down Change the channel. 2 Remote Control Input Change the currently-displayed...
.... Number Pad Manually enter a channel. Last Return to the previous on-screen menu. Volume Up/Down Increase or decrease loudness of the audio. Power Turn TV on or off or on -screen menu. Info Display the info window. Channel Up/Down Change the channel. 2 Remote Control Input Change the currently-displayed...


