
M550VSE User Manual
Page 1
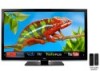
USER GUIDE MOMDODEELLSS // E3D320VX // ME3D44270V0XVSE // ME3D54750V0XVSE M650VSE INSTALLING YOUR new TV CONTROLS & CONNECTIONS CONNECTING YOUR DEVICES USING THE ON-SCREEN MENU USING THE USB MEDIA PLAYER USING VIZIO INTERNET APPS TROUBLESHOOTING & SUPPORT Help, SPECs, warranty & LEGAL
USER GUIDE MOMDODEELLSS // E3D320VX // ME3D44270V0XVSE // ME3D54750V0XVSE M650VSE INSTALLING YOUR new TV CONTROLS & CONNECTIONS CONNECTING YOUR DEVICES USING THE ON-SCREEN MENU USING THE USB MEDIA PLAYER USING VIZIO INTERNET APPS TROUBLESHOOTING & SUPPORT Help, SPECs, warranty & LEGAL
M550VSE User Manual
Page 3
...fit into your outlet, consult an electrician for your safety. To get the most out of your new VIZIO product, read these instructions before operating your TV. It is designed and manufactured to operate within defined design limits. We recommend that produce heat. •...sure to inspect the package contents to the presence of important operating instructions. Important Safety Instructions Your TV is intended to protect your investment beyond the standard warranty, VIZIO offers on or pinched, particularly at plugs, convenience receptacles, and the point where they exit from...
...fit into your outlet, consult an electrician for your safety. To get the most out of your new VIZIO product, read these instructions before operating your TV. It is designed and manufactured to operate within defined design limits. We recommend that produce heat. •...sure to inspect the package contents to the presence of important operating instructions. Important Safety Instructions Your TV is intended to protect your investment beyond the standard warranty, VIZIO offers on or pinched, particularly at plugs, convenience receptacles, and the point where they exit from...
M550VSE User Manual
Page 4
... you are not blocked or covered. When a cart is used for long period of the display. Operating your TV. • Your TV should be installed near your TV and easily accessible. • Only power of the marked voltage can result in a bookcase or cabinet unless proper...The manufacturer's warranty does not cover user abuse or improper installations. • The power cord must be used , use caution when moving your TV. Any other hazards. To totally disconnect power, unplug the power cord. • The lightning flash with the apparatus. with arrowhead ...
... you are not blocked or covered. When a cart is used for long period of the display. Operating your TV. • Your TV should be installed near your TV and easily accessible. • Only power of the marked voltage can result in a bookcase or cabinet unless proper...The manufacturer's warranty does not cover user abuse or improper installations. • The power cord must be used , use caution when moving your TV. Any other hazards. To totally disconnect power, unplug the power cord. • The lightning flash with the apparatus. with arrowhead ...

M550VSE User Manual
Page 5
...the connector with wet hands. • Insert batteries in accordance with heavy dust or high humidity. If any object drops into your TV. - Operating your TV in environments with liquids, such as vases, shall be of sufficient magnitude to excessive heat such as the disconnect device, the disconnect...your dealer immediately. Continuous use in this case may cause fire or electric shock. • Follow instructions for moving your TV. • When unplugging your TV, hold the AC/DC power adapter, not the cord. Do not expose batteries to constitute a risk of electric shock, do ...
...the connector with wet hands. • Insert batteries in accordance with heavy dust or high humidity. If any object drops into your TV. - Operating your TV in environments with liquids, such as vases, shall be of sufficient magnitude to excessive heat such as the disconnect device, the disconnect...your dealer immediately. Continuous use in this case may cause fire or electric shock. • Follow instructions for moving your TV. • When unplugging your TV, hold the AC/DC power adapter, not the cord. Do not expose batteries to constitute a risk of electric shock, do ...
M550VSE User Manual
Page 6
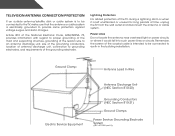
...antenna near overhead light or power circuits, or where it is left unattended or unused for long periods of time, unplug the TV from the wall outlet and disconnect the antenna or cable system. Ground Clamp Antenna Lead In Wire Electric Service Equipment Antenna Discharge ... the grounding conductors, location of antenna discharge unit, connection to earth in the building installation. Lightning Protection For added protection of the TV during a lightning storm or when it could fall into such power lines or circuits. Television Antenna Connection Protection If an outside...
...antenna near overhead light or power circuits, or where it is left unattended or unused for long periods of time, unplug the TV from the wall outlet and disconnect the antenna or cable system. Ground Clamp Antenna Lead In Wire Electric Service Equipment Antenna Discharge ... the grounding conductors, location of antenna discharge unit, connection to earth in the building installation. Lightning Protection For added protection of the TV during a lightning storm or when it could fall into such power lines or circuits. Television Antenna Connection Protection If an outside...

M550VSE User Manual
Page 7
...(Best 24 Connecting to a Wireless Network 35 Changing the Advanced Network Settings 36 Testing Your Network Connection 36 Changing the TV Settings 37 Changing the Input Source 37 Setting the Tuner Mode 37 Scanning for Channels 37 Adding New Channels 38 Skipping ...Up Closed Captioning 28 Changing the Appearance of Contents Installing the TV 3 Inspecting the Package Contents 3 Installing the TV 3 Installing the TV Stand (M470VSE 4 Installing the TV Stand (M550VSE 7 Installing the TV Stand (M650VSE 10 Installing the TV on a Wall 14 Controls and Connections 15 Rear Panel 15...
...(Best 24 Connecting to a Wireless Network 35 Changing the Advanced Network Settings 36 Testing Your Network Connection 36 Changing the TV Settings 37 Changing the Input Source 37 Setting the Tuner Mode 37 Scanning for Channels 37 Adding New Channels 38 Skipping ...Up Closed Captioning 28 Changing the Appearance of Contents Installing the TV 3 Inspecting the Package Contents 3 Installing the TV 3 Installing the TV Stand (M470VSE 4 Installing the TV Stand (M550VSE 7 Installing the TV Stand (M650VSE 10 Installing the TV on a Wall 14 Controls and Connections 15 Rear Panel 15...

M550VSE User Manual
Page 8
... Menu Language 42 Setting the Time Zone 43 Adjusting the CEC Settings 43 Turning the VIZIO Logo On or Off 44 Using the Help Menu 44 Displaying System Information 45 Resetting the TV Settings 45 Restoring the TV to Factory Default Settings 45 Using Guided Setup 46 Using the Info Window 47 Limited... 60 Legal & Compliance 61 Using the USB Media Player 48 Using the USB Media Player 48 Connecting a USB Thumb Drive to the TV 48 Playing USB Media 48 Using VIZIO Internet Apps 51 Using the VIA Shortcut Buttons 51 Using the VIA Dock 51 Moving an App on the VIA Dock 51...
... Menu Language 42 Setting the Time Zone 43 Adjusting the CEC Settings 43 Turning the VIZIO Logo On or Off 44 Using the Help Menu 44 Displaying System Information 45 Resetting the TV Settings 45 Restoring the TV to Factory Default Settings 45 Using Guided Setup 46 Using the Info Window 47 Limited... 60 Legal & Compliance 61 Using the USB Media Player 48 Using the USB Media Player 48 Connecting a USB Thumb Drive to the TV 48 Playing USB Media 48 Using VIZIO Internet Apps 51 Using the VIA Shortcut Buttons 51 Using the VIA Dock 51 Moving an App on the VIA Dock 51...

M550VSE User Manual
Page 9
... ensure nothing is missing or damaged. 4 x M4 14mm Screws 4 x M4 8mm Screws For M470VSE 4 x M5 16mm Screws 5 x M5 8mm Screws For M550VSE VIZIO HDTV with Stand Remote Control with Full Keyboard and Batteries Quick Start Guide Package Contents 4 x M5 16mm Screws 4 x M5 8mm Screws 5 x M4 8mm Screws ...For M650VSE Installing the TV After removing the TV from falling over if: • It is placed on an uneven, unstable, or non-level surface • It is pushed, pulled, or...
... ensure nothing is missing or damaged. 4 x M4 14mm Screws 4 x M4 8mm Screws For M470VSE 4 x M5 16mm Screws 5 x M5 8mm Screws For M550VSE VIZIO HDTV with Stand Remote Control with Full Keyboard and Batteries Quick Start Guide Package Contents 4 x M5 16mm Screws 4 x M5 8mm Screws 5 x M4 8mm Screws ...For M650VSE Installing the TV After removing the TV from falling over if: • It is placed on an uneven, unstable, or non-level surface • It is pushed, pulled, or...

M550VSE User Manual
Page 10
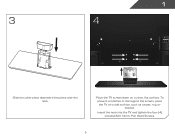
Then slide the neck piece downward into the center holes as shown. 4 Attach the neck piece by tightening the four (4) included M4 8mm Pan Head Screws into place. 1 installing the TV Stand (M470VSE) 1 2 Place the base upside down resting on a ledge.
Then slide the neck piece downward into the center holes as shown. 4 Attach the neck piece by tightening the four (4) included M4 8mm Pan Head Screws into place. 1 installing the TV Stand (M470VSE) 1 2 Place the base upside down resting on a ledge.
M550VSE User Manual
Page 11
1 3 4 Slide the collar piece downward into the TV and tighten the four (4) included M4 14mm Pan HeaTdhisSPcrordeucwt Ssol.d Separately 5 To prevent scratches or damage to the screen, place the TV on a clean, flat surface. Insert the neck into place over the neck. Place the TV screen-down on a soft surface, such as carpet, rug, or blanket.
1 3 4 Slide the collar piece downward into the TV and tighten the four (4) included M4 14mm Pan HeaTdhisSPcrordeucwt Ssol.d Separately 5 To prevent scratches or damage to the screen, place the TV on a clean, flat surface. Insert the neck into place over the neck. Place the TV screen-down on a soft surface, such as carpet, rug, or blanket.

M550VSE User Manual
Page 12
1 5 6 Slide the base cover into place. Place the TV on a stable, level surface. 6
1 5 6 Slide the base cover into place. Place the TV on a stable, level surface. 6
M550VSE User Manual
Page 13
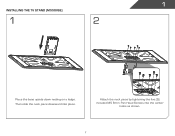
1 installing the TV Stand (M550VSE) 1 2 Place the base upside down resting on a ledge. Then slide the neck piece downward into the center holes as shown. 7 Attach the neck piece by tightening the five (5) included M5 8mm Pan Head Screws into place.
1 installing the TV Stand (M550VSE) 1 2 Place the base upside down resting on a ledge. Then slide the neck piece downward into the center holes as shown. 7 Attach the neck piece by tightening the five (5) included M5 8mm Pan Head Screws into place.

M550VSE User Manual
Page 14
1 3 4 Slide the collar piece downward into the TV and tighten the four (4) included M5 16mm Pan HeaTdhisSPcrordeucwt Ssol.d Separately 8 Insert the neck into place over the neck. To prevent scratches or damage to the screen, place the TV on a clean, flat surface. Place the TV screen-down on a soft surface, such as carpet, rug, or blanket.
1 3 4 Slide the collar piece downward into the TV and tighten the four (4) included M5 16mm Pan HeaTdhisSPcrordeucwt Ssol.d Separately 8 Insert the neck into place over the neck. To prevent scratches or damage to the screen, place the TV on a clean, flat surface. Place the TV screen-down on a soft surface, such as carpet, rug, or blanket.

M550VSE User Manual
Page 15
Place the TV on a stable, level surface. 9 1 5 6 Slide the base cover into place.
Place the TV on a stable, level surface. 9 1 5 6 Slide the base cover into place.

M550VSE User Manual
Page 16
First slide the base bracket into the cover. 10 Next rest the entire base bracket into the edge with the appropriate notch pieces. Then slide the neck piece downward into place. installing the TV Stand (M650VSE) 1 2 B 1 A Place the base upside down resting on a ledge.
First slide the base bracket into the cover. 10 Next rest the entire base bracket into the edge with the appropriate notch pieces. Then slide the neck piece downward into place. installing the TV Stand (M650VSE) 1 2 B 1 A Place the base upside down resting on a ledge.

M550VSE User Manual
Page 18
1 5 6 Slide the collar piece downward into place over the neck. Align the base with the TV and tighten the four (4) included M5 16mm phillips screws. 12 To prevent scratches or damage to the screen, place the TV on a clean, flat surface. Place the TV screen-down on a soft surface, such as carpet, rug, or blanket.
1 5 6 Slide the collar piece downward into place over the neck. Align the base with the TV and tighten the four (4) included M5 16mm phillips screws. 12 To prevent scratches or damage to the screen, place the TV on a clean, flat surface. Place the TV screen-down on a soft surface, such as carpet, rug, or blanket.

M550VSE User Manual
Page 19
1 7 8 Slide the base cover into place. Place the TV on a stable, level surface. 13
1 7 8 Slide the base cover into place. Place the TV on a stable, level surface. 13

M550VSE User Manual
Page 20
...-down on a wall: 1. Specifications for the weight/load of this TV. This allows the TV to rest closer to find the appropriate mount for your TV model: Installing a TV on a wall requires lifting. M470VSE M550VSE M650VSE Screw Size: M6 Screw Length: 12mm Screw Pitch: 1.0mm Hole Pattern: 300mm (V) x 400mm ...begin the installation. Attach your TV and wall mount to the wall, carefully following the instructions that you have the correct mount for your TV, you . M650VSE M550VSE Wall Mount Screw Location - Installing the TV on a Wall To mount your TV on a wall, you may...
...-down on a wall: 1. Specifications for the weight/load of this TV. This allows the TV to rest closer to find the appropriate mount for your TV model: Installing a TV on a wall requires lifting. M470VSE M550VSE M650VSE Screw Size: M6 Screw Length: 12mm Screw Pitch: 1.0mm Hole Pattern: 300mm (V) x 400mm ...begin the installation. Attach your TV and wall mount to the wall, carefully following the instructions that you have the correct mount for your TV, you . M650VSE M550VSE Wall Mount Screw Location - Installing the TV on a Wall To mount your TV on a wall, you may...

M550VSE User Manual
Page 22
VOLUME UP/DOWN - Increase or decrease volume level. CHANNEL UP/DOWN - Change the channel. Change input source. 16 2 VIA CH+ CHVOL+ VOLINPUT Side Panel Side Panel POWER - Turn TV off or on -screen menu. Open the on . INPUT - VIA -
VOLUME UP/DOWN - Increase or decrease volume level. CHANNEL UP/DOWN - Change the channel. Change input source. 16 2 VIA CH+ CHVOL+ VOLINPUT Side Panel Side Panel POWER - Turn TV off or on -screen menu. Open the on . INPUT - VIA -
M550VSE User Manual
Page 24
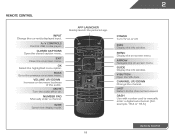
App launcher Quickly launch the pictured app. Power Turn TV on or off or on. Guide Display the info window. Closed Captions Open the closed caption menu. Menu Display the on -screen menu. Channel Up/...
App launcher Quickly launch the pictured app. Power Turn TV on or off or on. Guide Display the info window. Closed Captions Open the closed caption menu. Menu Display the on -screen menu. Channel Up/...


