
M420SV User Manual
Page 3
... the TV 1 Installing the TV Stand 1 Installing the TV on a Wall 2 Controls and Connections 3 Rear Panel Inputs 3 Rear Panel Buttons 4 Front Panel 4 Remote Control 5 VIA Shortcut Buttons 6 Replacing the Batteries 6 Connecting Your Devices 7 Before You Begin 7 Connecting Your Devices 7 Setting Up Your Network Connection 9 Connecting to A Wired Network 9 Connecting to a ...of the Inputs 26 Changing the On-Screen Menu Language 26 Setting the Time Zone 27 Adjusting the CEC Settings 27 Turning the VIZIO Logo On or Off 28 Using the Help Menu 28 Displaying System Information 28
... the TV 1 Installing the TV Stand 1 Installing the TV on a Wall 2 Controls and Connections 3 Rear Panel Inputs 3 Rear Panel Buttons 4 Front Panel 4 Remote Control 5 VIA Shortcut Buttons 6 Replacing the Batteries 6 Connecting Your Devices 7 Before You Begin 7 Connecting Your Devices 7 Setting Up Your Network Connection 9 Connecting to A Wired Network 9 Connecting to a ...of the Inputs 26 Changing the On-Screen Menu Language 26 Setting the Time Zone 27 Adjusting the CEC Settings 27 Turning the VIZIO Logo On or Off 28 Using the Help Menu 28 Displaying System Information 28
M420SV User Manual
Page 14
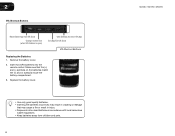
Insert two AAA batteries into the remote control. Make sure that may cause a fire or result in injury. • Dispose of old or dead batteries in accordance with local hazardous waste regulations. &#... VIA Sidebar is open) View Settings for Active VIA App Exit App/Exit VIA Dock VIA Shortcut Buttons Replacing the Batteries 1. 2 VIA Shortcut Buttons Move/Delete App from children and pets. 6 M420SV / M470SV / M550SV Replace the battery cover. • Use only good quality batteries. • Inserting the batteries incorrectly may result in cracking...
Insert two AAA batteries into the remote control. Make sure that may cause a fire or result in injury. • Dispose of old or dead batteries in accordance with local hazardous waste regulations. &#... VIA Sidebar is open) View Settings for Active VIA App Exit App/Exit VIA Dock VIA Shortcut Buttons Replacing the Batteries 1. 2 VIA Shortcut Buttons Move/Delete App from children and pets. 6 M420SV / M470SV / M550SV Replace the battery cover. • Use only good quality batteries. • Inserting the batteries incorrectly may result in cracking...
M420SV User Manual
Page 46
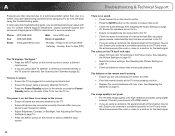
...game console, cable/satellite box) that are connected to the TV. • If you are using digital sources. Ensure your TV, contact VIZIO's Support Department. The colors on page 15. • Reset the picture settings. See Adjusting the Picture Settings on the TV don't look ...plugged into a working . • Ensure you are only pressing one button at a time. • Point the remote directly at the TV when pressing a button. • Replace the remote batteries with HDMI cables. • If you are using this troubleshooting guide. Troubleshooting & Technical Support There is no ...
...game console, cable/satellite box) that are connected to the TV. • If you are using digital sources. Ensure your TV, contact VIZIO's Support Department. The colors on page 15. • Reset the picture settings. See Adjusting the Picture Settings on the TV don't look ...plugged into a working . • Ensure you are only pressing one button at a time. • Point the remote directly at the TV when pressing a button. • Replace the remote batteries with HDMI cables. • If you are using this troubleshooting guide. Troubleshooting & Technical Support There is no ...

M420SV QSG
Page 6
symbols on the batteries must correspond to the back of the TV. The + and - symbols inside the battery compartment. Replace the battery cover by pressing gently and sliding away from the remote. Plug the power cord into place. FIRST-TIME SETUP 1 2 Remove the battery cover by gently sliding it back into an electrical outlet. Insert the batteries. Connect the power cord to the + and -
symbols on the batteries must correspond to the back of the TV. The + and - symbols inside the battery compartment. Replace the battery cover by pressing gently and sliding away from the remote. Plug the power cord into place. FIRST-TIME SETUP 1 2 Remove the battery cover by gently sliding it back into an electrical outlet. Insert the batteries. Connect the power cord to the + and -


