M420SV User Manual
Page 9
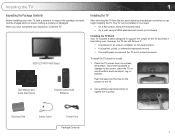
...; On a wall, using a VESA-standard wall mount (not included) Installing the TV Stand Your TV includes a stand designed to support the weight of the TV. VIZIO LCD HDTV with Batteries 2. Use the images below to the screen, place the TV on the bottom of the TV and keep it from the... box and inspecting the package contents you have completed your new TV, take a moment to tighten the 4 screws. Push the base into the hole on a soft surface, such as carpet, rug, or blanket. When you can still fall over . Cleaning Cloth Safety Cable Power Cord ...
...; On a wall, using a VESA-standard wall mount (not included) Installing the TV Stand Your TV includes a stand designed to support the weight of the TV. VIZIO LCD HDTV with Batteries 2. Use the images below to the screen, place the TV on the bottom of the TV and keep it from the... box and inspecting the package contents you have completed your new TV, take a moment to tighten the 4 screws. Push the base into the hole on a soft surface, such as carpet, rug, or blanket. When you can still fall over . Cleaning Cloth Safety Cable Power Cord ...
M420SV User Manual
Page 10
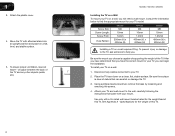
... a Wall To mount your TV on a wall requires lifting. Consult the information below to your TV model: Screw Size: Screw Length: Screw Pitch: Hole Pattern: M420SV M6 10mm 1.0mm 200mm (V) x 400mm (H) M470SV M6 10mm 1.0mm 400mm (V) x 400mm (H) M550SV M8 10mm 1.25mm 400mm (V) x 400mm (H) Installing a TV on a...the weight/load of this TV. 2 Place the TV face-down on a clean, flat, stable surface. Using a philips-head screwdriver, remove the base by loosening and removing the screws. 4. Attach your TV on a flat, level, and stable surface. 5. To prevent injury or damage to the...
... a Wall To mount your TV on a wall requires lifting. Consult the information below to your TV model: Screw Size: Screw Length: Screw Pitch: Hole Pattern: M420SV M6 10mm 1.0mm 200mm (V) x 400mm (H) M470SV M6 10mm 1.0mm 400mm (V) x 400mm (H) M550SV M8 10mm 1.25mm 400mm (V) x 400mm (H) Installing a TV on a...the weight/load of this TV. 2 Place the TV face-down on a clean, flat, stable surface. Using a philips-head screwdriver, remove the base by loosening and removing the screws. 4. Attach your TV on a flat, level, and stable surface. 5. To prevent injury or damage to the...
M420SV User Manual
Page 33
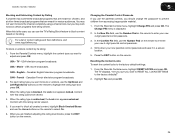
...menu is blocked, the Lock icon appears locked. From the Parental Controls menu, highlight RESET LOCKS and press OK. Highlight Yes and press OK. 25 M420SV / M470SV / M550SV 5 Blocking and Unblocking Content by its rating. CAN - Content with this is unblocked, the Lock icon appears unlocked. When you...5. Write down your new 4-digit parental control passcode. 4. In the New Pin field, use the Number Pad on the remote to block content based on the remote. In the Confirm Pin field, use the Number Pad on the remote to select On. 6. Press the EXIT button on the...
...menu is blocked, the Lock icon appears locked. From the Parental Controls menu, highlight RESET LOCKS and press OK. Highlight Yes and press OK. 25 M420SV / M470SV / M550SV 5 Blocking and Unblocking Content by its rating. CAN - Content with this is unblocked, the Lock icon appears unlocked. When you...5. Write down your new 4-digit parental control passcode. 4. In the New Pin field, use the Number Pad on the remote to block content based on the remote. In the Confirm Pin field, use the Number Pad on the remote to select On. 6. Press the EXIT button on the...

M420SV User Manual
Page 35
M420SV / M470SV / M550SV 5 Setting the Time Zone To ensure the correct time is displayed when you press the INFO button, set the TV's time zone: To have the TV display the correct time, you the most accurate location-based information, such as weather or news. 8. Use the Arrow buttons on the remote. 27...
M420SV / M470SV / M550SV 5 Setting the Time Zone To ensure the correct time is displayed when you press the INFO button, set the TV's time zone: To have the TV display the correct time, you the most accurate location-based information, such as weather or news. 8. Use the Arrow buttons on the remote. 27...

M420SV User Manual
Page 51
...provide source code to you on your VIZIO VIA device. The changes or modifications not expressly approved by turning the equipment off and on, the user is connected. 4. Use the AC cords listed below for help. USA: UL Canada: CSA Germany: VDE UK: BASE/BS Japan: Electric Appliance Control Act ... B Radio Interference Statement NOTE: This equipment has been tested and found to comply with the FCC Rules could void the user's authority to VIZIO at www.VIZIO.com. This equipment generates, uses and can also obtain a copy of gSOAP public license from the date of the distribution of the FCC...
...provide source code to you on your VIZIO VIA device. The changes or modifications not expressly approved by turning the equipment off and on, the user is connected. 4. Use the AC cords listed below for help. USA: UL Canada: CSA Germany: VDE UK: BASE/BS Japan: Electric Appliance Control Act ... B Radio Interference Statement NOTE: This equipment has been tested and found to comply with the FCC Rules could void the user's authority to VIZIO at www.VIZIO.com. This equipment generates, uses and can also obtain a copy of gSOAP public license from the date of the distribution of the FCC...

M420SV QSG
Page 2
PACKAGE CONTENTS VIZIO LCD HDTV with Base 1 Remote Control with Batteries Cleaning Cloth Safety Cable Power Cord User Manual and Quick Start Guide
PACKAGE CONTENTS VIZIO LCD HDTV with Base 1 Remote Control with Batteries Cleaning Cloth Safety Cable Power Cord User Manual and Quick Start Guide

M420SV QSG
Page 4
Use a phillips-head screwdriver to the screen, place the TV on a soft surface, such as carpet, rug, or blanket. INSTALLING THE BASE 1 2 Place the TV screen-down on the bottom of the TV. To prevent scratches or damage to tighten the 4 screws. Push the base into the hole on a clean, flat surface.
Use a phillips-head screwdriver to the screen, place the TV on a soft surface, such as carpet, rug, or blanket. INSTALLING THE BASE 1 2 Place the TV screen-down on the bottom of the TV. To prevent scratches or damage to tighten the 4 screws. Push the base into the hole on a clean, flat surface.

M420SV QSG
Page 5
Move the TV with attached base into an upright position and place on a flat, level, and stable surface. 3 4 Attach the plastic cover.
Move the TV with attached base into an upright position and place on a flat, level, and stable surface. 3 4 Attach the plastic cover.

