M320SL User Manua
Page 2
... LLC. Manufactured under license from Dolby Laboratories. This product qualifies for ENERGY STAR in the "factory default" setting and this is the setting in which power savings will increase power consumption that could exceed the limits necessary to qualify for ENERGY STAR rating.
... LLC. Manufactured under license from Dolby Laboratories. This product qualifies for ENERGY STAR in the "factory default" setting and this is the setting in which power savings will increase power consumption that could exceed the limits necessary to qualify for ENERGY STAR rating.
M320SL User Manua
Page 3
...VIZIO.com or call toll free at plugs, convenience receptacles, and the point where they exit from the apparatus. • Only use attachments/accessories specified by the manufacturer, or sold We recommend that produce heat. • Do not defeat the safety purpose of the obsolete outlet. • Protect the power...heat registers, stoves, or other components to protect your TV. When Reading this Manual When you to the presence of your new VIZIO product, read the accompanying helpful tip. Important Safety Instructions Your TV is intended to alert you see this symbol, please read the...
...VIZIO.com or call toll free at plugs, convenience receptacles, and the point where they exit from the apparatus. • Only use attachments/accessories specified by the manufacturer, or sold We recommend that produce heat. • Do not defeat the safety purpose of the obsolete outlet. • Protect the power...heat registers, stoves, or other components to protect your TV. When Reading this Manual When you to the presence of your new VIZIO product, read the accompanying helpful tip. Important Safety Instructions Your TV is intended to alert you see this symbol, please read the...
M320SL User Manua
Page 4
... or objects have an electrician install the correct outlet, or use caution when moving your TV from an area of low temperature to a power outlet, power is intended to alert the user to the presence of un-isolated, dangerous voltage within the inside of your TV that may be of...8226; Slots and openings in fire or electric shock. • The wall socket should be installed near your TV and easily accessible. • Only power of the marked voltage can be replaced when using different voltage than the specified voltage may form in a bookcase or cabinet unless proper ventilation is...
... or objects have an electrician install the correct outlet, or use caution when moving your TV from an area of low temperature to a power outlet, power is intended to alert the user to the presence of un-isolated, dangerous voltage within the inside of your TV that may be of...8226; Slots and openings in fire or electric shock. • The wall socket should be installed near your TV and easily accessible. • Only power of the marked voltage can be replaced when using different voltage than the specified voltage may form in a bookcase or cabinet unless proper ventilation is...
M320SL User Manua
Page 5
... If repair is intended to alert the user to the presence of uninsulated DANGEROUS VOLTAGE within the product's enclosure that may be placed on the power cord may damage the wires inside the cord and cause fire or electric shock. If any abnormality occurs. Your TV is damaged, the internal ...in fire or electric shock. • Do not use your dealer for use of electric shock, do not perform any servicing other than that the power cord and any way. - Continued use by qualified service personnel only. To reduce the risk of your TV may cause the batteries to persons. ...
... If repair is intended to alert the user to the presence of uninsulated DANGEROUS VOLTAGE within the product's enclosure that may be placed on the power cord may damage the wires inside the cord and cause fire or electric shock. If any abnormality occurs. Your TV is damaged, the internal ...in fire or electric shock. • Do not use your dealer for use of electric shock, do not perform any servicing other than that the power cord and any way. - Continued use by qualified service personnel only. To reduce the risk of your TV may cause the batteries to persons. ...
M320SL User Manua
Page 6
... they will turn off their analog signal and switch to receive over-the-air TV. DTV Transition Advisory The nationwide switch to receive low power, Class A or translator television stations and with a built-in tuner capable of processing digital broadcasts.
... they will turn off their analog signal and switch to receive over-the-air TV. DTV Transition Advisory The nationwide switch to receive low power, Class A or translator television stations and with a built-in tuner capable of processing digital broadcasts.
M320SL User Manua
Page 7
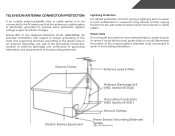
...grounding of the lead-in the building installation. Lightning Protection For added protection of the grounding electrode. Power Lines Do not locate the antenna near overhead light or power circuits, or where it is electrically grounded to provide some protection against voltage surges and static charges... to be connected to grounding electrodes, and requirements of the TV during a lightning storm or when it could fall into such power lines or circuits. Ground Clamp Antenna Lead In Wire Electric Service Equipment Antenna Discharge Unit (NEC Section 810-20) Grounding Conductors ...
...grounding of the lead-in the building installation. Lightning Protection For added protection of the grounding electrode. Power Lines Do not locate the antenna near overhead light or power circuits, or where it is electrically grounded to provide some protection against voltage surges and static charges... to be connected to grounding electrodes, and requirements of the TV during a lightning storm or when it could fall into such power lines or circuits. Ground Clamp Antenna Lead In Wire Electric Service Equipment Antenna Discharge Unit (NEC Section 810-20) Grounding Conductors ...
M320SL User Manua
Page 8
Table of Digital Closed Captions.. 23 Activating the Sleep Timer 24 Setting the Auto Power Off Feature 24 Adjusting the Picture Settings 24 Adjusting the Advanced Picture Settings 25 Adjusting the Color Temperature 26 Adjusting the Picture Size and... 14 Connecting Your Devices 15 Connecting A Device 15 Connecting A PC 16 Connecting an audio device (Model M320SL 17 Connecting an audio device (Model M370SL, M420SL, M470SL, M550SL 18 Connecting to your network 19 Connecting to a Wired Network (Best 19 Connecting to a Wireless Network 30 Changing the Advanced Network Settings ...
Table of Digital Closed Captions.. 23 Activating the Sleep Timer 24 Setting the Auto Power Off Feature 24 Adjusting the Picture Settings 24 Adjusting the Advanced Picture Settings 25 Adjusting the Color Temperature 26 Adjusting the Picture Size and... 14 Connecting Your Devices 15 Connecting A Device 15 Connecting A PC 16 Connecting an audio device (Model M320SL 17 Connecting an audio device (Model M370SL, M420SL, M470SL, M550SL 18 Connecting to your network 19 Connecting to a Wired Network (Best 19 Connecting to a Wireless Network 30 Changing the Advanced Network Settings ...
M320SL User Manua
Page 10
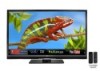
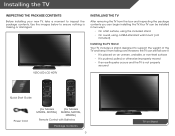
VIZIO LED LCD HDTV Installing the TV After removing the TV from falling over if: • It is placed on an uneven, unstable, or non-level ... the TV Inspecting the Package Contents Before installing your new TV, take a moment to ensure nothing is not properly secured Quick Start Guide Power Cord (For Models M320SL, M370SL) (For Models M420SL, M470SL, M550SL) Remote Control with Batteries Package Contents 3 TV on Stand Use the images below to inspect the package contents.
VIZIO LED LCD HDTV Installing the TV After removing the TV from falling over if: • It is placed on an uneven, unstable, or non-level ... the TV Inspecting the Package Contents Before installing your new TV, take a moment to ensure nothing is not properly secured Quick Start Guide Power Cord (For Models M320SL, M370SL) (For Models M420SL, M470SL, M550SL) Remote Control with Batteries Package Contents 3 TV on Stand Use the images below to inspect the package contents.
M320SL User Manua
Page 16
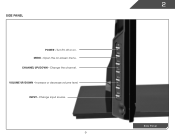
MENU - Open the on . Increase or decrease volume level. CHANNEL UP/DOWN - Change the channel. Side Panel POWER - INPUT - Change input source. 9 2 Side Panel VOLUME UP/DOWN - Turn TV off or on -screen menu.
MENU - Open the on . Increase or decrease volume level. CHANNEL UP/DOWN - Change the channel. Side Panel POWER - INPUT - Change input source. 9 2 Side Panel VOLUME UP/DOWN - Turn TV off or on -screen menu.

M320SL User Manua
Page 18
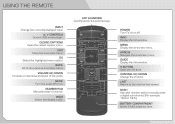
... the currently-displayed input. Ok Select the highlighted menu option. Number Pad Manually enter a channel. Dash Use with number pad to the channel last viewed. Power Turn TV on -screen menu. A/V Controls Control USB media player. Menu Display the on or off or on -screen menu. Guide Display the info window...
... the currently-displayed input. Ok Select the highlighted menu option. Number Pad Manually enter a channel. Dash Use with number pad to the channel last viewed. Power Turn TV on -screen menu. A/V Controls Control USB media player. Menu Display the on or off or on -screen menu. Guide Display the info window...

M320SL User Manua
Page 19
...audio. Remote Control 12 Number Pad Manually enter a channel. Menu Display the on . A/V Controls Control USB media player. Mute Turn the audio off . Power Turn TV on -screen menu. Closed Captions Open the closed caption menu. Last Return to manually enter a digital sub-channel. (For example, 18-4 ...or 18-5.) battery compartment Insert 2 AAA batteries here. 2 Remote Control - FRONT (Models M420SL, M470SL, M550SL) Input Change the currently-displayed input. Arrow Navigate the on or off or on -screen menu.
...audio. Remote Control 12 Number Pad Manually enter a channel. Menu Display the on . A/V Controls Control USB media player. Mute Turn the audio off . Power Turn TV on -screen menu. Closed Captions Open the closed caption menu. Last Return to manually enter a digital sub-channel. (For example, 18-4 ...or 18-5.) battery compartment Insert 2 AAA batteries here. 2 Remote Control - FRONT (Models M420SL, M470SL, M550SL) Input Change the currently-displayed input. Arrow Navigate the on or off or on -screen menu.
M320SL User Manua
Page 27
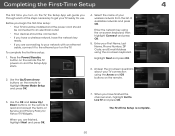
... OK. To complete the first-time setup: 1. Use the Up/Down Arrow buttons on the remote to the ethernet port on the TV. Press the Power/Standby button on and the Setup App starts. 2. Select the name of Service and Privacy Policy for use. When you have a wireless network, have... Setup is complete. 20 Highlight Next and press OK. 6. Before you begin the first-time setup: • Your TV should be installed and the power cord should be connected to an electrical outlet. • Your devices should be connected. • If you are connecting to your network with an ethernet...
... OK. To complete the first-time setup: 1. Use the Up/Down Arrow buttons on the remote to the ethernet port on the TV. Press the Power/Standby button on and the Setup App starts. 2. Select the name of Service and Privacy Policy for use. When you have a wireless network, have... Setup is complete. 20 Highlight Next and press OK. 6. Before you begin the first-time setup: • Your TV should be installed and the power cord should be connected to an electrical outlet. • Your devices should be connected. • If you are connecting to your network with an ethernet...
M320SL User Manua
Page 31
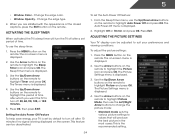
...menu is the recommended setting. 24 This is displayed. 4. The Sleep Timer menu is displayed. 2. Press OK, then press EXIT. Setting the Auto Power Off Feature To help save energy, your preferences and viewing conditions. To adjust the picture settings: 1. Use the Arrow buttons on the remote to ... deactivated. Highlight Off or 10 min and press OK. Press Exit. Adjusting the Picture Settings Your TV display can be adjusted to highlight Auto Power Off and press OK. From the Sleep Timer menu, use the Left/Right Arrow buttons to change the picture mode: • Standard mode...
...menu is the recommended setting. 24 This is displayed. 4. The Sleep Timer menu is displayed. 2. Press OK, then press EXIT. Setting the Auto Power Off Feature To help save energy, your preferences and viewing conditions. To adjust the picture settings: 1. Use the Arrow buttons on the remote to ... deactivated. Highlight Off or 10 min and press OK. Press Exit. Adjusting the Picture Settings Your TV display can be adjusted to highlight Auto Power Off and press OK. From the Sleep Timer menu, use the Left/Right Arrow buttons to change the picture mode: • Standard mode...
M320SL User Manua
Page 50
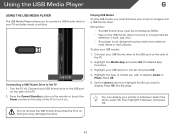
... button on the remote or touch the Power control on the side of media you wish to your TV and play media from external hard drives or mp3 players. Highlight the Media App ...
... button on the remote or touch the Power control on the side of media you wish to your TV and play media from external hard drives or mp3 players. Highlight the Media App ...

M320SL User Manua
Page 58
...securely attached to the TV. • Ensure all cables to ensure they are securely attached. The power is on, but there is connected securely to the TV and move the antenna around the room or... the TV on. The buttons on the remote aren't working electrical outlet. • Ensure the power cable is off. • Check the audio settings. Devices differ; See Adjusting the Picture Settings ...TV don't look right. • Adust the Color and Tint settings in the Picture menu. There is no power. • Ensure the TV is plugged into a working . • Ensure you are only pressing one button...
...securely attached to the TV. • Ensure all cables to ensure they are securely attached. The power is on, but there is connected securely to the TV and move the antenna around the room or... the TV on. The buttons on the remote aren't working electrical outlet. • Ensure the power cable is off. • Check the audio settings. Devices differ; See Adjusting the Picture Settings ...TV don't look right. • Adust the Color and Tint settings in the Picture menu. There is no power. • Ensure the TV is plugged into a working . • Ensure you are only pressing one button...
M320SL User Manua
Page 62
... PRE-AUTHORIZATION MUST BE OBTAINED BEFORE SENDING ANY PRODUCT TO A VIZIO SERVICE CENTER. Parts and Labor There will be responsible for example: cosmetic damage, normal wear and tear, improper operation, improper voltage supply or power surges, signal issues, damages from the unit before it is ...determined to be sent to a VIZIO service center to 4:00PM Saturday and Sunday, Pacific Time, or visit www.VIZIO.com. This warranty does not cover, for restoring ...
... PRE-AUTHORIZATION MUST BE OBTAINED BEFORE SENDING ANY PRODUCT TO A VIZIO SERVICE CENTER. Parts and Labor There will be responsible for example: cosmetic damage, normal wear and tear, improper operation, improper voltage supply or power surges, signal issues, damages from the unit before it is ...determined to be sent to a VIZIO service center to 4:00PM Saturday and Sunday, Pacific Time, or visit www.VIZIO.com. This warranty does not cover, for restoring ...
M320SL User Manua
Page 63
... is valid for a period of three (3) years from the date of the distribution of media, shipping and handling upon request made to VIZIO at www.VIZIO.com. Caution Always use , copy, modify, merge, publish, distribute, sublicense, and/or sell copies of the user to correct the...separation between the equipment and receiver. 3. This device complies with Part 15 of any radio or TV interference caused by VIZIO. Shielded interface cables and AC power cord, if any interference received, including interference that may cause harmful interference to Part 15 of copyrights to operate this ...
... is valid for a period of three (3) years from the date of the distribution of media, shipping and handling upon request made to VIZIO at www.VIZIO.com. Caution Always use , copy, modify, merge, publish, distribute, sublicense, and/or sell copies of the user to correct the...separation between the equipment and receiver. 3. This device complies with Part 15 of any radio or TV interference caused by VIZIO. Shielded interface cables and AC power cord, if any interference received, including interference that may cause harmful interference to Part 15 of copyrights to operate this ...
M470SL Quick Start Guide
Page 2
... that produce heat. • Do not defeat the safety purpose of the polarized or grounding-type plug. To totally disconnect power, unplug the power cord. • The lightning flash with arrowhead symbol within the product's enclosure that may function abnormally. Do not try to...dust or high humidity. Doing so could short circuit parts causing a fire or electric shock. To avoid electric shock, avoid handling the power cord during electrical storms. • Unplug your TV from the apparatus. • Only use attachments/accessories specified by the manufacturer. ...
... that produce heat. • Do not defeat the safety purpose of the polarized or grounding-type plug. To totally disconnect power, unplug the power cord. • The lightning flash with arrowhead symbol within the product's enclosure that may function abnormally. Do not try to...dust or high humidity. Doing so could short circuit parts causing a fire or electric shock. To avoid electric shock, avoid handling the power cord during electrical storms. • Unplug your TV from the apparatus. • Only use attachments/accessories specified by the manufacturer. ...
M470SL Quick Start Guide
Page 6
.... NUMBER PAD Manually enter a channel. GUIDE Display the info window. VOLUME UP/DOWN Increase or decrease loudness of the audio. WIDE Switch the display mode. POWER Turn TV on -screen menu. OK Select the highlighted menu option. V BUTTON Open the VIA dock. INFO Display the info window. CHANNEL UP/DOWN Change...
.... NUMBER PAD Manually enter a channel. GUIDE Display the info window. VOLUME UP/DOWN Increase or decrease loudness of the audio. WIDE Switch the display mode. POWER Turn TV on -screen menu. OK Select the highlighted menu option. V BUTTON Open the VIA dock. INFO Display the info window. CHANNEL UP/DOWN Change...

M470SL Quick Start Guide
Page 8
Connect the power cord to the back of the TV. Plug the power cord into place. FIRST-TIME SETUP 1AAA BATTERY AAA BATTERY 2 AAA BATTERY AAA BATTERY Remove the battery cover by pressing gently on the arrow and sliding away from the remote. Insert the included batteries. Gently slide the battery cover back into an electrical outlet.
Connect the power cord to the back of the TV. Plug the power cord into place. FIRST-TIME SETUP 1AAA BATTERY AAA BATTERY 2 AAA BATTERY AAA BATTERY Remove the battery cover by pressing gently on the arrow and sliding away from the remote. Insert the included batteries. Gently slide the battery cover back into an electrical outlet.


