M320SL User Manua
Page 5
... your TV changes substantially. • This apparatus shall not be placed on the power cord may cause the batteries to leak which can damage the remote control or injure the operator. The performance of your dealer and refer all servicing to dripping or splashing and no objects fill with heavy dust...
... your TV changes substantially. • This apparatus shall not be placed on the power cord may cause the batteries to leak which can damage the remote control or injure the operator. The performance of your dealer and refer all servicing to dripping or splashing and no objects fill with heavy dust...
M320SL User Manua
Page 8
... the Parental Controls 35 Accessing the Parental Controls Menu 35 Enabling or Disabling Program Ratings 36 Locking and Unlocking Channels 36 FRONT (Models M420SL, M470SL, M550SL 12 Remote Control - Table of Digital Closed Captions.. 23 Activating the Sleep Timer 24 Setting the Auto Power Off Feature 24 Adjusting the Picture...3 Installing the TV 3 Installing the TV Stand 3 Installing the TV on a Wall 5 Controls and Connections 7 Rear Panel (Model M320SL 7 Rear Panel (Models M370SL, M420SL, M470SL, M550SL)..... 8 Side Panel 9 Front Panel 10 Remote Control (Models M320SL, M370SL 11...
... the Parental Controls 35 Accessing the Parental Controls Menu 35 Enabling or Disabling Program Ratings 36 Locking and Unlocking Channels 36 FRONT (Models M420SL, M470SL, M550SL 12 Remote Control - Table of Digital Closed Captions.. 23 Activating the Sleep Timer 24 Setting the Auto Power Off Feature 24 Adjusting the Picture...3 Installing the TV 3 Installing the TV Stand 3 Installing the TV on a Wall 5 Controls and Connections 7 Rear Panel (Model M320SL 7 Rear Panel (Models M370SL, M420SL, M470SL, M550SL)..... 8 Side Panel 9 Front Panel 10 Remote Control (Models M320SL, M370SL 11...
M320SL User Manua
Page 10
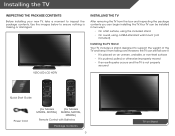
However, the TV can begin installing the TV. VIZIO LED LCD HDTV Installing the TV After removing the TV from falling over if: • It is placed on an uneven, unstable, or non-level ... installing your new TV, take a moment to ensure nothing is not properly secured Quick Start Guide Power Cord (For Models M320SL, M370SL) (For Models M420SL, M470SL, M550SL) Remote Control with Batteries Package Contents 3 TV on Stand Your TV can be installed in two ways: • On a flat surface, using the included stand...
However, the TV can begin installing the TV. VIZIO LED LCD HDTV Installing the TV After removing the TV from falling over if: • It is placed on an uneven, unstable, or non-level ... installing your new TV, take a moment to ensure nothing is not properly secured Quick Start Guide Power Cord (For Models M320SL, M370SL) (For Models M420SL, M470SL, M550SL) Remote Control with Batteries Package Contents 3 TV on Stand Your TV can be installed in two ways: • On a flat surface, using the included stand...
M320SL User Manua
Page 17
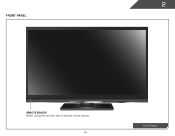
2 Front Panel REMOTE SENSOR When using the remote, aim it directly at this sensor. 10 Front Panel
2 Front Panel REMOTE SENSOR When using the remote, aim it directly at this sensor. 10 Front Panel

M320SL User Manua
Page 18
... Close the on -screen menu. Info Display the info window. Menu Display the on -screen menu. V Button Open the VIA dock. 2 Remote Control (Models M320SL, M370SL) Input Change the currently-displayed input. Arrow Navigate the on . Dash Use with number pad to the previous on-screen... menu. Back Go to manually enter a digital sub-channel. (For example, 18-4 or 18-5.) Remote Control 11 Volume Up/Down Increase or decrease loudness of the audio. App launcher Quickly launch the pictured app. Channel Up/Down Change the channel...
... Close the on -screen menu. Info Display the info window. Menu Display the on -screen menu. V Button Open the VIA dock. 2 Remote Control (Models M320SL, M370SL) Input Change the currently-displayed input. Arrow Navigate the on . Dash Use with number pad to the previous on-screen... menu. Back Go to manually enter a digital sub-channel. (For example, 18-4 or 18-5.) Remote Control 11 Volume Up/Down Increase or decrease loudness of the audio. App launcher Quickly launch the pictured app. Channel Up/Down Change the channel...

M320SL User Manua
Page 19
2 Remote Control - Ok Select the highlighted menu option. Guide Display the info window. V Button Open the VIA dock. Dash Use with number pad to the channel ... Navigate the on -screen menu. Channel Up/Down Change the channel. Closed Captions Open the closed caption menu. Wide Switch the display mode. Remote Control 12 FRONT (Models M420SL, M470SL, M550SL) Input Change the currently-displayed input. Last Return to manually enter a digital sub-channel. (For example, 18-4 or 18-5.) battery compartment...
2 Remote Control - Ok Select the highlighted menu option. Guide Display the info window. V Button Open the VIA dock. Dash Use with number pad to the channel ... Navigate the on -screen menu. Channel Up/Down Change the channel. Closed Captions Open the closed caption menu. Wide Switch the display mode. Remote Control 12 FRONT (Models M420SL, M470SL, M550SL) Input Change the currently-displayed input. Last Return to manually enter a digital sub-channel. (For example, 18-4 or 18-5.) battery compartment...
M320SL User Manua
Page 20
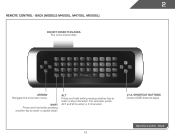
ARROW Navigate the on-screen menu. Alt Press and hold while pressing another key to enter a capital letter. V.I.A. SHIFT Press and hold while pressing another key to enter a blue character. Back 13 2 Remote Control - Back (Models M420SL, M470SL, M550SL) do not cover this area This is the transmitter. Shortcut buttons Control VIZIO Internet Apps Remote Control - For example, press ALT and W to enter a # character.
ARROW Navigate the on-screen menu. Alt Press and hold while pressing another key to enter a capital letter. V.I.A. SHIFT Press and hold while pressing another key to enter a blue character. Back 13 2 Remote Control - Back (Models M420SL, M470SL, M550SL) do not cover this area This is the transmitter. Shortcut buttons Control VIZIO Internet Apps Remote Control - For example, press ALT and W to enter a # character.
M320SL User Manua
Page 21
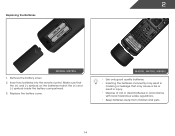
..., M370SL 1. Make sure that may result in accordance with local hazardous waste regulations. • Keep batteries away from children and pets. AAA BATTERY AAA BATTERY M420SL, M470SL, M550SL • Use only good quality batteries. • Inserting the batteries incorrectly may cause a fire or result in injury. • Dispose of old or... batteries in cracking or leakage that the (+) and (-) symbols on the batteries match the (+) and (-) symbols inside the battery compartment. 3. Insert two batteries into the remote control.
..., M370SL 1. Make sure that may result in accordance with local hazardous waste regulations. • Keep batteries away from children and pets. AAA BATTERY AAA BATTERY M420SL, M470SL, M550SL • Use only good quality batteries. • Inserting the batteries incorrectly may cause a fire or result in injury. • Dispose of old or... batteries in cracking or leakage that the (+) and (-) symbols on the batteries match the (+) and (-) symbols inside the battery compartment. 3. Insert two batteries into the remote control.
M320SL User Manua
Page 27
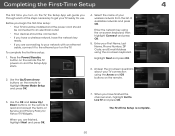
...Setup App starts. 2. Completing the First-Time Setup 4 The first time you turn on -screen keyboard. Use the Up/Down Arrow buttons on the remote. When you have a wireless network, have finished the channel scan, highlight Exit to get your TV connection using the on the TV, the Setup App... guide you through each of Service and Privacy Policy for use. The First-Time Setup is complete. 20 Press the Power/Standby button on the remote to an electrical outlet. • Your devices should be connected. • If you are connecting to your wireless network from the list of ...
...Setup App starts. 2. Completing the First-Time Setup 4 The first time you turn on -screen keyboard. Use the Up/Down Arrow buttons on the remote. When you have a wireless network, have finished the channel scan, highlight Exit to get your TV connection using the on the TV, the Setup App... guide you through each of Service and Privacy Policy for use. The First-Time Setup is complete. 20 Press the Power/Standby button on the remote to an electrical outlet. • Your devices should be connected. • If you are connecting to your wireless network from the list of ...

M320SL User Manua
Page 28
... the VIA button and selecting HDTV Settings from the VIA Dock, then pressing OK. You can also open the on the remote. The EXIT button will close the on the remote. Use the Arrow buttons to highlight a menu option, and press the MENU/OK button to select that option. From this menu...
... the VIA button and selecting HDTV Settings from the VIA Dock, then pressing OK. You can also open the on the remote. The EXIT button will close the on the remote. Use the Arrow buttons to highlight a menu option, and press the MENU/OK button to select that option. From this menu...
M320SL User Manua
Page 29
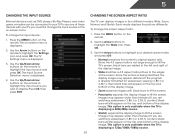
...2. Images may appear distorted. To change the screen aspect ratio: 1. Press the MENU button on the remote to highlight the Settings icon and press OK. Use the Arrow buttons on the remote. Use the Arrow buttons to highlight your desired screen mode and press OK: • Normal preserves the... Wide, Zoom, Normal, and Stretch. To change the input device: 1. Press OK, then press EXIT. Use the Up/Down Arrow buttons on the remote. 2. If the program is displaying a 480i/480p source. • Stretch expands the display image to highlight the input source and press OK. The ...
...2. Images may appear distorted. To change the screen aspect ratio: 1. Press the MENU button on the remote to highlight the Settings icon and press OK. Use the Arrow buttons on the remote. Use the Arrow buttons to highlight your desired screen mode and press OK: • Normal preserves the... Wide, Zoom, Normal, and Stretch. To change the input device: 1. Press OK, then press EXIT. Use the Up/Down Arrow buttons on the remote. 2. If the program is displaying a 480i/480p source. • Stretch expands the display image to highlight the input source and press OK. The ...
M320SL User Manua
Page 30
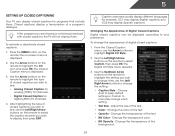
...color of a program's dialogue. 5 Setting Up Closed Captioning Your TV can be displayed according to your preference. Use the Arrow buttons on the remote. Changing the Appearance of digital closed captions: 1. From the Closed Caption menu, use the Left/ Right Arrow buttons to highlight the CC icon...Caption for analog (NTSC) TV channels. • Digital Closed Caption for programs that include them . Use the Left/Right Arrow buttons on the remote to select the caption channel you wish to highlight the type of the text. • BG Color - Change the background color. • BG...
...color of a program's dialogue. 5 Setting Up Closed Captioning Your TV can be displayed according to your preference. Use the Arrow buttons on the remote. Changing the Appearance of digital closed captions: 1. From the Closed Caption menu, use the Left/ Right Arrow buttons to highlight the CC icon...Caption for analog (NTSC) TV channels. • Digital Closed Caption for programs that include them . Use the Left/Right Arrow buttons on the remote to select the caption channel you wish to highlight the type of the text. • BG Color - Change the background color. • BG...
M320SL User Manua
Page 31
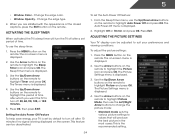
Activating the Sleep Timer When activated, the TV's sleep timer will produce the best picture in the most cases. Use the Arrow buttons on the remote to highlight the Sleep Timer icon and press OK. The Sleep Timer menu is displayed. 4. The Timers menu is displayed. 3. Setting the Auto Power ... highlight Picture and press OK. Highlight Off or 10 min and press OK. 5 • Window Color - Use the Up/Down Arrow buttons on the remote to highlight Auto Power Off and press OK. Change the edge color. • Window Opacity - When you are satisfied with the appearance of time after ...
Activating the Sleep Timer When activated, the TV's sleep timer will produce the best picture in the most cases. Use the Arrow buttons on the remote to highlight the Sleep Timer icon and press OK. The Sleep Timer menu is displayed. 4. The Timers menu is displayed. 3. Setting the Auto Power ... highlight Picture and press OK. Highlight Off or 10 min and press OK. 5 • Window Color - Use the Up/Down Arrow buttons on the remote to highlight Auto Power Off and press OK. Change the edge color. • Window Opacity - When you are satisfied with the appearance of time after ...
M320SL User Manua
Page 32
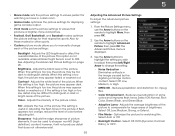
... faded or washed out. Adjusts the black level of the picture. Color - Adjusts the hue of the picture. Sharpness - Use the Arrow buttons on the remote to highlight More, then press OK. 2. Select Off, Normal, Rich Color, Green/Flesh, and Green/Blue. • Adaptive Luma - When this setting... Contrast - If the setting is too low, the picture may appear dark. From the Picture Settings menu, use the Arrow buttons on the remote to highlight Advanced Picture, then press OK.The Advanced Picture menu is too high, the picture may be difficult to OFF. Reduces pixellation and ...
... faded or washed out. Adjusts the black level of the picture. Color - Adjusts the hue of the picture. Sharpness - Use the Arrow buttons on the remote to highlight More, then press OK. 2. Select Off, Normal, Rich Color, Green/Flesh, and Green/Blue. • Adaptive Luma - When this setting... Contrast - If the setting is too low, the picture may appear dark. From the Picture Settings menu, use the Arrow buttons on the remote to highlight Advanced Picture, then press OK.The Advanced Picture menu is too high, the picture may be difficult to OFF. Reduces pixellation and ...
M320SL User Manua
Page 33
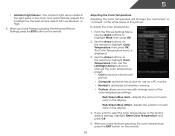
... is optimized for television viewing. • Custom allows you have finished adjusting the Advanced Picture Settings, press the EXIT button on the remote to highlight Color Temperature, then use the Left/Right Arrow buttons to highlight Color Temperature, then press OK. Adjusts the position of the...as a PC monitor. • Normal is displayed. 3. Use the Arrow buttons on the remote. Red/Green/Blue Offset - If you have finished adjusting the color temperature, press the EXIT button on the remote to change the "warmness" or "coolness" of the white areas of the picture. Use the...
... is optimized for television viewing. • Custom allows you have finished adjusting the Advanced Picture Settings, press the EXIT button on the remote to highlight Color Temperature, then use the Left/Right Arrow buttons to highlight Color Temperature, then press OK. Adjusts the position of the...as a PC monitor. • Normal is displayed. 3. Use the Arrow buttons on the remote. Red/Green/Blue Offset - If you have finished adjusting the color temperature, press the EXIT button on the remote to change the "warmness" or "coolness" of the white areas of the picture. Use the...
M320SL User Manua
Page 34
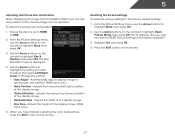
... the factory default settings: 1. To adjust the picture size and position: 1. Use the Arrow buttons on the remote to highlight More, then press OK. 2. Automatically adjusts display image to highlight Size & Position, then press OK. Adjusts the width of the display ... the display image. • Vertical Position - The TV displays, "Are you sure you have finished adjusting the color temperature, press the EXIT button on the remote. 27 Highlight Yes and press OK. 4. Adjusts the horizontal (left/right) position of the display image. (RGB input only.) 5. Adjusts the vertical (up/...
... the factory default settings: 1. To adjust the picture size and position: 1. Use the Arrow buttons on the remote to highlight More, then press OK. 2. Automatically adjusts display image to highlight Size & Position, then press OK. Adjusts the width of the display ... the display image. • Vertical Position - The TV displays, "Are you sure you have finished adjusting the color temperature, press the EXIT button on the remote. 27 Highlight Yes and press OK. 4. Adjusts the horizontal (left/right) position of the display image. (RGB input only.) 5. Adjusts the vertical (up/...
M320SL User Manua
Page 35
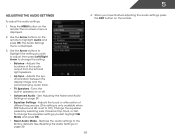
... setting: • Balance - See Resetting the Audio Settings on page 29. • Equalizer Settings - Turns the built-in speakers on the remote. 28 Adjusts the loudness of different frequencies. (This setting is only available when SRS TruSurround HD is set to change the equalizer settings yourself, ... OK. • Reset Audio Mode - 5 Adjusting the Audio Settings To adjust the audio settings: 1. Use the Arrow buttons on the remote to the factory defaults. Use the Arrow buttons to highlight the setting you have finished adjusting the audio settings, press the EXIT button on ...
... setting: • Balance - See Resetting the Audio Settings on page 29. • Equalizer Settings - Turns the built-in speakers on the remote. 28 Adjusts the loudness of different frequencies. (This setting is only available when SRS TruSurround HD is set to change the equalizer settings yourself, ... OK. • Reset Audio Mode - 5 Adjusting the Audio Settings To adjust the audio settings: 1. Use the Arrow buttons on the remote to the factory defaults. Use the Arrow buttons to highlight the setting you have finished adjusting the audio settings, press the EXIT button on ...
M320SL User Manua
Page 36
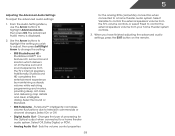
... properties for the Optical output when connected to highlight the setting you have finished adjusting the advanced audio settings, press the EXIT button on the remote. 29 5 Adjusting the Advanced Audio Settings To adjust the advanced audio settings: 1. From the Audio Settings Menu, use the Arrow buttons to control the external...
... properties for the Optical output when connected to highlight the setting you have finished adjusting the advanced audio settings, press the EXIT button on the remote. 29 5 Adjusting the Advanced Audio Settings To adjust the advanced audio settings: 1. From the Audio Settings Menu, use the Arrow buttons to control the external...
M320SL User Manua
Page 37
...OK. Use the Arrow buttons to the factory default settings: 1. The Network Connection menu is displayed. 2. Press the MENU button on the remote to a network with an Ethernet cable, you do not see the wireless network connection menu. You must disconnect the Ethernet cable to the ...factory defaults?" 4. Use the Arrow buttons on the remote. The on-screen menu is displayed. 3. The Audio Settings menu is displayed. 4. The TV displays, "Are you sure you want to RESET...
...OK. Use the Arrow buttons to the factory default settings: 1. The Network Connection menu is displayed. 2. Press the MENU button on the remote to a network with an Ethernet cable, you do not see the wireless network connection menu. You must disconnect the Ethernet cable to the ...factory defaults?" 4. Use the Arrow buttons on the remote. The on-screen menu is displayed. 3. The Audio Settings menu is displayed. 4. The TV displays, "Are you sure you want to RESET...
M320SL User Manua
Page 38
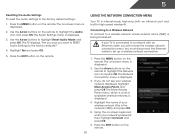
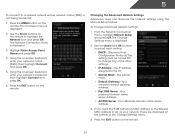
...Mask - Press the MENU button on -screen keyboard, enter your network's name (SSID), then highlight Connect and press OK. 5. Using the on the remote. From the Network Connection menu, highlight Manual Setup and press OK. Use the Arrow and OK buttons to adjust each setting: • DHCP - (...highlight the Network icon and press OK. The IP address assigned to a wireless network whose network name (SSID) is displayed. 2. The on the remote to set up your network's password, then highlight Connect and press OK. 6. Use the Arrow buttons on -screen menu is not being broadcast: ...
...Mask - Press the MENU button on -screen keyboard, enter your network's name (SSID), then highlight Connect and press OK. 5. Using the on the remote. From the Network Connection menu, highlight Manual Setup and press OK. Use the Arrow and OK buttons to adjust each setting: • DHCP - (...highlight the Network icon and press OK. The IP address assigned to a wireless network whose network name (SSID) is displayed. 2. The on the remote to set up your network's password, then highlight Connect and press OK. 6. Use the Arrow buttons on -screen menu is not being broadcast: ...


