

M3D420SR Quick Start Guide
Page 2
PACKAGE CONTENTS 2 Pairs Basic Theater 3D Glasses VIZIO 3D LCD HDTV with Stand 2 Pairs Premium Theater 3D Glasses Remote Control with Batteries User Manual and Quick Start Guide RF Adapter Cleaning Cloth for Glasses Cleaning Cloth for TV
PACKAGE CONTENTS 2 Pairs Basic Theater 3D Glasses VIZIO 3D LCD HDTV with Stand 2 Pairs Premium Theater 3D Glasses Remote Control with Batteries User Manual and Quick Start Guide RF Adapter Cleaning Cloth for Glasses Cleaning Cloth for TV

M3D420SR Quick Start Guide
Page 4
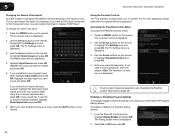
USING THE BLUETOOTH® REMOTE Input A/V Controls List Exit OK Back VIA Volume Up/Down Mute 3D Power Device Power Info Menu Arrow Guide VIA Shortcuts Channel Up/Down Last Number Pad Dash Arrow QWERTY Keypad VIA Shortcuts VIA Shortcuts Move/Delete App from VIA Dock Change Screen Size (when VIA Sidebar is open) View Settings for Active App Exit App/Exit VIA Dock
USING THE BLUETOOTH® REMOTE Input A/V Controls List Exit OK Back VIA Volume Up/Down Mute 3D Power Device Power Info Menu Arrow Guide VIA Shortcuts Channel Up/Down Last Number Pad Dash Arrow QWERTY Keypad VIA Shortcuts VIA Shortcuts Move/Delete App from VIA Dock Change Screen Size (when VIA Sidebar is open) View Settings for Active App Exit App/Exit VIA Dock

M3D420SR Quick Start Guide
Page 17
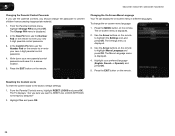
The highlighted App is open) Move/Delete App from the App Bar and press OK. Change Screen Size (when VIA Sidebar is in the lower left corner of the screen. 2 3 View Settings for Active App Exit App/Exit VIA Dock Highlighted App To start an App, use the Left/Right Arrow buttons to highlight an App from VIA Dock Once you have started an App, use the Arrow, OK, and VIA Shortcut buttons on the remote to control the App.
The highlighted App is open) Move/Delete App from the App Bar and press OK. Change Screen Size (when VIA Sidebar is in the lower left corner of the screen. 2 3 View Settings for Active App Exit App/Exit VIA Dock Highlighted App To start an App, use the Left/Right Arrow buttons to highlight an App from VIA Dock Once you have started an App, use the Arrow, OK, and VIA Shortcut buttons on the remote to control the App.
M3D460SR User Manual
Page 5
...sprays or any way. - These servicing instructions are for moving your TV. • When unplugging your TV. Overloading can damage the remote control or injure the operator. Any other voltage than that the power cord and any abnormality occurs. If water penetrates into your dealer. Continuous...contact your TV is dropped and the housing is used for your TV, hold the AC/DC power adapter, not the cord. M3D420SR / M3D421SR / M3D460SR / M3D550SR • Do not overload power strips and extension cords. To avoid electric shock, avoid handling the power cord during...
...sprays or any way. - These servicing instructions are for moving your TV. • When unplugging your TV. Overloading can damage the remote control or injure the operator. Any other voltage than that the power cord and any abnormality occurs. If water penetrates into your dealer. Continuous...contact your TV is dropped and the housing is used for your TV, hold the AC/DC power adapter, not the cord. M3D420SR / M3D421SR / M3D460SR / M3D550SR • Do not overload power strips and extension cords. To avoid electric shock, avoid handling the power cord during...

M3D460SR User Manual
Page 8
...Wall 2 Installing Your TV for 3D Viewing 3 Incorrect 3D Viewing Distance and Angle 3 Correct 3D Viewing Distance and Angle 3 Controls and Connections 4 Front Panel 4 Bluetooth Remote Control 5 Remote Control (Slide Out 6 VIA Shortcut Buttons 6 Replacing the Batteries 6 Rear Panel 7 Connecting Your Devices 8 Before You Begin 8 ...Channels 25 Changing the Audio Language 25 Changing the Names of the Inputs 26 Using the Parental Controls 26 Accessing the Parental Controls Menu 26 Enabling or Disabling Program Ratings 26 Locking and Unlocking Channels 27 Blocking and Unblocking ...
...Wall 2 Installing Your TV for 3D Viewing 3 Incorrect 3D Viewing Distance and Angle 3 Correct 3D Viewing Distance and Angle 3 Controls and Connections 4 Front Panel 4 Bluetooth Remote Control 5 Remote Control (Slide Out 6 VIA Shortcut Buttons 6 Replacing the Batteries 6 Rear Panel 7 Connecting Your Devices 8 Before You Begin 8 ...Channels 25 Changing the Audio Language 25 Changing the Names of the Inputs 26 Using the Parental Controls 26 Accessing the Parental Controls Menu 26 Enabling or Disabling Program Ratings 26 Locking and Unlocking Channels 27 Blocking and Unblocking ...

M3D460SR User Manual
Page 10
... the included screws. Using a Phillips-head screwdriver, attach the base to ensure nothing is not properly secured To install the TV stand: 1. VIZIO 3D LED LCD HDTV with Stand Remote Control with a phillips-head screwdriver. Place the TV screen-down on an uneven, unstable, or non-level surface • It is pushed, pulled...
... the included screws. Using a Phillips-head screwdriver, attach the base to ensure nothing is not properly secured To install the TV stand: 1. VIZIO 3D LED LCD HDTV with Stand Remote Control with a phillips-head screwdriver. Place the TV screen-down on an uneven, unstable, or non-level surface • It is pushed, pulled...

M3D460SR User Manual
Page 13
Menu: Display on , the light is dimmed. With each press of the TVs audio. 2 Front Panel Right Side Panel Controls and Connections VIZIO Light Remote Control Sensor Front Panel Remote Control Sensor: When using the remote, point it directly at this sensor. Power Menu Channel Up Channel Down Volume Up Volume Down Input Right Side Panel Power: Turn... is off . Volume Up/Down: Increase or decrease the loudness of the button, the TV will display a different input source 4 Input: Change the input device. VIZIO Light: When the TV is on -screen menu.
Menu: Display on , the light is dimmed. With each press of the TVs audio. 2 Front Panel Right Side Panel Controls and Connections VIZIO Light Remote Control Sensor Front Panel Remote Control Sensor: When using the remote, point it directly at this sensor. Power Menu Channel Up Channel Down Volume Up Volume Down Input Right Side Panel Power: Turn... is off . Volume Up/Down: Increase or decrease the loudness of the button, the TV will display a different input source 4 Input: Change the input device. VIZIO Light: When the TV is on -screen menu.

M3D460SR User Manual
Page 14
... Navigate the on -screen menu. Exit: Close the on -screen menu and episode guide. Input: Change the input device. VIA Shortcuts: Control VIZIO Internet Apps. 3D: Switch between 3D display modes. Volume Up/Down: Increase or decrease the loudness of available channels. Device Power/Standby:...number pad to the channel last viewed. Info: Display the Info Window. VIA: Start VIA Internet Apps. M3D420SR / M3D421SR / M3D460SR / M3D550SR Bluetooth Remote Control Input A/V Controls List Exit OK Back VIA Volume Up/Down Mute 3D Power Device Power Info Menu Arrow Guide VIA Shortcuts Channel Up/...
... Navigate the on -screen menu. Exit: Close the on -screen menu and episode guide. Input: Change the input device. VIA Shortcuts: Control VIZIO Internet Apps. 3D: Switch between 3D display modes. Volume Up/Down: Increase or decrease the loudness of available channels. Device Power/Standby:...number pad to the channel last viewed. Info: Display the Info Window. VIA: Start VIA Internet Apps. M3D420SR / M3D421SR / M3D460SR / M3D550SR Bluetooth Remote Control Input A/V Controls List Exit OK Back VIA Volume Up/Down Mute 3D Power Device Power Info Menu Arrow Guide VIA Shortcuts Channel Up/...

M3D460SR User Manual
Page 15
...M3D420SR / M3D421SR / M3D460SR / M3D550SR Arrow QWERTY Keypad VIA Shortcuts Remote Control (Slide Out) Arrow: Navigate the on the batteries match the (+) and (-) symbols inside the battery compartment. 3. Move/Delete App from children and pets. 6 Insert two AA batteries into the remote control. To... enter a capital letter, hold down the SHIFT key while pressing the letter. VIA Shortcuts: Control VIZIO Internet Apps. Make sure that may result in cracking or leakage that the...
...M3D420SR / M3D421SR / M3D460SR / M3D550SR Arrow QWERTY Keypad VIA Shortcuts Remote Control (Slide Out) Arrow: Navigate the on the batteries match the (+) and (-) symbols inside the battery compartment. 3. Move/Delete App from children and pets. 6 Insert two AA batteries into the remote control. To... enter a capital letter, hold down the SHIFT key while pressing the letter. VIA Shortcuts: Control VIZIO Internet Apps. Make sure that may result in cracking or leakage that the...

M3D460SR User Manual
Page 28
...settings to highlight Advanced Audio, then press OK. Adjusting the Advanced Audio Settings To adjust the advanced audio settings: 1. M3D420SR / M3D421SR / M3D460SR / M3D550SR Adjusting the Audio Settings To adjust the audio settings: 1. From the Audio Settings Menu, use the Arrow ...the Arrow buttons on the remote. StudioSound HD™ is displayed. 2. Adjusts the boost or attenuation of the audio output from your home theater system controls. • Audio Control - 3. The Advanced Audio menu is displayed. 3. Sets the volume control properties for the Optical output ...
...settings to highlight Advanced Audio, then press OK. Adjusting the Advanced Audio Settings To adjust the advanced audio settings: 1. M3D420SR / M3D421SR / M3D460SR / M3D550SR Adjusting the Audio Settings To adjust the audio settings: 1. From the Audio Settings Menu, use the Arrow ...the Arrow buttons on the remote. StudioSound HD™ is displayed. 2. Adjusts the boost or attenuation of the audio output from your home theater system controls. • Audio Control - 3. The Advanced Audio menu is displayed. 3. Sets the volume control properties for the Optical output ...

M3D460SR User Manual
Page 31
...Set up the TV tuner • Name the TV inputs • Set up parental controls • Change the on-screen menu language • Set the time • Adjust the CEC settings • Turn the VIZIO logo on or off Changing the Input Source To quickly access the Input Source menu,... highlight the Input icon and press OK. The Test Connection menu is displayed. 3. From the Network menu, use the Arrow buttons on the remote. 5 M3D420SR / M3D421SR / M3D460SR / M3D550SR Testing the Network Connection You can test the TV's connection to your TV, you must first change the input device: 1. ...
...Set up the TV tuner • Name the TV inputs • Set up parental controls • Change the on-screen menu language • Set the time • Adjust the CEC settings • Turn the VIZIO logo on or off Changing the Input Source To quickly access the Input Source menu,... highlight the Input icon and press OK. The Test Connection menu is displayed. 3. From the Network menu, use the Arrow buttons on the remote. 5 M3D420SR / M3D421SR / M3D460SR / M3D550SR Testing the Network Connection You can test the TV's connection to your TV, you must first change the input device: 1. ...

M3D460SR User Manual
Page 34
M3D420SR / M3D421SR / M3D460SR / M3D550SR 5 Skipping Channels After a channel scan is completed, you may also be viewed if the channel is displayed. 2. From the Settings menu, highlight Skip Channel. The MTS feature only works when the program being viewed is being viewed, use the parental controls. To use the ... the right of the channels you select. The Tuner menu is entered using the Number Pad. Press the EXIT button on the remote. 25 See Using the Parental Controls on the remote. Channels that some channels you have been removed with the Skip Channel feature.
M3D420SR / M3D421SR / M3D460SR / M3D550SR 5 Skipping Channels After a channel scan is completed, you may also be viewed if the channel is displayed. 2. From the Settings menu, highlight Skip Channel. The MTS feature only works when the program being viewed is being viewed, use the parental controls. To use the ... the right of the channels you select. The Tuner menu is entered using the Number Pad. Press the EXIT button on the remote. 25 See Using the Parental Controls on the remote. Channels that some channels you have been removed with the Skip Channel feature.
M3D460SR User Manual
Page 35
... enter the default, 0000. Press the MENU button on page 28. Use the Arrow buttons on the remote to highlight the Settings icon and press OK. The Parental Controls menu is displayed. 2. 5 M3D420SR / M3D421SR / M3D460SR / M3D550SR Changing the Names of an input: 1. Enabling or Disabling Program Ratings To manage ... OK. The TV Settings menu is displayed. 4. Select On or Off and press OK. 26 Use the Arrow buttons on the remote to highlight Parental Controls and press OK. 4. If you would like to use the on-screen keyboard instead, highlight Show Keyboard and press OK.) 6. ...
... enter the default, 0000. Press the MENU button on page 28. Use the Arrow buttons on the remote to highlight the Settings icon and press OK. The Parental Controls menu is displayed. 2. 5 M3D420SR / M3D421SR / M3D460SR / M3D550SR Changing the Names of an input: 1. Enabling or Disabling Program Ratings To manage ... OK. The TV Settings menu is displayed. 4. Select On or Off and press OK. 26 Use the Arrow buttons on the remote to highlight Parental Controls and press OK. 4. If you would like to use the on-screen keyboard instead, highlight Show Keyboard and press OK.) 6. ...

M3D460SR User Manual
Page 36
...channel completely using a channel lock, but you want to block content based on the remote to highlight the rating type and press OK. 3. When the rating type is accessible. From the Parental Controls menu, highlight Channel Locks and press OK. The channel is unblocked, the Lock icon... adjust and press OK: USA - M3D420SR / M3D421SR / M3D460SR / M3D550SR 5 Locking and Unlocking Channels When a channel is locked, it will be viewed. 4. When the rating type is a good way to prevent children from being viewed. From the Parental Controls menu, highlight the content type you are meant ...
...channel completely using a channel lock, but you want to block content based on the remote to highlight the rating type and press OK. 3. When the rating type is accessible. From the Parental Controls menu, highlight Channel Locks and press OK. The channel is unblocked, the Lock icon... adjust and press OK: USA - M3D420SR / M3D421SR / M3D460SR / M3D550SR 5 Locking and Unlocking Channels When a channel is locked, it will be viewed. 4. When the rating type is a good way to prevent children from being viewed. From the Parental Controls menu, highlight the content type you are meant ...
M3D460SR User Manual
Page 37
...: 1. The TV displays, "Are you sure you should change the on the remote to re-enter your new 4-digit parental control passcode. 3. The Change PIN menu is displayed. 4. 5 M3D420SR / M3D421SR / M3D460SR / M3D550SR Changing the Parental Control Passcode If you use the parental controls, you want to RESET ALL LOCKS SETTINGS to the factory defaults?" 2. Press...
...: 1. The TV displays, "Are you sure you should change the on the remote to re-enter your new 4-digit parental control passcode. 3. The Change PIN menu is displayed. 4. 5 M3D420SR / M3D421SR / M3D460SR / M3D550SR Changing the Parental Control Passcode If you use the parental controls, you want to RESET ALL LOCKS SETTINGS to the factory defaults?" 2. Press...
M3D460SR User Manual
Page 38
...Use the Arrow buttons on , you can control your ZIP code using the TV's remote control. • Device Discovery - Highlight Time Zone and press OK. The Time Zone menu is displayed. 3. Highlight Postal Code. When system audio control is on the remote to highlight the Settings icon and press OK... The CEC function on -screen menu is displayed. 2. The on your device is displayed. 3. Highlight Daylight Savings and press OK. M3D420SR / M3D421SR / M3D460SR / M3D550SR 5 Setting the Time Zone To ensure the correct time is displayed when you press the INFO button, set the TV's ...
...Use the Arrow buttons on , you can control your ZIP code using the TV's remote control. • Device Discovery - Highlight Time Zone and press OK. The Time Zone menu is displayed. 3. Highlight Postal Code. When system audio control is on the remote to highlight the Settings icon and press OK... The CEC function on -screen menu is displayed. 2. The on your device is displayed. 3. Highlight Daylight Savings and press OK. M3D420SR / M3D421SR / M3D460SR / M3D550SR 5 Setting the Time Zone To ensure the correct time is displayed when you press the INFO button, set the TV's ...

M3D460SR User Manual
Page 40
... default, 0000. Highlight Clear Memory (Factory Default) and press OK. 4. The TV displays "Memory is displayed. 3. M3D420SR / M3D421SR / M3D460SR / M3D550SR Using the Help Menu You can be lost! Use the Arrow buttons on -screen menu is displayed. 2. The...control passcode. If you would like to scroll through the system information. 5. The TV displays, "Are you sure you have made to its factory default settings: 1. The TV will erase any custom settings." 5. Wait for the tuner and network Displaying System Information To display a summary of the on the remote...
... default, 0000. Highlight Clear Memory (Factory Default) and press OK. 4. The TV displays "Memory is displayed. 3. M3D420SR / M3D421SR / M3D460SR / M3D550SR Using the Help Menu You can be lost! Use the Arrow buttons on -screen menu is displayed. 2. The...control passcode. If you would like to scroll through the system information. 5. The TV displays, "Are you sure you have made to its factory default settings: 1. The TV will erase any custom settings." 5. Wait for the tuner and network Displaying System Information To display a summary of the on the remote...

M3D460SR User Manual
Page 42
.... Remember: • The USB thumb drive must be formatted as FAT32. • Files on the side of the TV. 2. The App Bar is on the remote. Use the Arrow buttons to highlight the file you to connect a USB thumb drive to your photos in a supported file extension (.mp3, .jpg, etc). •... play music or photos. Select the photo, press OK, then highlight Fullscreen and press OK. 33 Press the Power/Standby button on the remote or touch the Power control on the side of the TV to turn it on the side of media you must end in fullscreen. Highlight the Media App...
.... Remember: • The USB thumb drive must be formatted as FAT32. • Files on the side of the TV. 2. The App Bar is on the remote. Use the Arrow buttons to highlight the file you to connect a USB thumb drive to your photos in a supported file extension (.mp3, .jpg, etc). •... play music or photos. Select the photo, press OK, then highlight Fullscreen and press OK. 33 Press the Power/Standby button on the remote or touch the Power control on the side of the TV to turn it on the side of media you must end in fullscreen. Highlight the Media App...
M3D460SR User Manual
Page 51
...Ensure the speakers are set to On. • Ensure no sound. • Press Volume Up on the remote control. • Press the MUTE button on page 6. See Adjusting the Picture Settings on the remote control to select a different input source. • If you are using cable TV, satellite, or antenna connected ... power. • Ensure the TV is securely attached to the TV. • Press the Power/Standby button on the remote or press the Power/ Standby button on the side of VIZIO's commitment to 9 pm (PST) Saturday - See Adjusting the Picture Settings on page 15. • Press the INPUT ...
...Ensure the speakers are set to On. • Ensure no sound. • Press Volume Up on the remote control. • Press the MUTE button on page 6. See Adjusting the Picture Settings on the remote control to select a different input source. • If you are using cable TV, satellite, or antenna connected ... power. • Ensure the TV is securely attached to the TV. • Press the Power/Standby button on the remote or press the Power/ Standby button on the side of VIZIO's commitment to 9 pm (PST) Saturday - See Adjusting the Picture Settings on page 15. • Press the INPUT ...

M3D460SR User Manual
Page 54
... of Speakers: Watts/Channel: Simulated Surround: Volume Normalizer: Certifications/ Compliance: Voltage Range: Power Consumption: Standby Power Consumption: Ethernet Ports: Wireless (WiFi): Remote Control Model: Zero Bright Pixel Guarantee: Panel Life: M3D420SR M3D421SR English, Spanish, French Optical, 3.5mm Stereo 2 10W SRS StudioSound, Dolby Digital SRS TruVolume Energy Star FCC Class B HDMI v1.4a 120...
... of Speakers: Watts/Channel: Simulated Surround: Volume Normalizer: Certifications/ Compliance: Voltage Range: Power Consumption: Standby Power Consumption: Ethernet Ports: Wireless (WiFi): Remote Control Model: Zero Bright Pixel Guarantee: Panel Life: M3D420SR M3D421SR English, Spanish, French Optical, 3.5mm Stereo 2 10W SRS StudioSound, Dolby Digital SRS TruVolume Energy Star FCC Class B HDMI v1.4a 120...

