User Manual
Page 1
...Write down the serial number located on your VIZIO LCD HDTV, please visit our website at www.vizio.com or call toll free at 888-VIZIOCE (888-849-4623). Purchase Date VIZIO is a registered trademark of your VIZIO GV42L FHDTV10A either at techsupport@vizio.com. We recommend you register your GV42L ... license from your set, please read these instructions before making any adjustments, and retain them for your new VIZIO GV42L FHDTV10A LCD Television purchase. Visit our website or call 949-428-2525 or email us to protect your investment beyond the standard warranty...
...Write down the serial number located on your VIZIO LCD HDTV, please visit our website at www.vizio.com or call toll free at 888-VIZIOCE (888-849-4623). Purchase Date VIZIO is a registered trademark of your VIZIO GV42L FHDTV10A either at techsupport@vizio.com. We recommend you register your GV42L ... license from your set, please read these instructions before making any adjustments, and retain them for your new VIZIO GV42L FHDTV10A LCD Television purchase. Visit our website or call 949-428-2525 or email us to protect your investment beyond the standard warranty...

User Manual
Page 5
...on a flat surface to shorten the service life of the HDTV, using a washer under the nut. 2. If you have a drywell finish it to mount your TV on the wall, please see below 'Preparing Your LCD HDTV for Wall Mounting' for more information on the wall with ... the VIZIO GV42L FHDTV10A TV are sold separately Wall Mounts High Definition Cables Extra or replacement Remote VIZIO also offers Installation Services and Extended Warranty Services for your VIZIO GV42L FHDTV10A To purchase or inquire about 280W, please use the power cord designated for your VIZIO HDTV. VIZIO offers ...
...on a flat surface to shorten the service life of the HDTV, using a washer under the nut. 2. If you have a drywell finish it to mount your TV on the wall, please see below 'Preparing Your LCD HDTV for Wall Mounting' for more information on the wall with ... the VIZIO GV42L FHDTV10A TV are sold separately Wall Mounts High Definition Cables Extra or replacement Remote VIZIO also offers Installation Services and Extended Warranty Services for your VIZIO GV42L FHDTV10A To purchase or inquire about 280W, please use the power cord designated for your VIZIO HDTV. VIZIO offers ...

User Manual
Page 6
...hang the GV42L FHDTV10A. Unplug all of the TV. Gently remove the stand base. 6. The pitch of your GV42L FHDTV10A. 2. The screws type required is 600mm horizontally and 200mm vertically. VIZIO GV42L FHDTV10A User Manual Preparing Your LCD HDTV for Wall Mounting The VIZIO GV42L FHDTV10A can either be removed. 5. ... can be kept on the stand base or mounted on a soft and flat surface (blanket, foam, cloth, etc) to prevent any damage to the TV. 3. To find the perfect mount for viewing. To remove the stand base 1. Remove the four (4) screws (screw's specs: M4, 0.7 Pitch, 15mm...
...hang the GV42L FHDTV10A. Unplug all of the TV. Gently remove the stand base. 6. The pitch of your GV42L FHDTV10A. 2. The screws type required is 600mm horizontally and 200mm vertically. VIZIO GV42L FHDTV10A User Manual Preparing Your LCD HDTV for Wall Mounting The VIZIO GV42L FHDTV10A can either be removed. 5. ... can be kept on the stand base or mounted on a soft and flat surface (blanket, foam, cloth, etc) to prevent any damage to the TV. 3. To find the perfect mount for viewing. To remove the stand base 1. Remove the four (4) screws (screw's specs: M4, 0.7 Pitch, 15mm...

User Manual
Page 9
......12 1.4 VIZIO Universal Remote Control ...14 1.4.1 Insertion of Batteries in the Remote Control 17 1.4.2 Remote Control Range ...17 1.4.3 VIZIO Universal Remote Control...LCD HDTV Settings ...36 3.4 Program Information...37 Chapter 4 Advanced Adjustment of HDTV 38 4.1 Using the On Screen Display (OSD) ...38 4.2 DTV / TV Input Picture Adjustment...39 4.2.1 Picture Mode ...39 4.2.2 Backlight ...39 4.2.3 Contrast ...40 4.2.4 Brightness...40 4.2.5 Color ...40 4.2.6 Tint...40 4.2.7 Sharpness ...41 4.2.8 Color Temperature...41 4.3 Advanced Video ...42 4.3.1 DNR...42 4.3.2 Black Level Extender ...42...
......12 1.4 VIZIO Universal Remote Control ...14 1.4.1 Insertion of Batteries in the Remote Control 17 1.4.2 Remote Control Range ...17 1.4.3 VIZIO Universal Remote Control...LCD HDTV Settings ...36 3.4 Program Information...37 Chapter 4 Advanced Adjustment of HDTV 38 4.1 Using the On Screen Display (OSD) ...38 4.2 DTV / TV Input Picture Adjustment...39 4.2.1 Picture Mode ...39 4.2.2 Backlight ...39 4.2.3 Contrast ...40 4.2.4 Brightness...40 4.2.5 Color ...40 4.2.6 Tint...40 4.2.7 Sharpness ...41 4.2.8 Color Temperature...41 4.3 Advanced Video ...42 4.3.1 DNR...42 4.3.2 Black Level Extender ...42...
User Manual
Page 13
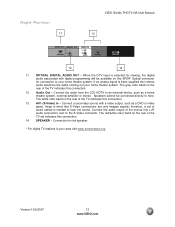
Right Portion 11 VIZIO GV42L FHDTV10A User Manual 13 12 14 11. Audio Out - Keep in your home theatre system. therefore, a set indicates this connection. 13. Connect the audio from the LCD HDTV to an external device, such as a DVD or video game. The white color band on the ...been supplied then stereo audio would be the audio coming out your home theatre system. Speakers cannot be available on the rear of the TV indicates this SPDIF Optical connector for connection to here. Connection for viewing, the digital audio associated with s-video output, such as a home...
Right Portion 11 VIZIO GV42L FHDTV10A User Manual 13 12 14 11. Audio Out - Keep in your home theatre system. therefore, a set indicates this connection. 13. Connect the audio from the LCD HDTV to an external device, such as a DVD or video game. The white color band on the ...been supplied then stereo audio would be the audio coming out your home theatre system. Speakers cannot be available on the rear of the TV indicates this SPDIF Optical connector for connection to here. Connection for viewing, the digital audio associated with s-video output, such as a home...

User Manual
Page 19
... Input (white color area) at the rear of your Cable or Satellite Box (Best) 1. 2. 3. 4. Connect a HDMI cable to the HDMI output of the LCD HDTV. Version 10/9/2007 19 www.VIZIO.com Select HDMI using the HDMI 1 input for another component, or you do not want to use... cable or satellite operator. The HDMI input on the LCD TV supports High-bandwidth Digital Content Protection (HDCP). Note: To maintain the display quality, use the HDMI 1 input for details. Refer to your HDTV Set-Top Box user manual for optimal results. VIZIO GV42L FHDTV10A User Manual Note: For more info refer ...
... Input (white color area) at the rear of your Cable or Satellite Box (Best) 1. 2. 3. 4. Connect a HDMI cable to the HDMI output of the LCD HDTV. Version 10/9/2007 19 www.VIZIO.com Select HDMI using the HDMI 1 input for another component, or you do not want to use... cable or satellite operator. The HDMI input on the LCD TV supports High-bandwidth Digital Content Protection (HDCP). Note: To maintain the display quality, use the HDMI 1 input for details. Refer to your HDTV Set-Top Box user manual for optimal results. VIZIO GV42L FHDTV10A User Manual Note: For more info refer ...

User Manual
Page 20
...output connectors associated with DVI: 1. Select HDMI using the INPUT button on your HDTV Set-Top Box user manual for a greater selection of the LCD HDTV, or directly by pressing the HDMI button on the LCD TV supports High-bandwidth Digital Content Protection (HDCP). Use the RGB PC input for ...other end to the LCD HDTV and HDTV Set-Top Box. 5. Refer to the HDMI Input (white color area) at the rear of the LCD HDTV. 4. Note: The HDMI Input is for added security and protection. Version 10/9/2007 20 www.VIZIO.com Turn off the power to the LCD HDTV and HDTV Set-Top Box. ...
...output connectors associated with DVI: 1. Select HDMI using the INPUT button on your HDTV Set-Top Box user manual for a greater selection of the LCD HDTV, or directly by pressing the HDMI button on the LCD TV supports High-bandwidth Digital Content Protection (HDCP). Use the RGB PC input for ...other end to the LCD HDTV and HDTV Set-Top Box. 5. Refer to the HDMI Input (white color area) at the rear of the LCD HDTV. 4. Note: The HDMI Input is for added security and protection. Version 10/9/2007 20 www.VIZIO.com Turn off the power to the LCD HDTV and HDTV Set-Top Box. ...

User Manual
Page 21
... power to the LCD HDTV and HDTV Set-Top Box. 2. row of the LCD HDTV, or directly by pressing the Component button on your HDTV Set-Top Box to use the Component 1 input for more information about the video output requirements of the LCD HDTV. 5. Version 10/9/2007 21 www.VIZIO.com Connect the ...Top Box to the Component 2 connections coded by the purple area. Note: a) b) If you when viewing from the rear of the TV) at the rear of the LCD HDTV. 6. row of connectors nearest to you do not want to the corresponding Y (green color) connector in the Component 1 group (green...
... power to the LCD HDTV and HDTV Set-Top Box. 2. row of the LCD HDTV, or directly by pressing the Component button on your HDTV Set-Top Box to use the Component 1 input for more information about the video output requirements of the LCD HDTV. 5. Version 10/9/2007 21 www.VIZIO.com Connect the ...Top Box to the Component 2 connections coded by the purple area. Note: a) b) If you when viewing from the rear of the TV) at the rear of the LCD HDTV. 6. row of connectors nearest to you do not want to the corresponding Y (green color) connector in the Component 1 group (green...

User Manual
Page 22
... LCD HDTV. 3. Refer to the LCD HDTV. 4. Version 10/9/2007 22 www.VIZIO.com Connect the coaxial (RF) connector from your cable, satellite or TV station operator. Refer to the program guides, or consult your antenna or digital cable to the LCD HDTV. 2. For Professional antenna installation contact VIZIO at the rear of the LCD HDTV, or directly by pressing the TV...
... LCD HDTV. 3. Refer to the LCD HDTV. 4. Version 10/9/2007 22 www.VIZIO.com Connect the coaxial (RF) connector from your cable, satellite or TV station operator. Refer to the program guides, or consult your antenna or digital cable to the LCD HDTV. 2. For Professional antenna installation contact VIZIO at the rear of the LCD HDTV, or directly by pressing the TV...

User Manual
Page 23
... side of the LCD HDTV, or directly by pressing the TV button on the rear of the LCD HDTV 3. Note: If you have an off the power to the LCD HDTV. 2. Turn on the power to the LCD HDTV and VCR. 4. VIZIO GV42L FHDTV10A User Manual 2.3.2 Using Your Antenna or Cable for TV 1. Turn on the power to the LCD HDTV. 4. Connect the...
... side of the LCD HDTV, or directly by pressing the TV button on the rear of the LCD HDTV 3. Note: If you have an off the power to the LCD HDTV. 2. Turn on the power to the LCD HDTV and VCR. 4. VIZIO GV42L FHDTV10A User Manual 2.3.2 Using Your Antenna or Cable for TV 1. Turn on the power to the LCD HDTV. 4. Connect the...

User Manual
Page 24
...are already using the INPUT button on the power to the LCD HDTV and your GV42L FHDTV10A - Turn off the power to the LCD HDTV and DVD player. 2. Refer to your DVD player user manual for details. See www.VIZIO.com or call 1-888-VIZIOCe (1-888-849-4623) for more... information about the video output requirements of the LCD HDTV. 3. Connecting your DVD player and the...
...are already using the INPUT button on the power to the LCD HDTV and your GV42L FHDTV10A - Turn off the power to the LCD HDTV and DVD player. 2. Refer to your DVD player user manual for details. See www.VIZIO.com or call 1-888-VIZIOCe (1-888-849-4623) for more... information about the video output requirements of the LCD HDTV. 3. Connecting your DVD player and the...

User Manual
Page 25
... for more information about the video output requirements of the product. For DVD Players with the HDMI input (white area) at the rear of the LCD HDTV. 3. Using an audio cable (white and red connectors), connect the cable to the HDMI Input (white color area) at the rear of the.... Select HDMI using the INPUT button on the power to the LCD HDTV and your DVD player and connect the other end to the LCD HDTV and DVD player. 2. Turn on the remote or side of the LCD HDTV. 4. Version 10/9/2007 25 www.VIZIO.com Turn off the power to the audio connectors associated with DVI...
... for more information about the video output requirements of the product. For DVD Players with the HDMI input (white area) at the rear of the LCD HDTV. 3. Using an audio cable (white and red connectors), connect the cable to the HDMI Input (white color area) at the rear of the.... Select HDMI using the INPUT button on the power to the LCD HDTV and your DVD player and connect the other end to the LCD HDTV and DVD player. 2. Turn on the remote or side of the LCD HDTV. 4. Version 10/9/2007 25 www.VIZIO.com Turn off the power to the audio connectors associated with DVI...

User Manual
Page 26
...) connector in the Component 1 group (green color area - Refer to you when viewing from the rear of the TV) at the rear of the LCD HDTV. 3. VIZIO GV42L FHDTV10A User Manual 2.4.2 Using Component Video Connecting your DVD player user manual for more information about the video output requirements...DVD Player (Better): 1. Connect the Pr (red color) connector on the remote or side of the LCD HDTV. 4. Turn on the Remote Control. Version 10/9/2007 26 www.VIZIO.com Connect the Pb (blue color) connector on your DVD player to the audio output connectors associated with...
...) connector in the Component 1 group (green color area - Refer to you when viewing from the rear of the TV) at the rear of the LCD HDTV. 3. VIZIO GV42L FHDTV10A User Manual 2.4.2 Using Component Video Connecting your DVD player user manual for more information about the video output requirements...DVD Player (Better): 1. Connect the Pr (red color) connector on the remote or side of the LCD HDTV. 4. Turn on the Remote Control. Version 10/9/2007 26 www.VIZIO.com Connect the Pb (blue color) connector on your DVD player to the audio output connectors associated with...

User Manual
Page 27
...on your DVD player user manual for more information about the video output requirements of the LCD HDTV, or directly by pressing the AV button on the left hand side of the LCD HDTV. 3. Version 10/9/2007 27 www.VIZIO.com Using an audio cable (white and red connectors), connect the cable to the ...audio output connectors associated with the S-Video output on the power to the LCD HDTV and DVD player. 2. Turn off the power to...
...on your DVD player user manual for more information about the video output requirements of the LCD HDTV, or directly by pressing the AV button on the left hand side of the LCD HDTV. 3. Version 10/9/2007 27 www.VIZIO.com Using an audio cable (white and red connectors), connect the cable to the ...audio output connectors associated with the S-Video output on the power to the LCD HDTV and DVD player. 2. Turn off the power to...

User Manual
Page 28
...corresponding R (red color) and L (white color) audio input connectors in the AV2 input (orange color area) row of connectors at the rear of the LCD HDTV. 4. VIZIO GV42L FHDTV10A User Manual 2.4.4 Using Composite (AV2) Video Connecting your DVD player user manual for more information about the video output requirements of the product... to use the AV2 input for the DVD player, and you are not using the INPUT button on the remote or side of the LCD HDTV, or directly by pressing the AV button on your DVD player to your DVD Player (Good): 1. Turn off the power to the AV1 ...
...corresponding R (red color) and L (white color) audio input connectors in the AV2 input (orange color area) row of connectors at the rear of the LCD HDTV. 4. VIZIO GV42L FHDTV10A User Manual 2.4.4 Using Composite (AV2) Video Connecting your DVD player user manual for more information about the video output requirements of the product... to use the AV2 input for the DVD player, and you are not using the INPUT button on the remote or side of the LCD HDTV, or directly by pressing the AV button on your DVD player to your DVD Player (Good): 1. Turn off the power to the AV1 ...

User Manual
Page 29
... button on your VCR or Video Camera to the audio connectors associated with the AV1 input at the rear right hand side connections of the LCD HDTV. 4. Using an audio cable (white and red connectors), connect the cable to the audio output connectors associated with the S-Video output on... the other end to the S-Video jack in the AV1 group at the back right hand side connections of the LCD HDTV. 3. Version 10/9/2007 29 www.VIZIO.com Turn off the power to the LCD HDTV and VCR or Video Camera. 5. VIZIO GV42L FHDTV10A User Manual 2.5 Connecting Your VCR or Video Camera 1.
... button on your VCR or Video Camera to the audio connectors associated with the AV1 input at the rear right hand side connections of the LCD HDTV. 4. Using an audio cable (white and red connectors), connect the cable to the audio output connectors associated with the S-Video output on... the other end to the S-Video jack in the AV1 group at the back right hand side connections of the LCD HDTV. 3. Version 10/9/2007 29 www.VIZIO.com Turn off the power to the LCD HDTV and VCR or Video Camera. 5. VIZIO GV42L FHDTV10A User Manual 2.5 Connecting Your VCR or Video Camera 1.

User Manual
Page 30
... OUT (gray area) at the rear of Audio received with the programs from the LCD HDTV will now be connected directly to select OFF so that the sound from the DTV/TV CABLE/ANTENNA input. The audio output is active when receiving digital audio with HD Programs... ANALOG OUT (gray area) audio connectors at the rear of the LCD HDTV. Press the SPEAKERS. Note: a) b) Refer to your Receiver/Amp user manual to select the Audio menu. 6. on the remote control to external speakers. VIZIO GV42L FHDTV10A User Manual 2.6 Connecting an external Receiver/Amp 1. Version ...
... OUT (gray area) at the rear of Audio received with the programs from the LCD HDTV will now be connected directly to select OFF so that the sound from the DTV/TV CABLE/ANTENNA input. The audio output is active when receiving digital audio with HD Programs... ANALOG OUT (gray area) audio connectors at the rear of the LCD HDTV. Press the SPEAKERS. Note: a) b) Refer to your Receiver/Amp user manual to select the Audio menu. 6. on the remote control to external speakers. VIZIO GV42L FHDTV10A User Manual 2.6 Connecting an external Receiver/Amp 1. Version ...
User Manual
Page 31
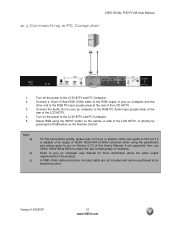
... output requirements of resolution. Version 10/9/2007 31 www.VIZIO.com Connect the Audio Out on the Remote Control. Select RGB using the parameters and values given to best quality of the product. Turn on Section 2.7.2 of the LCD HDTV. 4. Refer to your pc computer to the RGB... at 60Hz to obtain the next to you on the power to the LCD HDTV and PC Computer. 2. If not supported, then use VESA 1360x768 at the rear of this User's Manual. Turn off the power to the LCD HDTV and PC Computer. 5. VIZIO GV42L FHDTV10A User Manual 2.7 Connecting a PC Computer 1.
... output requirements of resolution. Version 10/9/2007 31 www.VIZIO.com Connect the Audio Out on the Remote Control. Select RGB using the parameters and values given to best quality of the product. Turn on Section 2.7.2 of the LCD HDTV. 4. Refer to your pc computer to the RGB... at 60Hz to obtain the next to you on the power to the LCD HDTV and PC Computer. 2. If not supported, then use VESA 1360x768 at the rear of this User's Manual. Turn off the power to the LCD HDTV and PC Computer. 5. VIZIO GV42L FHDTV10A User Manual 2.7 Connecting a PC Computer 1.

User Manual
Page 33
...cable source is connected to the DTV/TV input, you do not see this button will show 'snow' and the first Initial Setup OSD panel. Connecting the Power Cable Connect the power cord to the LCD HDTV (see page 6. 3.1 Basic LCD HDTV Start Up 1. VIZIO GV42L FHDTV10A User Manual Chapter 3 Setting... Up to select TV using the INPUT button on the remote control or the side of the LCD HDTV, or directly by pressing the INPUT button on the...
...cable source is connected to the DTV/TV input, you do not see this button will show 'snow' and the first Initial Setup OSD panel. Connecting the Power Cable Connect the power cord to the LCD HDTV (see page 6. 3.1 Basic LCD HDTV Start Up 1. VIZIO GV42L FHDTV10A User Manual Chapter 3 Setting... Up to select TV using the INPUT button on the remote control or the side of the LCD HDTV, or directly by pressing the INPUT button on the...

User Manual
Page 36
... grounded electrical outlet or surge protector. 1. Viewing Modes, on the remote control to a lower light level. 2. VIZIO GV42L FHDTV10A User Manual 3.2 Watching a TV Program Before you start watching TV, please make sure that all of the LCD HDTV connections are secure and you have selected the correct video input source. 3. Also, verify that any cable...
... grounded electrical outlet or surge protector. 1. Viewing Modes, on the remote control to a lower light level. 2. VIZIO GV42L FHDTV10A User Manual 3.2 Watching a TV Program Before you start watching TV, please make sure that all of the LCD HDTV connections are secure and you have selected the correct video input source. 3. Also, verify that any cable...


