User Manual
Page 2
... shock. • Follow instructions for moving the product. If any object drops into the slot on the top of electric shock or component damage, switch off the power before operating the display. o The Display is dropped or damaged in fire or electric shock. • Do not use an adapter to repair or service the product yourself. Opening or removing the back cover...
... shock. • Follow instructions for moving the product. If any object drops into the slot on the top of electric shock or component damage, switch off the power before operating the display. o The Display is dropped or damaged in fire or electric shock. • Do not use an adapter to repair or service the product yourself. Opening or removing the back cover...

User Manual
Page 5
...; VIZIO offers professional installation services. VIZIO GV42L FHDTV10A User Manual Additional Certified Accessories for the VIZIO GV42L FHDTV10A TV are sold separately Wall Mounts High Definition Cables Extra or replacement Remote VIZIO also offers Installation Services and Extended Warranty Services for your VIZIO GV42L FHDTV10A To purchase or inquire about 280W, please use the power cord designated for TV. Install the TV in places with a Wall Mount, a Safety Strap has been included to attach the HDTV to the wall...
...; VIZIO offers professional installation services. VIZIO GV42L FHDTV10A User Manual Additional Certified Accessories for the VIZIO GV42L FHDTV10A TV are sold separately Wall Mounts High Definition Cables Extra or replacement Remote VIZIO also offers Installation Services and Extended Warranty Services for your VIZIO GV42L FHDTV10A To purchase or inquire about 280W, please use the power cord designated for TV. Install the TV in places with a Wall Mount, a Safety Strap has been included to attach the HDTV to the wall...

User Manual
Page 6
..., 25mm long. Now, the GV42L FHDTV10A can fit securely to a mount (sold separately) by squeezing the sides to the TV. 3. VIZIO GV42L FHDTV10A User Manual Preparing Your LCD HDTV for Wall Mounting The VIZIO GV42L FHDTV10A can either be removed. 5. To remove the stand base 1. Place the GV42L FHDTV10A face down on a soft and flat surface (blanket, foam, cloth, etc) to prevent any damage to...
..., 25mm long. Now, the GV42L FHDTV10A can fit securely to a mount (sold separately) by squeezing the sides to the TV. 3. VIZIO GV42L FHDTV10A User Manual Preparing Your LCD HDTV for Wall Mounting The VIZIO GV42L FHDTV10A can either be removed. 5. To remove the stand base 1. Place the GV42L FHDTV10A face down on a soft and flat surface (blanket, foam, cloth, etc) to prevent any damage to...

User Manual
Page 9
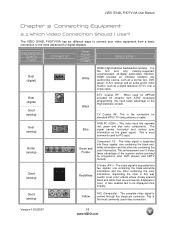
... Antenna or Digital Cable for DTV 22 2.3.2 Using Your Antenna or Cable for TV ...23 2.3.3 Using the Antenna or Cable through your VCR 23 2.4 Connecting Your DVD Player ...24 2.4.1 Using HDMI ...24 2.4.2 Using Component Video...26 2.4.3 Using S-Video (AV1)...27 2.4.4 Using Composite (AV2) Video ...28 2.5 Connecting Your VCR or Video Camera ...29 2.6 Connecting an external Receiver/Amp ...30 2.7 Connecting a PC Computer ...31 2.7.1 Preset PC Resolutions...32 2.7.2 Resolution (1920x1080) through RGB (15-Pin VGA) Input 32 Chapter 3 Setting Up to Watch Television 33 3.1 Basic LCD HDTV...
... Antenna or Digital Cable for DTV 22 2.3.2 Using Your Antenna or Cable for TV ...23 2.3.3 Using the Antenna or Cable through your VCR 23 2.4 Connecting Your DVD Player ...24 2.4.1 Using HDMI ...24 2.4.2 Using Component Video...26 2.4.3 Using S-Video (AV1)...27 2.4.4 Using Composite (AV2) Video ...28 2.5 Connecting Your VCR or Video Camera ...29 2.6 Connecting an external Receiver/Amp ...30 2.7 Connecting a PC Computer ...31 2.7.1 Preset PC Resolutions...32 2.7.2 Resolution (1920x1080) through RGB (15-Pin VGA) Input 32 Chapter 3 Setting Up to Watch Television 33 3.1 Basic LCD HDTV...

User Manual
Page 10
... PC Input Audio Adjustment ...56 4.17 PC Input Setup ...56 4.18 Understanding Viewing Modes...57 4.18.1 Picture-In-Picture (PIP) Mode...58 4.18.2 Using PIP/POP Feature...59 4.18.3 How to select PIP/POP...60 4.18.4 Setting the Sleep Timer ...61 4.19 Programming the VIZIO Universal Remote Control 62 4.19.1 Programming for VCR ...62 4.19.2 Programming for Cable Set-Top Box...62 4.19.3 Programming for DVD Player ...63 4.19.4 Searching for Component Codes ...63 4.20 Using a Cable or Satellite Remote ...63 Chapter 5 Maintenance and Troubleshooting 64...
... PC Input Audio Adjustment ...56 4.17 PC Input Setup ...56 4.18 Understanding Viewing Modes...57 4.18.1 Picture-In-Picture (PIP) Mode...58 4.18.2 Using PIP/POP Feature...59 4.18.3 How to select PIP/POP...60 4.18.4 Setting the Sleep Timer ...61 4.19 Programming the VIZIO Universal Remote Control 62 4.19.1 Programming for VCR ...62 4.19.2 Programming for Cable Set-Top Box...62 4.19.3 Programming for DVD Player ...63 4.19.4 Searching for Component Codes ...63 4.20 Using a Cable or Satellite Remote ...63 Chapter 5 Maintenance and Troubleshooting 64...
User Manual
Page 12
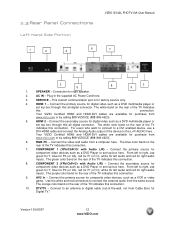
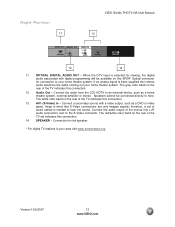
... - COMPONENT 1 (YPb/CbPr/Cr with Audio L/R) - From left to the L+R AUDIO here. . Connection for factory service only. 4. Plug-in the supplied AC Power Cord here. 3. HDMI 1 - AV2 In - SPEAKER - SERVICE - This custom communication port is for right speaker. 2. Connect the primary source for digital video such as a VCR or video game. Connect the secondary source for digital video such as a DVD multimedia player or set top box here. The purple color band on the rear of -the-wall, not from Cable Box) for right audio inputs...
... - COMPONENT 1 (YPb/CbPr/Cr with Audio L/R) - From left to the L+R AUDIO here. . Connection for factory service only. 4. Plug-in the supplied AC Power Cord here. 3. HDMI 1 - AV2 In - SPEAKER - SERVICE - This custom communication port is for right speaker. 2. Connect the primary source for digital video such as a VCR or video game. Connect the secondary source for digital video such as a DVD multimedia player or set top box here. The purple color band on the rear of -the-wall, not from Cable Box) for right audio inputs...
User Manual
Page 13
... an analog signal is been supplied then stereo audio would be the audio coming out your area visit www.antennaweb.org Version 10/9/2007 13 www.VIZIO.com therefore, a set indicates this connection. 12. OPTICAL DIGITAL AUDIO OUT - Speakers cannot be available on the rear of the TV indicates this connection. 14. Connection for viewing, the digital audio associated with s-video output, such as a home theatre system, external amplifier or stereo. The white color...
... an analog signal is been supplied then stereo audio would be the audio coming out your area visit www.antennaweb.org Version 10/9/2007 13 www.VIZIO.com therefore, a set indicates this connection. 12. OPTICAL DIGITAL AUDIO OUT - Speakers cannot be available on the rear of the TV indicates this connection. 14. Connection for viewing, the digital audio associated with s-video output, such as a home theatre system, external amplifier or stereo. The white color...
User Manual
Page 14
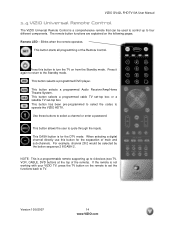
... www.VIZIO.com Remote LED - Blinks when the remote operates. Press it again to return to operate the VIZIO HDTV. This button selects a programmed Audio Receiver/Amp/Home Theatre System. When selecting a digital channel directly use this button to turn the TV on the following pages. This button selects a programmed DVD player. The remote button functions are explained on from the Standby mode. This button has been pre-programmed to select the codes to the Standby mode. VIZIO GV42L FHDTV10A User Manual 1.4 VIZIO Universal Remote Control The VIZIO Universal Remote Control...
... www.VIZIO.com Remote LED - Blinks when the remote operates. Press it again to return to operate the VIZIO HDTV. This button selects a programmed Audio Receiver/Amp/Home Theatre System. When selecting a digital channel directly use this button to turn the TV on the following pages. This button selects a programmed DVD player. The remote button functions are explained on from the Standby mode. This button has been pre-programmed to select the codes to the Standby mode. VIZIO GV42L FHDTV10A User Manual 1.4 VIZIO Universal Remote Control The VIZIO Universal Remote Control...

User Manual
Page 15
... off. This button displays program information. MUTE - These buttons turn the volume up or down . This button recalls the previously viewed channel. These buttons change the channels up or down . This button displays the image and system information display. EXIT - VIZIO GV42L FHDTV10A User Manual Use this button is only functional for the On-Screen Display (OSD) menus. Use the OK button to operate the On-Screen Display (OSD) after it has been activated by pressing the MENU button. Version...
... off. This button displays program information. MUTE - These buttons turn the volume up or down . This button recalls the previously viewed channel. These buttons change the channels up or down . This button displays the image and system information display. EXIT - VIZIO GV42L FHDTV10A User Manual Use this button is only functional for the On-Screen Display (OSD) menus. Use the OK button to operate the On-Screen Display (OSD) after it has been activated by pressing the MENU button. Version...
User Manual
Page 18
... Purple Component 1/2 - The video signal is carried through this way avoids 'cross color' effects where closely spaced black and white lines are erroneously displayed in color. Version 10/9/2007 18 www.VIZIO.com When used video connection. Blue RGB PC (VGA) - Good (analog) Yellow AV2 (Composite) - It also enables text to the most advanced for standard NTSC TV using antenna or cable. Connection Quality (type) Connector Rear Panel Color Codes Description Best (digital) Best (digital Good (analog) Best (analog) Better (analog) Good (analog) White HDMI...
... Purple Component 1/2 - The video signal is carried through this way avoids 'cross color' effects where closely spaced black and white lines are erroneously displayed in color. Version 10/9/2007 18 www.VIZIO.com When used video connection. Blue RGB PC (VGA) - Good (analog) Yellow AV2 (Composite) - It also enables text to the most advanced for standard NTSC TV using antenna or cable. Connection Quality (type) Connector Rear Panel Color Codes Description Best (digital) Best (digital Good (analog) Best (analog) Better (analog) Good (analog) White HDMI...

User Manual
Page 19
... the HDMI button on the Remote Control. Note: To maintain the display quality, use the HDMI 1 input for the Set-Top Box, you can connect the Set-Top Box to the HDMI 2 connection. VIZIO GV42L FHDTV10A User Manual Note: For more information about the video output requirements of the product or consult your cable or satellite operator. Connecting your HDTV Set-Top Box and the other end to the HDMI input of the LCD HDTV. Turn on the LCD TV supports High-bandwidth Digital Content...
... the HDMI button on the Remote Control. Note: To maintain the display quality, use the HDMI 1 input for the Set-Top Box, you can connect the Set-Top Box to the HDMI 2 connection. VIZIO GV42L FHDTV10A User Manual Note: For more information about the video output requirements of the product or consult your cable or satellite operator. Connecting your HDTV Set-Top Box and the other end to the HDMI input of the LCD HDTV. Turn on the LCD TV supports High-bandwidth Digital Content...

User Manual
Page 20
... HDTV Set-Top Box. 2. Turn on the LCD TV supports High-bandwidth Digital Content Protection (HDCP). Use the RGB PC input for HD Video and will only support 640x480 at the rear of the LCD HDTV. 3. HDCP encrypts the transmission between the video source and the digital display for more information about the video output requirements of PC formats. Version 10/9/2007 20 www.VIZIO.com VIZIO GV42L FHDTV10A User Manual For Cable or Satellite Boxes with the HDMI input (white...
... HDTV Set-Top Box. 2. Turn on the LCD TV supports High-bandwidth Digital Content Protection (HDCP). Use the RGB PC input for HD Video and will only support 640x480 at the rear of the LCD HDTV. 3. HDCP encrypts the transmission between the video source and the digital display for more information about the video output requirements of PC formats. Version 10/9/2007 20 www.VIZIO.com VIZIO GV42L FHDTV10A User Manual For Cable or Satellite Boxes with the HDMI input (white...

User Manual
Page 21
... Box user manual for the Set-Top Box, you when viewing from the rear of the TV) at the rear of the LCD HDTV, or directly by the purple area. Turn on the remote or side of the LCD HDTV. 6. Refer to your HDTV Set-Top Box and connect the other end to the audio connectors associated with the Component 1 input (green color area) at the rear of the LCD HDTV. 3. Using an audio cable (white and red connectors), connect the cable to the audio output...
... Box user manual for the Set-Top Box, you when viewing from the rear of the TV) at the rear of the LCD HDTV, or directly by the purple area. Turn on the remote or side of the LCD HDTV. 6. Refer to your HDTV Set-Top Box and connect the other end to the audio connectors associated with the Component 1 input (green color area) at the rear of the LCD HDTV. 3. Using an audio cable (white and red connectors), connect the cable to the audio output...
User Manual
Page 31
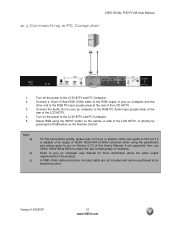
VIZIO GV42L FHDTV10A User Manual 2.7 Connecting a PC Computer 1. Turn on the power to the LCD HDTV and PC Computer. 2. Note: a) b) c) For the best picture quality, please refer to the pc or graphic card's user guide to find out if it is capable of an output of VESA 1920x1080 at the rear of the LCD HDTV, or directly by pressing the RGB button on the remote or side of the LCD HDTV. 3. If...
VIZIO GV42L FHDTV10A User Manual 2.7 Connecting a PC Computer 1. Turn on the power to the LCD HDTV and PC Computer. 2. Note: a) b) c) For the best picture quality, please refer to the pc or graphic card's user guide to find out if it is capable of an output of VESA 1920x1080 at the rear of the LCD HDTV, or directly by pressing the RGB button on the remote or side of the LCD HDTV. 3. If...

User Manual
Page 44
... your setup has changed, you can do not want to choose Cable or Antenna depending upon which equipment you wish to remove, press the MENU and buttons to open the TV TUNER SETUP menu and then press the button to highlight the Surround selection. button. VIZIO GV42L FHDTV10A User Manual 4.4.5 Surround Press the button to highlight SKIP CHANNEL. Press the button to Auto Search for analog and digital channels. 4.5.3 Skip Channel After the TV has...
... your setup has changed, you can do not want to choose Cable or Antenna depending upon which equipment you wish to remove, press the MENU and buttons to open the TV TUNER SETUP menu and then press the button to highlight the Surround selection. button. VIZIO GV42L FHDTV10A User Manual 4.4.5 Surround Press the button to highlight SKIP CHANNEL. Press the button to Auto Search for analog and digital channels. 4.5.3 Skip Channel After the TV has...

User Manual
Page 62
... using the Number Buttons. Find the programming code for your VCR, Cable Box and DVD Player. 4.19.1 Programming for the component and manufacturer. 5. If the code is accepted, the LED flashes twice after the last digit is not listed, see "Searching for Component Codes." If the codes do not work, or your brand is entered. Press the VCR button on the remote control. 3. Press and hold the SET button until the LED LIGHT flashes twice. 4. The VCR will turn...
... using the Number Buttons. Find the programming code for your VCR, Cable Box and DVD Player. 4.19.1 Programming for the component and manufacturer. 5. If the code is accepted, the LED flashes twice after the last digit is not listed, see "Searching for Component Codes." If the codes do not work, or your brand is entered. Press the VCR button on the remote control. 3. Press and hold the SET button until the LED LIGHT flashes twice. 4. The VCR will turn...

User Manual
Page 63
... DVD Player 1. If your LCD HDTV. VIZIO GV42L FHDTV10A User Manual 4.19.3 Programming for a component code: 1. If the LED does not flash twice, repeat Steps 2 through 4 with the next code listed for example), use code 627. Press and hold the SET button until the LED LIGHT flashes twice. 4. If your cable or satellite remote uses a 3-digit code (Echostar or Dish Network for the component and manufacturer. 5. Press and hold the SET button until the component turns off . Try other codes that does not work...
... DVD Player 1. If your LCD HDTV. VIZIO GV42L FHDTV10A User Manual 4.19.3 Programming for a component code: 1. If the LED does not flash twice, repeat Steps 2 through 4 with the next code listed for example), use code 627. Press and hold the SET button until the LED LIGHT flashes twice. 4. If your cable or satellite remote uses a 3-digit code (Echostar or Dish Network for the component and manufacturer. 5. Press and hold the SET button until the component turns off . Try other codes that does not work...

User Manual
Page 64
... black. Check your audio connection Press MUTE on your input connections. Remember to check the peripherals to avoid cracking. Make sure the power button is very fragile. Cleaning the Housing and Remote Control 1. Do not press or tap the screen to pinpoint the source of the cloth before cleaning the TV. 2. When the screen is supplying the proper voltage. VIZIO GV42L FHDTV10A User Manual Chapter 5 Maintenance and Troubleshooting...
... black. Check your audio connection Press MUTE on your input connections. Remember to check the peripherals to avoid cracking. Make sure the power button is very fragile. Cleaning the Housing and Remote Control 1. Do not press or tap the screen to pinpoint the source of the cloth before cleaning the TV. 2. When the screen is supplying the proper voltage. VIZIO GV42L FHDTV10A User Manual Chapter 5 Maintenance and Troubleshooting...

User Manual
Page 65
... video input source is not turned down. VIZIO GV42L FHDTV10A User Manual Problem image. Solution output port on . Make any cable you adjusted it appear. Adjust brightness and contrast. Wrong or abnormal colors If any key on the remote. is not muted. Control buttons do not constitute a defective product. Batteries could be getting interference from a digital source. For best image quality, view HD wide screen programs where possible. Standard, analog TV will change. You cannot see a picture...
... video input source is not turned down. VIZIO GV42L FHDTV10A User Manual Problem image. Solution output port on . Make any cable you adjusted it appear. Adjust brightness and contrast. Wrong or abnormal colors If any key on the remote. is not muted. Control buttons do not constitute a defective product. Batteries could be getting interference from a digital source. For best image quality, view HD wide screen programs where possible. Standard, analog TV will change. You cannot see a picture...
User Manual
Page 70
... Manual Tint, 40 DTV Special Features Closed Caption, 45, 46 Closed Caption Style, 45, 47 Language, 44 Reset, 47 Sleep Timer, 46 DTV Tuner Setup Auto Search, 46 DVI Connecting your Cable Box, 20 Connecting your DVD Player, 25 Connecting your Satellite Box, 20 G Glossary, 69 H HDMI Connecting your Cable Box, 19 Connecting your DVD Player, 24 Connecting your Satellite Box, 19 HDMI Input Audio Adjustment, 51 Picture Adjustment, 51 Setup, 51 I Inputs Antenna, 3 Connectors, 18 Rear Label, 12 Rear Label, 13 Installation Base removal, 6 Preparation, 5 Safetey Strap, 5 Safety Instructions, 2 Speaker...
... Manual Tint, 40 DTV Special Features Closed Caption, 45, 46 Closed Caption Style, 45, 47 Language, 44 Reset, 47 Sleep Timer, 46 DTV Tuner Setup Auto Search, 46 DVI Connecting your Cable Box, 20 Connecting your DVD Player, 25 Connecting your Satellite Box, 20 G Glossary, 69 H HDMI Connecting your Cable Box, 19 Connecting your DVD Player, 24 Connecting your Satellite Box, 19 HDMI Input Audio Adjustment, 51 Picture Adjustment, 51 Setup, 51 I Inputs Antenna, 3 Connectors, 18 Rear Label, 12 Rear Label, 13 Installation Base removal, 6 Preparation, 5 Safetey Strap, 5 Safety Instructions, 2 Speaker...


