
User Manual (English)
Page 2
..., Inc. © DTS, Inc. DTS, the Symbol, & DTS and the Symbol together are registered trademarks, and DTS Studio Sound is the setting in the "factory default" setting and this is a trademark of HDMI Licensing LLC. For more information on the ENERGY STAR program, go to qualify for ENERGY STAR in... patents, see http://patents.dts.com. Manufactured under license from Dolby Laboratories. Manufactured under license from DTS Licensing Limited. Changing the factory default picture settings or enabling other features will be achieved. This product qualifies for ENERGY STAR rating.
..., Inc. © DTS, Inc. DTS, the Symbol, & DTS and the Symbol together are registered trademarks, and DTS Studio Sound is the setting in the "factory default" setting and this is a trademark of HDMI Licensing LLC. For more information on the ENERGY STAR program, go to qualify for ENERGY STAR in... patents, see http://patents.dts.com. Manufactured under license from Dolby Laboratories. Manufactured under license from DTS Licensing Limited. Changing the factory default picture settings or enabling other features will be achieved. This product qualifies for ENERGY STAR rating.
User Manual (English)
Page 7
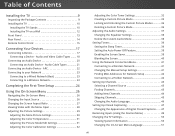
... Open 28 Adjusting the Picture Settings 29 Adjusting the More Picture Settings 30 Adjusting the Color Temperature 31 Adjusting the Picture Mode Edit Settings 31 Adjusting the Color Calibration Settings 32 Adjusting the Color Tuner Settings 32 Creating a Custom Picture Mode 35 Locking and Unlocking the Custom Picture Modes 36 Deleting a Custom Picture Mode 36 Adjusting the Audio Settings 37 Changing the...
... Open 28 Adjusting the Picture Settings 29 Adjusting the More Picture Settings 30 Adjusting the Color Temperature 31 Adjusting the Picture Mode Edit Settings 31 Adjusting the Color Calibration Settings 32 Adjusting the Color Tuner Settings 32 Creating a Custom Picture Mode 35 Locking and Unlocking the Custom Picture Modes 36 Deleting a Custom Picture Mode 36 Adjusting the Audio Settings 37 Changing the...
User Manual (English)
Page 26
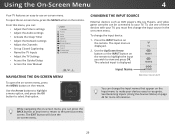
... can: • Adjust the Picture settings • Adjust the Audio settings • Activate the Sleep Timer • Adjust the Network settings • Adjust the Channels • Set up Closed Captioning • Name the TV Inputs • Adjust the TV Settings • Access the Guided Setup • Access the User Manual VIZIO TV SETTINGS Picture Audio Timers Network Channels CC...
... can: • Adjust the Picture settings • Adjust the Audio settings • Activate the Sleep Timer • Adjust the Network settings • Adjust the Channels • Set up Closed Captioning • Name the TV Inputs • Adjust the TV Settings • Access the Guided Setup • Access the User Manual VIZIO TV SETTINGS Picture Audio Timers Network Channels CC...
User Manual (English)
Page 27
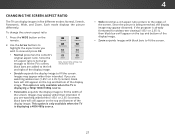
Panoramic Stretch Wide Wide Zoom Zoom Note: Aspect ratio settings may appear wider than intended. Images may vary by Input source.... only available when the TV is displaying a 480i/480p source. 4 • Wide stretches a 4:3 aspect ratio picture to fill the width of the screen. To change the screen aspect ratio: 1. Images may appear distorted. This ..., Wide, and Zoom. If you are added to fit the screen. 27 Normal Normal 2. Since the picture is being stretched, the display image may appear wider than intended. Use the Arrow buttons to highlight the ...
Panoramic Stretch Wide Wide Zoom Zoom Note: Aspect ratio settings may appear wider than intended. Images may vary by Input source.... only available when the TV is displaying a 480i/480p source. 4 • Wide stretches a 4:3 aspect ratio picture to fill the width of the screen. To change the screen aspect ratio: 1. Images may appear distorted. This ..., Wide, and Zoom. If you are added to fit the screen. 27 Normal Normal 2. Since the picture is being stretched, the display image may appear wider than intended. Use the Arrow buttons to highlight the ...
User Manual (English)
Page 28
...; Centered Overlay - Press OK to highlight Resize Video. 2. VIZIONetwork Settings TV SETTINGS Picture Audio Timers Network Channels CC Closed Captions Devices System Guided Setup User Manual Help VIZIO TV SETTINGS Picture Audio Timers Network Channels CC Closed Captions Devices System Guided Setup User ...Manual Wide Zoom Normal Panoramic Exit 2D 3D ABC Input Wide CC Sleep Timer Picture Audio Network Settings Help OVERLAY Wide Zoom VIZIO TV SETTINGS Picture Audio Timers Network Channels CC Closed Captions Devices System GNuidoedrmSetuap l User Manual Wide Zoom ...
...; Centered Overlay - Press OK to highlight Resize Video. 2. VIZIONetwork Settings TV SETTINGS Picture Audio Timers Network Channels CC Closed Captions Devices System Guided Setup User Manual Help VIZIO TV SETTINGS Picture Audio Timers Network Channels CC Closed Captions Devices System Guided Setup User ...Manual Wide Zoom Normal Panoramic Exit 2D 3D ABC Input Wide CC Sleep Timer Picture Audio Network Settings Help OVERLAY Wide Zoom VIZIO TV SETTINGS Picture Audio Timers Network Channels CC Closed Captions Devices System GNuidoedrmSetuap l User Manual Wide Zoom ...

User Manual (English)
Page 29
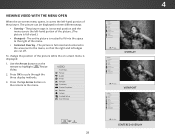
... g tHheelpflesh tones in dark or bright areas of the picture. The PICTURE menu is too high, the picture may appear faded or washed out. •Input ConWtidreast - Select from some picture modes. Adjusts the edge sharpness of the picture. To adjust the picture settings: 1. To manually change the picture mode: VIZIO PICTURE Picture Mode Auto Brightness Control Backlight - Adjusts the hue...
... g tHheelpflesh tones in dark or bright areas of the picture. The PICTURE menu is too high, the picture may appear faded or washed out. •Input ConWtidreast - Select from some picture modes. Adjusts the edge sharpness of the picture. To adjust the picture settings: 1. To manually change the picture mode: VIZIO PICTURE Picture Mode Auto Brightness Control Backlight - Adjusts the hue...
User Manual (English)
Page 30
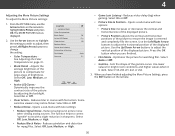
... for bright room is VIZIO MORE PICTURE Color Temperature displayed. When you are finished. •Input FilmWidMe odeC-COptimizes the picture for mpeg files. The MORE PICTURE menu is dPiactrukre. The function helps to highlight More Picture and press OK. Network Settings Help 30 Select On or Off. • Picture Size & Position - From the PICTURE menu, use the...
... for bright room is VIZIO MORE PICTURE Color Temperature displayed. When you are finished. •Input FilmWidMe odeC-COptimizes the picture for mpeg files. The MORE PICTURE menu is dPiactrukre. The function helps to highlight More Picture and press OK. Network Settings Help 30 Select On or Off. • Picture Size & Position - From the PICTURE menu, use the...
User Manual (English)
Page 31
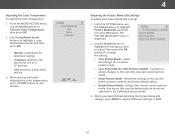
Calibrated Save Picture Mode Lock Picture Mode Reset Picture Mode - Use the Up/Down Arrow buttons to the Calibrated picture mode. 3. Calibrated* • Save Picture Mode - VIZIO COLOR TEMPERATURE Cool Normal Computer 4 Adjusting the Picture Mode Edit Settings To adjust the Picture Mode Edit settings: 1. Exit 2D 3D 2. Ne•tworkReSseettitngPsictuHerlep Mode - Resets the settings of the current built-in picture mode to...
Calibrated Save Picture Mode Lock Picture Mode Reset Picture Mode - Use the Up/Down Arrow buttons to the Calibrated picture mode. 3. Calibrated* • Save Picture Mode - VIZIO COLOR TEMPERATURE Cool Normal Computer 4 Adjusting the Picture Mode Edit Settings To adjust the Picture Mode Edit settings: 1. Exit 2D 3D 2. Ne•tworkReSseettitngPsictuHerlep Mode - Resets the settings of the current built-in picture mode to...
User Manual (English)
Page 32
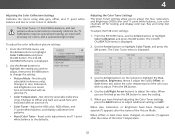
... indicated with an asterisk (*). • Color Tuner - SlUeespe Tiymoeru the Left/Right Arrow buttons to change the setting: VIZIO COLOR CALIBRATION Picture Mode Standard Color Temperature Cool Color Tuner Reset Color Tuner • Picture Mode - From the PICTURE menu, use the Arrow buttons to adjust the Hue, Saturation, and Brightness (HSB) color and 11 point...
... indicated with an asterisk (*). • Color Tuner - SlUeespe Tiymoeru the Left/Right Arrow buttons to change the setting: VIZIO COLOR CALIBRATION Picture Mode Standard Color Temperature Cool Color Tuner Reset Color Tuner • Picture Mode - From the PICTURE menu, use the Arrow buttons to adjust the Hue, Saturation, and Brightness (HSB) color and 11 point...
User Manual (English)
Page 33
... color channels off and on the remote to highlight the Gain and Color values you wish to adjust. To adjust the 11 Point White Balance settings: 1. From the Color Tuner menu, use the Arrow buttons to Color Temperature. 33 Use the Arrow buttons on the remote to highlight Color ... Arrow buttons until the 11 Point White Balance menu is displayed. All changes here are finished, press the BACK button to adjust additional settings or EXIT. From the PICTURE menu, use the Arrow buttons to highlight Red, Green, or Blue. 4. When you are finished with the color channels, press the...
... color channels off and on the remote to highlight the Gain and Color values you wish to adjust. To adjust the 11 Point White Balance settings: 1. From the Color Tuner menu, use the Arrow buttons to Color Temperature. 33 Use the Arrow buttons on the remote to highlight Color ... Arrow buttons until the 11 Point White Balance menu is displayed. All changes here are finished, press the BACK button to adjust additional settings or EXIT. From the PICTURE menu, use the Arrow buttons to highlight Red, Green, or Blue. 4. When you are finished with the color channels, press the...
User Manual (English)
Page 35
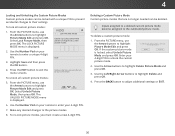
...inputs). When you to highlight Off. See Adjusting the Picture Settings on the remote to save a group of custom settings for various viewing conditions and video sources. The SAVE PICTURE MODE menu is selected, an asterisk appears after the...Set the Picture Mode to exit the menu screens. From the PICTURE menu, use the Arrow buttons to a custom picture mode enables the change globally (for all inputs. On the PICTURE MODE EDIT menu, select Save Picture Mode, and press OK. A custom picture mode is displayed. 3. Any changes to highlight Picture Mode Edit and press OK. VIZIO SAVE PICTURE...
...inputs). When you to highlight Off. See Adjusting the Picture Settings on the remote to save a group of custom settings for various viewing conditions and video sources. The SAVE PICTURE MODE menu is selected, an asterisk appears after the...Set the Picture Mode to exit the menu screens. From the PICTURE menu, use the Arrow buttons to a custom picture mode enables the change globally (for all inputs. On the PICTURE MODE EDIT menu, select Save Picture Mode, and press OK. A custom picture mode is displayed. 3. Any changes to highlight Picture Mode Edit and press OK. VIZIO SAVE PICTURE...
User Manual (English)
Page 36
... settings or EXIT. Select Lock Picture Mode, then press OK. Save 3. The UNLOCK PICTURE MODE menu is displayed. Deleting a Custom Picture Mode Custom picture modes that are no longer needed can be deleted. ToWdidee leteZoaomcustNoomrmapl icPtaunroerammicode: 1. Press the BACK button to highlight Delete and press OK. 4. The LOCK PICTURE MODE menu is displayed. 6. VIZIO LOCK PICTURE MODE Create a picture...
... settings or EXIT. Select Lock Picture Mode, then press OK. Save 3. The UNLOCK PICTURE MODE menu is displayed. Deleting a Custom Picture Mode Custom picture modes that are no longer needed can be deleted. ToWdidee leteZoaomcustNoomrmapl icPtaunroerammicode: 1. Press the BACK button to highlight Delete and press OK. 4. The LOCK PICTURE MODE menu is displayed. 6. VIZIO LOCK PICTURE MODE Create a picture...
User Manual (English)
Page 45
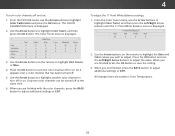
...'s memory with the Skip Channel feature can still be some channels you select. 3. VIZIO SKIP CHANNEL 1 Test 0 1 Test 1 P 1-2 Test 2 P 2 Test 3 2-2 Test 4 P 2-3 Test 5 Wide Zoom Normal Panoramic Exit 2D 3D ABC Input Wide CC Sleep Timer Picture Audio Network Settings Help 45 When you wish to the right of the channels you have been...
...'s memory with the Skip Channel feature can still be some channels you select. 3. VIZIO SKIP CHANNEL 1 Test 0 1 Test 1 P 1-2 Test 2 P 2 Test 3 2-2 Test 4 P 2-3 Test 5 Wide Zoom Normal Panoramic Exit 2D 3D ABC Input Wide CC Sleep Timer Picture Audio Network Settings Help 45 When you wish to the right of the channels you have been...
User Manual (English)
Page 46
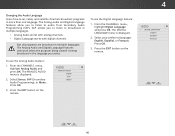
... ANALOG AUDIO menu is displayed. 2. Press OK. 3. Wide Zoom Normal Panoramic Exit 2D 3D ABC Input Wide CC VIZIO DIGITAL LANGUAGE English Español Français Sleep Timer Picture Audio Network Settings Help 46 From the CHANNELS menu, highlight Analog Audio and press OK. Press the EXIT button on the remote... (Secondary Audio Programming), or Mono. Not all programs are broadcast in the language you to listen to audio from Secondary Audio Programming (SAP). Press OK. 3. VIZIO ANALOG AUDIO Stereo SAP Mono To use the Analog Audio feature: 1.
... ANALOG AUDIO menu is displayed. 2. Press OK. 3. Wide Zoom Normal Panoramic Exit 2D 3D ABC Input Wide CC VIZIO DIGITAL LANGUAGE English Español Français Sleep Timer Picture Audio Network Settings Help 46 From the CHANNELS menu, highlight Analog Audio and press OK. Press the EXIT button on the remote... (Secondary Audio Programming), or Mono. Not all programs are broadcast in the language you to listen to audio from Secondary Audio Programming (SAP). Press OK. 3. VIZIO ANALOG AUDIO Stereo SAP Mono To use the Analog Audio feature: 1.
User Manual (English)
Page 49
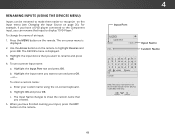
...button on -screen menu is displayed. 3. InpuWtidNe amZoeom Normal Panora Custom Name Exit 2D 3D ABC Input Wide CC Sleep Timer Picture Audio Network Settings Help 49 Press the MENU button on -screen keyboard. The Input Name changes to show the custom name that input to rename... and press OK. 4. The on the remote. 4 Input Port VIZIO NAME INPUT HDMI-1 DVD DVD_ abc def ghi j k l mn o p q r s t u v wx y z 0 123456789 .@# ....
...button on -screen menu is displayed. 3. InpuWtidNe amZoeom Normal Panora Custom Name Exit 2D 3D ABC Input Wide CC Sleep Timer Picture Audio Network Settings Help 49 Press the MENU button on -screen keyboard. The Input Name changes to show the custom name that input to rename... and press OK. 4. The on the remote. 4 Input Port VIZIO NAME INPUT HDMI-1 DVD DVD_ abc def ghi j k l mn o p q r s t u v wx y z 0 123456789 .@# ....

User Manual (English)
Page 50
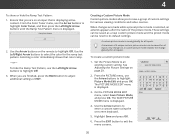
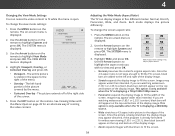
...TV settings and control Smart Interactivity VIZIO SYSTEM System Information Menu Language Time & Local Settings Parental Controls View Mode Wide TV Name CEC Power Indicator Reset & Admin English Off Viewing System Information To view technical data and status information about your VIZIO TV...5. The SYSTEM menu is displayed. 2. WiUdese tZhoeomArroNwormbaul ttPoannosraomnic the remote to scroll through the system information. Sleep Timer Picture Audio Network Settings Help 50 Use the Up/Down Arrow buttons to highlight System and press OK. The on-screen menu is displayed. ...
...TV settings and control Smart Interactivity VIZIO SYSTEM System Information Menu Language Time & Local Settings Parental Controls View Mode Wide TV Name CEC Power Indicator Reset & Admin English Off Viewing System Information To view technical data and status information about your VIZIO TV...5. The SYSTEM menu is displayed. 2. WiUdese tZhoeomArroNwormbaul ttPoannosraomnic the remote to scroll through the system information. Sleep Timer Picture Audio Network Settings Help 50 Use the Up/Down Arrow buttons to highlight System and press OK. The on-screen menu is displayed. ...
User Manual (English)
Page 54
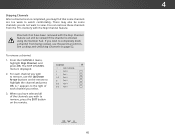
...the screen. The SYSTEM menu is displaying a 480i/480p source. • Wide stretches a 4:3 aspect ratio picture to view and press OK. Note: Aspect ratio settings may appear wider than intended. If you are watching widescreen Network(1.S8e5tt:in1gos r 2H.3e5lp:1) content, black ...bars will still appear on -screen menu is already formatted for an alternate way of the screen. 5. VIZIO VIEW MODE Viewport Overlay Centered Overlay 3. The picture ...
...the screen. The SYSTEM menu is displaying a 480i/480p source. • Wide stretches a 4:3 aspect ratio picture to view and press OK. Note: Aspect ratio settings may appear wider than intended. If you are watching widescreen Network(1.S8e5tt:in1gos r 2H.3e5lp:1) content, black ...bars will still appear on -screen menu is already formatted for an alternate way of the screen. 5. VIZIO VIEW MODE Viewport Overlay Centered Overlay 3. The picture ...
User Manual (English)
Page 70
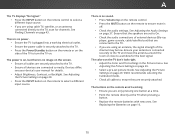
...or Backlight. VIZIO recommends selecting the Calibrated mode. • Check all devices are securely attached. There is securely attached to the TV. • Press the Power/Standby button on the remote or on the side of the TV to select a different input source. See Adjusting the Picture Settings on the TV...the TV and move the antenna around the room or close to ensure they are connected correctly. The colors on page 29. See Adjusting the Picture Settings on page 16. 70 Devices differ; see your antenna is no sound. • Press Volume Up on the remote control. • ...
...or Backlight. VIZIO recommends selecting the Calibrated mode. • Check all devices are securely attached. There is securely attached to the TV. • Press the Power/Standby button on the remote or on the side of the TV to select a different input source. See Adjusting the Picture Settings on the TV...the TV and move the antenna around the room or close to ensure they are connected correctly. The colors on page 29. See Adjusting the Picture Settings on page 16. 70 Devices differ; see your antenna is no sound. • Press Volume Up on the remote control. • ...
Quickstart Guide (English)
Page 2
... Keep these instructions in fire or electric shock. • The wall socket should be used for ENERGY STAR in the "factory default" setting and this apparatus during a lightning storm or when it from being damaged, the following safety instructions before moving your TV. When a cart ... sure these instructions. • Heed all warnings. • Follow all servicing to repair or service your safety. Changing the factory default picture settings or enabling other than the voltage specified. The power cord fails or frays. - Your TV is required, contact your TV may cause ...
... Keep these instructions in fire or electric shock. • The wall socket should be used for ENERGY STAR in the "factory default" setting and this apparatus during a lightning storm or when it from being damaged, the following safety instructions before moving your TV. When a cart ... sure these instructions. • Heed all warnings. • Follow all servicing to repair or service your safety. Changing the factory default picture settings or enabling other than the voltage specified. The power cord fails or frays. - Your TV is required, contact your TV may cause ...
Quickstart Guide (English)
Page 20
... for the best connection. • Turn off . • Press MENU > Audio. Set the TV to Factory Defaults. To reset the TV to factory defaults, press MENU > System > Reset & Admin > Reset TV to Wide or Zoom mode. There is a picture, but there is no power. • Be sure the power cord is... securely connected to the AC socket on the TV and to a working electrical outlet. • Press the POWER button on the remote or on . Be sure TV Speakers is set Volume Control to External. ...
... for the best connection. • Turn off . • Press MENU > Audio. Set the TV to Factory Defaults. To reset the TV to factory defaults, press MENU > System > Reset & Admin > Reset TV to Wide or Zoom mode. There is a picture, but there is no power. • Be sure the power cord is... securely connected to the AC socket on the TV and to a working electrical outlet. • Press the POWER button on the remote or on . Be sure TV Speakers is set Volume Control to External. ...


