User Manual (English)
Page 2
...TV should be sure these instructions. Never spill liquids on the label. Safety & Certification THANK YOU FOR CHOOSING VIZIO IMPORTANT SAFETY INSTRUCTIONS • Use only with the cart, stand, tripod, bracket, or table specified by the manufacturer. We recommend that produce heat. • Do not.... Wait before cleaning your TV. • When moving the cart/apparatus combination to protect your investment beyond the standard warranty, VIZIO offers on your safety. Do not install your TV. Doing so could short circuit parts causing a fire or electric shock. ...
...TV should be sure these instructions. Never spill liquids on the label. Safety & Certification THANK YOU FOR CHOOSING VIZIO IMPORTANT SAFETY INSTRUCTIONS • Use only with the cart, stand, tripod, bracket, or table specified by the manufacturer. We recommend that produce heat. • Do not.... Wait before cleaning your TV. • When moving the cart/apparatus combination to protect your investment beyond the standard warranty, VIZIO offers on your safety. Do not install your TV. Doing so could short circuit parts causing a fire or electric shock. ...
User Manual (English)
Page 6
...Resetting a Preset Picture Mode 27 Blocking and Unblocking Content by Rating 44 Inspecting the Package Contents 7 Installing the TV 8 Installing the TV Stand 8 Installing the TV on the Input Menu 41 Moving an App in My Apps 56 Viewing Video with CEC 46 Turning the Power ...fullscreen V.I .A. Plus Apps Window Overview 55 Customizing the V.I .A. Table of Digital Closed Captions 39 Deleting an App from the TV 49 Using VIZIO Internet Apps Plus® (V.I .A. Audio Cable Types 16 Connecting an Audio Device - Plus 53 Completing The First-Time Setup 19 Listening to Play...
...Resetting a Preset Picture Mode 27 Blocking and Unblocking Content by Rating 44 Inspecting the Package Contents 7 Installing the TV 8 Installing the TV Stand 8 Installing the TV on the Input Menu 41 Moving an App in My Apps 56 Viewing Video with CEC 46 Turning the Power ...fullscreen V.I .A. Plus Apps Window Overview 55 Customizing the V.I .A. Table of Digital Closed Captions 39 Deleting an App from the TV 49 Using VIZIO Internet Apps Plus® (V.I .A. Audio Cable Types 16 Connecting an Audio Device - Plus 53 Completing The First-Time Setup 19 Listening to Play...
User Manual (English)
Page 7
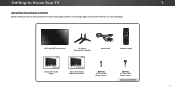
Use the images below to inspect the package contents. Getting to Know Your TV 1 INSPECTING THE PACKAGE CONTENTS Before installing your new TV, take a moment to ensure that nothing is missing or damaged. VIZIO LED UHDTV with Stand TV Stands (two identical stands) Power Cord Remote Control Quick Start Guide English Quick Start Guide Spanish and French (E65-C3) 4 x 14 mm M5 Phillips Screws (E70-C3) 4 x 18 mm M5 Phillips Screws PACKAGE CONTENTS 7
Use the images below to inspect the package contents. Getting to Know Your TV 1 INSPECTING THE PACKAGE CONTENTS Before installing your new TV, take a moment to ensure that nothing is missing or damaged. VIZIO LED UHDTV with Stand TV Stands (two identical stands) Power Cord Remote Control Quick Start Guide English Quick Start Guide Spanish and French (E65-C3) 4 x 14 mm M5 Phillips Screws (E70-C3) 4 x 18 mm M5 Phillips Screws PACKAGE CONTENTS 7

User Manual (English)
Page 8
...-standard wall mount (not included) Installing the TV Stand Your TV includes a stand designed to support the weight of the TV as carpet, rug, or blanket. Place the TV screen-down on a clean, flat surface. When you can begin installing the TV. For E65-C3: Use two (2) 14 mm M5 Phillips screws for... each stand. 1 INSTALLING THE TV After removing the TV from falling over if: • It is placed on an uneven, unstable, or...
...-standard wall mount (not included) Installing the TV Stand Your TV includes a stand designed to support the weight of the TV as carpet, rug, or blanket. Place the TV screen-down on a clean, flat surface. When you can begin installing the TV. For E65-C3: Use two (2) 14 mm M5 Phillips screws for... each stand. 1 INSTALLING THE TV After removing the TV from falling over if: • It is placed on an uneven, unstable, or...

User Manual (English)
Page 9
... the base and neck by loosening and removing the screws. 4. For some wall mounts, you . Screw Size: Hole Pattern: Weight w/o Stand: E65-C3 M6 400 mm (V) x 400 mm (H) 50.71 lbs E70-C3 M6 400 mm (V) x 400 mm (H) 55.69 lbs Be sure the mount you choose is clear of debris that came with...
... the base and neck by loosening and removing the screws. 4. For some wall mounts, you . Screw Size: Hole Pattern: Weight w/o Stand: E65-C3 M6 400 mm (V) x 400 mm (H) 50.71 lbs E70-C3 M6 400 mm (V) x 400 mm (H) 55.69 lbs Be sure the mount you choose is clear of debris that came with...
User Manual (English)
Page 62
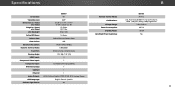
... w/ Stand: w/o Stand: Weight w/ Stand: w/o Stand: LCD Backlight: Active LED Zones: Refresh Rate: Clear Action: Maximum Resolution: Dynamic Contrast Ratio: Pixel Pitch: Viewing Angle: HDMI Inputs: Component Video Inputs: Composite Inputs: RF Antenna Input: USB Port: Ethernet: Audio Outputs: OSD Language: Ambient Light Sensor: E65-C3 65... French, Spanish Yes B Remote Control Model: Certifications: Voltage Range: Power Consumption: Standby Power: Zero Bright Pixel Guarantee: E65-C3 XRT112 cUL, FCC Class B, BETS-7 Issue 2, FCC ID, IC, HDMI 1.4b (CEC, ARC), Dolby Digital Plus 120V @ 60 Hz 90.1 W ...
... w/ Stand: w/o Stand: Weight w/ Stand: w/o Stand: LCD Backlight: Active LED Zones: Refresh Rate: Clear Action: Maximum Resolution: Dynamic Contrast Ratio: Pixel Pitch: Viewing Angle: HDMI Inputs: Component Video Inputs: Composite Inputs: RF Antenna Input: USB Port: Ethernet: Audio Outputs: OSD Language: Ambient Light Sensor: E65-C3 65... French, Spanish Yes B Remote Control Model: Certifications: Voltage Range: Power Consumption: Standby Power: Zero Bright Pixel Guarantee: E65-C3 XRT112 cUL, FCC Class B, BETS-7 Issue 2, FCC ID, IC, HDMI 1.4b (CEC, ARC), Dolby Digital Plus 120V @ 60 Hz 90.1 W ...

User Manual (English)
Page 63
...w/ Stand: w/o Stand: Weight w/ Stand: w/o Stand: LCD Backlight: Active LED Zones: Refresh Rate: Clear Action: Maximum Resolution: Dynamic Contrast Ratio: Pixel Pitch: Viewing Angle: HDMI Inputs: Component Video Inputs: Composite Inputs: RF Antenna Input: USB Port: Ethernet: Audio Outputs: OSD Language: Ambient Light Sensor: E70-C3 70...French, Spanish Yes B Remote Control Model: Certifications: Voltage Range: Power Consumption: Standby Power: Zero Bright Pixel Guarantee: E70-C3 XRT112 cUL, FCC Class B, BETS-7 Issue 2, FCC ID, IC, HDMI 1.4b (CEC, ARC), Dolby Digital Plus 120V @ 60 Hz 101.9 W ...
...w/ Stand: w/o Stand: Weight w/ Stand: w/o Stand: LCD Backlight: Active LED Zones: Refresh Rate: Clear Action: Maximum Resolution: Dynamic Contrast Ratio: Pixel Pitch: Viewing Angle: HDMI Inputs: Component Video Inputs: Composite Inputs: RF Antenna Input: USB Port: Ethernet: Audio Outputs: OSD Language: Ambient Light Sensor: E70-C3 70...French, Spanish Yes B Remote Control Model: Certifications: Voltage Range: Power Consumption: Standby Power: Zero Bright Pixel Guarantee: E70-C3 XRT112 cUL, FCC Class B, BETS-7 Issue 2, FCC ID, IC, HDMI 1.4b (CEC, ARC), Dolby Digital Plus 120V @ 60 Hz 101.9 W ...
Quickstart Guide (English)
Page 2
... using dropped or damaged appliances. If water penetrates into your TV. - Continued use attachments/accessories specified by the manufacturer. • Use only with the cart, stand, tripod, bracket, or table specified by qualified service personnel only. The power cord fails or frays. - Keep these openings are not blocked or covered. When...
... using dropped or damaged appliances. If water penetrates into your TV. - Continued use attachments/accessories specified by the manufacturer. • Use only with the cart, stand, tripod, bracket, or table specified by qualified service personnel only. The power cord fails or frays. - Keep these openings are not blocked or covered. When...
Quickstart Guide (English)
Page 8
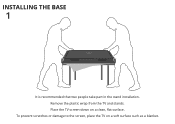
To prevent scratches or damage to the screen, place the TV on a clean, flat surface. INSTALLING THE BASE 1 It is recommended that two people take part in the stand installation. Remove the plastic wrap from the TV and stands. Place the TV screen-down on a soft surface such as a blanket.
To prevent scratches or damage to the screen, place the TV on a clean, flat surface. INSTALLING THE BASE 1 It is recommended that two people take part in the stand installation. Remove the plastic wrap from the TV and stands. Place the TV screen-down on a soft surface such as a blanket.

Quickstart Guide (English)
Page 9
2 Insert stands into the back of the TV. (The stands are finished, place the TV on a stable, level surface. Insert the screws into the base of the TV and tighten them using a Phillips screwdriver. When you are identical.) Secure each stand to the TV with two (2) Phillips screws (included).
2 Insert stands into the back of the TV. (The stands are finished, place the TV on a stable, level surface. Insert the screws into the base of the TV and tighten them using a Phillips screwdriver. When you are identical.) Secure each stand to the TV with two (2) Phillips screws (included).


