
E472VL User Manual
Page 4
... has been damaged in electric shock or fire. Doing so could short circuit parts causing a fire or electric shock. Never spill liquids on your TV. This may cause fire or electric shock. • Slots and openings in accordance with the manufacturer's instructions. • Do not install near water...A polarized plug has two blades and a third grounding prong. This plug will fit only into the apparatus, the apparatus has been eposed E472VL / E552VL to rain or moisture, does not operate normally or has been dropped. • Unplug the power cord before turning on the label. Wait before...
... has been damaged in electric shock or fire. Doing so could short circuit parts causing a fire or electric shock. Never spill liquids on your TV. This may cause fire or electric shock. • Slots and openings in accordance with the manufacturer's instructions. • Do not install near water...A polarized plug has two blades and a third grounding prong. This plug will fit only into the apparatus, the apparatus has been eposed E472VL / E552VL to rain or moisture, does not operate normally or has been dropped. • Unplug the power cord before turning on the label. Wait before...
E472VL User Manual
Page 5
... result in this case may cause the batteries to qualified service personnel. • WARNING: Keep your TV yourself. • Avoid using dropped or damaged appliances. These servicing instructions are qualified to persons. E472VL / E552VL • Do not overload power strips and extension cords. h The lightning flash with instructions. Opening or removing...
... result in this case may cause the batteries to qualified service personnel. • WARNING: Keep your TV yourself. • Avoid using dropped or damaged appliances. These servicing instructions are qualified to persons. E472VL / E552VL • Do not overload power strips and extension cords. h The lightning flash with instructions. Opening or removing...
E472VL User Manual
Page 6
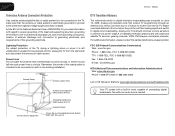
...(1-888-388-2009) List of US Television Stations: www.high-techproductions.com/usTVstations.htm Antenna Discharge Unit (NEC Section 810-20) Your TV comes with a built-in tuner capable of the grounding electrode. Electric Service Equipment Grounding Conductors (NEC Section 810-21) Ground Clamps Power...broadcasting was complete on June 12, 2009. E472VL / E552VL Television Antenna Connection Protection If an outside antenna/satellite dish or cable system is to be connected to the TV, make sure that receive TV programming through an antenna now need a converter box to continue to ...
...(1-888-388-2009) List of US Television Stations: www.high-techproductions.com/usTVstations.htm Antenna Discharge Unit (NEC Section 810-20) Your TV comes with a built-in tuner capable of the grounding electrode. Electric Service Equipment Grounding Conductors (NEC Section 810-21) Ground Clamps Power...broadcasting was complete on June 12, 2009. E472VL / E552VL Television Antenna Connection Protection If an outside antenna/satellite dish or cable system is to be connected to the TV, make sure that receive TV programming through an antenna now need a converter box to continue to ...

E472VL User Manual
Page 7
... 16 Using the Network Connection Menu 17 Connecting to a Wireless Network 17 Changing the Advanced Network Settings 18 Testing Your Network Connection 18 Changing the TV Settings 18 Changing the Input Source 18 Setting the Tuner Mode 19 Scanning for Channels 19 Adding New Channels 20 Skipping Channels 20 Changing the... the Names of the Inputs 23 Changing the On-Screen Menu Language 24 Setting the Time Zone 24 Adjusting the CEC Settings 25 Turning the VIZIO Logo On or Off 25 Using the Help Menu 25 Displaying System Information 25 Resetting the...
... 16 Using the Network Connection Menu 17 Connecting to a Wireless Network 17 Changing the Advanced Network Settings 18 Testing Your Network Connection 18 Changing the TV Settings 18 Changing the Input Source 18 Setting the Tuner Mode 19 Scanning for Channels 19 Adding New Channels 20 Skipping Channels 20 Changing the... the Names of the Inputs 23 Changing the On-Screen Menu Language 24 Setting the Time Zone 24 Adjusting the CEC Settings 25 Turning the VIZIO Logo On or Off 25 Using the Help Menu 25 Displaying System Information 25 Resetting the...
E472VL User Manual
Page 8
...28 Using the USB Media Player 28 Connecting a USB Thumb Drive to the TV 28 Playing USB Media 28 Using VIZIO Internet Apps 31 Using the VIA Shortcut Buttons 31 Using the VIA Dock ... Profile 33 Restoring the VIA Dock to the Factory Default Settings 34 Troubleshooting & Technical Support 35 The TV displays "No Signal 35 There is no power 35 The power is on, but there is no..."noise" or static on the screen 36 When I change input source, the volume changes 36 E472VL / E552VL When I change input source, the display image changes size 36 Specifications 37 Limited Warranty 39 ON PARTS AND...
...28 Using the USB Media Player 28 Connecting a USB Thumb Drive to the TV 28 Playing USB Media 28 Using VIZIO Internet Apps 31 Using the VIA Shortcut Buttons 31 Using the VIA Dock ... Profile 33 Restoring the VIA Dock to the Factory Default Settings 34 Troubleshooting & Technical Support 35 The TV displays "No Signal 35 There is no power 35 The power is on, but there is no..."noise" or static on the screen 36 When I change input source, the volume changes 36 E472VL / E552VL When I change input source, the display image changes size 36 Specifications 37 Limited Warranty 39 ON PARTS AND...
E472VL User Manual
Page 9
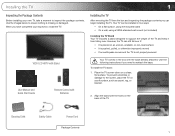
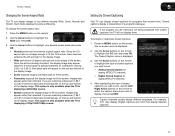
... contents. Use the following instructions if you need to support the weight of the TV. To install the TV stand: 1. To prevent scratches or damage to ensure nothing is not properly secured VIZIO LCD HDTV with Stand User Manual and Quick Start Guide Remote Control with Batteries Your... TV comes in two ways: • On a flat surface, using the included stand • On a wall, using a VESA-standard...
... contents. Use the following instructions if you need to support the weight of the TV. To install the TV stand: 1. To prevent scratches or damage to ensure nothing is not properly secured VIZIO LCD HDTV with Stand User Manual and Quick Start Guide Remote Control with Batteries Your... TV comes in two ways: • On a flat surface, using the included stand • On a wall, using a VESA-standard...
E472VL User Manual
Page 10
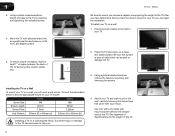
... Size: Screw Length: Screw Pitch: Hole Pattern: E472VL M6 20mm 1.0mm 200mm (V) x 400mm (H) E552VL M8 25mm 1.25mm 200mm (V) x 400mm (H) Installing a TV on a wall requires lifting. Move the TV with attached stand into an upright position and place on a wall: 1. E472VL / E552VL Be sure the mount you will need a wall mount. To ensure proper ventilation...
... Size: Screw Length: Screw Pitch: Hole Pattern: E472VL M6 20mm 1.0mm 200mm (V) x 400mm (H) E552VL M8 25mm 1.25mm 200mm (V) x 400mm (H) Installing a TV on a wall requires lifting. Move the TV with attached stand into an upright position and place on a wall: 1. E472VL / E552VL Be sure the mount you will need a wall mount. To ensure proper ventilation...
E472VL User Manual
Page 12
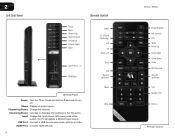
... Panel Remote Control Power Menu Channel Up Channel Down Volume Up Volume Down Input USB Ports (1, 2) HDMI Port Left Side Panel Power: Turn the TV on -screen menu. Input: Change the input device. Menu: Display on . Channel Up/Down: Change the channel. Volume Up/Down: Increase or decrease ...to turn off. With each press of the TVs audio. Press and hold for 3 seconds to play music, photos, or video. HDMI Port: Connect HDMI devices. 4 Input CC (Closed Captioning) Exit OK Arrow Left Back VIA Volume Up/Down Mute Wide E472VL / E552VL Power/Standby A/V Controls Info Menu Arrow Up ...
... Panel Remote Control Power Menu Channel Up Channel Down Volume Up Volume Down Input USB Ports (1, 2) HDMI Port Left Side Panel Power: Turn the TV on -screen menu. Input: Change the input device. Menu: Display on . Channel Up/Down: Change the channel. Volume Up/Down: Increase or decrease ...to turn off. With each press of the TVs audio. Press and hold for 3 seconds to play music, photos, or video. HDMI Port: Connect HDMI devices. 4 Input CC (Closed Captioning) Exit OK Arrow Left Back VIA Volume Up/Down Mute Wide E472VL / E552VL Power/Standby A/V Controls Info Menu Arrow Up ...
E472VL User Manual
Page 13
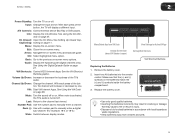
... Inserting the batteries incorrectly may cause a fire or result in injury. • Dispose of the button, the TV will increase or decrease by one. VIA Shortcuts: Control VIZIO Internet Apps. See the VIA Shortcut Buttons graphic. Number Pad: Use the number pad to the channel last viewed...control. Make sure that may result in accordance with number pad to the previous on -screen menu and episode guide. E472VL / E552VL 2 Power/Standby: Turn the TV on . Input: Change the input device. Info: Display the Info Window. Arrow: Navigate the on -screen menu options. Back:...
... Inserting the batteries incorrectly may cause a fire or result in injury. • Dispose of the button, the TV will increase or decrease by one. VIA Shortcuts: Control VIZIO Internet Apps. See the VIA Shortcut Buttons graphic. Number Pad: Use the number pad to the channel last viewed...control. Make sure that may result in accordance with number pad to the previous on -screen menu and episode guide. E472VL / E552VL 2 Power/Standby: Turn the TV on . Input: Change the input device. Info: Display the Info Window. Arrow: Navigate the on -screen menu options. Back:...
E472VL User Manual
Page 14
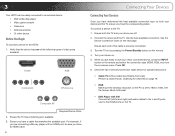
... device to the HDTV: 1. See the Device Connection Chart on . 5. Verify that matches the available port. Press OK. 6. Connect the device and the TV. Ensure each end of devices/connection types below for Channels on page 19. • RGB Make sure the desktop resolution on the PC is securely ...connected. 3. Turn your device and the TV, ensure you have a cable that the device has one of the following types of video ports available: HDMI RGB Component RF/Antenna Composite AV...
... device to the HDTV: 1. See the Device Connection Chart on . 5. Verify that matches the available port. Press OK. 6. Connect the device and the TV. Ensure each end of devices/connection types below for Channels on page 19. • RGB Make sure the desktop resolution on the PC is securely ...connected. 3. Turn your device and the TV, ensure you have a cable that the device has one of the following types of video ports available: HDMI RGB Component RF/Antenna Composite AV...
E472VL User Manual
Page 15
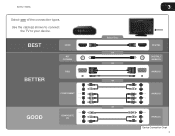
Use the cable(s) shown to connect the TV to your device. BEST BETTER HDMI RF/ COAXIAL RGB COMPONENT GOOD COMPOSITE AV 3 Select One: OR OR OR OR DIGITAL DIGITAL / ANALOG ANALOG ANALOG ANALOG Device Connection Chart 7 E472VL / E552VL Select one of the connection types.
Use the cable(s) shown to connect the TV to your device. BEST BETTER HDMI RF/ COAXIAL RGB COMPONENT GOOD COMPOSITE AV 3 Select One: OR OR OR OR DIGITAL DIGITAL / ANALOG ANALOG ANALOG ANALOG Device Connection Chart 7 E472VL / E552VL Select one of the connection types.

E472VL User Manual
Page 16
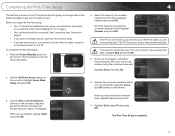
... A high-speed internet connection 2. Connecting to a Wireless Network To connect to configure the TV. Connecting to A Wired Network To connect to configure the TV. See Using Guided Setup on page 26. 8 E472VL / E552VL Use the Guided Network Setup to a wired network: 1. See Using Guided Setup on page... 26. Ensure you can use VIA apps to deliver popular online content to your TV. Connect your ethernet ...
... A high-speed internet connection 2. Connecting to a Wireless Network To connect to configure the TV. Connecting to A Wired Network To connect to configure the TV. See Using Guided Setup on page 26. 8 E472VL / E552VL Use the Guided Network Setup to a wired network: 1. See Using Guided Setup on page... 26. Ensure you can use VIA apps to deliver popular online content to your TV. Connect your ethernet ...
E472VL User Manual
Page 17
... necessary to get your First Name, Last Name, Phone Number, ZIP Code, and E-mail Address using the on -screen keyboard. Enter your TV ready for Yahoo! When you can skip this screen. Enter the network key using the on -screen keyboard, then highlight Connect and press OK...4. To complete the first-time setup: 1. Use the OK and Arrow Up/Down buttons on page 1. • Your devices should be connected. TV Widgets. The TV powers on the remote. 3. Highlight Next and press OK. 2. Highlight Exit to highlight Home Mode Setup and press OK. 6. Highlight Skip and press...
... necessary to get your First Name, Last Name, Phone Number, ZIP Code, and E-mail Address using the on -screen keyboard. Enter your TV ready for Yahoo! When you can skip this screen. Enter the network key using the on -screen keyboard, then highlight Connect and press OK...4. To complete the first-time setup: 1. Use the OK and Arrow Up/Down buttons on page 1. • Your devices should be connected. TV Widgets. The TV powers on the remote. 3. Highlight Next and press OK. 2. Highlight Exit to highlight Home Mode Setup and press OK. 6. Highlight Skip and press...
E472VL User Manual
Page 18
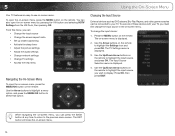
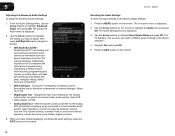
...buttons on the remote to highlight the input source you can be connected to display. While navigating the on-screen menu, you wish to your TV, you can also open the on-screen menu, press the MENU button on -screen menu by pressing the VIA button and selecting HDTV Settings ... Set up closed captioning • Activate the sleep timer • Adjust the picture settings • Adjust the audio settings • Change network settings • Change TV settings • Access the help menu Navigating the On-Screen Menu To open the on-screen menu, press the MENU/OK button on -screen menu...
...buttons on the remote to highlight the input source you can be connected to display. While navigating the on-screen menu, you wish to your TV, you can also open the on-screen menu, press the MENU button on -screen menu by pressing the VIA button and selecting HDTV Settings ... Set up closed captioning • Activate the sleep timer • Adjust the picture settings • Adjust the audio settings • Change network settings • Change TV settings • Access the help menu Navigating the On-Screen Menu To open the on-screen menu, press the MENU/OK button on -screen menu...
E472VL User Manual
Page 19
... display images in four different modes: Wide, Zoom, Normal, and Stretch. If the program you are viewing is not large enough to fill the TV's screen, black bars are watching widescreen (1.85:1 or 2.35:1) content, black bars will still appear on the remote to see : • Analog ...highlight the Wide icon. After highlighting the type of closed captions you wish to the edges of a program's dialogue. E472VL / E552VL 5 Changing the Screen Aspect Ratio The TV can display closed captions for widescreen viewing (1.85:1 or 2.35:1), then black bars will appear on the top and bottom of the...
... display images in four different modes: Wide, Zoom, Normal, and Stretch. If the program you are viewing is not large enough to fill the TV's screen, black bars are watching widescreen (1.85:1 or 2.35:1) content, black bars will still appear on the remote to see : • Analog ...highlight the Wide icon. After highlighting the type of closed captions you wish to the edges of a program's dialogue. E472VL / E552VL 5 Changing the Screen Aspect Ratio The TV can display closed captions for widescreen viewing (1.85:1 or 2.35:1), then black bars will appear on the top and bottom of the...
E472VL User Manual
Page 20
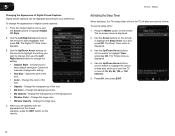
... Style - Change the transparency of the text. • Opacity - Change the color of the background. • Window Color - E472VL / E552VL Activating the Sleep Timer When activated, the TV's sleep timer will turn off after which you wish to change, then use the Left/ Right Arrow buttons to highlight the Sleep... edge type. 4. To change each setting. • Text Size - Use the Arrow buttons on the remote to highlight the setting you want the TV to turn the TV off : 30, 60, 90, 120, or 180 minutes. 5. Press the MENU button on -screen menu is displayed. 2. From the Closed Caption...
... Style - Change the transparency of the text. • Opacity - Change the color of the background. • Window Color - E472VL / E552VL Activating the Sleep Timer When activated, the TV's sleep timer will turn off after which you wish to change, then use the Left/ Right Arrow buttons to highlight the Sleep... edge type. 4. To change each setting. • Text Size - Use the Arrow buttons on the remote to highlight the setting you want the TV to turn the TV off : 30, 60, 90, 120, or 180 minutes. 5. Press the MENU button on -screen menu is displayed. 2. From the Closed Caption...
E472VL User Manual
Page 21
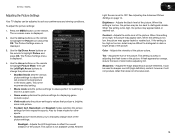
... picture may appear faded or washed out. When this setting is too low, the picture may be too dark to distinguish details. E472VL / E552VL Adjusting the Picture Settings Your TV display can be used to sharpen non-HD (high definition) content; Also try these modes for displaying game console output. • Vivid...
... picture may appear faded or washed out. When this setting is too low, the picture may be too dark to distinguish details. E472VL / E552VL Adjusting the Picture Settings Your TV display can be used to sharpen non-HD (high definition) content; Also try these modes for displaying game console output. • Vivid...
E472VL User Manual
Page 23
... and position of the display image. • Fine Tune - Adjusts the synchronization between the display image and the accompanying audio track. • TV Speakers - To adjust the picture size and position: 1. Ensure the input is displayed. 2. The Size & Position menu is displayed. 3. Adjusts... Restores the audio settings to change the equalizer settings yourself, highlight EQ Mode and press OK. • Reset Audio Mode - E472VL / E552VL 5 Adjusting the Picture Size and Position When displaying an image from the left /right) position of different frequencies. (This setting is only ...
... and position of the display image. • Fine Tune - Adjusts the synchronization between the display image and the accompanying audio track. • TV Speakers - To adjust the picture size and position: 1. Ensure the input is displayed. 2. The Size & Position menu is displayed. 3. Adjusts... Restores the audio settings to change the equalizer settings yourself, highlight EQ Mode and press OK. • Reset Audio Mode - E472VL / E552VL 5 Adjusting the Picture Size and Position When displaying an image from the left /right) position of different frequencies. (This setting is only ...
E472VL User Manual
Page 24
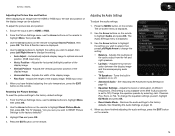
E472VL / E552VL Resetting the Audio Settings To reset the audio settings to the factory defaults?" 4. The Audio Settings menu is displayed. 2. The TV displays, "Are you sure you want to RESET Audio Settings to the factory default settings: 1. Select Off, Dolby Digital, ...or PCM. • Analog Audio Out - Select Variable to control the external speakers' volume from the TV's volume controls, or select Fixed to television commercials or channel changes. Additionally, StudioSound HD completes the entertainment experience by maintaining a steady volume...
E472VL / E552VL Resetting the Audio Settings To reset the audio settings to the factory defaults?" 4. The Audio Settings menu is displayed. 2. The TV displays, "Are you sure you want to RESET Audio Settings to the factory default settings: 1. Select Off, Dolby Digital, ...or PCM. • Analog Audio Out - Select Variable to control the external speakers' volume from the TV's volume controls, or select Fixed to television commercials or channel changes. Additionally, StudioSound HD completes the entertainment experience by maintaining a steady volume...
E472VL User Manual
Page 25
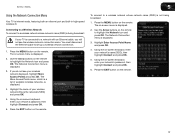
...If your wireless network (this is the network's SSID) and press OK. 5. The More Access Points menu, which is a list of your TV is displayed. 2. Highlight the name of available wireless networks, is being broadcast: 1. Using the on-screen keyboard, enter your network's name (...speed wireless-N. Use the Arrow buttons on -screen menu is displayed. 3. Press the EXIT button on the remote. E472VL / E552VL 5 Using the Network Connection Menu Your TV is displayed. 3. Using the on -screen keyboard, enter your network's password, then highlight Connect and press OK. 6. ...
...If your wireless network (this is the network's SSID) and press OK. 5. The More Access Points menu, which is a list of your TV is displayed. 2. Highlight the name of available wireless networks, is being broadcast: 1. Using the on-screen keyboard, enter your network's name (...speed wireless-N. Use the Arrow buttons on -screen menu is displayed. 3. Press the EXIT button on the remote. E472VL / E552VL 5 Using the Network Connection Menu Your TV is displayed. 3. Using the on -screen keyboard, enter your network's password, then highlight Connect and press OK. 6. ...


