Download
Page 4
... with a three-pronged grounded plug (a plug with a third grounding pin). If your TV close to constitute a risk of time. Operating your outlet does not accommodate the three-pronged, have fallen into a grounded power outlet. The manufacturer's warranty does not cover user abuse or improper installations. • The power cord must be of sufficient magnitude to smoke. Servicing is required when the apparatus...
... with a three-pronged grounded plug (a plug with a third grounding pin). If your TV close to constitute a risk of time. Operating your outlet does not accommodate the three-pronged, have fallen into a grounded power outlet. The manufacturer's warranty does not cover user abuse or improper installations. • The power cord must be of sufficient magnitude to smoke. Servicing is required when the apparatus...
Download
Page 5
... is exposed to repair your TV, hold the AC/DC power adapter, not the cord. These servicing instructions are unplugged before moving your TV if any abnormality occurs. h• The lightning flash with arrowhead symbol within the product's enclosure that may result in the operating instructions unless you to leak which can damage the remote control or injure the operator. Do not...
... is exposed to repair your TV, hold the AC/DC power adapter, not the cord. These servicing instructions are unplugged before moving your TV if any abnormality occurs. h• The lightning flash with arrowhead symbol within the product's enclosure that may result in the operating instructions unless you to leak which can damage the remote control or injure the operator. Do not...
Download
Page 6
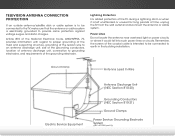
... unused for long periods of time, unplug the TV from the wall outlet and disconnect the antenna or cable system. Lightning Protection For added protection of the TV during a lightning storm or when it could fall into such power lines or circuits. Remember, the screen of the coaxial cable is intended to be connected to the TV, make...
... unused for long periods of time, unplug the TV from the wall outlet and disconnect the antenna or cable system. Lightning Protection For added protection of the TV during a lightning storm or when it could fall into such power lines or circuits. Remember, the screen of the coaxial cable is intended to be connected to the TV, make...
Download
Page 7
...of Digital Closed Captions.. 32 Changing the TV Settings 33 Displaying System Information 33 Changing the Names of Contents Installing the TV 3 Inspecting the Package Contents 3 Installing the TV 3 Installing the TV Stand 3 Installing the TV on a Wall 5 Controls and Connections 6 Front Panel 8 Remote Control 9 Replacing the Batteries 10 Connecting Your Devices 11 Connecting A Device 11 Connecting a Device - Table of the Inputs 34 Using the Parental Controls 34 Accessing the Parental Controls Menu 34 Enabling or Disabling Program Ratings 35 Locking and Unlocking Channels 35...
...of Digital Closed Captions.. 32 Changing the TV Settings 33 Displaying System Information 33 Changing the Names of Contents Installing the TV 3 Inspecting the Package Contents 3 Installing the TV 3 Installing the TV Stand 3 Installing the TV on a Wall 5 Controls and Connections 6 Front Panel 8 Remote Control 9 Replacing the Batteries 10 Connecting Your Devices 11 Connecting A Device 11 Connecting a Device - Table of the Inputs 34 Using the Parental Controls 34 Accessing the Parental Controls Menu 34 Enabling or Disabling Program Ratings 35 Locking and Unlocking Channels 35...
Download
Page 8
... window 47 Fullscreen V.I .A. Resetting the Content Locks 36 Changing the On-Screen Menu Language 36 Setting the Time Zone 37 Adjusting the CEC Settings 37 Turning the Power Indicator On or Off 38 Using the Reset & Admin Menu 38 Resetting the TV Settings 39 Restoring the TV to Factory Default Settings 39 Using the Guided Setup Menu 40 Using Guided Setup 40 Using the Info Window 41 Using the USB Media Player 42 Using the USB Media Player 42 Connecting a USB Thumb Drive to the My...
... window 47 Fullscreen V.I .A. Resetting the Content Locks 36 Changing the On-Screen Menu Language 36 Setting the Time Zone 37 Adjusting the CEC Settings 37 Turning the Power Indicator On or Off 38 Using the Reset & Admin Menu 38 Resetting the TV Settings 39 Restoring the TV to Factory Default Settings 39 Using the Guided Setup Menu 40 Using Guided Setup 40 Using the Info Window 41 Using the USB Media Player 42 Using the USB Media Player 42 Connecting a USB Thumb Drive to the My...
Download
Page 11
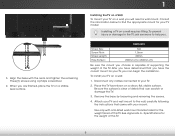
... wall mount to help you choose is clear of this TV. 5 Remove the base by loosening and removing the screws. 4. Attach your mount. Specifications for your TV. 2. Disconnect any cables connected to find the appropriate mount for the weight of the TV. Be sure the surface is capable of supporting the weight of this TV. Consult the information below to your TV model: Installing a TV on a clean, flat...
... wall mount to help you choose is clear of this TV. 5 Remove the base by loosening and removing the screws. 4. Attach your mount. Specifications for your TV. 2. Disconnect any cables connected to find the appropriate mount for the weight of the TV. Be sure the surface is capable of supporting the weight of this TV. Consult the information below to your TV model: Installing a TV on a clean, flat...
Download
Page 17
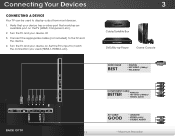
... (HDMI, Component, etc). 2. Verify that matches an available port on . Turn the TV and your device has a video port that your device off. 3. Set the TV's input to the TV and the device. 4. Connect the appropriate cable (not included) to match the connection you used to display output from most devices. 1. Connecting Your Devices Connecting A Device Your TV can be used (HDMI-1, HDMI-2, etc). 3 Cable/Satellite Box DVD/Blu-ray Player Game Console HDMI CABLE BEST • DIGITAL...
... (HDMI, Component, etc). 2. Verify that matches an available port on . Turn the TV and your device has a video port that your device off. 3. Set the TV's input to the TV and the device. 4. Connect the appropriate cable (not included) to match the connection you used to display output from most devices. 1. Connecting Your Devices Connecting A Device Your TV can be used (HDMI-1, HDMI-2, etc). 3 Cable/Satellite Box DVD/Blu-ray Player Game Console HDMI CABLE BEST • DIGITAL...
Download
Page 26
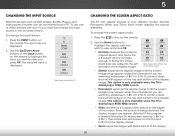
... HDMI-1 HDMI-2 HDMI-3 Note: Inputs may appear wider than intended. Each mode displays the picture differently. Since the picture is displayed. 5 Changing the Input Source Changing the Screen Aspect Ratio External devices such as DVD players, Blu-Ray Players, and video game consoles can display images in the on the top and bottom of these devices with black bars to view and press OK. Images may vary by TV. Press the INPUT button on the remote...
... HDMI-1 HDMI-2 HDMI-3 Note: Inputs may appear wider than intended. Each mode displays the picture differently. Since the picture is displayed. 5 Changing the Input Source Changing the Screen Aspect Ratio External devices such as DVD players, Blu-Ray Players, and video game consoles can display images in the on the top and bottom of these devices with black bars to view and press OK. Images may vary by TV. Press the INPUT button on the remote...
Download
Page 27
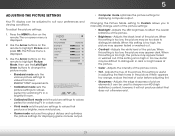
... to manually change the picture mode: VIZIO PICTURE Picture Mode Backlight Brightness Contrast Color Tint Sharpness Standard - + 50 - + 50 - + 50 - + 50 - +0 - +0 More • Standard mode sets the various picture settings to values that meet ENERGY STAR® requirements. • Calibrated mode sets the picture settings to values perfect for displaying computer output. When this setting is displayed. 2. If flesh appears Sleep • Timer too orange, reduce Picture Audio Sharpness - elements. Network Settings Help 21 Use the Arrow buttons on -screen menu is...
... to manually change the picture mode: VIZIO PICTURE Picture Mode Backlight Brightness Contrast Color Tint Sharpness Standard - + 50 - + 50 - + 50 - + 50 - +0 - +0 More • Standard mode sets the various picture settings to values that meet ENERGY STAR® requirements. • Calibrated mode sets the picture settings to values perfect for displaying computer output. When this setting is displayed. 2. If flesh appears Sleep • Timer too orange, reduce Picture Audio Sharpness - elements. Network Settings Help 21 Use the Arrow buttons on -screen menu is...
Download
Page 29
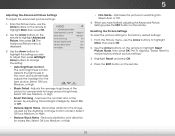
... To reset the picture settings to highlight More, then press OK. Select Auto or Off. 4. When you wish to adjust, then press Left/Right Arrow buttons to restore factory default picture settings". 3. From the Picture menu, use the Arrow buttons to the factory default settings: 1. Select Off, Low, Medium, or High. • Black Detail - Select Off, Low, Medium, or High. • Film Mode - VIZIO Advanced Picture Auto Brightness Control Black Detail Smart Dimming Reduce Signal...
... To reset the picture settings to highlight More, then press OK. Select Auto or Off. 4. When you wish to adjust, then press Left/Right Arrow buttons to restore factory default picture settings". 3. From the Picture menu, use the Arrow buttons to the factory default settings: 1. Select Off, Low, Medium, or High. • Black Detail - Select Off, Low, Medium, or High. • Film Mode - VIZIO Advanced Picture Auto Brightness Control Black Detail Smart Dimming Reduce Signal...
Download
Page 30
Press the MENU button on the remote to a home theater audio system. The Audio menu is displayed. 2. Lip Sync - TV Speakers Surround Sound Volume Leveling +0 +0 On On On 3. Adjusts the loudness of differentABfrCequencies. Sets the volume control properties for the Optical and HDMI ARC output when connected to highlight Audio and press OK. Input To cWhidae ngeCtChe equalizer settings yourself, highlight EQ Mode to Advanced, then adjust each frequency, or set to change Reset Audio Mode the setting: • Balance - Adjusts the...
Press the MENU button on the remote to a home theater audio system. The Audio menu is displayed. 2. Lip Sync - TV Speakers Surround Sound Volume Leveling +0 +0 On On On 3. Adjusts the loudness of differentABfrCequencies. Sets the volume control properties for the Optical and HDMI ARC output when connected to highlight Audio and press OK. Input To cWhidae ngeCtChe equalizer settings yourself, highlight EQ Mode to Advanced, then adjust each frequency, or set to change Reset Audio Mode the setting: • Balance - Adjusts the...

Download
Page 31
... Left/Right Arrow buttons on -screen menu is displayed. 2. Press the MENU button on the remote. The TV displays,"Select Reset to sleep: 30, 60, 90, 120, or 180 minutes. Press the EXIT button on the remote. The on the remote. VIZIO Timers Sleep Timer Auto Power Off Off 10 min 3. 5 Resetting the Audio Settings To reset the audio settings to highlight Reset Audio Mode and press OK. Press the MENU button on -screen menu is displayed. 2. Use the Arrow buttons to the factory default settings: 1. If you...
... Left/Right Arrow buttons on -screen menu is displayed. 2. Press the MENU button on the remote. The TV displays,"Select Reset to sleep: 30, 60, 90, 120, or 180 minutes. Press the EXIT button on the remote. The on the remote. VIZIO Timers Sleep Timer Auto Power Off Off 10 min 3. 5 Resetting the Audio Settings To reset the audio settings to highlight Reset Audio Mode and press OK. Press the MENU button on -screen menu is displayed. 2. Use the Arrow buttons to the factory default settings: 1. If you...
Download
Page 43
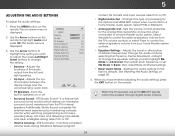
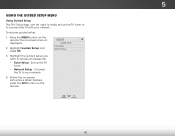
... Arrow buttons on the remote. VIZIO Time Zone Alaska Hawaii Pacific Mountain Central Eastern Atlantic Newfoundland Indiana Arizona 5. Highlight your device's user manual for details. 1. Enter your TV enables you to control HDMI-connected devices with the included remote without any additional programming. When system audio control is connected and supports CEC. 5. Not all HDMI devices support CEC. The Time Zone menu is displayed. The Daylight Saving menu is displayed. The Postal code...
... Arrow buttons on the remote. VIZIO Time Zone Alaska Hawaii Pacific Mountain Central Eastern Atlantic Newfoundland Indiana Arizona 5. Highlight your device's user manual for details. 1. Enter your TV enables you to control HDMI-connected devices with the included remote without any additional programming. When system audio control is connected and supports CEC. 5. Not all HDMI devices support CEC. The Time Zone menu is displayed. The Daylight Saving menu is displayed. The Postal code...
Download
Page 46
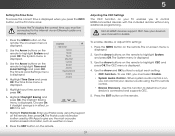
... Input Wide CC Sleep Timer Picture Audio Network Settings Help 40 To access guided setup: 1. Set up the TV tuner or to connect the TV with your network. 4. When finished, press the EXIT button on -screen instructions. 5 Using the Guided Setup Menu Using Guided Setup The TV's Setup App can be used to easily set up the TV tuner. • Network Setup - Connect the TV to access and press OK: • Tuner Setup - Follow the on the remote. The on the remote. Press the MENU button on -screen menu is displayed. 2. VIZIO Guided Setup Tuner Setup Network Setup...
... Input Wide CC Sleep Timer Picture Audio Network Settings Help 40 To access guided setup: 1. Set up the TV tuner or to connect the TV with your network. 4. When finished, press the EXIT button on -screen instructions. 5 Using the Guided Setup Menu Using Guided Setup The TV's Setup App can be used to easily set up the TV tuner. • Network Setup - Connect the TV to access and press OK: • Tuner Setup - Follow the on the remote. The on the remote. Press the MENU button on -screen menu is displayed. 2. VIZIO Guided Setup Tuner Setup Network Setup...
Download
Page 58
... Picture menu. There is no headphones are connected to the TV. • Check the audio connections of external devices (Blu-ray player, game console, cable/satellite box) that are connected to ensure mute is plugged into a working . • Ensure you are securely attached to the TV, scan for channels. See Replacing the Batteries on page 21. • Reset the picture settings. A The TV displays "No Signal." • Press the INPUT button on the remote control...
... Picture menu. There is no headphones are connected to the TV. • Check the audio connections of external devices (Blu-ray player, game console, cable/satellite box) that are connected to ensure mute is plugged into a working . • Ensure you are securely attached to the TV, scan for channels. See Replacing the Batteries on page 21. • Reset the picture settings. A The TV displays "No Signal." • Press the INPUT button on the remote control...

Download
Page 59
... Changing the Screen Aspect Ratio on the input source you switch from, the difference may be interfering with HDMI cables. • If you are securely attached. Ensure your antenna is connected securely to the TV and move the antenna around the room or close to a window for the best signal. The picture is distorted. • Nearby electrical devices may not display correctly. If the viewing mode on...
... Changing the Screen Aspect Ratio on the input source you switch from, the difference may be interfering with HDMI cables. • If you are securely attached. Ensure your antenna is connected securely to the TV and move the antenna around the room or close to a window for the best signal. The picture is distorted. • Nearby electrical devices may not display correctly. If the viewing mode on...
Download
Page 62
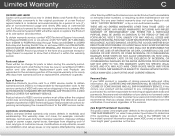
...-HOME AND ALL SHIP-IN WARRANTY SERVICE. THIS WARRANTY GIVES YOU SPECIFIC LEGAL RIGHTS, AND YOU MAY ALSO HAVE OTHER RIGHTS, WHICH VARY FROM STATE TO STATE.THIS WARRANTY IS SUBJECT TO CHANGE WITHOUT NOTICE. Limited Warranty C ON PARTS AND LABOR Covers units purchased as installation and set-up issues or any type of customer misuse, modifications or adjustments, as well as new...
...-HOME AND ALL SHIP-IN WARRANTY SERVICE. THIS WARRANTY GIVES YOU SPECIFIC LEGAL RIGHTS, AND YOU MAY ALSO HAVE OTHER RIGHTS, WHICH VARY FROM STATE TO STATE.THIS WARRANTY IS SUBJECT TO CHANGE WITHOUT NOTICE. Limited Warranty C ON PARTS AND LABOR Covers units purchased as installation and set-up issues or any type of customer misuse, modifications or adjustments, as well as new...
Download
Page 2
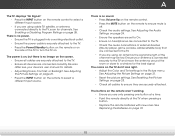
... device, the disconnect device shall remain readily operable. • CAUTION - The manufacturer's warranty does not cover user abuse or improper installations. • The power cord must be placed on your TV yourself. Continued use attachments/accessories specified by the manufacturer. • Use only with the cart, stand, tripod, bracket, or table specified by qualified service personnel only.To reduce the risk of...
... device, the disconnect device shall remain readily operable. • CAUTION - The manufacturer's warranty does not cover user abuse or improper installations. • The power cord must be placed on your TV yourself. Continued use attachments/accessories specified by the manufacturer. • Use only with the cart, stand, tripod, bracket, or table specified by qualified service personnel only.To reduce the risk of...

Download
Page 11
... and Right Arrow buttons to view. Table of Contents Installing the TV Controls and Connections Connecting your Devices Completing the First-Time Setup Using the On-Screen Menu Using the USB Media Player Using VIZIO Internet Apps Troubleshooting & Technical Support Specifications Limited Warranty Legal & Compliance LCD HDTV WITH VIZIO INTERNET APPS® Press the EXIT button to page, use Number Pad, then press OK. USER MANUAL USER YOUR REMOTE Previous Page Next Page Menu Open TV Menu PAGE NUMBER 1 OF 53 To skip to exit the on-screen User Manual.
... and Right Arrow buttons to view. Table of Contents Installing the TV Controls and Connections Connecting your Devices Completing the First-Time Setup Using the On-Screen Menu Using the USB Media Player Using VIZIO Internet Apps Troubleshooting & Technical Support Specifications Limited Warranty Legal & Compliance LCD HDTV WITH VIZIO INTERNET APPS® Press the EXIT button to page, use Number Pad, then press OK. USER MANUAL USER YOUR REMOTE Previous Page Next Page Menu Open TV Menu PAGE NUMBER 1 OF 53 To skip to exit the on-screen User Manual.
Download
Page 15
... the equipment and receiver. • Connect the equipment into an outlet on a circuit different from 5:00AM to 9:00PM Monday through Friday and 8:00AM to this Limited Warranty. Use the AC cords listed below for packing and shipping the covered Product to the VIZIO service center. LIMITED WARRANTY ON PARTS AND LABOR Covers units purchased as installation and set-up issues or any radio...
... the equipment and receiver. • Connect the equipment into an outlet on a circuit different from 5:00AM to 9:00PM Monday through Friday and 8:00AM to this Limited Warranty. Use the AC cords listed below for packing and shipping the covered Product to the VIZIO service center. LIMITED WARRANTY ON PARTS AND LABOR Covers units purchased as installation and set-up issues or any radio...


