
E500i-A1 User Manual
Page 1
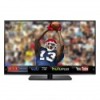
USER GUIDE MMODDEELLS // E3D320VX // E3ED44220V0Xi-A1 // E3ED54700V0Xi-A1 INSTALLING YOUR new TV CONTROLS & CONNECTIONS CONNECTING YOUR DEVICES USING THE ON-SCREEN MENU USING THE USB MEDIA PLAYER USING VIZIO INTERNET APPS TROUBLESHOOTING & SUPPORT Help, SPECs, warranty & LEGAL
USER GUIDE MMODDEELLS // E3D320VX // E3ED44220V0Xi-A1 // E3ED54700V0Xi-A1 INSTALLING YOUR new TV CONTROLS & CONNECTIONS CONNECTING YOUR DEVICES USING THE ON-SCREEN MENU USING THE USB MEDIA PLAYER USING VIZIO INTERNET APPS TROUBLESHOOTING & SUPPORT Help, SPECs, warranty & LEGAL
E500i-A1 User Manual
Page 3
... accompanying important warning or notice. A polarized plug has two blades and a third grounding prong. Welcome Thank You for Choosing VIZIO And congratulations on or pinched, particularly at plugs, convenience receptacles, and the point where they exit from the apparatus. • Only ... wide blade or the third prong are no missing or damaged parts. Important Safety Instructions Your TV is intended to ensure there are provided for replacement of your new VIZIO HDTV. Misuse may result in accordance with the manufacturer's instructions. • Do not install near...
... accompanying important warning or notice. A polarized plug has two blades and a third grounding prong. Welcome Thank You for Choosing VIZIO And congratulations on or pinched, particularly at plugs, convenience receptacles, and the point where they exit from the apparatus. • Only ... wide blade or the third prong are no missing or damaged parts. Important Safety Instructions Your TV is intended to ensure there are provided for replacement of your new VIZIO HDTV. Misuse may result in accordance with the manufacturer's instructions. • Do not install near...

E500i-A1 User Manual
Page 4
... the power cord. • The lightning flash with a third grounding pin). Any other voltage than the voltage specified. Do not install your TV. Doing so could short circuit parts causing a fire or electric shock. To avoid electric shock, avoid handling the power cord during electrical storms.... Do not defeat the safety purpose of time. This is always flowing into a grounded power outlet. Overloading can be maintained between your TV yourself. Servicing is intended to alert the user to your home, consult your dealer or local power company. • Do not apply...
... the power cord. • The lightning flash with a third grounding pin). Any other voltage than the voltage specified. Do not install your TV. Doing so could short circuit parts causing a fire or electric shock. To avoid electric shock, avoid handling the power cord during electrical storms.... Do not defeat the safety purpose of time. This is always flowing into a grounded power outlet. Overloading can be maintained between your TV yourself. Servicing is intended to alert the user to your home, consult your dealer or local power company. • Do not apply...
E500i-A1 User Manual
Page 5
... batteries in environments with heavy dust or high humidity may cause fire or electric shock. • Follow instructions for moving your TV. • When unplugging your TV will not be used as vases, shall be exposed to rain or other cables are for an extended period of time, unplug...; This apparatus shall not be placed on the power cord may cause fire or electric shock. • Do not install your dealer immediately. Your TV is dropped or damaged in an area with liquids, such as the disconnect device, the disconnect device shall remain readily operable. • CAUTION -...
... batteries in environments with heavy dust or high humidity may cause fire or electric shock. • Follow instructions for moving your TV. • When unplugging your TV will not be used as vases, shall be exposed to rain or other cables are for an extended period of time, unplug...; This apparatus shall not be placed on the power cord may cause fire or electric shock. • Do not install your dealer immediately. Your TV is dropped or damaged in an area with liquids, such as the disconnect device, the disconnect device shall remain readily operable. • CAUTION -...
E500i-A1 User Manual
Page 6
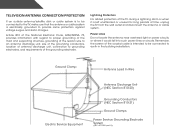
...Power Lines Do not locate the antenna near overhead light or power circuits, or where it is intended to be connected to the TV, make sure that the antenna or cable system is electrically grounded to provide some protection against voltage surges and static charges. Lightning ...Protection For added protection of the TV during a lightning storm or when it could fall into such power lines or circuits. Television Antenna Connection Protection If an ...
...Power Lines Do not locate the antenna near overhead light or power circuits, or where it is intended to be connected to the TV, make sure that the antenna or cable system is electrically grounded to provide some protection against voltage surges and static charges. Lightning ...Protection For added protection of the TV during a lightning storm or when it could fall into such power lines or circuits. Television Antenna Connection Protection If an ...
E500i-A1 User Manual
Page 7
Table of Contents Installing the TV 3 Inspecting the Package Contents 3 Installing the TV 3 Installing the TV Stand 3 Base Installation (E420i 4 Base Installation Continued (E420i 5 Base Installation (E500i 6 Base Installation Continued (E500i 7 Installing the TV on a Wall 8 Controls and Connections 10 Rear Panel 10 Side Panel 11... 28 Connecting to a Wireless Network 28 Changing the Advanced Network Settings 29 Testing Your Network Connection 30 Changing the TV Settings 30 Changing the Input Source 30 Setting the Tuner Mode 31 Scanning for Channels 31 Adding New Channels 32...
Table of Contents Installing the TV 3 Inspecting the Package Contents 3 Installing the TV 3 Installing the TV Stand 3 Base Installation (E420i 4 Base Installation Continued (E420i 5 Base Installation (E500i 6 Base Installation Continued (E500i 7 Installing the TV on a Wall 8 Controls and Connections 10 Rear Panel 10 Side Panel 11... 28 Connecting to a Wireless Network 28 Changing the Advanced Network Settings 29 Testing Your Network Connection 30 Changing the TV Settings 30 Changing the Input Source 30 Setting the Tuner Mode 31 Scanning for Channels 31 Adding New Channels 32...
E500i-A1 User Manual
Page 8
... 36 Changing the On-Screen Menu Language 36 Setting the Time Zone 37 Adjusting the CEC Settings 37 Turning the VIZIO Logo On or Off 37 Resetting the TV Settings 38 Restoring the TV to Factory Default Settings 38 Using Guided Setup 39 Using the Info Window 40 Using the USB Media Player... 41 Using the USB Media Player 41 Connecting a USB Thumb Drive to the TV 41 Playing USB Media 41 Using VIZIO Internet Apps 43 Using the VIA Shortcut Buttons 43 Using the VIA Dock 43 Moving an App on the VIA Dock 43...
... 36 Changing the On-Screen Menu Language 36 Setting the Time Zone 37 Adjusting the CEC Settings 37 Turning the VIZIO Logo On or Off 37 Resetting the TV Settings 38 Restoring the TV to Factory Default Settings 38 Using Guided Setup 39 Using the Info Window 40 Using the USB Media Player... 41 Using the USB Media Player 41 Connecting a USB Thumb Drive to the TV 41 Playing USB Media 41 Using VIZIO Internet Apps 43 Using the VIA Shortcut Buttons 43 Using the VIA Dock 43 Moving an App on the VIA Dock 43...
E500i-A1 User Manual
Page 9
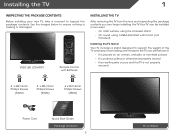
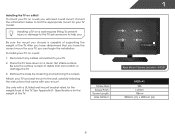
...VIZIO LED LCD HDTV Remote Control with Batteries Installing the TV After removing the TV from falling over if: • It is placed on Stand Your TV can be installed in two ways: • On a flat surface, using the included stand • On a wall, using a VESA-standard wall mount (not included) Installing the TV...is not properly secured 6 x M4 14mm Phillips Screws (E420i) 3 x M6 12mm Phillips Screws (E500i) 4 x M4 16mm Phillips Screws (E500i) Power Cord Quick Start Guide Package Contents 3 TV on an uneven, unstable, or non-level surface • It is pushed, pulled, or otherwise ...
...VIZIO LED LCD HDTV Remote Control with Batteries Installing the TV After removing the TV from falling over if: • It is placed on Stand Your TV can be installed in two ways: • On a flat surface, using the included stand • On a wall, using a VESA-standard wall mount (not included) Installing the TV...is not properly secured 6 x M4 14mm Phillips Screws (E420i) 3 x M6 12mm Phillips Screws (E500i) 4 x M4 16mm Phillips Screws (E500i) Power Cord Quick Start Guide Package Contents 3 TV on an uneven, unstable, or non-level surface • It is pushed, pulled, or otherwise ...

E500i-A1 User Manual
Page 10
1 Base Installation (E420i) 1 2 To install the base: Place the TV screen-down on a soft surface, such as shown above . Using a phillips screwdriver, tighten three (3) M4 14 mm screws into place as shown above . 4 To prevent scratches or damage to the screen, place the TV on a clean, flat surface. Align the neck piece with the bottom of the TV and slide it into the holes as carpet, rug, or blanket.
1 Base Installation (E420i) 1 2 To install the base: Place the TV screen-down on a soft surface, such as shown above . Using a phillips screwdriver, tighten three (3) M4 14 mm screws into place as shown above . 4 To prevent scratches or damage to the screen, place the TV on a clean, flat surface. Align the neck piece with the bottom of the TV and slide it into the holes as carpet, rug, or blanket.
E500i-A1 User Manual
Page 11
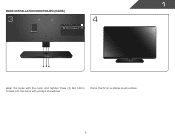
1 Base Installation Continued (E420i) 3 4 Align the base with the neck and tighten three (3) M4 14mm screws into the base with phillips screwdriver Place the TV on a stable, level surface. 5
1 Base Installation Continued (E420i) 3 4 Align the base with the neck and tighten three (3) M4 14mm screws into the base with phillips screwdriver Place the TV on a stable, level surface. 5

E500i-A1 User Manual
Page 12
Using a phillips screwdriver, tighten Four (4) M4 16 mm screws into place as shown above . 6 Align the neck piece with the bottom of the TV and slide it into the holes as shown above . 1 Base Installation (E500i) 1 2 To install the base: Place the TV screen-down on a soft surface, such as carpet, rug, or blanket. To prevent scratches or damage to the screen, place the TV on a clean, flat surface.
Using a phillips screwdriver, tighten Four (4) M4 16 mm screws into place as shown above . 6 Align the neck piece with the bottom of the TV and slide it into the holes as shown above . 1 Base Installation (E500i) 1 2 To install the base: Place the TV screen-down on a soft surface, such as carpet, rug, or blanket. To prevent scratches or damage to the screen, place the TV on a clean, flat surface.

E500i-A1 User Manual
Page 13
1 Base Installation Continued (E500i) 3 4 Align the base with the neck and tighten three (3) M6 12mm screws into the base with phillips screwdriver Place the TV on a stable, level surface. 7
1 Base Installation Continued (E500i) 3 4 Align the base with the neck and tighten three (3) M6 12mm screws into the base with phillips screwdriver Place the TV on a stable, level surface. 7
E500i-A1 User Manual
Page 14
.... Disconnect any cables connected to find the appropriate mount for the weight/load of this TV. E420i E420i-A1 M6 1.0mm 18mm 200mm (V) x 200mm (H) 8 Consult the information below to your TV. 2. To prevent injury or damage to the TV, ask someone to the wall, carefully following the instructions that came with a UL-listed wall...
.... Disconnect any cables connected to find the appropriate mount for the weight/load of this TV. E420i E420i-A1 M6 1.0mm 18mm 200mm (V) x 200mm (H) 8 Consult the information below to your TV. 2. To prevent injury or damage to the TV, ask someone to the wall, carefully following the instructions that came with a UL-listed wall...
E500i-A1 User Manual
Page 17
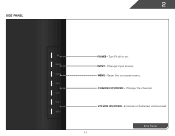
MENU - Open the on . VOLUME UP/DOWN - Turn TV off or on -screen menu. Increase or decrease volume level. CHANNEL UP/DOWN - Change input source. Side Panel 11 Change the channel. INPUT - 2 Side Panel INPUT MENU CH ^ CH VOL ^ VOL ^ ^ POWER -
MENU - Open the on . VOLUME UP/DOWN - Turn TV off or on -screen menu. Increase or decrease volume level. CHANNEL UP/DOWN - Change input source. Side Panel 11 Change the channel. INPUT - 2 Side Panel INPUT MENU CH ^ CH VOL ^ VOL ^ ^ POWER -

E500i-A1 User Manual
Page 19
... channel. Closed Captions Open the closed caption menu. V Button Open the VIA dock. Dash Use with number pad to the channel last viewed. Power Turn TV on or off or on. 2 Remote Control Input Change the currently-displayed input. Number Pad Manually enter a channel.
... channel. Closed Captions Open the closed caption menu. V Button Open the VIA dock. Dash Use with number pad to the channel last viewed. Power Turn TV on or off or on. 2 Remote Control Input Change the currently-displayed input. Number Pad Manually enter a channel.

E500i-A1 User Manual
Page 21
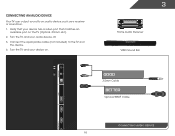
... your device has a video port that matches an available port on . Set the TV's input to display output from most devices. 1. COMPONENT CABLE • ANALOG BETTER • HD VIDEO (1080i)* • STEREO AUDIO AV CABLE GOOD * Maximum Resolution ...15 • ANALOG • VIDEO (480i)* • STEREO AUDIO CONNECTING A DEVICE Connecting Your Devices Connecting A Device Your TV can be used to match the connection you used (HDMI-1, HDMI-2, etc). 3 Cable/Satellite Box DVD/Blu-ray Player Game Console HDMI CABLE BEST •...
... your device has a video port that matches an available port on . Set the TV's input to display output from most devices. 1. COMPONENT CABLE • ANALOG BETTER • HD VIDEO (1080i)* • STEREO AUDIO AV CABLE GOOD * Maximum Resolution ...15 • ANALOG • VIDEO (480i)* • STEREO AUDIO CONNECTING A DEVICE Connecting Your Devices Connecting A Device Your TV can be used to match the connection you used (HDMI-1, HDMI-2, etc). 3 Cable/Satellite Box DVD/Blu-ray Player Game Console HDMI CABLE BEST •...
E500i-A1 User Manual
Page 22
Connect the appropriate cable (not included) to an audio device, such as a receiver or sound bar. 1. Turn the TV and your device on the TV (Optical, 3.5mm, etc). 2. Turn the TV and your audio device off. 3. Connecting an audio device Your TV can output sound to the TV and the device. 4. Verify that your device has a video port that matches an available port on . 3 Home Audio Receiver VIZIO Sound Bar GOOD 3.5mm Cable BETTER Optical/SPDIF Cable CONNECTING AUDIO DEVICE 16
Connect the appropriate cable (not included) to an audio device, such as a receiver or sound bar. 1. Turn the TV and your device on the TV (Optical, 3.5mm, etc). 2. Turn the TV and your audio device off. 3. Connecting an audio device Your TV can output sound to the TV and the device. 4. Verify that your device has a video port that matches an available port on . 3 Home Audio Receiver VIZIO Sound Bar GOOD 3.5mm Cable BETTER Optical/SPDIF Cable CONNECTING AUDIO DEVICE 16
E500i-A1 User Manual
Page 23
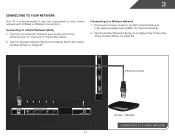
...page 39. 3 Connecting to your router and to the ethernet port on the back of the TV. See below. 2. Connect an ethernet cable to a Wired Network (Best) 1. Connecting to configure the TV. Use the Guided Network Setup to a Wireless Network 1. Ensure you have a router or modem... broadcasting as high-speed wireless signal (802.11n recommended). 2. It can be connected to configure the TV. Use the Guided Network Setup to your home network with a Wired or Wireless connection. Ethernet Cable Router / Modem CONNECTING TO A WIRED NETWORK ...
...page 39. 3 Connecting to your router and to the ethernet port on the back of the TV. See below. 2. Connect an ethernet cable to a Wired Network (Best) 1. Connecting to configure the TV. Use the Guided Network Setup to a Wireless Network 1. Ensure you have a router or modem... broadcasting as high-speed wireless signal (802.11n recommended). 2. It can be connected to configure the TV. Use the Guided Network Setup to your home network with a Wired or Wireless connection. Ethernet Cable Router / Modem CONNECTING TO A WIRED NETWORK ...

E500i-A1 User Manual
Page 24
...finished the channel scan, highlight Exit to the ethernet port on and the Setup App starts. 2. To complete the first-time setup: 1. The TV powers on the TV. When you do not see video or hear audio from the list of your wireless network from the device. Select the name of available... on-screen questions about your TV connection using the on the TV, the Setup App will guide you through each of Service and Privacy Policy for use. Use the Left/Right Arrow buttons on the remote. Highlight Next and press OK. 6. Press the Power/Standby button on E500i only 7. Name this Input ...
...finished the channel scan, highlight Exit to the ethernet port on and the Setup App starts. 2. To complete the first-time setup: 1. The TV powers on the TV. When you do not see video or hear audio from the list of your wireless network from the device. Select the name of available... on-screen questions about your TV connection using the on the TV, the Setup App will guide you through each of Service and Privacy Policy for use. Use the Left/Right Arrow buttons on the remote. Highlight Next and press OK. 6. Press the Power/Standby button on E500i only 7. Name this Input ...
E500i-A1 User Manual
Page 25
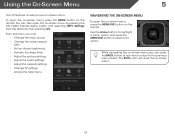
... on the remote. The EXIT button will close the on -screen menu by pressing the VIA (VIZIO Internet Apps) button and selecting HDTV Settings from the VIA Dock, then pressing OK. You can also..., and press the MENU/OK button to the previous menu screen. Using the On-Screen Menu 5 Your TV features an easy-to-use on -screen menu, you can: • Change the input source •... Adjust the picture settings • Adjust the audio settings • Adjust the network settings • Change TV settings • Access the help menu Navigating the On-Screen Menu To open the on-screen menu, press...
... on the remote. The EXIT button will close the on -screen menu by pressing the VIA (VIZIO Internet Apps) button and selecting HDTV Settings from the VIA Dock, then pressing OK. You can also..., and press the MENU/OK button to the previous menu screen. Using the On-Screen Menu 5 Your TV features an easy-to-use on -screen menu, you can: • Change the input source •... Adjust the picture settings • Adjust the audio settings • Adjust the network settings • Change TV settings • Access the help menu Navigating the On-Screen Menu To open the on-screen menu, press...


