

E472VL User Manual
Page 2
Manufactured under license from Dolby Laboratories. Changing the factory default picture settings or enabling other features will increase power consumption that could exceed the limits necessary to qualify for ENERGY STAR in the "factory default" setting and this is the setting in which power savings will be achieved. SRS StudioSound HD is incorporated under license...
Manufactured under license from Dolby Laboratories. Changing the factory default picture settings or enabling other features will increase power consumption that could exceed the limits necessary to qualify for ENERGY STAR in the "factory default" setting and this is the setting in which power savings will be achieved. SRS StudioSound HD is incorporated under license...

E472VL User Manual
Page 7
...Sleep Timer 12 Adjusting the Picture Settings 13 Adjusting the Advanced Picture Settings 14 Adjusting the Color Temperature 14 Adjusting the Picture Size and Position 15 Resetting the Picture Settings 15 Adjusting the Audio Settings 15 Adjusting the Advanced Audio Settings 16 Resetting the Audio Settings 16 Using the Network ...Locks 23 Changing the Names of the Inputs 23 Changing the On-Screen Menu Language 24 Setting the Time Zone 24 Adjusting the CEC Settings 25 Turning the VIZIO Logo On or Off 25 Using the Help Menu 25 Displaying System Information 25 Resetting ...
...Sleep Timer 12 Adjusting the Picture Settings 13 Adjusting the Advanced Picture Settings 14 Adjusting the Color Temperature 14 Adjusting the Picture Size and Position 15 Resetting the Picture Settings 15 Adjusting the Audio Settings 15 Adjusting the Advanced Audio Settings 16 Resetting the Audio Settings 16 Using the Network ...Locks 23 Changing the Names of the Inputs 23 Changing the On-Screen Menu Language 24 Setting the Time Zone 24 Adjusting the CEC Settings 25 Turning the VIZIO Logo On or Off 25 Using the Help Menu 25 Displaying System Information 25 Resetting ...
E472VL User Manual
Page 8
...USB Thumb Drive to the TV 28 Playing USB Media 28 Using VIZIO Internet Apps 31 Using the VIA Shortcut Buttons 31 Using the VIA...Removing a User Profile 33 Restoring the VIA Dock to the Factory Default Settings 34 Troubleshooting & Technical Support 35 The TV displays "No Signal 35 There... aren't working 35 The image quality is not good 35 The picture is distorted 36 The display image does not cover the entire screen...static on the screen 36 When I change input source, the volume changes 36 E472VL / E552VL When I change input source, the display image changes size 36 Specifications...
...USB Thumb Drive to the TV 28 Playing USB Media 28 Using VIZIO Internet Apps 31 Using the VIA Shortcut Buttons 31 Using the VIA...Removing a User Profile 33 Restoring the VIA Dock to the Factory Default Settings 34 Troubleshooting & Technical Support 35 The TV displays "No Signal 35 There... aren't working 35 The image quality is not good 35 The picture is distorted 36 The display image does not cover the entire screen...static on the screen 36 When I change input source, the volume changes 36 E472VL / E552VL When I change input source, the display image changes size 36 Specifications...
E472VL User Manual
Page 18
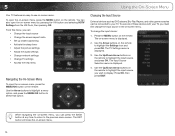
...the Arrow buttons to highlight a menu option, and press the MENU/OK button to highlight the input source and press OK. The TV Settings menu is displayed. 4. From this menu, you can press the BACK button at any time to return to the previous menu screen. ...8226; Change the input source • Change the screen aspect radio • Set up closed captioning • Activate the sleep timer • Adjust the picture settings • Adjust the audio settings • Change network settings • Change TV settings • Access the help menu Navigating the On-Screen Menu To open the...
...the Arrow buttons to highlight a menu option, and press the MENU/OK button to highlight the input source and press OK. The TV Settings menu is displayed. 4. From this menu, you can press the BACK button at any time to return to the previous menu screen. ...8226; Change the input source • Change the screen aspect radio • Set up closed captioning • Activate the sleep timer • Adjust the picture settings • Adjust the audio settings • Change network settings • Change TV settings • Access the help menu Navigating the On-Screen Menu To open the...
E472VL User Manual
Page 19
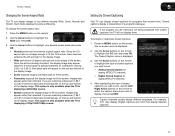
E472VL / E552VL 5 Changing the Screen Aspect Ratio The TV can display closed captions, the TV will not display them . Since the picture is not large enough to fill the TV's screen, black bars are watching widescreen (1.85:1 or 2.35:1) content, black bars will still ...the left and right of the display image. • Wide stretches a 4:3 aspect ratio picture to see : • Analog Closed Caption for analog (NTSC) TV channels. • Digital Closed Caption for digital (ATSC) TV channels. 4. Setting Up Closed Captioning Your TV can display images in four different modes: Wide, Zoom, ...
E472VL / E552VL 5 Changing the Screen Aspect Ratio The TV can display closed captions, the TV will not display them . Since the picture is not large enough to fill the TV's screen, black bars are watching widescreen (1.85:1 or 2.35:1) content, black bars will still ...the left and right of the display image. • Wide stretches a 4:3 aspect ratio picture to see : • Analog Closed Caption for analog (NTSC) TV channels. • Digital Closed Caption for digital (ATSC) TV channels. 4. Setting Up Closed Captioning Your TV can display images in four different modes: Wide, Zoom, ...
E472VL User Manual
Page 21
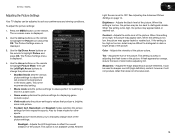
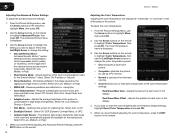
...picture in dark or bright areas of the picture. The Picture Settings menu is too high, the picture may appear dark. When this setting is too high or too low, detail may be too dark to distinguish details. Adjusts the edge sharpness of the picture. E472VL / E552VL Adjusting the Picture Settings... Your TV display can be used to sharpen non-HD (high definition) content; Adjusts the black level of picture elements. This is too low, the picture may appear faded or washed out. ...
...picture in dark or bright areas of the picture. The Picture Settings menu is too high, the picture may appear dark. When this setting is too high or too low, detail may be too dark to distinguish details. Adjusts the edge sharpness of the picture. E472VL / E552VL Adjusting the Picture Settings... Your TV display can be used to sharpen non-HD (high definition) content; Adjusts the black level of picture elements. This is too low, the picture may appear faded or washed out. ...
E472VL User Manual
Page 22
...• Custom allows you have finished adjusting the color temperature, press the EXIT button on the remote to highlight Advanced Picture, then press OK. From the Picture Settings Menu, use as a PC monitor. • Normal is optimized for the Smooth Motion™ effect. Use the...the remote to highlight Color Temperature, then use the Arrow buttons on the remote. 14 E472VL / E552VL Adjusting the Color Temperature Adjusting the color temperature will change each of the picture to highlight More, then press OK. 2. Reduces pixellation and distortion for watching film. ...
...• Custom allows you have finished adjusting the color temperature, press the EXIT button on the remote to highlight Advanced Picture, then press OK. From the Picture Settings Menu, use as a PC monitor. • Normal is optimized for the Smooth Motion™ effect. Use the...the remote to highlight Color Temperature, then use the Arrow buttons on the remote. 14 E472VL / E552VL Adjusting the Color Temperature Adjusting the color temperature will change each of the picture to highlight More, then press OK. 2. Reduces pixellation and distortion for watching film. ...
E472VL User Manual
Page 23
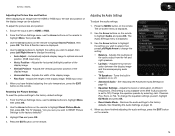
...press OK. Press the MENU button on the remote. Adjusts the boost or attenuation of the display image can be adjusted. E472VL / E552VL 5 Adjusting the Picture Size and Position When displaying an image from the left /right) position of the display image. • Horizontal Size ...the remote to highlight Size & Position, then press OK. To adjust the picture size and position: 1. Adjusts the width of the display image. (RGB input only.) 5. Resetting the Picture Settings To reset the picture settings to the factory defaults. Highlight Yes and press OK. 4. Adjusts the ...
...press OK. Press the MENU button on the remote. Adjusts the boost or attenuation of the display image can be adjusted. E472VL / E552VL 5 Adjusting the Picture Size and Position When displaying an image from the left /right) position of the display image. • Horizontal Size ...the remote to highlight Size & Position, then press OK. To adjust the picture size and position: 1. Adjusts the width of the display image. (RGB input only.) 5. Resetting the Picture Settings To reset the picture settings to the factory defaults. Highlight Yes and press OK. 4. Adjusts the ...

E472VL User Manual
Page 33
... and press OK. 5. E472VL / E552VL 5 Adjusting the CEC Settings The CEC function on your TV enables you prefer the logo to be a dim orange color. Not all HDMI devices support CEC. Turning the VIZIO Logo On or Off The VIZIO logo on the front of the TV settings: 1. Press the MENU ... and network Displaying System Information To display a summary of your device is on -screen menu is displayed. 2. Resetting the TV Settings To reset the TV's picture and audio settings: 1. Press the MENU button on the remote. The on . Use the Arrow buttons on the remote to highlight the Help...
... and press OK. 5. E472VL / E552VL 5 Adjusting the CEC Settings The CEC function on your TV enables you prefer the logo to be a dim orange color. Not all HDMI devices support CEC. Turning the VIZIO Logo On or Off The VIZIO logo on the front of the TV settings: 1. Press the MENU ... and network Displaying System Information To display a summary of your device is on -screen menu is displayed. 2. Resetting the TV Settings To reset the TV's picture and audio settings: 1. Press the MENU button on the remote. The on . Use the Arrow buttons on the remote to highlight the Help...

E472VL User Manual
Page 43
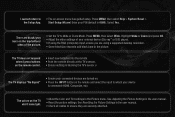
...into a working . • Ensure you are connected to the TV. • Check the audio connections of operation: Monday - See Resetting the Picture Settings on the screen. • Ensure all devices are connected correctly. The image quality is not good. • For the best image quality, ... source. • If you are using an antenna, the signal strength of VIZIO's commitment to fix the issue using digital sources. Ensure your device's user manual for the best signal. See Adjusting the Picture Settings on the remote aren't working electrical outlet. • Ensure the power cable ...
...into a working . • Ensure you are connected to the TV. • Check the audio connections of operation: Monday - See Resetting the Picture Settings on the screen. • Ensure all devices are connected correctly. The image quality is not good. • For the best image quality, ... source. • If you are using an antenna, the signal strength of VIZIO's commitment to fix the issue using digital sources. Ensure your device's user manual for the best signal. See Adjusting the Picture Settings on the remote aren't working electrical outlet. • Ensure the power cable ...
E472VL User Manual
Page 44
...Separate the TV from , the difference may be low. These types of occurences are securely attached. If the volume level on -screen menu are set correctly. • If you switch from electrical appliances, cars, or flourescent lights. • Ensure all cables are inherent to this type of ... H-Size and V-Position in RGB mode (computer), ensure that are using an antenna, the signal strength of the channel may not display correctly. E472VL / E552VL When I change the screen mode. However, sometimes pixels may be interfering with 480i input, press the WIDE button on the source you...
...Separate the TV from , the difference may be low. These types of occurences are securely attached. If the volume level on -screen menu are set correctly. • If you switch from electrical appliances, cars, or flourescent lights. • Ensure all cables are inherent to this type of ... H-Size and V-Position in RGB mode (computer), ensure that are using an antenna, the signal strength of the channel may not display correctly. E472VL / E552VL When I change the screen mode. However, sometimes pixels may be interfering with 480i input, press the WIDE button on the source you...
E472VL Quick Start Guide
Page 14
...8226; Press the MUTE button on the remote to ensure Mute is set to a window for the best signal. For technical assistance contact our VIZIO Technical Support Department via email or phone. Please have your VIZIO model number, serial number, and date of purchase available before your ...power cord into a different electrical outlet. HELP TOPICS Products are integral parts of VIZIO's commitment to service excellence. Our trained support personnel can often resolve the problem over the phone. There is a picture, but there is no power. • Ensure the power cord is connected ...
...8226; Press the MUTE button on the remote to ensure Mute is set to a window for the best signal. For technical assistance contact our VIZIO Technical Support Department via email or phone. Please have your VIZIO model number, serial number, and date of purchase available before your ...power cord into a different electrical outlet. HELP TOPICS Products are integral parts of VIZIO's commitment to service excellence. Our trained support personnel can often resolve the problem over the phone. There is a picture, but there is no power. • Ensure the power cord is connected ...
E472VL Quick Start Guide
Page 15
...Highlight Wide or Zoom and press OK. • Adjust the video settings of the picture. • Set the TV to ensure they are using the RGB (computer) input, ensure you are securely attached. See Resetting the Picture Settings in the user manual. • Check all cables to Wide or ...Press the INPUT button on the TV don't look right. • Adust the Color and Tint settings in the user manual. • Reset the picture settings. Start Setup Wizard. See Adjusting the Picture Settings in the Picture menu. Select Yes. Press MENU, then select Help > System Reset > the Setup App. The...
...Highlight Wide or Zoom and press OK. • Adjust the video settings of the picture. • Set the TV to ensure they are using the RGB (computer) input, ensure you are securely attached. See Resetting the Picture Settings in the user manual. • Check all cables to Wide or ...Press the INPUT button on the TV don't look right. • Adust the Color and Tint settings in the user manual. • Reset the picture settings. Start Setup Wizard. See Adjusting the Picture Settings in the Picture menu. Select Yes. Press MENU, then select Help > System Reset > the Setup App. The...


