E420VO QSG
Page 1
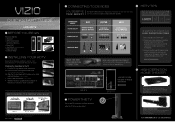
...into an upright position and place so that the rear connectors remain accessible. for E470VL) FIG. 3 3. Align the TV stand hooks with your TV. ©2010 VIZIO Inc. Move the TV into TV and tighten thumb screw (see fig. 2 - XMA1200 / XMA500 3 CONNECTING TO DEVICES YOU DESERVE THE... HD cable box or satellite receiver may be required). 3. ® E320VL / E370VL / E420VL / E420VO / E470VL / E550VL LCD HDTV 1 BEFORE YOU BEGIN What's In the Box • VIZIO HDTV • VIZIO Remote Control (VR15 includes 2 AA batteries) (VUR13 includes 2 AAA batteries) • Power Cord • User...
...into an upright position and place so that the rear connectors remain accessible. for E470VL) FIG. 3 3. Align the TV stand hooks with your TV. ©2010 VIZIO Inc. Move the TV into TV and tighten thumb screw (see fig. 2 - XMA1200 / XMA500 3 CONNECTING TO DEVICES YOU DESERVE THE... HD cable box or satellite receiver may be required). 3. ® E320VL / E370VL / E420VL / E420VO / E470VL / E550VL LCD HDTV 1 BEFORE YOU BEGIN What's In the Box • VIZIO HDTV • VIZIO Remote Control (VR15 includes 2 AA batteries) (VUR13 includes 2 AAA batteries) • Power Cord • User...
E470VL User Manual
Page 11
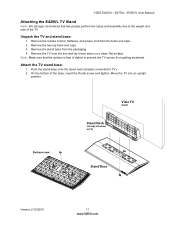
... perform the setup and assembly due to the weight and size of the TV. Unpack the TV and stand base: 1. VIZIO E420VL / E470VL / E550VL User Manual Attaching the E420VL TV Stand Note: We strongly recommend that the surface is free of debris to prevent the TV screen from the ...packaging. 4. On the bottom of the base, insert the thumb screw and tighten. Bottom view Vizio TV (back) Stand Neck (already attached to...
... perform the setup and assembly due to the weight and size of the TV. Unpack the TV and stand base: 1. VIZIO E420VL / E470VL / E550VL User Manual Attaching the E420VL TV Stand Note: We strongly recommend that the surface is free of debris to prevent the TV screen from the ...packaging. 4. On the bottom of the base, insert the thumb screw and tighten. Bottom view Vizio TV (back) Stand Neck (already attached to...
E470VL User Manual
Page 12
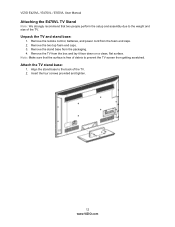
... assembly due to the weight and size of the TV. 2. Align the stand base to prevent the TV screen from the packaging. 4. Insert the four screws provided and tighten. 12 www.VIZIO.com VIZIO E420VL / E470VL / E550VL User Manual Attaching the E470VL TV Stand Note: We strongly recommend that the surface is free of debris to the...
... assembly due to the weight and size of the TV. 2. Align the stand base to prevent the TV screen from the packaging. 4. Insert the four screws provided and tighten. 12 www.VIZIO.com VIZIO E420VL / E470VL / E550VL User Manual Attaching the E470VL TV Stand Note: We strongly recommend that the surface is free of debris to the...
E470VL User Manual
Page 13
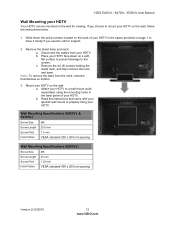
... HDTV face down the serial number located on bottom. 3. Remove the stand base and neck: a. b. Remove the six (6) screws holding the stand neck, and then remove the neck and base. b. VIZIO E420VL / E470VL / E550VL User Manual Wall Mounting your HDTV Your HDTV can be mounted... a. Attach your HDTV. Wall Mounting Specifications (E420VL & E470VL) Screw Size M6 Screw Length 20.0 mm Screw Pitch 1.0 mm Hole Pattern VESA standard 200 x 200 mm spacing Wall Mounting Specifications (E550VL) Screw Size M8 Screw Length 25 mm Screw Pitch 1.25 mm Hole Pattern VESA standard 400 x 200...
... HDTV face down the serial number located on bottom. 3. Remove the stand base and neck: a. b. Remove the six (6) screws holding the stand neck, and then remove the neck and base. b. VIZIO E420VL / E470VL / E550VL User Manual Wall Mounting your HDTV Your HDTV can be mounted... a. Attach your HDTV. Wall Mounting Specifications (E420VL & E470VL) Screw Size M6 Screw Length 20.0 mm Screw Pitch 1.0 mm Hole Pattern VESA standard 200 x 200 mm spacing Wall Mounting Specifications (E550VL) Screw Size M8 Screw Length 25 mm Screw Pitch 1.25 mm Hole Pattern VESA standard 400 x 200...


