
User Manual English
Page 2
... electric shock. • The wall socket should be used as power-supply cord or plug is designed and manufactured to your Display. Pulling on your Display to the presence of uninsulated DANGEROUS VOLTAGE within defined design limits. Install in accordance with arrowhead symbol within an equilateral triangle is exposed to rain or other components to operate within the product's enclosure that...
... electric shock. • The wall socket should be used as power-supply cord or plug is designed and manufactured to your Display. Pulling on your Display to the presence of uninsulated DANGEROUS VOLTAGE within defined design limits. Install in accordance with arrowhead symbol within an equilateral triangle is exposed to rain or other components to operate within the product's enclosure that...

User Manual English
Page 3
...Picture Mode Edit Settings 40 Adjusting the Color Calibration Settings 43 Adjusting Audio Settings 45 Adjusting Timer Settings 47 Activating the Sleep Timer 48 Setting the Auto Power Off Feature 48 Adjusting Network Settings 49 Using the Network Connection menu 50 Renaming Devices on the Input Menu 53 Renaming Devices on the Input Menu 54 Enabling HDMI Color Subsampling 54 Changing the Display System Settings 55 Viewing System Information 56 Changing the On-Screen Menu Language 56 Setting the Time and Local Settings 57 Adjusting the CEC Settings 57 Choosing a Power Mode Setting...
...Picture Mode Edit Settings 40 Adjusting the Color Calibration Settings 43 Adjusting Audio Settings 45 Adjusting Timer Settings 47 Activating the Sleep Timer 48 Setting the Auto Power Off Feature 48 Adjusting Network Settings 49 Using the Network Connection menu 50 Renaming Devices on the Input Menu 53 Renaming Devices on the Input Menu 54 Enabling HDMI Color Subsampling 54 Changing the Display System Settings 55 Viewing System Information 56 Changing the On-Screen Menu Language 56 Setting the Time and Local Settings 57 Adjusting the CEC Settings 57 Choosing a Power Mode Setting...

User Manual English
Page 5
The actual number of ports and their locations may be subject to change. Overview - Back 1 2 3 1 1 2 Power Button Volume Up/Down Buttons Input Button USB Ports Component Ports HDMI Port Optical/SPDIF Audio Out Port HDMI Ports 3 RCA Audio Out Ports Ethernet Port Note: The images shown here are for illustrative purposes only and may vary, depending on the model. 5
The actual number of ports and their locations may be subject to change. Overview - Back 1 2 3 1 1 2 Power Button Volume Up/Down Buttons Input Button USB Ports Component Ports HDMI Port Optical/SPDIF Audio Out Port HDMI Ports 3 RCA Audio Out Ports Ethernet Port Note: The images shown here are for illustrative purposes only and may vary, depending on the model. 5

User Manual English
Page 6
... AAA batteries (included). Power Turn the Display on the batteries and remote. 1 2 6 Input Change the currently displayed input. Channel Up/Down (Not supported) Picture Mode Cycle through the different aspect ratio modes. To insert/replace the batteries: 1. Insert a coin and pry open the back cover. 2. 1 BASIC REMOTE Overview Use the Basic Remote to control the basic functions of the remote. Aspect Ratio Cycle through the different picture modes. Find the notch...
... AAA batteries (included). Power Turn the Display on the batteries and remote. 1 2 6 Input Change the currently displayed input. Channel Up/Down (Not supported) Picture Mode Cycle through the different aspect ratio modes. To insert/replace the batteries: 1. Insert a coin and pry open the back cover. 2. 1 BASIC REMOTE Overview Use the Basic Remote to control the basic functions of the remote. Aspect Ratio Cycle through the different picture modes. Find the notch...

User Manual English
Page 8
..., play games, text or even watch another show, without having to switch back and forth between those apps or sources. First-Time Setup 2 Welcome to VIZIO SmartCast !™ Your new VIZIO Display is part of the all-new collection of Displays, displays, sound bars, and home audio speakers that can all be the same. It works over WiFi, so you can control your VIZIO Display from anywhere in one view, without...
..., play games, text or even watch another show, without having to switch back and forth between those apps or sources. First-Time Setup 2 Welcome to VIZIO SmartCast !™ Your new VIZIO Display is part of the all-new collection of Displays, displays, sound bars, and home audio speakers that can all be the same. It works over WiFi, so you can control your VIZIO Display from anywhere in one view, without...
User Manual English
Page 9
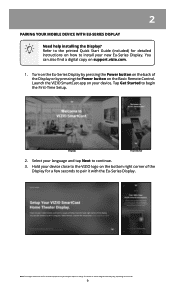
... and may vary, depending on support.vizio.com. 1. Select your device. The actual on-screen image and text may be subject to begin the First-Time Setup. 2 PAIRING YOUR MOBILE DEVICE WITH EU-SERIES DISPLAY Need help installing the Display? Turn on the Eu-Series Display by pressing the Power button on the Basic Remote Control. You can also find a digital copy on the model. 9 Note: The images shown here...
... and may vary, depending on support.vizio.com. 1. Select your device. The actual on-screen image and text may be subject to begin the First-Time Setup. 2 PAIRING YOUR MOBILE DEVICE WITH EU-SERIES DISPLAY Need help installing the Display? Turn on the Eu-Series Display by pressing the Power button on the Basic Remote Control. You can also find a digital copy on the model. 9 Note: The images shown here...
User Manual English
Page 13
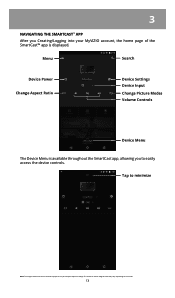
The actual on the model. 13 Tap to easily access the device controls. 3 NAVIGATING THE SMARTCAST™ APP After you Creating/Logging into your MyVIZIO account, the home page of the SmartCast™ app is available throughout the SmartCast app, allowing you to minimize Note: The images shown here are for illustrative purposes only and may vary, depending on -screen image and text may be subject to change. Menu Search Device Power Change Aspect Ratio Device Settings Device Input Change Picture Modes Volume Controls Device Menu The Device Menu is displayed.
The actual on the model. 13 Tap to easily access the device controls. 3 NAVIGATING THE SMARTCAST™ APP After you Creating/Logging into your MyVIZIO account, the home page of the SmartCast™ app is available throughout the SmartCast app, allowing you to minimize Note: The images shown here are for illustrative purposes only and may vary, depending on -screen image and text may be subject to change. Menu Search Device Power Change Aspect Ratio Device Settings Device Input Change Picture Modes Volume Controls Device Menu The Device Menu is displayed.

User Manual English
Page 18
A) Tap on your display settings and content. C) For On Demand: Select a source and tap the play button. The Device Menu is displayed − allowing you want to watch to control your display. D) Your title begins playing on the play button. The actual on-screen image and text may vary, depending on the ...A B C D Note: The images shown here are for illustrative purposes only and may be subject to access content. 18 Tap on the model. * Separate user account may be required to change. B) Select On Demand or On Now (Online feed*) and tap the play button. 3 3.
A) Tap on your display settings and content. C) For On Demand: Select a source and tap the play button. The Device Menu is displayed − allowing you want to watch to control your display. D) Your title begins playing on the play button. The actual on-screen image and text may vary, depending on the ...A B C D Note: The images shown here are for illustrative purposes only and may be subject to access content. 18 Tap on the model. * Separate user account may be required to change. B) Select On Demand or On Now (Online feed*) and tap the play button. 3 3.

User Manual English
Page 20
... or On Now (Online feed*) and tap the play button. C) For On Demand: Select a source and tap the play button. Your content begins playing on the model. * Separate user account may be required to change. 3 3. The actual on-screen image and text may vary, depending on your device settings and content. A) Tap on the content you to . 4. The Device Menu is displayed − allowing...
... or On Now (Online feed*) and tap the play button. C) For On Demand: Select a source and tap the play button. Your content begins playing on the model. * Separate user account may be required to change. 3 3. The actual on-screen image and text may vary, depending on your device settings and content. A) Tap on the content you to . 4. The Device Menu is displayed − allowing...
User Manual English
Page 28
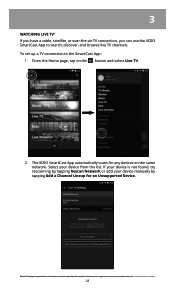
... Device. To set up a TV connection to search, discover, and browse live TV channels. The VIZIO SmartCast App automatically scans for any devices on the button and select Live TV. 2. From the Home page, tap on the same network. 3 WATCHING LIVE TV* If you have a cable, satellite, or over-the-air TV connection, you can use the VIZIO SmartCast App to...
... Device. To set up a TV connection to search, discover, and browse live TV channels. The VIZIO SmartCast App automatically scans for any devices on the button and select Live TV. 2. From the Home page, tap on the same network. 3 WATCHING LIVE TV* If you have a cable, satellite, or over-the-air TV connection, you can use the VIZIO SmartCast App to...
User Manual English
Page 30
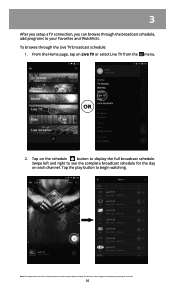
... TV from the menu. Swipe left and right to change. From the Home page, tap on the model. 30 Tap on each channel. To browse through the broadcast schedule, add programs to your Favorites and Watchlists. OR 2. 3 After you setup a TV connection, you can browse through the Live TV broadcast schedule: 1. Tap the play button to display the full broadcast...
... TV from the menu. Swipe left and right to change. From the Home page, tap on the model. 30 Tap on each channel. To browse through the broadcast schedule, add programs to your Favorites and Watchlists. OR 2. 3 After you setup a TV connection, you can browse through the Live TV broadcast schedule: 1. Tap the play button to display the full broadcast...

User Manual English
Page 38
... color before adjusting tint. • Color Temperature - It can be difficult to distinguish in the picture. This setting is too high, the picture may appear dark. Adjusts the 'warmness' and 'coolness' of the white areas of the picture. • Select Cool produces a blue-hued picture. • Select Computer for a optimized picture for use as a PC monitor. • Select Normal for a optimized picture for television viewing. • Black...
... color before adjusting tint. • Color Temperature - It can be difficult to distinguish in the picture. This setting is too high, the picture may appear dark. Adjusts the 'warmness' and 'coolness' of the white areas of the picture. • Select Cool produces a blue-hued picture. • Select Computer for a optimized picture for use as a PC monitor. • Select Normal for a optimized picture for television viewing. • Black...

User Manual English
Page 40
... picture modes. • Unlock Picture Mode • Allow changes to custom picture modes. (Available after a custom picture mode is locked) • Delete Picture Mode • Delete a custom picture mode. To save a custom picture mode: 1. Inputs assigned to that custom picture mode will add an asterisk (*) on -screen keyboard to enter a name for various viewing conditions and video sources. From the Picture Mode Edit menu, select Save Picture Mode. 2. Use the on the top right corner of the present mode. 3 Adjusting the Picture Mode Edit Settings Picture Mode Settings...
... picture modes. • Unlock Picture Mode • Allow changes to custom picture modes. (Available after a custom picture mode is locked) • Delete Picture Mode • Delete a custom picture mode. To save a custom picture mode: 1. Inputs assigned to that custom picture mode will add an asterisk (*) on -screen keyboard to enter a name for various viewing conditions and video sources. From the Picture Mode Edit menu, select Save Picture Mode. 2. Use the on the top right corner of the present mode. 3 Adjusting the Picture Mode Edit Settings Picture Mode Settings...

User Manual English
Page 42
... picture mode: 1. A dialogue window is displayed. 2. 3 Deleting a Custom Picture Mode Custom picture modes that are no longer needed can be deleted. From the Picture Mode Edit menu, Tap Delete Picture Mode. From the Picture Mode Edit menu, Tap Reset Picture Mode. Inputs assigned to a deleted custom picture mode become assigned to the factory default values. 42 Tap on Yes to the factory default values. Tap on Yes to reset the preset picture mode to the Calibrated picture mode. To delete custom picture modes: 1. Resetting a Picture Mode Reset the picture mode settings...
... picture mode: 1. A dialogue window is displayed. 2. 3 Deleting a Custom Picture Mode Custom picture modes that are no longer needed can be deleted. From the Picture Mode Edit menu, Tap Delete Picture Mode. From the Picture Mode Edit menu, Tap Reset Picture Mode. Inputs assigned to a deleted custom picture mode become assigned to the factory default values. 42 Tap on Yes to the factory default values. Tap on Yes to reset the preset picture mode to the Calibrated picture mode. To delete custom picture modes: 1. Resetting a Picture Mode Reset the picture mode settings...
User Manual English
Page 43
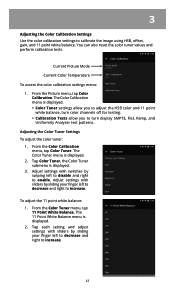
...to turn display SMPTE, Flat, Ramp, and Uniformity Analyzer test patterns. Tap each setting and adjust settings with sliders by sliding your finger left to disable and right to increase. The 11 Point White Balance menu is displayed. 3. Tap Color Tuner, the Color Tuner submenu is displayed. 2. From the Color Tuner menu, tap 11 Point White Balance. 3 Adjusting the Color Calibration Settings Use the color calibration settings to increase. 43 From the Color Calibration menu, tap Color Tuner. Current Picture Mode Current Color Temperature To access the color calibration settings...
...to turn display SMPTE, Flat, Ramp, and Uniformity Analyzer test patterns. Tap each setting and adjust settings with sliders by sliding your finger left to disable and right to increase. The 11 Point White Balance menu is displayed. 3. Tap Color Tuner, the Color Tuner submenu is displayed. 2. From the Color Tuner menu, tap 11 Point White Balance. 3 Adjusting the Color Calibration Settings Use the color calibration settings to increase. 43 From the Color Calibration menu, tap Color Tuner. Current Picture Mode Current Color Temperature To access the color calibration settings...

User Manual English
Page 46
... loudness of processing for the RCA connector when connected to a home theater audio system. Changes the type of the audio output from the left to disable and right to enable. • Volume Leveling - Sets the volume control properties for digital audio out and HDMI ARC output when connected to the Audio Out output ports. • Surround Sound - If this occurs, turn volume leveling off . Volume leveling uses DTS TruVolume™ to deliver an immersive surround...
... loudness of processing for the RCA connector when connected to a home theater audio system. Changes the type of the audio output from the left to disable and right to enable. • Volume Leveling - Sets the volume control properties for digital audio out and HDMI ARC output when connected to the Audio Out output ports. • Surround Sound - If this occurs, turn volume leveling off . Volume leveling uses DTS TruVolume™ to deliver an immersive surround...

User Manual English
Page 57
Set time format to the HDMI ARC input. Adjusting the CEC Settings The CEC function on your device's user manual for details. Select ARC Only for these devices). From the System menu, tap CEC. Select Disable to turn daylight savings time on CEC, select Enable to use the Tablet Remote to control CEC devices connected to control HDMI-connected devices with the included Tablet Remote without any additional programming. Set the date and time. • Time Zone - See...
Set time format to the HDMI ARC input. Adjusting the CEC Settings The CEC function on your device's user manual for details. Select ARC Only for these devices). From the System menu, tap CEC. Select Disable to turn daylight savings time on CEC, select Enable to use the Tablet Remote to control CEC devices connected to control HDMI-connected devices with the included Tablet Remote without any additional programming. Set the date and time. • Time Zone - See...

User Manual English
Page 64
Specifications B Screen Size: Viewable Area: Dimensions w/ Stand: Dimensions w/o Stand: Weight w/ Stand: w/o Stand: LCD Backlight: Active LED Zones: Refresh Rate: Clear Action: Maximum Resolution: Dynamic Contrast Ratio: Pixel Pitch: Viewing Angle: HDMI Inputs: Component Video Inputs: USB Ports: Ethernet Port: Audio Outputs: OSD Languages: Ambient Light Sensor: Remote Control: Certifications: Voltage Range: Power Consumption: Standby Power: E43u-D2 43" Class 42.51" 38.39 x 24.54 x 8.23" (97.50 x 62.33 x 20.90 cm) 38.39 x 22.38 x 3.39" (97.50 x 56.85 x 8....
Specifications B Screen Size: Viewable Area: Dimensions w/ Stand: Dimensions w/o Stand: Weight w/ Stand: w/o Stand: LCD Backlight: Active LED Zones: Refresh Rate: Clear Action: Maximum Resolution: Dynamic Contrast Ratio: Pixel Pitch: Viewing Angle: HDMI Inputs: Component Video Inputs: USB Ports: Ethernet Port: Audio Outputs: OSD Languages: Ambient Light Sensor: Remote Control: Certifications: Voltage Range: Power Consumption: Standby Power: E43u-D2 43" Class 42.51" 38.39 x 24.54 x 8.23" (97.50 x 62.33 x 20.90 cm) 38.39 x 22.38 x 3.39" (97.50 x 56.85 x 8....
User Manual English
Page 72
... VIZIO Technical Support hours are 6:00AM to 9:00PM Monday through Friday and 7:00AM to resolve the issue informally with unreadable or removed serial numbers; (k) products requiring routine maintenance; What This Warranty Does Not Cover This warranty does not cover: (a) cosmetic damage; (b) normal wear and tear; (c) improper operation; (d) improper voltage supply or power surges; (e) signal issues; (f) damage from an authorized retailer in -home service is...
... VIZIO Technical Support hours are 6:00AM to 9:00PM Monday through Friday and 7:00AM to resolve the issue informally with unreadable or removed serial numbers; (k) products requiring routine maintenance; What This Warranty Does Not Cover This warranty does not cover: (a) cosmetic damage; (b) normal wear and tear; (c) improper operation; (d) improper voltage supply or power surges; (e) signal issues; (f) damage from an authorized retailer in -home service is...
User Manual English
Page 74
... trademarks, trade names or service marks other factors may not be subject to customs and export control laws in a fire or with a voltage converter kit sold for typographical, technical, or descriptive errors. Internet Connectivity Network conditions, environmental and other than its own. This Quick Start Guide may negatively affect connectivity and the resulting video quality, if any. VIZIO, Inc. claims any...
... trademarks, trade names or service marks other factors may not be subject to customs and export control laws in a fire or with a voltage converter kit sold for typographical, technical, or descriptive errors. Internet Connectivity Network conditions, environmental and other than its own. This Quick Start Guide may negatively affect connectivity and the resulting video quality, if any. VIZIO, Inc. claims any...


