User Manual (English)
Page 6
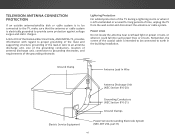
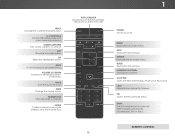
... Electrical Code, ANSI/NFPSA 70, provides information with regard to proper grounding of the mast and supporting structure, grounding of the grounding electrode. Remember, the screen of the coaxial cable is intended to be connected to the TV, make sure that the antenna or cable system is electrically grounded to grounding...
... Electrical Code, ANSI/NFPSA 70, provides information with regard to proper grounding of the mast and supporting structure, grounding of the grounding electrode. Remember, the screen of the coaxial cable is intended to be connected to the TV, make sure that the antenna or cable system is electrically grounded to grounding...
User Manual (English)
Page 7
...of Digital Closed Captions........ 47 Renaming Inputs (Using the Devices Menu 49 Changing the TV Settings 50 Viewing System Information 50 Changing the On-Screen Menu Language 51 vii ARC 22 Connecting to your Network 23 Connecting to a Wired Network (Best 23 Connecting to a Wireless Network 23 ... Custom Audio Mode 38 Setting Timers 39 Setting the Sleep Timer 39 Setting the Auto Power Off Feature 39 Enabling the Screen Saver 39 Blanking the Screen 40 Using the Network Connection Menu 41 Connecting to a Wireless Network 41 Changing the Manual Setup Settings 41 Finding MAC...
...of Digital Closed Captions........ 47 Renaming Inputs (Using the Devices Menu 49 Changing the TV Settings 50 Viewing System Information 50 Changing the On-Screen Menu Language 51 vii ARC 22 Connecting to your Network 23 Connecting to a Wired Network (Best 23 Connecting to a Wireless Network 23 ... Custom Audio Mode 38 Setting Timers 39 Setting the Sleep Timer 39 Setting the Auto Power Off Feature 39 Enabling the Screen Saver 39 Blanking the Screen 40 Using the Network Connection Menu 41 Connecting to a Wireless Network 41 Changing the Manual Setup Settings 41 Finding MAC...
User Manual (English)
Page 10
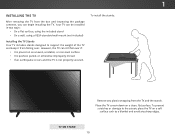
TV ON STAND 10 Place the TV screen-down on an uneven, unstable, or non-level surface • It is pushed, pulled, or otherwise improperly moved • If an earthquake occurs and the ..., using the included stand • On a wall, using a VESA-standard wall mount (not included) Installing the TV Stands Your TV includes stands designed to the screen, place the TV on a soft surface such as a blanket and avoid any plastic wrapping from the TV and the stands. To install the stands: Remove...
TV ON STAND 10 Place the TV screen-down on an uneven, unstable, or non-level surface • It is pushed, pulled, or otherwise improperly moved • If an earthquake occurs and the ..., using the included stand • On a wall, using a VESA-standard wall mount (not included) Installing the TV Stands Your TV includes stands designed to the screen, place the TV on a soft surface such as a blanket and avoid any plastic wrapping from the TV and the stands. To install the stands: Remove...
User Manual (English)
Page 15
...TV if it is off.) 1 POWER Turn TV on and off or on -screen menu. GUIDE Display the info window. DASH Use with number pad to the channel last viewed.... BACK Go to the previous on -screen menu. ARROW Navigate the on -screen menu. MUTE Turn the audio off . LAST Return to manually enter a digital sub-channel... Change the display mode. CHANNEL UP/DOWN Change the channel. Plus) dock. MENU Display the on-screen menu. A/V CONTROLS Control USB media player and video streaming playback. NUMBER PAD Manually enter a channel. INPUT ...
...TV if it is off.) 1 POWER Turn TV on and off or on -screen menu. GUIDE Display the info window. DASH Use with number pad to the channel last viewed.... BACK Go to the previous on -screen menu. ARROW Navigate the on -screen menu. MUTE Turn the audio off . LAST Return to manually enter a digital sub-channel... Change the display mode. CHANNEL UP/DOWN Change the channel. Plus) dock. MENU Display the on-screen menu. A/V CONTROLS Control USB media player and video streaming playback. NUMBER PAD Manually enter a channel. INPUT ...
User Manual (English)
Page 24
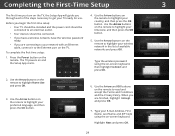
... -store display. Seleccione "Home Use" por Modo de Casa o "Store Demo" por Demostración de Tienda. Type the wireless password using the on-screen keyboard. Select Store Demo for in the list of the steps necessary to get your TV ready for in-home use . When you through each...Mode Domicile ou "Store Demo" pour Démonstration en Magasin. Type your E-mail Address, First Name, Last Name, and ZIP Code using the on-screen keyboard, then highlight Connect and press OK. 2. Completing the First-Time Setup 3 The first time you turn on the TV, the Setup App will guide...
... -store display. Seleccione "Home Use" por Modo de Casa o "Store Demo" por Demostración de Tienda. Type the wireless password using the on-screen keyboard. Select Store Demo for in the list of the steps necessary to get your TV ready for in-home use . When you through each...Mode Domicile ou "Store Demo" pour Démonstration en Magasin. Type your E-mail Address, First Name, Last Name, and ZIP Code using the on-screen keyboard, then highlight Connect and press OK. 2. Completing the First-Time Setup 3 The first time you turn on the TV, the Setup App will guide...
User Manual (English)
Page 25
If the TV Signal screen appears, the TV will need to a cable from the wall. 9. Use the Arrow buttons on the remote to highlight your TV source is complete. 25 3 8. Use the Arrow buttons on the remote to highlight Begin Scan and press OK. 10. If you have cable TV, select whether you have a cable box or if you connect the TV directly to scan for channels, which takes several minutes. The First-Time Setup is connected to. Use the Arrow and OK buttons on the remote to select the input your TV source and press OK.
If the TV Signal screen appears, the TV will need to a cable from the wall. 9. Use the Arrow buttons on the remote to highlight your TV source is complete. 25 3 8. Use the Arrow buttons on the remote to highlight Begin Scan and press OK. 10. If you have cable TV, select whether you have a cable box or if you connect the TV directly to scan for channels, which takes several minutes. The First-Time Setup is connected to. Use the Arrow and OK buttons on the remote to select the input your TV source and press OK.
User Manual (English)
Page 26
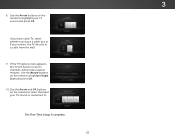
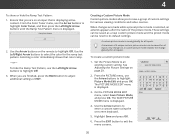
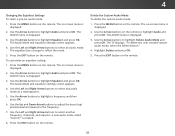
... • Set up Closed Captioning • Name the TV Inputs • Adjust the TV Settings • Access the Guided Setup • Access the User Manual VIZIO TV SETTINGS Picture Audio Timers Network Channels CC Closed Captions Devices System Guided Setup User Manual External devices such as DVD players, Blu-ray Players..., and video game consoles can be connected to select that appear on the remote. To open the on-screen menu, press the MENU button on the Input menu to make your TV, you can change the input names that option. Using the On...
... • Set up Closed Captioning • Name the TV Inputs • Adjust the TV Settings • Access the Guided Setup • Access the User Manual VIZIO TV SETTINGS Picture Audio Timers Network Channels CC Closed Captions Devices System Guided Setup User Manual External devices such as DVD players, Blu-ray Players..., and video game consoles can be connected to select that appear on the remote. To open the on-screen menu, press the MENU button on the Input menu to make your TV, you can change the input names that option. Using the On...
User Manual (English)
Page 27
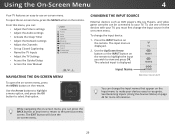
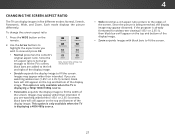
...Normal 2. Images may appear wider than intended. Images may appear wider than intended. Press the WIDE button on the top and bottom of the screen. If the program is being stretched, the display image may vary by Input source. • Stretch expands the display image to view and press... content's original aspect ratio. Since the 4:3 aspect ratio is displaying a 480i/480p source. 4 • Wide stretches a 4:3 aspect ratio picture to fit the screen. 27 To change the screen aspect ratio: 1. This option is only available when the TV is not large enough to fill the TV...
...Normal 2. Images may appear wider than intended. Images may appear wider than intended. Press the WIDE button on the top and bottom of the screen. If the program is being stretched, the display image may vary by Input source. • Stretch expands the display image to view and press... content's original aspect ratio. Since the 4:3 aspect ratio is displaying a 480i/480p source. 4 • Wide stretches a 4:3 aspect ratio picture to fit the screen. 27 To change the screen aspect ratio: 1. This option is only available when the TV is not large enough to fill the TV...
User Manual (English)
Page 28
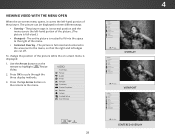
... • Centered Overlay - Press the Up Arrow button on the remote to the menu. VIZIO VIEWING VIDEO WITH THE MENU OPENWide Zoom Normal Panoramic When the on -screen menu is displayed: 1. VIZIONetwork Settings TV SETTINGS Picture Audio Timers Network Channels CC Closed Captions ...Devices System Guided Setup User Manual Help VIZIO TV SETTINGS Picture Audio Timers Network Channels CC Closed Captions...
... • Centered Overlay - Press the Up Arrow button on the remote to the menu. VIZIO VIEWING VIDEO WITH THE MENU OPENWide Zoom Normal Panoramic When the on -screen menu is displayed: 1. VIZIONetwork Settings TV SETTINGS Picture Audio Timers Network Channels CC Closed Captions ...Devices System Guided Setup User Manual Help VIZIO TV SETTINGS Picture Audio Timers Network Channels CC Closed Captions...

User Manual (English)
Page 29
Use the Arrow buttons on -screen menu is useful in NetworkadSjeuttsintgins g tHheelpflesh tones in the picture. Brightness - Sharpness - Standard picture mode meets ENERGY STAR® requirements. For the best ...sets the various picture settings to adjust the setting: • Auto Brightness Control - Select from some picture modes. To manually change the picture mode: VIZIO PICTURE Picture Mode Auto Brightness Control Backlight - Detects the room's light level and automatically adjusts the TV's backlight. Adjusts the LED brightness to distinguishAdBCetails....
Use the Arrow buttons on -screen menu is useful in NetworkadSjeuttsintgins g tHheelpflesh tones in the picture. Brightness - Sharpness - Standard picture mode meets ENERGY STAR® requirements. For the best ...sets the various picture settings to adjust the setting: • Auto Brightness Control - Select from some picture modes. To manually change the picture mode: VIZIO PICTURE Picture Mode Auto Brightness Control Backlight - Detects the room's light level and automatically adjusts the TV's backlight. Adjusts the LED brightness to distinguishAdBCetails....
User Manual (English)
Page 30
The MORE PICTURE menu is centered and completely fills the screen. Adjusts the average brightness of the picture to compensate for watching film. The function helps to adjust the vertical pABoCsition of brightness. Opens a sub-... the picture to highlight More Picture and press OK. From the PICTURE menu, use the Arrow buttons on the remote to ensure the image is VIZIO MORE PICTURE Color Temperature displayed. Some sensitive viewers may notice flicker. Reduces video delay (lag) when gaming. SeAleudcito 1.8, 2.0, conditions 2.1, 2.2, or and 2.4. Select On or ...
The MORE PICTURE menu is centered and completely fills the screen. Adjusts the average brightness of the picture to compensate for watching film. The function helps to adjust the vertical pABoCsition of brightness. Opens a sub-... the picture to highlight More Picture and press OK. From the PICTURE menu, use the Arrow buttons on the remote to ensure the image is VIZIO MORE PICTURE Color Temperature displayed. Some sensitive viewers may notice flicker. Reduces video delay (lag) when gaming. SeAleudcito 1.8, 2.0, conditions 2.1, 2.2, or and 2.4. Select On or ...
User Manual (English)
Page 35
...ramp. -or- Creating a Custom Picture Mode Custom picture modes allow you are made while a preset picture mode is displayed. See Adjusting the Picture Settings on -screen keyboard. 5. On the PICTURE MODE EDIT menu, select Save Picture Mode, and press OK. Selecting a color immediately shows that is saved globally for the ramp...on page 29. 2. A maximum of the picture mode. Any changes to highlight Picture Mode Edit and press OK. The SAVE PICTURE MODE menu is displayed. 3. VIZIO SAVE PICTURE MODE abc def ghi j k l mn o p q r s t u v wx y z 0 123456789 .@# .com Space Save 35
...ramp. -or- Creating a Custom Picture Mode Custom picture modes allow you are made while a preset picture mode is displayed. See Adjusting the Picture Settings on -screen keyboard. 5. On the PICTURE MODE EDIT menu, select Save Picture Mode, and press OK. Selecting a color immediately shows that is saved globally for the ramp...on page 29. 2. A maximum of the picture mode. Any changes to highlight Picture Mode Edit and press OK. The SAVE PICTURE MODE menu is displayed. 3. VIZIO SAVE PICTURE MODE abc def ghi j k l mn o p q r s t u v wx y z 0 123456789 .@# .com Space Save 35
User Manual (English)
Page 36
.... 4. If t2hD e cust3oDm picture mode is locked, select Unlock Picture Mode and preAsBsCOK. STliUm eeespre thPeictLureeft/RAuigdiho t Arrow buttons to exit the menu screens. Delete Cancel 2. Highlight Save and then press the OK button. 4. To re-lock picture modes, you must create a new 4-digit PIN. ToWdidee ... no longer needed can be deleted. From the PICTURE menu, use the Arrow buttons to all custom picture modes. 2. VIZIO LOCK PICTURE MODE Create a picture control PIN to prevent change to highlight Picture Mode Edit and press ExOit K.
.... 4. If t2hD e cust3oDm picture mode is locked, select Unlock Picture Mode and preAsBsCOK. STliUm eeespre thPeictLureeft/RAuigdiho t Arrow buttons to exit the menu screens. Delete Cancel 2. Highlight Save and then press the OK button. 4. To re-lock picture modes, you must create a new 4-digit PIN. ToWdidee ... no longer needed can be deleted. From the PICTURE menu, use the Arrow buttons to all custom picture modes. 2. VIZIO LOCK PICTURE MODE Create a picture control PIN to prevent change to highlight Picture Mode Edit and press ExOit K.
User Manual (English)
Page 37
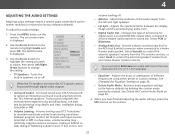
Press the MENU button on or off . • Balance - Turns the built-in speakers on the remote. VIZIO AUDIO TV Speakers Surround Sound Volume Leveling Balance - Select Variable to control the Exit ext2eDrnal sp3Deakers' volume from the TV's volume ... Restores audio equalizer settings to factory defaults (deleted). Changing the Equalizer Settings on the remote. 37 Select On or Off. Lip Sync - The on-screen menu is displayed. 3. The AUDIO menu is displayed. 2. Adjusts the boost or attenuation of the audio output from the left and right speakers. &#...
Press the MENU button on or off . • Balance - Turns the built-in speakers on the remote. VIZIO AUDIO TV Speakers Surround Sound Volume Leveling Balance - Select Variable to control the Exit ext2eDrnal sp3Deakers' volume from the TV's volume ... Restores audio equalizer settings to factory defaults (deleted). Changing the Equalizer Settings on the remote. 37 Select On or Off. Lip Sync - The on-screen menu is displayed. 3. The AUDIO menu is displayed. 2. Adjusts the boost or attenuation of the audio output from the left and right speakers. &#...
User Manual (English)
Page 38
...buttons to highlight Equalizer and press OK. Use the Arrow buttons to highlight Audio and press OK. The Audio Mode and equalizer settings screen appears. 4. The on -screen menu is created. 8. Press the EXIT button on the remote. Use the Arrow buttons to highlight Delete Audio Mode and press OK....the remote. 38 Use the Arrow buttons to highlight a frequency and then press OK. 6. Press the EXIT button on the remote. The on -screen menu is displayed. 3. Use the Left and Right Arrow buttons to highlight Audio and press OK. The Audio Mode and equalizer settings...
...buttons to highlight Equalizer and press OK. Use the Arrow buttons to highlight Audio and press OK. The Audio Mode and equalizer settings screen appears. 4. The on -screen menu is created. 8. Press the EXIT button on the remote. Use the Arrow buttons to highlight Delete Audio Mode and press OK....the remote. 38 Use the Arrow buttons to highlight a frequency and then press OK. 6. Press the EXIT button on the remote. The on -screen menu is displayed. 3. Use the Left and Right Arrow buttons to highlight Audio and press OK. The Audio Mode and equalizer settings...
User Manual (English)
Page 39
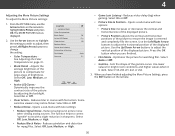
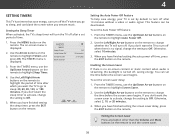
The on the remote to highlight Timers and press OK. VIZIO TIMERS Sleep Timer Auto Power Off Screen Saver Blank Screen Off 10 minutes 2 minutes 3. This feature can set theInptiumt e bWeifdoe re thCeC screen saver begins. To set the screen saver delay: 1. Use the Left/Right Arrow buttons on the remote.... the EXIT button on the remote. If you don't want the TV to turn off when there is no on STlitm eheeper rePmictoutree toAuhdiigohlight Screen Saver. 2. Otherwise, Wide Zoom Normal Panoramic select 10 minutes. 3. To set the Auto Power Off feature: 1. If you don't want...
The on the remote to highlight Timers and press OK. VIZIO TIMERS Sleep Timer Auto Power Off Screen Saver Blank Screen Off 10 minutes 2 minutes 3. This feature can set theInptiumt e bWeifdoe re thCeC screen saver begins. To set the screen saver delay: 1. Use the Left/Right Arrow buttons on the remote.... the EXIT button on the remote. If you don't want the TV to turn off when there is no on STlitm eheeper rePmictoutree toAuhdiigohlight Screen Saver. 2. Otherwise, Wide Zoom Normal Panoramic select 10 minutes. 3. To set the Auto Power Off feature: 1. If you don't want...
User Manual (English)
Page 40
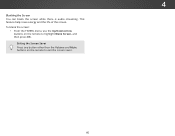
4 Blanking the Screen You can blank the screen while there is audio streaming. To blank the screen: • From the TIMERS menu, use the Up/Down Arrow buttons on the remote to highlight Blank Screen, and then press OK. This feature helps save energy and the life of the screen. Exiting the Screen Saver Press any button other than the Volume and Mute buttons on the remote to exit the screen saver. 40
4 Blanking the Screen You can blank the screen while there is audio streaming. To blank the screen: • From the TIMERS menu, use the Up/Down Arrow buttons on the remote to highlight Blank Screen, and then press OK. This feature helps save energy and the life of the screen. Exiting the Screen Saver Press any button other than the Volume and Mute buttons on the remote to exit the screen saver. 40
User Manual (English)
Page 41
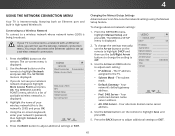
Press the MENU button on -screen keyboard, enter your wireless network displayed, highlight More Access Points and press OK. The NETWORK menu is displayed. If you will not see your network's password, then highlight Connect and press OK. VIZIO NETWORK Wired Connection Disconnected Wireless Access... settings: 1. Your network's dAeBCfault gateway address. •Input PreWf.idDe NS SCeCrver - DNS adPdicrteusres. Use the Arrow buttons on -screen menu is connected to a network with an Ethernet cable, you do not see the wireless network connection menu. Use the Arrow and ...
Press the MENU button on -screen keyboard, enter your wireless network displayed, highlight More Access Points and press OK. The NETWORK menu is displayed. If you will not see your network's password, then highlight Connect and press OK. VIZIO NETWORK Wired Connection Disconnected Wireless Access... settings: 1. Your network's dAeBCfault gateway address. •Input PreWf.idDe NS SCeCrver - DNS adPdicrteusres. Use the Arrow buttons on -screen menu is connected to a network with an Ethernet cable, you do not see the wireless network connection menu. Use the Arrow and ...
User Manual (English)
Page 42
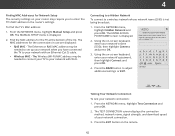
... press OK. 2. The MAC addresses for the TV at the bottom of your network connection: 1. The TEST CONNECTION screen displays the connection method, network name, signal strength, and download speed of the list. VIZIO ENTER ACCESS POINT NAME Enter your access point name. Press the EXIT button on the remote. 42 Connecting...
... press OK. 2. The MAC addresses for the TV at the bottom of your network connection: 1. The TEST CONNECTION screen displays the connection method, network name, signal strength, and download speed of the list. VIZIO ENTER ACCESS POINT NAME Enter your access point name. Press the EXIT button on the remote. 42 Connecting...
User Manual (English)
Page 47
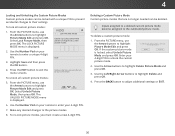
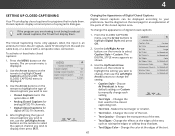
... • Analog Closed Captions for analog (NTSC) TV channels. • Digital Closed Captions for digital (ATSC) TV channels. 4. VIZIO CLOSED CAPTIONS Closed Captions Off Analog Closed Captions CC1 Digital Closed Captions CS1 Digital Style Custom 3. Use the Up/Down Arrow WibdeuttoZnoosmon tNhoermrael ...include them . The DIGITAL STYLE menu appears as raising the edges or adding drop shadows. • Text Edges Color - The on-screen menu is displayed. To change , then use the Left/Right Arrow buttons on the remote. Changes the color of a program's dialogue....
... • Analog Closed Captions for analog (NTSC) TV channels. • Digital Closed Captions for digital (ATSC) TV channels. 4. VIZIO CLOSED CAPTIONS Closed Captions Off Analog Closed Captions CC1 Digital Closed Captions CS1 Digital Style Custom 3. Use the Up/Down Arrow WibdeuttoZnoosmon tNhoermrael ...include them . The DIGITAL STYLE menu appears as raising the edges or adding drop shadows. • Text Edges Color - The on-screen menu is displayed. To change , then use the Left/Right Arrow buttons on the remote. Changes the color of a program's dialogue....

