User Manual
Page 2
... license from SRS Labs, Inc. This product qualifies for ENERGY STAR in the "factory default" setting and this is the setting in which power savings will increase power consumption that could exceed the limits necessary to qualify for ENERGY STAR rating. Changing the factory default picture settings or enabling other features will...
... license from SRS Labs, Inc. This product qualifies for ENERGY STAR in the "factory default" setting and this is the setting in which power savings will increase power consumption that could exceed the limits necessary to qualify for ENERGY STAR rating. Changing the factory default picture settings or enabling other features will...
User Manual
Page 3
...and retain them for future reference. • To reduce the risk of electric shock or component damage, switch off the power before operating your TV. Read the following instructions should be observed for the installation, use attachments/accessories specified by the manufacturer,... or sold PRODUCT REGISTRATION To purchase or inquire about accessories and installation services for your VIZIO product at (877) 878-4946. To prevent your TV from being walked on or pinched, particularly at plugs, convenience ...
...and retain them for future reference. • To reduce the risk of electric shock or component damage, switch off the power before operating your TV. Read the following instructions should be observed for the installation, use attachments/accessories specified by the manufacturer,... or sold PRODUCT REGISTRATION To purchase or inquire about accessories and installation services for your VIZIO product at (877) 878-4946. To prevent your TV from being walked on or pinched, particularly at plugs, convenience ...
User Manual
Page 5
...8226; If any of the following occurs, contact the dealer: - Continued use your TV if any smoke or odor becomes apparent, unplug the power cord and contact your dealer. When your TV in an area with heavy dust or high humidity. If any abnormality occurs. Operating your TV in... disconnect device, the disconnect device shall remain readily operable. • CAUTION - Do not expose batteries to repair your TV, hold the AC/DC power adapter, not the cord. Do not expose your TV to qualified service personnel. • WARNING: Keep your dealer and refer all servicing to rain...
...8226; If any of the following occurs, contact the dealer: - Continued use your TV if any smoke or odor becomes apparent, unplug the power cord and contact your dealer. When your TV in an area with heavy dust or high humidity. If any abnormality occurs. Operating your TV in... disconnect device, the disconnect device shall remain readily operable. • CAUTION - Do not expose batteries to repair your TV, hold the AC/DC power adapter, not the cord. Do not expose your TV to qualified service personnel. • WARNING: Keep your dealer and refer all servicing to rain...
User Manual
Page 6
... they will turn off their analog signal and switch to receive over-the-air TV. DTV TRANSITION ADVISORY The nationwide switch to receive low power, Class A or translator television stations and with a built-in tuner capable of US Television Stations www.high-techproductions.com/usTVstations.htm Your TV comes with...
... they will turn off their analog signal and switch to receive over-the-air TV. DTV TRANSITION ADVISORY The nationwide switch to receive low power, Class A or translator television stations and with a built-in tuner capable of US Television Stations www.high-techproductions.com/usTVstations.htm Your TV comes with...
User Manual
Page 7
...voltage surges and static charges. Lightning Protection For added protection of the TV during a lightning storm or when it could fall into such power lines or circuits. Remember, the screen of the coaxial cable is intended to be connected to the TV, make sure that the ...grounding electrode. Ground Clamp Antenna Lead In Wire Antenna Discharge Unit (NEC Section 810-20) Grounding Conductors (NEC Section 810-21) Ground Clamps Power Service Grounding Electrode System (NEC ART 250, part H) Electric Service Equipment Article 810 of the National Electrical Code, ANSI/NFPSA 70, provides ...
...voltage surges and static charges. Lightning Protection For added protection of the TV during a lightning storm or when it could fall into such power lines or circuits. Remember, the screen of the coaxial cable is intended to be connected to the TV, make sure that the ...grounding electrode. Ground Clamp Antenna Lead In Wire Antenna Discharge Unit (NEC Section 810-20) Grounding Conductors (NEC Section 810-21) Ground Clamps Power Service Grounding Electrode System (NEC ART 250, part H) Electric Service Equipment Article 810 of the National Electrical Code, ANSI/NFPSA 70, provides ...
User Manual
Page 8
... Screen Aspect Ratio...16 Setting Up Closed Captioning...17 Changing the Appearance of Digital Closed Captions.. 17 Activating the Sleep Timer...18 Setting the Auto Power Off Feature...18
... Screen Aspect Ratio...16 Setting Up Closed Captioning...17 Changing the Appearance of Digital Closed Captions.. 17 Activating the Sleep Timer...18 Setting the Auto Power Off Feature...18
User Manual
Page 10
... is missing or damaged. Installing the TV INSPECTING THE PACKAGE CONTENTS Before installing your new TV, take a moment to ensure nothing is not properly secured VIZIO LCD HDTV Quick Start Guide Remote Control with Batteries Power Cord Package Contents 3 TV on Stand
... is missing or damaged. Installing the TV INSPECTING THE PACKAGE CONTENTS Before installing your new TV, take a moment to ensure nothing is not properly secured VIZIO LCD HDTV Quick Start Guide Remote Control with Batteries Power Cord Package Contents 3 TV on Stand

User Manual
Page 13
Turn TV off or on -screen menu. Open the on . Connect HDMI device. Side Panel 6 2 SIDE PANEL POWER - Increase or decrease volume level INPUT - Change the channel. VOLUME UP/DOWN - HDMI Side - USB - CHANNEL UP/DOWN - Connect USB thumb drive for photo or music playback. Change input source. MENU -
Turn TV off or on -screen menu. Open the on . Connect HDMI device. Side Panel 6 2 SIDE PANEL POWER - Increase or decrease volume level INPUT - Change the channel. VOLUME UP/DOWN - HDMI Side - USB - CHANNEL UP/DOWN - Connect USB thumb drive for photo or music playback. Change input source. MENU -
User Manual
Page 15
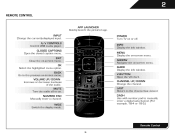
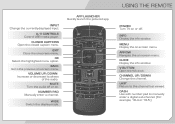
... enter a channel. V BUTTON Open the VIA dock. BACK Go to the previous on -screen menu. MUTE Turn the audio off . WIDE Switch the display mode. POWER Turn TV on or off or on. DASH Use with number pad to the channel last viewed. CLOSED CAPTIONS Open the closed caption menu. INFO...
... enter a channel. V BUTTON Open the VIA dock. BACK Go to the previous on -screen menu. MUTE Turn the audio off . WIDE Switch the display mode. POWER Turn TV on or off or on. DASH Use with number pad to the channel last viewed. CLOSED CAPTIONS Open the closed caption menu. INFO...
User Manual
Page 21
... turn on the TV, the Setup App will guide you through each of the steps necessary to get your TV ready for Yahoo! Press the Power/Standby button on -screen keyboard, then highlight Connect and press OK. 5. When you have the network key ready. • If you are finished, highlight... to highlight Home Mode Setup and press OK. 6. TV Widgets. Before you begin the first-time setup: • Your TV should be installed and the power cord should be connected to an electrical outlet. • Your devices should be connected. • If you have a wireless network, have finished the channel...
... turn on the TV, the Setup App will guide you through each of the steps necessary to get your TV ready for Yahoo! Press the Power/Standby button on -screen keyboard, then highlight Connect and press OK. 5. When you have the network key ready. • If you are finished, highlight... to highlight Home Mode Setup and press OK. 6. TV Widgets. Before you begin the first-time setup: • Your TV should be installed and the power cord should be connected to an electrical outlet. • Your devices should be connected. • If you have a wireless network, have finished the channel...
User Manual
Page 25
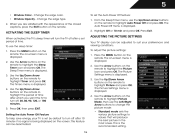
...icon and press OK. This is displayed. 4. From the Sleep Timer menu, use the Up/Down Arrow buttons on the remote to highlight Auto Power Off and press OK. To use the Left/Right Arrow buttons to change the picture mode: • Standard mode sets the various picture settings ...cases. The Sleep Timer menu is displayed. 4. Use the Up/Down Arrow buttons on the screen. The Timers menu is displayed. 3. Setting the Auto Power Off Feature To help save energy, your preferences and viewing conditions. To adjust the picture settings: 1. Use the Up/Down Arrow buttons on the remote...
...icon and press OK. This is displayed. 4. From the Sleep Timer menu, use the Up/Down Arrow buttons on the remote to highlight Auto Power Off and press OK. To use the Left/Right Arrow buttons to change the picture mode: • Standard mode sets the various picture settings ...cases. The Sleep Timer menu is displayed. 4. Use the Up/Down Arrow buttons on the screen. The Timers menu is displayed. 3. Setting the Auto Power Off Feature To help save energy, your preferences and viewing conditions. To adjust the picture settings: 1. Use the Up/Down Arrow buttons on the remote...
User Manual
Page 44
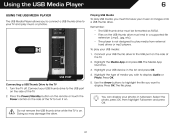
... OK, then highlight Fullscreen and press OK. Playing USB Media 6 To play USB media, you must end in fullscreen. Press the Power/Standby button on the remote or touch the Power control on the side of media you want to display. You can display your photos in a supported file extension (.mp3, .jpg...
... OK, then highlight Fullscreen and press OK. Playing USB Media 6 To play USB media, you must end in fullscreen. Press the Power/Standby button on the remote or touch the Power control on the side of media you want to display. You can display your photos in a supported file extension (.mp3, .jpg...
User Manual
Page 52
...to ensure they are using cable TV, satellite, or antenna connected directly to the TV, scan for details. • Adjust Brightness, Contrast, or Backlight. The power is on, but there is no sound. • Press Volume Up on the remote control. • Press the MUTE button on the remote to a ... page 18 • Reset the picture settings. See Adjusting the Audio Settings on page 22 Ensure the speakers are set to On. • Ensure no power. • Ensure the TV is no headphones are connected to the TV. • Check the audio connections of external devices (Blu-ray player, game...
...to ensure they are using cable TV, satellite, or antenna connected directly to the TV, scan for details. • Adjust Brightness, Contrast, or Backlight. The power is on, but there is no sound. • Press Volume Up on the remote control. • Press the MUTE button on the remote to a ... page 18 • Reset the picture settings. See Adjusting the Audio Settings on page 22 Ensure the speakers are set to On. • Ensure no power. • Ensure the TV is no headphones are connected to the TV. • Check the audio connections of external devices (Blu-ray player, game...
User Manual
Page 56
... SERVICE. This warranty does not cover, for example: cosmetic damage, normal wear and tear, improper operation, improper voltage supply or power surges, signal issues, damages from warranty service or replacement, whichever is greater. Products with unreadable or removed serial numbers, or requiring..."DETAILS" tab of the servicer. Replacement parts and Products are not covered. PREAUTHORIZATION IS REQUIRED BEFORE SENDING ANY PRODUCT TO A VIZIO SERVICE CENTER FOR WARRANTY SERVICE. Parts and Labor There will be restored to you always clear all applicable data and passwords. Limited...
... SERVICE. This warranty does not cover, for example: cosmetic damage, normal wear and tear, improper operation, improper voltage supply or power surges, signal issues, damages from warranty service or replacement, whichever is greater. Products with unreadable or removed serial numbers, or requiring..."DETAILS" tab of the servicer. Replacement parts and Products are not covered. PREAUTHORIZATION IS REQUIRED BEFORE SENDING ANY PRODUCT TO A VIZIO SERVICE CENTER FOR WARRANTY SERVICE. Parts and Labor There will be restored to you always clear all applicable data and passwords. Limited...
User Manual
Page 57
...AC cords listed below for help. Consult the dealer or an experienced radio/TV technician for each area. Shielded interface cables and AC power cord, if any such software and associated documentation files (the "Open Source Software"), to deal in the Open Source Software without ... not expressly approved by the party responsible for attribution of gSOAP public license from that interference will not occur in order to VIZIO at www.VIZIO.com. Open Source Software Notice Your VIA device may not cause harmful interference, and (2) this equipment. Permission is hereby granted...
...AC cords listed below for help. Consult the dealer or an experienced radio/TV technician for each area. Shielded interface cables and AC power cord, if any such software and associated documentation files (the "Open Source Software"), to deal in the Open Source Software without ... not expressly approved by the party responsible for attribution of gSOAP public license from that interference will not occur in order to VIZIO at www.VIZIO.com. Open Source Software Notice Your VIA device may not cause harmful interference, and (2) this equipment. Permission is hereby granted...

E422VLE Quick Start Guide
Page 2
... that contained in fire or electric shock. • Do not use your safety. If any smoke or odor becomes apparent, unplug the power cord and contact your TV is dropped and the housing is damaged, the internal components may cause fire or electric shock. • Follow...apparatus during lightning. Read the following occurs, contact the dealer: - Do not install your TV close to persons. • Do not overload power strips and extension cords. If your outlet does not accommodate the three-pronged, have fallen into the apparatus, the apparatus has been exposed to rain...
... that contained in fire or electric shock. • Do not use your safety. If any smoke or odor becomes apparent, unplug the power cord and contact your TV is dropped and the housing is damaged, the internal components may cause fire or electric shock. • Follow...apparatus during lightning. Read the following occurs, contact the dealer: - Do not install your TV close to persons. • Do not overload power strips and extension cords. If your outlet does not accommodate the three-pronged, have fallen into the apparatus, the apparatus has been exposed to rain...

E422VLE Quick Start Guide
Page 4
PACKAGE CONTENTS Power Cord VIZIO LCD HDTV with Stand Remote Control with Batteries This Quick Start Guide HELP VIZIO REDUCE PAPER WASTE. DOWNLOAD THE FULL USER MANUAL AT VIZIO.COM/SUPPORT
PACKAGE CONTENTS Power Cord VIZIO LCD HDTV with Stand Remote Control with Batteries This Quick Start Guide HELP VIZIO REDUCE PAPER WASTE. DOWNLOAD THE FULL USER MANUAL AT VIZIO.COM/SUPPORT
E422VLE Quick Start Guide
Page 5
... Control USB media player. BACK Go to the previous on -screen menu. DASH Use with number pad to the channel last viewed. USING THE REMOTE POWER Turn TV on or off or on. INFO Display the info window.
... Control USB media player. BACK Go to the previous on -screen menu. DASH Use with number pad to the channel last viewed. USING THE REMOTE POWER Turn TV on or off or on. INFO Display the info window.

E422VLE Quick Start Guide
Page 8
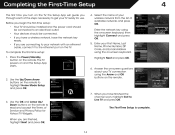
Insert the included batteries. Connect the power cord to the back of the TV. FIRST-TIME SETUP 1 2 Remove the battery cover by pressing gently on the arrow and sliding away from the remote. Plug the power cord into place. Gently slide the battery cover back into an electrical outlet.
Insert the included batteries. Connect the power cord to the back of the TV. FIRST-TIME SETUP 1 2 Remove the battery cover by pressing gently on the arrow and sliding away from the remote. Plug the power cord into place. Gently slide the battery cover back into an electrical outlet.

E422VLE Quick Start Guide
Page 9
Connect an Ethernet cable from a wall outlet, connect it to highlight Home Mode Setup and press OK. Use the Arrow buttons on the remote. Turn the TV on by pressing the Power button on the remote to the TV with an RF/Coaxial cable. The Setup App is displayed. 3 4 Ethernet Cable Coaxial Cable If you have an external antenna or a cable connection that extends from your router or modem.
Connect an Ethernet cable from a wall outlet, connect it to highlight Home Mode Setup and press OK. Use the Arrow buttons on the remote. Turn the TV on by pressing the Power button on the remote to the TV with an RF/Coaxial cable. The Setup App is displayed. 3 4 Ethernet Cable Coaxial Cable If you have an external antenna or a cable connection that extends from your router or modem.


