User Manual
Page 21
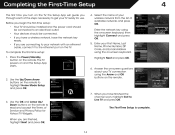
... the on the remote to Live TV and press OK. The First-Time Setup is complete. 14 Use the Up/Down Arrow buttons on -screen keyboard, then highlight Connect and press OK. 5. When you have a wireless network, have finished the channel scan, highlight Exit to highlight Home Mode Setup and press... your First Name, Last Name, Phone Number, ZIP Code, and E-mail Address using the Arrow and OK buttons on the TV. Answer the on -screen keyboard. TV Widgets.
... the on the remote to Live TV and press OK. The First-Time Setup is complete. 14 Use the Up/Down Arrow buttons on -screen keyboard, then highlight Connect and press OK. 5. When you have a wireless network, have finished the channel scan, highlight Exit to highlight Home Mode Setup and press... your First Name, Last Name, Phone Number, ZIP Code, and E-mail Address using the Arrow and OK buttons on the TV. Answer the on -screen keyboard. TV Widgets.

User Manual
Page 31
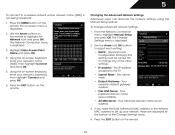
... menu. The TV displays, "Are you sure you will not see your wireless network displayed, highlight More Access Points and press OK. The on -screen keyboard, enter your TV is the network's SSID) and press OK. 5. The Network Connection menu is displayed. 4. Using the on -screen menu is displayed. 3. Use the...
... menu. The TV displays, "Are you sure you will not see your wireless network displayed, highlight More Access Points and press OK. The on -screen keyboard, enter your TV is the network's SSID) and press OK. 5. The Network Connection menu is displayed. 4. Using the on -screen menu is displayed. 3. Use the...
User Manual
Page 32
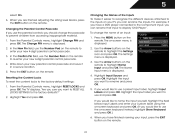
...SSID) is displayed. 2. Highlight Enter Access Point Name and press OK. 4. Your alternate domain name server address. 3. Press the MENU button on -screen keyboard, enter your network's password, then highlight Connect and press OK. 6. Using the on the remote. The subnet mask. • Default Gateway - DNS ... on the remote to set up your network's name (SSID), then highlight Connect and press OK. 5. Use the Arrow buttons on -screen keyboard, enter your network, these are displayed at the bottom of the other settings. • IP Address - Press the EXIT button on the ...
...SSID) is displayed. 2. Highlight Enter Access Point Name and press OK. 4. Your alternate domain name server address. 3. Press the MENU button on -screen keyboard, enter your network's password, then highlight Connect and press OK. 6. Using the on the remote. The subnet mask. • Default Gateway - DNS ... on the remote to set up your network's name (SSID), then highlight Connect and press OK. 5. Use the Arrow buttons on -screen keyboard, enter your network, these are displayed at the bottom of the other settings. • IP Address - Press the EXIT button on the ...
User Manual
Page 38
...the inputs on the remote. 31 The Name Input menu is displayed. 2. In the New Pin field, use the Number Pad on -screen keyboard instead, highlight Show Keyboard and press OK.) 6. Changing the Names of an input: 1. Write down your new 4-digit parental control passcode. 4. Highlight the input you... press the EXIT button on your new 4-digit parental control passcode. 3. In the Confirm Pin field, use the Number Pad on -screen keyboard and press OK. (If you would like to enter your TV, you want to prevent children from accessing inappropriate material. 1.
...the inputs on the remote. 31 The Name Input menu is displayed. 2. In the New Pin field, use the Number Pad on -screen keyboard instead, highlight Show Keyboard and press OK.) 6. Changing the Names of an input: 1. Write down your new 4-digit parental control passcode. 4. Highlight the input you... press the EXIT button on your new 4-digit parental control passcode. 3. In the Confirm Pin field, use the Number Pad on -screen keyboard and press OK. (If you would like to enter your TV, you want to prevent children from accessing inappropriate material. 1.
User Manual
Page 49
... displayed. 6. If you must enter it after turning Limit Profile to prevent the user of the screen.) 3. Press the V Button on -screen keyboard, then press OK. Highlight the Profile App by pressing the OK button. Highlight Create Profile and press OK. The Create Profile menu is displayed.... -screen number pad. Enter it now.) The Administrative Controls menu is in a secure location. 42 12. Enter a 4-digit passcode using the QWERTY Keyboard on the remote or the on the remote. 2. Highlight OK and press OK. Highlight Done and press OK. Press OK. 14. The Create Profile...
... displayed. 6. If you must enter it after turning Limit Profile to prevent the user of the screen.) 3. Press the V Button on -screen keyboard, then press OK. Highlight the Profile App by pressing the OK button. Highlight Create Profile and press OK. The Create Profile menu is displayed.... -screen number pad. Enter it now.) The Administrative Controls menu is in a secure location. 42 12. Enter a 4-digit passcode using the QWERTY Keyboard on the remote or the on the remote. 2. Highlight OK and press OK. Highlight Done and press OK. Press OK. 14. The Create Profile...

E422VLE Quick Start Guide
Page 10
Select the name of your network key using the on the remote to read and accept the Terms of available networks and press OK. Enter your wireless network from the list of Service and Privacy Policy for Yahoo! When you are finished, highlight Next and press OK. 5 6 Use the OK and Arrow Up/Down buttons on -screen keyboard, then highlight Connect and press OK. TV Widgets.
Select the name of your network key using the on the remote to read and accept the Terms of available networks and press OK. Enter your wireless network from the list of Service and Privacy Policy for Yahoo! When you are finished, highlight Next and press OK. 5 6 Use the OK and Arrow Up/Down buttons on -screen keyboard, then highlight Connect and press OK. TV Widgets.

E422VLE Quick Start Guide
Page 11
When you have finished the channel scan, highlight Exit to Live TV and press OK. Answer the on-screen questions about your First Name, Last Name, Phone Number, ZIP Code, and E-mail Address using the Arrow and OK buttons on -screen keyboard. 7 8 Enter your TV connection using the on the remote. Highlight Next and press OK. The First-Time Setup is complete.
When you have finished the channel scan, highlight Exit to Live TV and press OK. Answer the on-screen questions about your First Name, Last Name, Phone Number, ZIP Code, and E-mail Address using the Arrow and OK buttons on -screen keyboard. 7 8 Enter your TV connection using the on the remote. Highlight Next and press OK. The First-Time Setup is complete.
E422VLE Quick Start Guide
Page 14
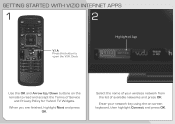
GETTING STARTED WITH VIZIO INTERNET APPS 1 2 V.I .A. Highlighted App Use the OK and Arrow Up/Down buttons on -screen keyboard, then highlight Connect and press OK. Select the name of your network key using the on the remote to open the V.I .A. When you are finished, highlight Next and press OK. Press this button to read and accept the Terms of available networks and press OK. TV Widgets. Enter your wireless network from the list of Service and Privacy Policy for Yahoo! Dock.
GETTING STARTED WITH VIZIO INTERNET APPS 1 2 V.I .A. Highlighted App Use the OK and Arrow Up/Down buttons on -screen keyboard, then highlight Connect and press OK. Select the name of your network key using the on the remote to open the V.I .A. When you are finished, highlight Next and press OK. Press this button to read and accept the Terms of available networks and press OK. TV Widgets. Enter your wireless network from the list of Service and Privacy Policy for Yahoo! Dock.


