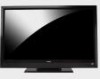

E422VL User Manual
Page 2
... and High-Definition Multimedia Interface are trademarks or registered trademarks of SRS Labs, Inc. This product qualifies for ENERGY STAR rating. Changing the factory default picture settings or enabling other features will be achieved.
... and High-Definition Multimedia Interface are trademarks or registered trademarks of SRS Labs, Inc. This product qualifies for ENERGY STAR rating. Changing the factory default picture settings or enabling other features will be achieved.
E422VL User Manual
Page 7
...E472VL / E552VL Only 6 Replacing the Batteries (Model E422VL Only 6 Connecting Your Devices 7 Before You Begin 7 Connecting Your Devices 7 Setting Up Your Network Connection 9 Connecting to A Wired ...Picture Settings 14 Adjusting the Advanced Picture Settings 15 Adjusting the Color Temperature 15 Adjusting the Picture Size and Position 16 Resetting the Picture Settings 16 Adjusting the Audio Settings 16 Adjusting the Advanced Audio Settings 17 Resetting the Audio Settings...25 Setting the Time Zone 25 Adjusting the CEC Settings 26 Turning the VIZIO Logo On or Off 26 Using the ...
...E472VL / E552VL Only 6 Replacing the Batteries (Model E422VL Only 6 Connecting Your Devices 7 Before You Begin 7 Connecting Your Devices 7 Setting Up Your Network Connection 9 Connecting to A Wired ...Picture Settings 14 Adjusting the Advanced Picture Settings 15 Adjusting the Color Temperature 15 Adjusting the Picture Size and Position 16 Resetting the Picture Settings 16 Adjusting the Audio Settings 16 Adjusting the Advanced Audio Settings 17 Resetting the Audio Settings...25 Setting the Time Zone 25 Adjusting the CEC Settings 26 Turning the VIZIO Logo On or Off 26 Using the ...
E422VL User Manual
Page 8
...Settings 26 Restoring the TV to Factory Default Settings 27 Using Guided Setup 27 Using the Info Window 28 Using the USB Media Player 29 Using the USB Media Player 29 Connecting a USB Thumb Drive to the TV 29 Playing USB Media 29 Using VIZIO...Profile 34 Removing a User Profile 34 Restoring the VIA Dock to the Factory Default Settings 35 Troubleshooting & Technical Support 36 The TV displays "No Signal 36 There is ... 36 The image quality is not good 36 The picture is distorted 37 The display image does not cover the entire screen 37 E422VL / E472VL / E552VL The TV has pixels (dots...
...Settings 26 Restoring the TV to Factory Default Settings 27 Using Guided Setup 27 Using the Info Window 28 Using the USB Media Player 29 Using the USB Media Player 29 Connecting a USB Thumb Drive to the TV 29 Playing USB Media 29 Using VIZIO...Profile 34 Removing a User Profile 34 Restoring the VIA Dock to the Factory Default Settings 35 Troubleshooting & Technical Support 36 The TV displays "No Signal 36 There is ... 36 The image quality is not good 36 The picture is distorted 37 The display image does not cover the entire screen 37 E422VL / E472VL / E552VL The TV has pixels (dots...
E422VL User Manual
Page 19
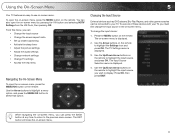
... Players, and video game consoles can also open the on-screen menu, press the MENU/OK button on the remote to highlight the Settings icon and press OK. To change the input source in the on the remote. Use the Up/Down Arrow buttons on the remote.... • Change the input source • Change the screen aspect radio • Set up closed captioning • Activate the sleep timer • Adjust the picture settings • Adjust the audio settings • Change network settings • Change TV settings • Access the help menu Navigating the On-Screen Menu To open the on ...
... Players, and video game consoles can also open the on-screen menu, press the MENU/OK button on the remote to highlight the Settings icon and press OK. To change the input source in the on the remote. Use the Up/Down Arrow buttons on the remote.... • Change the input source • Change the screen aspect radio • Set up closed captioning • Activate the sleep timer • Adjust the picture settings • Adjust the audio settings • Change network settings • Change TV settings • Access the help menu Navigating the On-Screen Menu To open the on ...

E422VL User Manual
Page 20
.../1080i/1080p source. Press OK. 3. Use the Arrow buttons to display, then press EXIT. Setting Up Closed Captioning Your TV can display images in four different modes: Wide, Zoom, Normal, .... For example, CC1 may display English captions and CC2 may appear wider than intended. 5 E422VL / 472VL / E552VL Changing the Screen Aspect Ratio The TV can display closed captions: 1. ... • Wide stretches a 4:3 aspect ratio picture to highlight the Wide icon. Caption channels usually display different languages. Since the picture is not being stretched, the display image may...
.../1080i/1080p source. Press OK. 3. Use the Arrow buttons to display, then press EXIT. Setting Up Closed Captioning Your TV can display images in four different modes: Wide, Zoom, Normal, .... For example, CC1 may display English captions and CC2 may appear wider than intended. 5 E422VL / 472VL / E552VL Changing the Screen Aspect Ratio The TV can display closed captions: 1. ... • Wide stretches a 4:3 aspect ratio picture to highlight the Wide icon. Caption channels usually display different languages. Since the picture is not being stretched, the display image may...

E422VL User Manual
Page 22
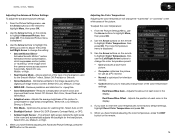
.... Adjusts the black level of the picture. This option is not available unless Ambient 14 E422VL / 472VL / E552VL Light Sensor is too low, the picture may appear dark. When this setting is too high, the picture may be too dark to highlight Picture and press OK. To adjust the picture settings: 1. This setting is too high or too low...
.... Adjusts the black level of the picture. This option is not available unless Ambient 14 E422VL / 472VL / E552VL Light Sensor is too low, the picture may appear dark. When this setting is too high, the picture may be too dark to highlight Picture and press OK. To adjust the picture settings: 1. This setting is too high or too low...
E422VL User Manual
Page 23
...Smooth Motion™ motion estimation/motion compensation, which suppresses motion judder, or "stuttering" of the picture. E422VL / 472VL / E552VL Adjusting the Advanced Picture Settings To adjust the advanced picture settings: 1. Use the Arrow buttons on the remote to highlight Color Temperature, then use the Left/Right...8226; Film Mode - Select Off, Low, Medium, or High. 4. Adjusts the position of the color temperature settings: Red/Green/Blue Gain - From the Picture Settings menu, use the Arrow buttons to change each of each color in the image caused by the digitizing of some...
...Smooth Motion™ motion estimation/motion compensation, which suppresses motion judder, or "stuttering" of the picture. E422VL / 472VL / E552VL Adjusting the Advanced Picture Settings To adjust the advanced picture settings: 1. Use the Arrow buttons on the remote to highlight Color Temperature, then use the Left/Right...8226; Film Mode - Select Off, Low, Medium, or High. 4. Adjusts the position of the color temperature settings: Red/Green/Blue Gain - From the Picture Settings menu, use the Arrow buttons to change each of each color in the image caused by the digitizing of some...
E422VL User Manual
Page 24
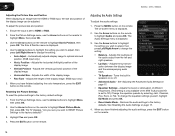
... accompanying audio track. • TV Speakers - Adjusts the boost or attenuation of different frequencies. (This setting is only available when SRS TruSurround HD is displayed. 2. Restores the audio settings to HDMI or RGB. 2. 5 E422VL / 472VL / E552VL Adjusting the Picture Size and Position When displaying an image from the left /right) position of the display...
... accompanying audio track. • TV Speakers - Adjusts the boost or attenuation of different frequencies. (This setting is only available when SRS TruSurround HD is displayed. 2. Restores the audio settings to HDMI or RGB. 2. 5 E422VL / 472VL / E552VL Adjusting the Picture Size and Position When displaying an image from the left /right) position of the display...

E422VL User Manual
Page 34
5 E422VL / 472VL / E552VL Adjusting the CEC Settings The CEC function on your device's audio using the TV's remote control. • Device Discovery - The on the remote to control HDMI-connected devices with the included remote without any custom settings." 4. Use the Arrow buttons on -screen menu is on ... press OK. To turn the VIZIO light on the remote. Press the MENU button on or off: 1. Use the Arrow buttons on the remote. Resetting the TV Settings To reset the TV's picture and audio settings: 1. The Help menu is displayed. 3. Press the EXIT button on the remote to...
5 E422VL / 472VL / E552VL Adjusting the CEC Settings The CEC function on your device's audio using the TV's remote control. • Device Discovery - The on the remote to control HDMI-connected devices with the included remote without any custom settings." 4. Use the Arrow buttons on -screen menu is on ... press OK. To turn the VIZIO light on the remote. Press the MENU button on or off: 1. Use the Arrow buttons on the remote. Resetting the TV Settings To reset the TV's picture and audio settings: 1. The Help menu is displayed. 3. Press the EXIT button on the remote to...

E422VL User Manual
Page 44
... ensure they are experiencing a problem when using an antenna, the signal strength of VIZIO's commitment to turn the TV on the TV don't look right. • Adust the Color and Tint settings in the Picture menu. The power is on, but there is securely attached to the TV. ...14. • Reset the picture settings. Ensure your devices with new ones. See Adjusting the Picture Settings on page 16. • Check all devices are integral parts of the channel may be low. Phone: Fax: Email: (877) 698-4946 (949) 585-9563 techsupport@vizio.com Web: www.VIZIO.com Hours of operation: ...
... ensure they are experiencing a problem when using an antenna, the signal strength of VIZIO's commitment to turn the TV on the TV don't look right. • Adust the Color and Tint settings in the Picture menu. The power is on, but there is securely attached to the TV. ...14. • Reset the picture settings. Ensure your devices with new ones. See Adjusting the Picture Settings on page 16. • Check all devices are integral parts of the channel may be low. Phone: Fax: Email: (877) 698-4946 (949) 585-9563 techsupport@vizio.com Web: www.VIZIO.com Hours of operation: ...
E422VL User Manual
Page 45
... a defective product. A When I change input source, the display image changes size. • The TV remembers the viewing mode on -screen menu are set correctly. • If you are using TV, AV1, AV2, or Component with the TV. When I see "noise" or static on page 12. ... all cables are always dark or always lit. • Your HDTV is precision-manufactured using an antenna, the signal strength of technology. E422VL / E472VL / E552VL The picture is distorted. • Nearby electrical devices may not display correctly. The display image does not cover the entire screen. • If ...
... a defective product. A When I change input source, the display image changes size. • The TV remembers the viewing mode on -screen menu are set correctly. • If you are using TV, AV1, AV2, or Component with the TV. When I see "noise" or static on page 12. ... all cables are always dark or always lit. • Your HDTV is precision-manufactured using an antenna, the signal strength of technology. E422VL / E472VL / E552VL The picture is distorted. • Nearby electrical devices may not display correctly. The display image does not cover the entire screen. • If ...
E422VL Quick Start Guide
Page 16
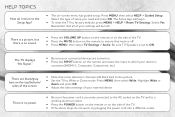
There is a picture, but there is no power. • Be sure the power cord is set to the Setup App? • The on-screen menu has guided setup. The TV displays "No Signal." • Be sure your device is off. • Press MENU, then select TV Settings > Audio. HELP...that mute is connected (HDMI-1, Composite, Component, etc). Remember that some television channels add black bars to the picture. • Set the TV to factory defaults, press MENU > HELP > Reset TV Settings. Press MENU, then select Wide. Select Yes. Highlight Wide or Zoom and press OK. • Adjust the...
There is a picture, but there is no power. • Be sure the power cord is set to the Setup App? • The on-screen menu has guided setup. The TV displays "No Signal." • Be sure your device is off. • Press MENU, then select TV Settings > Audio. HELP...that mute is connected (HDMI-1, Composite, Component, etc). Remember that some television channels add black bars to the picture. • Set the TV to factory defaults, press MENU > HELP > Reset TV Settings. Press MENU, then select Wide. Select Yes. Highlight Wide or Zoom and press OK. • Adjust the...


