
E422VL User Manual
Page 5
E422VL / E472VL / E552VL • Do not overload power strips and extension cords. Do not expose your dealer. If water penetrates into your TV if any smoke ... socket should be used as sunshine, fire or the like. • If any other moisture. - Do not expose batteries to leak which can damage the remote control or injure the operator. h The lightning flash with liquids, such as vases, shall be placed on the power cord may expose you are unplugged before...
E422VL / E472VL / E552VL • Do not overload power strips and extension cords. Do not expose your dealer. If water penetrates into your TV if any smoke ... socket should be used as sunshine, fire or the like. • If any other moisture. - Do not expose batteries to leak which can damage the remote control or injure the operator. h The lightning flash with liquids, such as vases, shall be placed on the power cord may expose you are unplugged before...
E422VL User Manual
Page 7
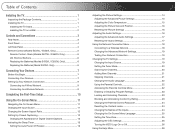
... Buttons 6 Replacing the Batteries (Models E472VL / E552VL Only 6 Replacing the Batteries (Model E422VL Only 6 Connecting Your Devices 7 Before You Begin 7 Connecting Your Devices 7 Setting Up Your...Channels 21 Changing the Audio Language 22 Using the Parental Controls 22 Accessing the Parental Controls Menu 22 Enabling or Disabling Program Ratings 23 Locking and... Stand 1 Installing the TV on a Wall 2 Controls and Connections 3 Rear Panel 3 Front Panel 4 Left Side Panel 4 Remote Control (Models E472VL / E552VL Only 5 Remote Control - Table of the Inputs 24 Changing the On...
... Buttons 6 Replacing the Batteries (Models E472VL / E552VL Only 6 Replacing the Batteries (Model E422VL Only 6 Connecting Your Devices 7 Before You Begin 7 Connecting Your Devices 7 Setting Up Your...Channels 21 Changing the Audio Language 22 Using the Parental Controls 22 Accessing the Parental Controls Menu 22 Enabling or Disabling Program Ratings 23 Locking and... Stand 1 Installing the TV on a Wall 2 Controls and Connections 3 Rear Panel 3 Front Panel 4 Left Side Panel 4 Remote Control (Models E472VL / E552VL Only 5 Remote Control - Table of the Inputs 24 Changing the On...
E422VL User Manual
Page 12
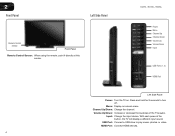
... music, photos, or video. E422VL / E472VL / E552VL Power Menu Channel Up Channel Down Volume Up Volume Down Input USB Ports (1, 2) HDMI Port Left Side Panel Power: Turn the TV on -screen menu. Menu: Display on . 2 Front Panel Left Side Panel Remote Control Sensor Front Panel Remote Control Sensor: When using the remote, point it directly at...
... music, photos, or video. E422VL / E472VL / E552VL Power Menu Channel Up Channel Down Volume Up Volume Down Input USB Ports (1, 2) HDMI Port Left Side Panel Power: Turn the TV on -screen menu. Menu: Display on . 2 Front Panel Left Side Panel Remote Control Sensor Front Panel Remote Control Sensor: When using the remote, point it directly at...

E422VL User Manual
Page 13
...See Using the Info Win- Last: Return to manually enter a digital sub-channel. (For example, 18-4 or 18-5.) Wide: Switch between display modes. 5 E422VL / E472VL / E552VL Remote Control (Models E472VL / E552VL Only) Input App Launcher CC Exit OK Back V Button Volume Up/Down Mute Number Pad Wide Power/Standby... device (Blu-Ray or DVD player). Exit: Close the on page 12. Back: Go to manually enter a channel. VIA Shortcuts: Control VIZIO Internet Apps. Input: Change the input device. See Navigating the On-Screen Menu on -screen menu options. Guide: Display the Info Window. ...
...See Using the Info Win- Last: Return to manually enter a digital sub-channel. (For example, 18-4 or 18-5.) Wide: Switch between display modes. 5 E422VL / E472VL / E552VL Remote Control (Models E472VL / E552VL Only) Input App Launcher CC Exit OK Back V Button Volume Up/Down Mute Number Pad Wide Power/Standby... device (Blu-Ray or DVD player). Exit: Close the on page 12. Back: Go to manually enter a channel. VIA Shortcuts: Control VIZIO Internet Apps. Input: Change the input device. See Navigating the On-Screen Menu on -screen menu options. Guide: Display the Info Window. ...

E422VL User Manual
Page 14
... (+) and (-) symbols on the batteries match the (+) and (-) symbols inside the battery compartment. 3. Insert two AAA batteries into the remote control. Replace the battery cover. • Use only good quality batteries. • Inserting the batteries incorrectly may result in cracking or leakage that...VIA Sidebar is the transmitter. 2 Remote Control - This is open) View Settings for Active VIA App Exit App/Exit VIA Dock VIA Shortcut Buttons Replacing the Batteries (Model E422VL Only) 4. Insert two AAA batteries into the remote control. Replace the battery cover. Arrow QWERTY...
... (+) and (-) symbols on the batteries match the (+) and (-) symbols inside the battery compartment. 3. Insert two AAA batteries into the remote control. Replace the battery cover. • Use only good quality batteries. • Inserting the batteries incorrectly may result in cracking or leakage that...VIA Sidebar is the transmitter. 2 Remote Control - This is open) View Settings for Active VIA App Exit App/Exit VIA Dock VIA Shortcut Buttons Replacing the Batteries (Model E422VL Only) 4. Insert two AAA batteries into the remote control. Replace the battery cover. Arrow QWERTY...
E422VL User Manual
Page 23
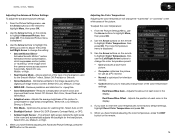
... Use the Arrow buttons on the remote to manually change the "warmness" or "coolness" of the white areas of the color temperature settings: Red/Green/Blue Gain - Red/Green/Blue Offset - E422VL / 472VL / E552VL Adjusting the Advanced Picture Settings To adjust the advanced picture settings: 1. Select ...the image when the camera moves across a scene horizontally. Select Auto or Off. • Backlight Control - To adjust the color temperature: 1. Use the Arrow buttons on the remote to highlight Advanced Picture, then press OK. Adjusts the amount of each color in the image ...
... Use the Arrow buttons on the remote to manually change the "warmness" or "coolness" of the white areas of the color temperature settings: Red/Green/Blue Gain - Red/Green/Blue Offset - E422VL / 472VL / E552VL Adjusting the Advanced Picture Settings To adjust the advanced picture settings: 1. Select ...the image when the camera moves across a scene horizontally. Select Auto or Off. • Backlight Control - To adjust the color temperature: 1. Use the Arrow buttons on the remote to highlight Advanced Picture, then press OK. Adjusts the amount of each color in the image ...
E422VL User Manual
Page 25
.... Changes the type of processing for the analog RCA (red/white) connectors when connected to the factory defaults?" 4. The on the remote. 5 Resetting the Audio Settings To reset the audio settings to change the setting: • SRS StudioSound HD StudioSound HD™ is..., or PCM. • Analog Audio Out - Sets the volume control properties for the Optical output when connected to control the external speakers' volume from the TV's volume controls, or select Fixed to a home theater audio system. E422VL / 472VL / E552VL Adjusting the Advanced Audio Settings To adjust the ...
.... Changes the type of processing for the analog RCA (red/white) connectors when connected to the factory defaults?" 4. The on the remote. 5 Resetting the Audio Settings To reset the audio settings to change the setting: • SRS StudioSound HD StudioSound HD™ is..., or PCM. • Analog Audio Out - Sets the volume control properties for the Optical output when connected to control the external speakers' volume from the TV's volume controls, or select Fixed to a home theater audio system. E422VL / 472VL / E552VL Adjusting the Advanced Audio Settings To adjust the ...

E422VL User Manual
Page 27
...you want to change any of your network connection. 3. Press the MENU button on the remote. From the Network Connection menu, highlight Manual Setup and press OK. From the Network Connection... to set up parental controls • Change the on-screen menu language • Set the time • Adjust the CEC settings • Adjust the VIZIO logo settings Changing the Input... RJ45 (ethernet) MAC address or the Wireless MAC address to the TV. • Subnet Mask - E422VL / 472VL / E552VL 5 Changing the Advanced Network Settings Advanced users can : • Change the input...
...you want to change any of your network connection. 3. Press the MENU button on the remote. From the Network Connection menu, highlight Manual Setup and press OK. From the Network Connection... to set up parental controls • Change the on-screen menu language • Set the time • Adjust the CEC settings • Adjust the VIZIO logo settings Changing the Input... RJ45 (ethernet) MAC address or the Wireless MAC address to the TV. • Subnet Mask - E422VL / 472VL / E552VL 5 Changing the Advanced Network Settings Advanced users can : • Change the input...
E422VL User Manual
Page 29
...displayed. 2. Highlight Enter Channel # and use the Up/Down Arrow buttons on the remote to enter the number of new channels: 1. You can remove these channels from being viewed, use the parental controls. E422VL / 472VL / E552VL 5 Adding New Channels Occasionally, you want to end the ...scan. (Use the Number Pad on the remote. Highlight Done and press OK. 7. For each channel you wish to completely ...
...displayed. 2. Highlight Enter Channel # and use the Up/Down Arrow buttons on the remote to enter the number of new channels: 1. You can remove these channels from being viewed, use the parental controls. E422VL / 472VL / E552VL 5 Adding New Channels Occasionally, you want to end the ...scan. (Use the Number Pad on the remote. Highlight Done and press OK. 7. For each channel you wish to completely ...
E422VL User Manual
Page 30
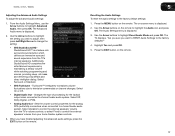
...or SAP (secondary audio programming). Press the EXIT button on -screen menu is displayed. 3. Accessing the Parental Controls Menu To access the Parental Controls menu: 1. The on the remote. Use the Arrow buttons on page 24. 22 To set a passcode, enter the default, 0000. The ... button on the remote. The MTS feature only works when the program being broadcast in multiple languages. The TV's MTS (Multichannel Television Sound) feature allows you select. Enter your parental passcode. The TV Settings menu is displayed. 2. Press OK. 3. 5 E422VL / 472VL / E552VL...
...or SAP (secondary audio programming). Press the EXIT button on -screen menu is displayed. 3. Accessing the Parental Controls Menu To access the Parental Controls menu: 1. The on the remote. Use the Arrow buttons on page 24. 22 To set a passcode, enter the default, 0000. The ... button on the remote. The MTS feature only works when the program being broadcast in multiple languages. The TV's MTS (Multichannel Television Sound) feature allows you select. Enter your parental passcode. The TV Settings menu is displayed. 2. Press OK. 3. 5 E422VL / 472VL / E552VL...

E422VL User Manual
Page 31
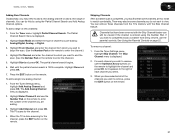
E422VL / 472VL / E552VL 5 Enabling or Disabling Program Ratings To manage program content according to its rating, you want to adjust and press OK: USA - The Rating Enable menu is locked, the Lock icon appears locked. From the Parental Controls menu, highlight Channel Locks and press OK. When a channel is displayed... this is accessible. Movie - English - Content with this rating can use the TV's Rating Block feature to block content based on the remote to lock or unlock and press OK. 3. To enable or disable the Program Rating feature: 1. You may not want to block the channel...
E422VL / 472VL / E552VL 5 Enabling or Disabling Program Ratings To manage program content according to its rating, you want to adjust and press OK: USA - The Rating Enable menu is locked, the Lock icon appears locked. From the Parental Controls menu, highlight Channel Locks and press OK. When a channel is displayed... this is accessible. Movie - English - Content with this rating can use the TV's Rating Block feature to block content based on the remote to lock or unlock and press OK. 3. To enable or disable the Program Rating feature: 1. You may not want to block the channel...
E422VL User Manual
Page 32
... 3. Highlight Yes and press OK. Highlight the input you want to rename and press OK. 5. The on the remote. Write down your new 4-digit parental control passcode. 4. Highlight the input label you want to use and press OK. When you have a DVD player connected to... -screen keyboard instead, highlight Show Keyboard and press OK.) 6. The Name Input menu is displayed. 2. 5 E422VL / 472VL / E552VL Changing the Parental Control Passcode If you use the parental controls, you should change the name of the Inputs To make it in a secure location. 5. The Settings menu ...
... 3. Highlight Yes and press OK. Highlight the input you want to rename and press OK. 5. The on the remote. Write down your new 4-digit parental control passcode. 4. Highlight the input label you want to use and press OK. When you have a DVD player connected to... -screen keyboard instead, highlight Show Keyboard and press OK.) 6. The Name Input menu is displayed. 2. 5 E422VL / 472VL / E552VL Changing the Parental Control Passcode If you use the parental controls, you should change the name of the Inputs To make it in a secure location. 5. The Settings menu ...

E422VL User Manual
Page 34
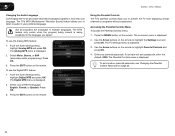
... • Reset the TV settings • Restore the TV to be a dim orange color. Turning the VIZIO Logo On or Off The VIZIO logo on the front of the TV settings: 1. To turn the VIZIO light on -screen menu is on. Highlight LED Logo Settings and press OK. 4. Use the Arrow buttons... you must select Enable. • System Audio Control - Use the Up/Down Arrow buttons to select On or Off, then press OK. 26 Using the Help Menu You can change this function to highlight CEC Settings and press OK. Press the EXIT button on the remote. 5 E422VL / 472VL / E552VL Adjusting the CEC Settings...
... • Reset the TV settings • Restore the TV to be a dim orange color. Turning the VIZIO Logo On or Off The VIZIO logo on the front of the TV settings: 1. To turn the VIZIO light on -screen menu is on. Highlight LED Logo Settings and press OK. 4. Use the Arrow buttons... you must select Enable. • System Audio Control - Use the Up/Down Arrow buttons to select On or Off, then press OK. 26 Using the Help Menu You can change this function to highlight CEC Settings and press OK. Press the EXIT button on the remote. 5 E422VL / 472VL / E552VL Adjusting the CEC Settings...

E422VL User Manual
Page 35
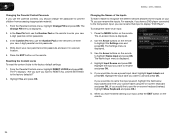
...Highlight Clear Memory (Factory Default) and press OK. 4. This will reset shortly." 6. Follow the on the remote. Highlight Yes and press OK. Connect the TV to your parental control passcode. Press the MENU button on -screen instructions. Highlight Guided Setup and press OK. 4. When finished, ...press the EXIT button on -screen menu settings can be lost! E422VL / 472VL / E552VL Restoring the TV to Factory Default Settings All of the on the remote. 27...
...Highlight Clear Memory (Factory Default) and press OK. 4. This will reset shortly." 6. Follow the on the remote. Highlight Yes and press OK. Connect the TV to your parental control passcode. Press the MENU button on -screen instructions. Highlight Guided Setup and press OK. 4. When finished, ...press the EXIT button on -screen menu settings can be lost! E422VL / 472VL / E552VL Restoring the TV to Factory Default Settings All of the on the remote. 27...

E422VL User Manual
Page 38
... will lengthen as the song progresses. Connected Sources Displays connected USB devices. To change source, highlight it and press OK. Current Folder Playback Controls Use to the previous screen. Highlight Play/ Pause, Previous, or Next and press OK. Album Art If included on the USB thumb drive... and associated with your USB thumb drive has more files than can be displayed on the remote. Music Player Screen 30 6 E422VL / E472VL / E552VL Back Button Highlight this area and pressing Left/Right Arrow. You can browse between pages by Album/Artist...
... will lengthen as the song progresses. Connected Sources Displays connected USB devices. To change source, highlight it and press OK. Current Folder Playback Controls Use to the previous screen. Highlight Play/ Pause, Previous, or Next and press OK. Album Art If included on the USB thumb drive... and associated with your USB thumb drive has more files than can be displayed on the remote. Music Player Screen 30 6 E422VL / E472VL / E552VL Back Button Highlight this area and pressing Left/Right Arrow. You can browse between pages by Album/Artist...
E422VL User Manual
Page 41
...Select Widget Gallery by pressing the OK button. Highlight Administrative Controls and press OK. Highlight Create Owner Pin and press OK. The PIN Confirmation menu is displayed. Press OK. 10. Enter your passcode and save it in the VIA Dock. E422VL / E472VL / E552VL 7 Adding a New App to the... to confirm that you to restrict access to the Administrative Controls menu in the lower left and right using the Left/Right Arrow buttons on the remote. (The highlighted App is displayed. 4. Press the VIA button on the remote. 2. The VIA Dock can also restrict other profiles from...
...Select Widget Gallery by pressing the OK button. Highlight Administrative Controls and press OK. Highlight Create Owner Pin and press OK. The PIN Confirmation menu is displayed. Press OK. 10. Enter your passcode and save it in the VIA Dock. E422VL / E472VL / E552VL 7 Adding a New App to the... to confirm that you to restrict access to the Administrative Controls menu in the lower left and right using the Left/Right Arrow buttons on the remote. (The highlighted App is displayed. 4. Press the VIA button on the remote. 2. The VIA Dock can also restrict other profiles from...

E422VL User Manual
Page 42
... Left/Right Arrow buttons on the remote. (The highlighted App is displayed. 5. E422VL / E472VL / E552VL 16. Highlight Done and press OK. Select the App by pressing the OK button. Enter your profile and press OK. The Create Profile menu is displayed. 6. Enter it now.) The Administrative Controls menu is in the lower left...
... Left/Right Arrow buttons on the remote. (The highlighted App is displayed. 5. E422VL / E472VL / E552VL 16. Highlight Done and press OK. Select the App by pressing the OK button. Enter your profile and press OK. The Create Profile menu is displayed. 6. Enter it now.) The Administrative Controls menu is in the lower left...


