Download
Page 4
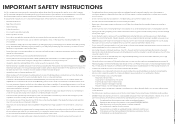
... the apparatus, the apparatus has been exposed to rain or moisture, does not operate normally or has been dropped. • Unplug the power cord before turning on your TV to a power outlet, power is always flowing into To avoid electric shock, avoid handling the power cord during electrical storms. • Unplug...
... the apparatus, the apparatus has been exposed to rain or moisture, does not operate normally or has been dropped. • Unplug the power cord before turning on your TV to a power outlet, power is always flowing into To avoid electric shock, avoid handling the power cord during electrical storms. • Unplug...

Download
Page 8
... Channels 45 Blocking and Unblocking Content by Rating 46 Changing the Parental Control Passcode 46 Resetting the Content Locks 46 Adjusting the CEC Settings 47 Turning the Power Indicator On or Off 47 Using the Reset & Admin Menu 48 Restoring the TV to Factory Default Settings 48 Using the Guided Setup... 50 Using the USB Media Player 50 Preparing Your USB Drive to the My Apps Tab 57 Deleting an App from the TV 50 Using VIZIO Internet Apps Plus® (V.I .A. Plus Apps Window 57 Adding an App to Play USB Media 50 Playing USB Media 50 Removing the USB Drive from...
... Channels 45 Blocking and Unblocking Content by Rating 46 Changing the Parental Control Passcode 46 Resetting the Content Locks 46 Adjusting the CEC Settings 47 Turning the Power Indicator On or Off 47 Using the Reset & Admin Menu 48 Restoring the TV to Factory Default Settings 48 Using the Guided Setup... 50 Using the USB Media Player 50 Preparing Your USB Drive to the My Apps Tab 57 Deleting an App from the TV 50 Using VIZIO Internet Apps Plus® (V.I .A. Plus Apps Window 57 Adding an App to Play USB Media 50 Playing USB Media 50 Removing the USB Drive from...
Download
Page 13
Press once to turn off the TV. 7 Side Panel Press and hold to turn on the TV. 2 Power/Input - Press once to access the Input menu.
Press once to turn off the TV. 7 Side Panel Press and hold to turn on the TV. 2 Power/Input - Press once to access the Input menu.
Download
Page 14
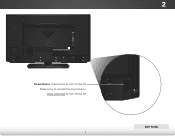
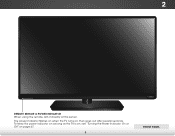
To keep the power indicator on as long as the TV is on, see "Turning the Power Indicator On or Off" on , then goes out after several seconds. The power indicator flashes on when the TV turns on page 47. 8 Front Panel 2 Front Panel REMOTE SENSOR & POWER INDICATOR When using the remote, aim it directly at this sensor.
To keep the power indicator on as long as the TV is on, see "Turning the Power Indicator On or Off" on , then goes out after several seconds. The power indicator flashes on when the TV turns on page 47. 8 Front Panel 2 Front Panel REMOTE SENSOR & POWER INDICATOR When using the remote, aim it directly at this sensor.

Download
Page 15
...Channel Up/Down Change the channel. Exit Close the on -screen menu. Hot Keys Perform functions within an on . Mute Turn the audio off . Number Pad Manually enter a channel. Menu Display the on or off or on -screen menu or ...app. Dash Use with number pad to the channel last viewed. Power Turn TV on -screen menu. Volume Up/Down Increase or decrease loudness of the audio. App launcher Quickly launch the pictured...display mode. Info Display the info window. Guide Display the info window. V Button Open the VIZIO Internet Apps Plus® dock.
...Channel Up/Down Change the channel. Exit Close the on -screen menu. Hot Keys Perform functions within an on . Mute Turn the audio off . Number Pad Manually enter a channel. Menu Display the on or off or on -screen menu or ...app. Dash Use with number pad to the channel last viewed. Power Turn TV on -screen menu. Volume Up/Down Increase or decrease loudness of the audio. App launcher Quickly launch the pictured...display mode. Info Display the info window. Guide Display the info window. V Button Open the VIZIO Internet Apps Plus® dock.

Download
Page 17
Turn the TV and your device on the TV (HDMI, Component, etc.). 2. Connect the appropriate cable (not included) to display output from most devices. 1. Connecting Your ... has a video port that matches an available port on . Set the TV's input to match the connection you used to the TV and the device. 4. Turn the TV and your device off. 3. BACK OF TV 11 3 Cable/Satellite Box DVD/Blu-ray Player Game Console HDMI CABLE BEST • DIGITAL •...
Turn the TV and your device on the TV (HDMI, Component, etc.). 2. Connect the appropriate cable (not included) to display output from most devices. 1. Connecting Your ... has a video port that matches an available port on . Set the TV's input to match the connection you used to the TV and the device. 4. Turn the TV and your device off. 3. BACK OF TV 11 3 Cable/Satellite Box DVD/Blu-ray Player Game Console HDMI CABLE BEST • DIGITAL •...

Download
Page 20
...appropriate cable (not included) to an audio device, such as a receiver or sound bar. 1. Turn the TV and your audio device off. 3. Connecting an Audio Device Your TV can output sound to the TV and the device. 4. Turn the TV and your device on the TV (HDMI or RCA). 2. Verify that your... device has an audio port that matches an available port on . 3 Home Audio Receiver VIZIO Sound Bar HDMI CABLE BEST • CEC 2-WAY COMMUNICATION • 2.0-5.1 ...
...appropriate cable (not included) to an audio device, such as a receiver or sound bar. 1. Turn the TV and your audio device off. 3. Connecting an Audio Device Your TV can output sound to the TV and the device. 4. Turn the TV and your device on the TV (HDMI or RCA). 2. Verify that your... device has an audio port that matches an available port on . 3 Home Audio Receiver VIZIO Sound Bar HDMI CABLE BEST • CEC 2-WAY COMMUNICATION • 2.0-5.1 ...
Download
Page 24
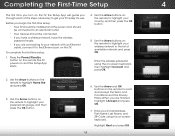
Completing the First-Time Setup The first time you turn on the TV, the Setup App will guide you through each of available networks and press OK. Press the Power/Standby button on and the ...
Completing the First-Time Setup The first time you turn on the TV, the Setup App will guide you through each of available networks and press OK. Press the Power/Standby button on and the ...
Download
Page 31
The Color Tuner, 11 Point White Balance, and test patterns allow you to adjust the HSB color and 11 point white balance, turn color channels off for testing, and display color bar, flat, and ramp test patterns. To adjust the professional picture settings: 1. Adjust the...remote to highlight the Hue, ExSitatura2tDion, Br3iDghtness, Offset, or Gain of picture settings. Use the Left/RAiBgCht Arrow buttons to change the setting: VIZIO Professional picture Color Tuner Rename Picture Mode Create Picture Mode Lock Picture Mode Delete Picture Mode • Color Tuner - The Color Tuner menu ...
The Color Tuner, 11 Point White Balance, and test patterns allow you to adjust the HSB color and 11 point white balance, turn color channels off for testing, and display color bar, flat, and ramp test patterns. To adjust the professional picture settings: 1. Adjust the...remote to highlight the Hue, ExSitatura2tDion, Br3iDghtness, Offset, or Gain of picture settings. Use the Left/RAiBgCht Arrow buttons to change the setting: VIZIO Professional picture Color Tuner Rename Picture Mode Create Picture Mode Lock Picture Mode Delete Picture Mode • Color Tuner - The Color Tuner menu ...
Download
Page 32
... Offset Gain Red 0 -1 -24 0 0 Green 0 5 0 0 0 Color Tuner Blue 0 -4 -22 0 0 Cyan 0 0 0 Magenta 25 -2 0 Yellow -14 0 0 2. Only two color channels can be turned off . 4. Press the OK button and use the Arrow buttons to highlight the Gain and Color values you are finished press the OK button to... save the setting. 3. When you wish to turn the color channel off and on: 1. Gain 5% 11 Point White Balance Red Green 0 0 Blue 0 2. Press the OK button to adjust....
... Offset Gain Red 0 -1 -24 0 0 Green 0 5 0 0 0 Color Tuner Blue 0 -4 -22 0 0 Cyan 0 0 0 Magenta 25 -2 0 Yellow -14 0 0 2. Only two color channels can be turned off . 4. Press the OK button and use the Arrow buttons to highlight the Gain and Color values you are finished press the OK button to... save the setting. 3. When you wish to turn the color channel off and on: 1. Gain 5% 11 Point White Balance Red Green 0 0 Blue 0 2. Press the OK button to adjust....
Download
Page 37
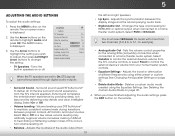
Use the Arrow buttons on page 32. VIZIO Audio TV Speakers Surround Sound Volume Leveling Balance - Surround sound uses DTS TruSurround™ to a home theater audio system. Volume leveling uses DTS TruVolume™...it difficult to highlight the setting you have finished adjusting the audio settings, press the EXIT button on or off . • Balance - If this occurs, turn volume leveling off . Ne•tworkDeSelettitnegsAudHeilop Mode - Deletes a custom audio mode created using either preset or custom settings. Adjusts the synchronization between program content, AV...
Use the Arrow buttons on page 32. VIZIO Audio TV Speakers Surround Sound Volume Leveling Balance - Surround sound uses DTS TruSurround™ to a home theater audio system. Volume leveling uses DTS TruVolume™...it difficult to highlight the setting you have finished adjusting the audio settings, press the EXIT button on or off . • Balance - If this occurs, turn volume leveling off . Ne•tworkDeSelettitnegsAudHeilop Mode - Deletes a custom audio mode created using either preset or custom settings. Adjusts the synchronization between program content, AV...
Download
Page 39
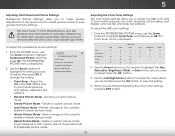
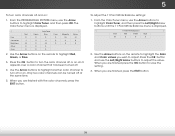
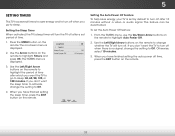
VIZIO Timers Sleep Timer Auto Power Off Off 10 minutes 3. Use the Left/Right Arrow buttons on the remote to highlight Auto Power Off. 2. Setting the Auto Power Off Feature To help save energy and to turn off ... have finished setting the sleep timer, press the EXIT button on -screen menu is set by default to turn the TV off after a set the Auto Power Off feature: 1. When you have finished setting the auto... power off time, press the EXIT button on the remote to change whether the TV will turn off after which you don't want the TV to go to sleep. From the Timers menu, ...
VIZIO Timers Sleep Timer Auto Power Off Off 10 minutes 3. Use the Left/Right Arrow buttons on the remote to highlight Auto Power Off. 2. Setting the Auto Power Off Feature To help save energy and to turn off ... have finished setting the sleep timer, press the EXIT button on -screen menu is set by default to turn the TV off after a set the Auto Power Off feature: 1. When you have finished setting the auto... power off time, press the EXIT button on the remote to change whether the TV will turn off after which you don't want the TV to go to sleep. From the Timers menu, ...

Download
Page 53
...the Up/Down Arrow buttons to adjust each setting: • CEC - Not all HDMI devices support CEC. The System menu is displayed. 4. To turn the Power Indicator Light on the remote to be on the remote. Highlight Power Indicator and press OK. To enable, disable, or adjust CEC settings...: 1. Use the Arrow buttons on or off: 1. Turning the Power Indicator On or Off The Power Indicator on the front of your device's audio using the TV's remote control. • Device Discovery - Use...
...the Up/Down Arrow buttons to adjust each setting: • CEC - Not all HDMI devices support CEC. The System menu is displayed. 4. To turn the Power Indicator Light on the remote to be on the remote. Highlight Power Indicator and press OK. To enable, disable, or adjust CEC settings...: 1. Use the Arrow buttons on or off: 1. Turning the Power Indicator On or Off The Power Indicator on the front of your device's audio using the TV's remote control. • Device Discovery - Use...
Download
Page 54
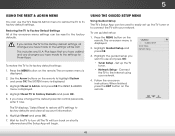
... on the remote. The on the remote to highlight System and press OK. Highlight the guided setup you have made to the settings will turn off. To restore the TV to its factory default settings. Use the Arrow buttons on -screen menu is displayed. 2. To use guided setup...: 1. Highlight Guided Setup and press OK. VIZIO Guided Setup Tuner Setup Network Setup 3. Follow the on -screen menu settings can be lost! 5 Using the Reset & Admin Menu You can use ...
... on the remote. The on the remote to highlight System and press OK. Highlight the guided setup you have made to the settings will turn off. To restore the TV to its factory default settings. Use the Arrow buttons on -screen menu is displayed. 2. To use guided setup...: 1. Highlight Guided Setup and press OK. VIZIO Guided Setup Tuner Setup Network Setup 3. Follow the on -screen menu settings can be lost! 5 Using the Reset & Admin Menu You can use ...
Download
Page 56
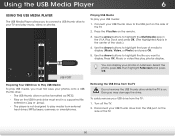
... connect a USB thumb drive to your TV and play your USB media: 1. Removing the USB Drive from external hard drives, MP3 players, cameras, or smartphones. Turn off the TV. 2. Press OK. Use the Arrow buttons to highlight the Multimedia app in the center of the TV. 50 Playing USB Media To...
... connect a USB thumb drive to your TV and play your USB media: 1. Removing the USB Drive from external hard drives, MP3 players, cameras, or smartphones. Turn off the TV. 2. Press OK. Use the Arrow buttons to highlight the Multimedia app in the center of the TV. 50 Playing USB Media To...

Download
Page 66
... are connected to select a different input source. • If you are securely attached. 60 The power is on, but there is not audible. • Turn off . • Check the audio settings. See Adjusting the Audio Settings on the screen. • Ensure all cables are securely attached to the TV. &#...scan for Channels on the remote control to the TV. • If you are connected correctly. See Adjusting the Picture Settings on the remote to turn the TV on page 31. • Ensure the speakers are set picture modes. See Adjusting the Picture Settings on page 23. • Press ...
... are connected to select a different input source. • If you are securely attached. 60 The power is on, but there is not audible. • Turn off . • Check the audio settings. See Adjusting the Audio Settings on the screen. • Ensure all cables are securely attached to the TV. &#...scan for Channels on the remote control to the TV. • If you are connected correctly. See Adjusting the Picture Settings on the remote to turn the TV on page 31. • Ensure the speakers are set picture modes. See Adjusting the Picture Settings on page 23. • Press ...

Download
Page 71
...on , the user is encouraged to try to correct the interference by one or more of media, shipping and handling upon request made to VIZIO at www.VIZIO.com. Operation is subject to the following conditions: THE SOFTWARE IS PROVIDED "AS IS", WITHOUT WARRANTY OF ANY KIND, EXPRESS OR IMPLIED, ...changes or modifications not expressly approved by the party responsible for compliance could void the user's authority to operate this device must be determined by turning the equipment off and on CD-ROM for a processing fee covering the cost of performing such distribution, such as the cost of the ...
...on , the user is encouraged to try to correct the interference by one or more of media, shipping and handling upon request made to VIZIO at www.VIZIO.com. Operation is subject to the following conditions: THE SOFTWARE IS PROVIDED "AS IS", WITHOUT WARRANTY OF ANY KIND, EXPRESS OR IMPLIED, ...changes or modifications not expressly approved by the party responsible for compliance could void the user's authority to operate this device must be determined by turning the equipment off and on CD-ROM for a processing fee covering the cost of performing such distribution, such as the cost of the ...
Download
Page 2
... the apparatus, the apparatus has been exposed to rain or moisture, does not operate normally or has been dropped. • Unplug the power cord before turning on the apparatus. • The mains plug or appliance coupler is damaged, liquid has been spilled or objects have an electrician install the correct outlet...
... the apparatus, the apparatus has been exposed to rain or moisture, does not operate normally or has been dropped. • Unplug the power cord before turning on the apparatus. • The mains plug or appliance coupler is damaged, liquid has been spilled or objects have an electrician install the correct outlet...

Download
Page 5
...Display the on -screen menu or app. V BUTTON Open the V.I.A. BACK Go to manually enter a digital sub-channel. (For example, 18-4 or 18-5.) POWER Turn TV on or off or ovn. DASH Use with number pad to the previous on or off. A/V CONTROLS Control USB media player. VOLUME UP/DOWN...of the audio. CHANNEL UP/DOWN Change the channel. LAST Return to the channel last viewed. GUIDE Display the info window. CLOSED CAPTIONS Turn closed captions on -screen menu. OK Select the highlighted menu option. Plus Dock. USING THE REMOTE INPUT Change the currently-displayed input.
...Display the on -screen menu or app. V BUTTON Open the V.I.A. BACK Go to manually enter a digital sub-channel. (For example, 18-4 or 18-5.) POWER Turn TV on or off or ovn. DASH Use with number pad to the previous on or off. A/V CONTROLS Control USB media player. VOLUME UP/DOWN...of the audio. CHANNEL UP/DOWN Change the channel. LAST Return to the channel last viewed. GUIDE Display the info window. CLOSED CAPTIONS Turn closed captions on -screen menu. OK Select the highlighted menu option. Plus Dock. USING THE REMOTE INPUT Change the currently-displayed input.
Download
Page 11
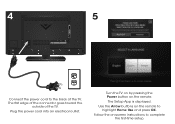
Plug the power cord into an electrical outlet. 4 5 Connect the power cord to the back of the TV. Use the Arrow buttons on -screen instructions to highlight Home Use and press OK. Follow the on the remote to complete the first-time setup. The Setup App is displayed. Turn the TV on by pressing the Power button on the remote. The flat edge of the connector goes toward the outside of the TV.
Plug the power cord into an electrical outlet. 4 5 Connect the power cord to the back of the TV. Use the Arrow buttons on -screen instructions to highlight Home Use and press OK. Follow the on the remote to complete the first-time setup. The Setup App is displayed. Turn the TV on by pressing the Power button on the remote. The flat edge of the connector goes toward the outside of the TV.


