
E500i-A1 User Manual
Page 3
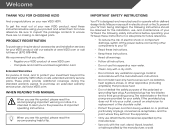
...sources such as radiators, heat registers, stoves, or other components to protect your investment beyond the standard warranty, VIZIO offers on your new VIZIO product, read the accompanying helpful tip. Install in electric shock or fire.To prevent your TV. If the...use attachments/accessories specified by the manufacturer, or sold These plans provide additional coverage during the standard warranty period. When Reading this Manual When you see this symbol, please read the accompanying important warning or notice. Misuse may result in accordance with the manufacturer's ...
...sources such as radiators, heat registers, stoves, or other components to protect your investment beyond the standard warranty, VIZIO offers on your new VIZIO product, read the accompanying helpful tip. Install in electric shock or fire.To prevent your TV. If the...use attachments/accessories specified by the manufacturer, or sold These plans provide additional coverage during the standard warranty period. When Reading this Manual When you see this symbol, please read the accompanying important warning or notice. Misuse may result in accordance with the manufacturer's ...

E500i-A1 User Manual
Page 19
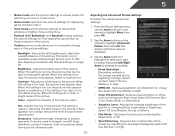
.... Channel Up/Down Change the channel. Dash Use with number pad to the previous on-screen menu. Number Pad Manually enter a channel. Closed Captions Open the closed caption menu. Back Go to manually enter a digital sub-channel. (For example, 18-4 or 18-5.) Remote Control 13 Exit Close the on -screen menu. Mute...
.... Channel Up/Down Change the channel. Dash Use with number pad to the previous on-screen menu. Number Pad Manually enter a channel. Closed Captions Open the closed caption menu. Back Go to manually enter a digital sub-channel. (For example, 18-4 or 18-5.) Remote Control 13 Exit Close the on -screen menu. Mute...

E500i-A1 User Manual
Page 27
... caption channel you wish to your preference. The on the remote to highlight Digital CC Style. 2. Choose Auto to keep default settings or Custom to manually change , then use the Arrow buttons to select Custom, then press OK. For example, CC1 may display English captions and CC2 may display Spanish captions...
... caption channel you wish to your preference. The on the remote to highlight Digital CC Style. 2. Choose Auto to keep default settings or Custom to manually change , then use the Arrow buttons to select Custom, then press OK. For example, CC1 may display English captions and CC2 may display Spanish captions...
E500i-A1 User Manual
Page 29
... color before adjusting tint. If flesh appears too orange, reduce the level of the picture. Use the Arrow buttons to highlight the setting you to manually change the setting: • Noise Reduction Diminishes artifacts in dark or bright areas of the picture. Contrast - When this setting is too high, the picture...
... color before adjusting tint. If flesh appears too orange, reduce the level of the picture. Use the Arrow buttons to highlight the setting you to manually change the setting: • Noise Reduction Diminishes artifacts in dark or bright areas of the picture. Contrast - When this setting is too high, the picture...
E500i-A1 User Manual
Page 30
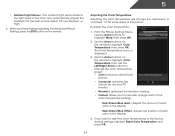
When you want to reset the color temperatures to manually change each of the picture. Use the Arrow buttons on the remote to highlight More, then press OK. 2. If you have finished adjusting the Advanced ...
When you want to reset the color temperatures to manually change each of the picture. Use the Arrow buttons on the remote to highlight More, then press OK. 2. If you have finished adjusting the Advanced ...
E500i-A1 User Manual
Page 35
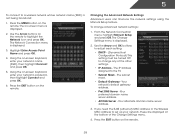
...'s name (SSID), then highlight Connect and press OK. 5. Changing the Advanced Network Settings Advanced users can fine-tune the network settings using the Manual Setup feature. The Change Settings menu is not being broadcast: 1. The subnet mask. • Default Gateway - Press the EXIT button on -...domain name server address. • Alt DNS Server - DNS Server - The Network Connection menu is displayed. 2. From the Network Connection menu, highlight Manual Setup and press OK. If you need the RJ45 (ethernet) MAC address or the Wireless MAC address to the TV. • Subnet Mask - Press...
...'s name (SSID), then highlight Connect and press OK. 5. Changing the Advanced Network Settings Advanced users can fine-tune the network settings using the Manual Setup feature. The Change Settings menu is not being broadcast: 1. The subnet mask. • Default Gateway - Press the EXIT button on -...domain name server address. • Alt DNS Server - DNS Server - The Network Connection menu is displayed. 2. From the Network Connection menu, highlight Manual Setup and press OK. If you need the RJ45 (ethernet) MAC address or the Wireless MAC address to the TV. • Subnet Mask - Press...

E500i-A1 User Manual
Page 43
...HDMI-connected devices with the included remote without any additional programming. Use the Arrow buttons on -screen menu is displayed. 2. Highlight your device's user manual for details. 1. Highlight Postal Code. The on the remote to highlight Time & Local Settings and press OK. Press the EXIT button on the ...Arrow buttons on -screen menu is set the TV's time zone: To have the TV display the correct time, you must be off , the VIZIO logo will be a dim orange color. The Time & Local Settings menu is displayed. 3. Enter your TV is displayed. 2. Use the Arrow buttons...
...HDMI-connected devices with the included remote without any additional programming. Use the Arrow buttons on -screen menu is displayed. 2. Highlight your device's user manual for details. 1. Highlight Postal Code. The on the remote to highlight Time & Local Settings and press OK. Press the EXIT button on the ...Arrow buttons on -screen menu is set the TV's time zone: To have the TV display the correct time, you must be off , the VIZIO logo will be a dim orange color. The Time & Local Settings menu is displayed. 3. Enter your TV is displayed. 2. Use the Arrow buttons...
E500i-A1 User Manual
Page 54
... are using cable TV, satellite, or antenna connected directly to turn the TV on page 22 • Reset the picture settings. Ensure your device's user manual for channels.
... are using cable TV, satellite, or antenna connected directly to turn the TV on page 22 • Reset the picture settings. Ensure your device's user manual for channels.

E420i-A1 Quick Start Guide
Page 4
PACKAGE CONTENTS VIZIO LED HDTV with Stand Remote Control with Batteries MODEL E500i-A1 VIZIO QUICK START GUIDE SMART TV + WIFI FULL HD LED TV FULL USER MANUAL AVAILABLE AT VIZIO.COM Power Cord This Quick Start Guide 6 x M4 14mm Phillips Screws HELP VIZIO REDUCE PAPER WASTE. DOWNLOAD THE FULL USER MANUAL AT VIZIO.COM/SUPPORT
PACKAGE CONTENTS VIZIO LED HDTV with Stand Remote Control with Batteries MODEL E500i-A1 VIZIO QUICK START GUIDE SMART TV + WIFI FULL HD LED TV FULL USER MANUAL AVAILABLE AT VIZIO.COM Power Cord This Quick Start Guide 6 x M4 14mm Phillips Screws HELP VIZIO REDUCE PAPER WASTE. DOWNLOAD THE FULL USER MANUAL AT VIZIO.COM/SUPPORT

E420i-A1 Quick Start Guide
Page 6
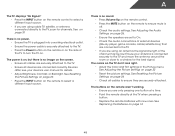
... app. MENU Display the on -screen menu. DASH Use with number pad to the previous on or off or on -screen menu. BACK Go to manually enter a digital sub-channel. (For example, 18-4 or 18-5.) LAST Return to the channel last viewed. EXIT Close the on -screen menu. A/V ...player. WIDE Switch the display mode. INFO Display the info window. GUIDE Display the info window. V BUTTON Open the VIA dock. NUMBER PAD Manually enter a channel. CLOSED CAPTIONS Open the closed caption menu. USING THE REMOTE INPUT Change the currently-displayed input. POWER Turn TV on -screen menu.
... app. MENU Display the on -screen menu. DASH Use with number pad to the previous on or off or on -screen menu. BACK Go to manually enter a digital sub-channel. (For example, 18-4 or 18-5.) LAST Return to the channel last viewed. EXIT Close the on -screen menu. A/V ...player. WIDE Switch the display mode. INFO Display the info window. GUIDE Display the info window. V BUTTON Open the VIA dock. NUMBER PAD Manually enter a channel. CLOSED CAPTIONS Open the closed caption menu. USING THE REMOTE INPUT Change the currently-displayed input. POWER Turn TV on -screen menu.

