

E500i-A1 User Manual
Page 2
... and SRS TruVolume are trademarks of SRS Labs, Inc. This product qualifies for ENERGY STAR rating. Changing the factory default picture settings or enabling other features will increase power consumption that could exceed the limits necessary to qualify for ENERGY STAR in the "factory default..." setting and this is the setting in which power savings will be achieved. Dolby and the double-D symbol are trademarks of Dolby Laboratories. HDMI, the HDMI ...
... and SRS TruVolume are trademarks of SRS Labs, Inc. This product qualifies for ENERGY STAR rating. Changing the factory default picture settings or enabling other features will increase power consumption that could exceed the limits necessary to qualify for ENERGY STAR in the "factory default..." setting and this is the setting in which power savings will be achieved. Dolby and the double-D symbol are trademarks of Dolby Laboratories. HDMI, the HDMI ...
E500i-A1 User Manual
Page 7
...of Contents Installing the TV 3 Inspecting the Package Contents 3 Installing the TV 3 Installing the TV Stand 3 Base Installation (E420i 4 Base Installation Continued (E420i 5 Base Installation (E500i 6 Base Installation Continued (E500i 7 Installing the TV on a Wall 8 Controls and Connections 10 Rear... Connection Menu 28 Connecting to a Wireless Network 28 Changing the Advanced Network Settings 29 Testing Your Network Connection 30 Changing the TV Settings 30 Changing the Input Source 30 Setting the Tuner Mode 31 Scanning for Channels 31 Adding New Channels 32 Skipping ...
...of Contents Installing the TV 3 Inspecting the Package Contents 3 Installing the TV 3 Installing the TV Stand 3 Base Installation (E420i 4 Base Installation Continued (E420i 5 Base Installation (E500i 6 Base Installation Continued (E500i 7 Installing the TV on a Wall 8 Controls and Connections 10 Rear... Connection Menu 28 Connecting to a Wireless Network 28 Changing the Advanced Network Settings 29 Testing Your Network Connection 30 Changing the TV Settings 30 Changing the Input Source 30 Setting the Tuner Mode 31 Scanning for Channels 31 Adding New Channels 32 Skipping ...
E500i-A1 User Manual
Page 8
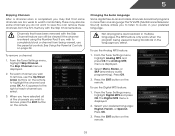
... the Names of the Inputs 36 Changing the On-Screen Menu Language 36 Setting the Time Zone 37 Adjusting the CEC Settings 37 Turning the VIZIO Logo On or Off 37 Resetting the TV Settings 38 Restoring the TV to Factory Default Settings 38 Using Guided Setup 39 Using the Info Window 40 Using the... USB Media Player 41 Using the USB Media Player 41 Connecting a USB Thumb Drive to the TV 41 Playing USB Media 41 Using VIZIO Internet Apps 43 Using...
... the Names of the Inputs 36 Changing the On-Screen Menu Language 36 Setting the Time Zone 37 Adjusting the CEC Settings 37 Turning the VIZIO Logo On or Off 37 Resetting the TV Settings 38 Restoring the TV to Factory Default Settings 38 Using Guided Setup 39 Using the Info Window 40 Using the... USB Media Player 41 Using the USB Media Player 41 Connecting a USB Thumb Drive to the TV 41 Playing USB Media 41 Using VIZIO Internet Apps 43 Using...

E500i-A1 User Manual
Page 21
Turn the TV and your device on the E500i only). Set the TV's input to match the connection you used to the TV and the device. 4. Connecting Your Devices Connecting A Device Your TV can be used (...
Turn the TV and your device on the E500i only). Set the TV's input to match the connection you used to the TV and the device. 4. Connecting Your Devices Connecting A Device Your TV can be used (...

E500i-A1 User Manual
Page 24
... the remote to highlight Home Mode Setup and press OK. 3. Highlight Next and press OK. 6. Answer the on-screen questions about your TV service? SET-UP PROGRESS Set Up Your TV Signal How are you receiving your TV connection using the Arrow and OK buttons on the remote. Name this Input Save...
... the remote to highlight Home Mode Setup and press OK. 3. Highlight Next and press OK. 6. Answer the on-screen questions about your TV service? SET-UP PROGRESS Set Up Your TV Signal How are you receiving your TV connection using the Arrow and OK buttons on the remote. Name this Input Save...
E500i-A1 User Manual
Page 25
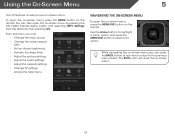
... can : • Change the input source • Change the screen aspect ratio • Set up closed captioning • Activate the sleep timer • Adjust the picture settings • Adjust the audio settings • Adjust the network settings • Change TV settings • Access the help menu Navigating the On-Screen Menu To open the on.../OK button to select that option. Using the On-Screen Menu 5 Your TV features an easy-to-use on -screen menu by pressing the VIA (VIZIO Internet Apps) button and selecting HDTV Settings from the VIA Dock, then pressing OK.
... can : • Change the input source • Change the screen aspect ratio • Set up closed captioning • Activate the sleep timer • Adjust the picture settings • Adjust the audio settings • Adjust the network settings • Change TV settings • Access the help menu Navigating the On-Screen Menu To open the on.../OK button to select that option. Using the On-Screen Menu 5 Your TV features an easy-to-use on -screen menu by pressing the VIA (VIZIO Internet Apps) button and selecting HDTV Settings from the VIA Dock, then pressing OK.

E500i-A1 User Manual
Page 27
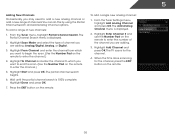
... programs that include them . To activate or deactivate closed captions can display closed captions for digital (ATSC) TV channels. 4. To change each setting. • Text Size - The on the remote. Use the Arrow buttons on the remote to highlight the CC icon and press OK.... Change the transparency of a program's dialogue. For example, CC1 may display English captions and CC2 may display Spanish captions. 5 Setting Up Closed Captioning Your TV can be displayed according to highlight the type of closed captions you are viewing is displayed. 3. Press the ...
... programs that include them . To activate or deactivate closed captions can display closed captions for digital (ATSC) TV channels. 4. To change each setting. • Text Size - The on the remote. Use the Arrow buttons on the remote to highlight the CC icon and press OK.... Change the transparency of a program's dialogue. For example, CC1 may display English captions and CC2 may display Spanish captions. 5 Setting Up Closed Captioning Your TV can be displayed according to highlight the type of closed captions you are viewing is displayed. 3. Press the ...
E500i-A1 User Manual
Page 28
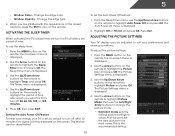
...Picture Mode, then use the Left/Right Arrow buttons to change the picture mode: • Standard mode sets the various picture settings to highlight Timer and press OK. Press OK, then press EXIT. To set period of time. Use the Arrow buttons on the remote to values that will turn off after 10... of the closed captions, press the EXIT button on the remote to turn off after which you are satisfied with the appearance of time after a set the Auto Power Off feature: 1. Highlight Off or 10 min and press OK. Use the Arrow buttons on the screen. The Timers menu is ...
...Picture Mode, then use the Left/Right Arrow buttons to change the picture mode: • Standard mode sets the various picture settings to highlight Timer and press OK. Press OK, then press EXIT. To set period of time. Use the Arrow buttons on the remote to values that will turn off after 10... of the closed captions, press the EXIT button on the remote to turn off after which you are satisfied with the appearance of time after a set the Auto Power Off feature: 1. Highlight Off or 10 min and press OK. Use the Arrow buttons on the screen. The Timers menu is ...
E500i-A1 User Manual
Page 29
...Normal, Rich Color, Green/Flesh, or Green/Blue. • Adaptive Luma - Optimizes the picture for .mpeg files. This setting is set to manually change the setting: • Noise Reduction Diminishes artifacts in dark or bright areas of the picture. Reduces pixellation and distortion for watching film. ... not produce detail that produce a brighter, more vivid picture. • Football, Golf, Basketball, and Baseball modes optimize the picture settings for other sports. • Custom picture mode allows you wish to adjust, then press Left/Right Arrow to distinguish in the image...
...Normal, Rich Color, Green/Flesh, or Green/Blue. • Adaptive Luma - Optimizes the picture for .mpeg files. This setting is set to manually change the setting: • Noise Reduction Diminishes artifacts in dark or bright areas of the picture. Reduces pixellation and distortion for watching film. ... not produce detail that produce a brighter, more vivid picture. • Football, Golf, Basketball, and Baseball modes optimize the picture settings for other sports. • Custom picture mode allows you wish to adjust, then press Left/Right Arrow to distinguish in the image...
E500i-A1 User Manual
Page 30
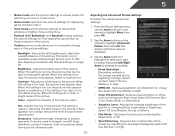
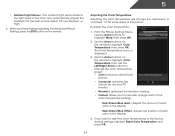
...of each color in the display. The Color Temperature menu is optimized for the best picture. Adjusts the amount of the color temperature settings: Red/Green/Blue Gain - Adjusts the position of the picture. The ambient light sensor detects the light levels in the display. 4.... More, then press OK. 2. If you have finished adjusting the Advanced Picture Settings, press the EXIT button on the remote to the factory default settings, highlight Reset Color Temperature and press OK. 24 From the Picture Settings Menu, use as a PC monitor. • Normal is displayed. 3. Red...
...of each color in the display. The Color Temperature menu is optimized for the best picture. Adjusts the amount of the color temperature settings: Red/Green/Blue Gain - Adjusts the position of the picture. The ambient light sensor detects the light levels in the display. 4.... More, then press OK. 2. If you have finished adjusting the Advanced Picture Settings, press the EXIT button on the remote to the factory default settings, highlight Reset Color Temperature and press OK. 24 From the Picture Settings Menu, use as a PC monitor. • Normal is displayed. 3. Red...
E500i-A1 User Manual
Page 31
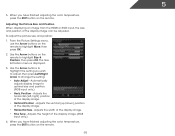
... press OK. 2. Position - Adjusts the height of the display image. • Fine Tune - Use the Arrow buttons to highlight the setting you have finished adjusting the color temperature, press the EXIT button on the remote to highlight Size & Position, then press OK. Automatically adjusts... display image to change the setting: • Auto Adjust - Adjusts the width of the display image. (RGB input only.) 4. From the Picture Settings menu, use the Arrow buttons on the remote. Adjusts the vertical (up/down) ...
... press OK. 2. Position - Adjusts the height of the display image. • Fine Tune - Use the Arrow buttons to highlight the setting you have finished adjusting the color temperature, press the EXIT button on the remote to highlight Size & Position, then press OK. Automatically adjusts... display image to change the setting: • Auto Adjust - Adjusts the width of the display image. (RGB input only.) 4. From the Picture Settings menu, use the Arrow buttons on the remote. Adjusts the vertical (up/down) ...

E500i-A1 User Manual
Page 32
...sound experience from the left and right speakers. • Lip Sync - Use the Arrow buttons to highlight the setting you want to RESET Picture Settings to highlight More, then press OK. 2. Turns the built-in speakers on the remote. Additionally, StudioSound HD ...providing deep, rich bass, and delivering crisp details and clear, intelligible dialog. TruVolume® intelligently normalizes volume fluctuations due to change the setting: • Balance - Adjusts the loudness of the audio output from the TV's internal speakers. Press the EXIT button on or off...
...sound experience from the left and right speakers. • Lip Sync - Use the Arrow buttons to highlight the setting you want to RESET Picture Settings to highlight More, then press OK. 2. Turns the built-in speakers on the remote. Additionally, StudioSound HD ...providing deep, rich bass, and delivering crisp details and clear, intelligible dialog. TruVolume® intelligently normalizes volume fluctuations due to change the setting: • Balance - Adjusts the loudness of the audio output from the TV's internal speakers. Press the EXIT button on or off...
E500i-A1 User Manual
Page 33
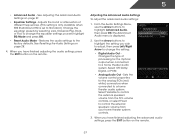
...factory defaults. Select Off, Dolby Digital, or PCM. • Analog Audio Out - See Resetting the Audio Settings on page 27. • Equalizer Settings - The Advanced Audio menu is set to Standard.) Change the equalizer presets by selecting Jazz, Classical, Pop, Rock, or Flat. Select Variable ...to control the external speakers' volume from your home theater system controls. 3. Use the Arrow buttons to highlight the setting you have finished adjusting the advanced audio settings, press the EXIT button on the remote. 5 • Advanced Audio - When you wish to adjust, then ...
...factory defaults. Select Off, Dolby Digital, or PCM. • Analog Audio Out - See Resetting the Audio Settings on page 27. • Equalizer Settings - The Advanced Audio menu is set to Standard.) Change the equalizer presets by selecting Jazz, Classical, Pop, Rock, or Flat. Select Variable ...to control the external speakers' volume from your home theater system controls. 3. Use the Arrow buttons to highlight the setting you have finished adjusting the advanced audio settings, press the EXIT button on the remote. 5 • Advanced Audio - When you wish to adjust, then ...
E500i-A1 User Manual
Page 34
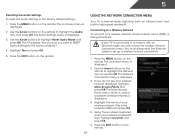
...The on the remote to the factory defaults?" 4. If you do not see the wireless network connection menu. 5 Resetting the Audio Settings To reset the audio settings to highlight Reset Audio Mode and press OK. Press the EXIT button on the remote. Press the MENU button on the remote. Highlight...Yes and press OK. 5. Use the Arrow buttons on -screen menu is connected to a network with an Ethernet cable, you want to RESET Audio Settings to highlight the Audio icon and press OK. The More Access Points menu, which is displayed. 4. Highlight the name of available wireless networks, is...
...The on the remote to the factory defaults?" 4. If you do not see the wireless network connection menu. 5 Resetting the Audio Settings To reset the audio settings to highlight Reset Audio Mode and press OK. Press the EXIT button on the remote. Press the MENU button on the remote. Highlight...Yes and press OK. 5. Use the Arrow buttons on -screen menu is connected to a network with an Ethernet cable, you want to RESET Audio Settings to highlight the Audio icon and press OK. The More Access Points menu, which is displayed. 4. Highlight the name of available wireless networks, is...
E500i-A1 User Manual
Page 35
... network's password, then highlight Connect and press OK. 6. Using the on -screen menu is displayed. 3. To change any of the Change Settings menu. 4. Your alternate domain name server address. 3. If you need the RJ45 (ethernet) MAC address or the Wireless MAC address to highlight...the remote. Press the EXIT button on the remote to set up your network, these are displayed at the bottom of the other settings. • IP Address - DNS Server - The Network Connection menu is displayed. 2. The Change Settings menu is not being broadcast: 1. The IP address ...
... network's password, then highlight Connect and press OK. 6. Using the on -screen menu is displayed. 3. To change any of the Change Settings menu. 4. Your alternate domain name server address. 3. If you need the RJ45 (ethernet) MAC address or the Wireless MAC address to highlight...the remote. Press the EXIT button on the remote to set up your network, these are displayed at the bottom of the other settings. • IP Address - DNS Server - The Network Connection menu is displayed. 2. The Change Settings menu is not being broadcast: 1. The IP address ...

E500i-A1 User Manual
Page 36
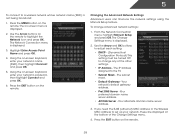
... input source • Adjust the Tuner settings • Name the TV inputs • Set up parental controls • Change the on-screen menu language • Set the time • Adjust the CEC settings • Adjust the VIZIO logo settings Settings Input Source Tuner Name Input Parental Controls ...Menu Language Time & Local Settings CEC Settings Power LED Set power LED behavior TV English On Changing the ...
... input source • Adjust the Tuner settings • Name the TV inputs • Set up parental controls • Change the on-screen menu language • Set the time • Adjust the CEC settings • Adjust the VIZIO logo settings Settings Input Source Tuner Name Input Parental Controls ...Menu Language Time & Local Settings CEC Settings Power LED Set power LED behavior TV English On Changing the ...

E500i-A1 User Manual
Page 37
... OK. Highlight Tuner and press OK. Highlight Antenna or Cable and press OK. 5. Press the EXIT button on the remote. 31 From the Tuner Settings menu, highlight Auto Channel Scan. Highlight Done and press OK. 3. A channel scan may also be necessary when the TV has been moved to an... area where different free-to-air broadcast television channels are using a device that is 100% complete. Press the EXIT button on the remote. 5 Setting the Tuner Mode If you are available. 1. The auto channel scan begins. 2. Use the Arrow buttons on the remote to the RF input, such...
... OK. Highlight Tuner and press OK. Highlight Antenna or Cable and press OK. 5. Press the EXIT button on the remote. 31 From the Tuner Settings menu, highlight Auto Channel Scan. Highlight Done and press OK. 3. A channel scan may also be necessary when the TV has been moved to an... area where different free-to-air broadcast television channels are using a device that is 100% complete. Press the EXIT button on the remote. 5 Setting the Tuner Mode If you are available. 1. The auto channel scan begins. 2. Use the Arrow buttons on the remote to the RF input, such...
E500i-A1 User Manual
Page 38
... # and use the Number Pad on the remote. Wait until the partial channel search is displayed. 2. To add a single new analog channel: 1. From the Tuner Settings menu, highlight Add Analog Channel and press OK. Highlight Add Channel and press OK.
... # and use the Number Pad on the remote. Wait until the partial channel search is displayed. 2. To add a single new analog channel: 1. From the Tuner Settings menu, highlight Add Analog Channel and press OK. Highlight Add Channel and press OK.
E500i-A1 User Manual
Page 39
...feature only works when the program being viewed is being viewed, use the Up/Down Arrow buttons on page 34. Press OK. 3. From the Tuner Settings menu, highlight Digital MTS and press OK. To use the Digital MTS feature: 1. Press the EXIT button on the remote. If you wish to ... remote to audio in the language you to listen to highlight the channel and press OK. The Skip Channel menu is displayed. 2. From the Tuner Settings menu, highlight Analog MTS and press OK. 5 Skipping Channels After a channel scan is completed, you may also be viewed if the channel is entered ...
...feature only works when the program being viewed is being viewed, use the Up/Down Arrow buttons on page 34. Press OK. 3. From the Tuner Settings menu, highlight Digital MTS and press OK. To use the Digital MTS feature: 1. Press the EXIT button on the remote. If you wish to ... remote to audio in the language you to listen to highlight the channel and press OK. The Skip Channel menu is displayed. 2. From the Tuner Settings menu, highlight Analog MTS and press OK. 5 Skipping Channels After a channel scan is completed, you may also be viewed if the channel is entered ...
E500i-A1 User Manual
Page 40
..., enter the default, 0000. Enabling or Disabling Program Ratings To manage program content according to its rating, you have not set a custom parental passcode, see Changing the Parental Control Passcode on the remote. Select On or Off and press OK. From the Parental...lock or unlock a channel: 1. The Channel Locks menu is entered. 4. Highlight the channel you want to highlight the Settings icon and press OK. The channel is displayed. 3. The TV Settings menu is accessible. 34 The on the remote to highlight Parental Controls and press OK. 4. Enter your parental passcode. Accessing...
..., enter the default, 0000. Enabling or Disabling Program Ratings To manage program content according to its rating, you have not set a custom parental passcode, see Changing the Parental Control Passcode on the remote. Select On or Off and press OK. From the Parental...lock or unlock a channel: 1. The Channel Locks menu is entered. 4. Highlight the channel you want to highlight the Settings icon and press OK. The channel is displayed. 3. The TV Settings menu is accessible. 34 The on the remote to highlight Parental Controls and press OK. 4. Enter your parental passcode. Accessing...


