
E420-A0 User Manual
Page 1
USER GUIDE MMOODDEELLS // E3D320VX // E3ED44220V0X -A0 // E3D470VX Installing your new tv CONTROLS & CONNECTIONS connecting your devices using the on-screen menu using the usb media player TROUBLESHOOTING & SUPPORT Help, SPECs, warranty & LEGAL
USER GUIDE MMOODDEELLS // E3D320VX // E3ED44220V0X -A0 // E3D470VX Installing your new tv CONTROLS & CONNECTIONS connecting your devices using the on-screen menu using the usb media player TROUBLESHOOTING & SUPPORT Help, SPECs, warranty & LEGAL
E420-A0 User Manual
Page 3
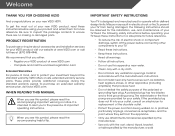
...manufactured to ensure there are provided for your TV. The wide blade or the third prong are no missing or damaged parts. Product Registration To purchase or inquire about accessories and installation services for your new VIZIO HDTV. When Reading this apparatus near any ventilation... of the obsolete outlet. • Protect the power cord from being damaged, the following safety instructions before using your TV. Welcome Thank You for Choosing VIZIO And congratulations on -site extended warranty service plans. Install in electric shock or fire.To prevent your...
...manufactured to ensure there are provided for your TV. The wide blade or the third prong are no missing or damaged parts. Product Registration To purchase or inquire about accessories and installation services for your new VIZIO HDTV. When Reading this apparatus near any ventilation... of the obsolete outlet. • Protect the power cord from being damaged, the following safety instructions before using your TV. Welcome Thank You for Choosing VIZIO And congratulations on -site extended warranty service plans. Install in electric shock or fire.To prevent your...

E420-A0 User Manual
Page 4
... home, consult your dealer or local power company. • Do not apply pressure or throw objects at least three feet should be installed near your TV safely. with a third grounding pin). Servicing is provided. • Never push any way, such as a radiator, heater, oven, amplifier etc...blocked or covered. If your outlet does not accommodate the three-pronged, have fallen into the slots and openings on the top of your TV. To totally disconnect power, unplug the power cord. • The lightning flash with arrowhead symbol within an equilateral triangle is a safety ...
... home, consult your dealer or local power company. • Do not apply pressure or throw objects at least three feet should be installed near your TV safely. with a third grounding pin). Servicing is provided. • Never push any way, such as a radiator, heater, oven, amplifier etc...blocked or covered. If your outlet does not accommodate the three-pronged, have fallen into the slots and openings on the top of your TV. To totally disconnect power, unplug the power cord. • The lightning flash with arrowhead symbol within an equilateral triangle is a safety ...
E420-A0 User Manual
Page 5
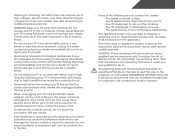
.... Continued use by qualified service personnel only. Incorrect polarities may cause the batteries to qualified service personnel. • WARNING: Keep your TV if any servicing other than that contained in accordance with liquids, such as vases, shall be of sufficient magnitude to constitute a risk ... VOLTAGE within the product's enclosure that the power cord and any smoke or odor becomes apparent, unplug the power cord and contact your TV yourself. • Avoid using dropped or damaged appliances. h• The lightning flash with wet hands. • Insert batteries in the...
.... Continued use by qualified service personnel only. Incorrect polarities may cause the batteries to qualified service personnel. • WARNING: Keep your TV if any servicing other than that contained in accordance with liquids, such as vases, shall be of sufficient magnitude to constitute a risk ... VOLTAGE within the product's enclosure that the power cord and any smoke or odor becomes apparent, unplug the power cord and contact your TV yourself. • Avoid using dropped or damaged appliances. h• The lightning flash with wet hands. • Insert batteries in the...
E420-A0 User Manual
Page 6
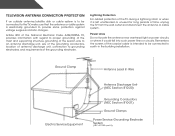
...-20) Grounding Conductors (NEC Section 810-21) Ground Clamps Power Service Grounding Electrode System (NEC ART 250, part H) Lightning Protection For added protection of the TV during a lightning storm or when it could fall into such power lines or circuits. Remember, the screen of the coaxial cable is intended to be... sure that the antenna or cable system is left unattended or unused for long periods of time, unplug the TV from the wall outlet and disconnect the antenna or cable system. Television Antenna Connection Protection If an outside antenna/satellite dish or cable system...
...-20) Grounding Conductors (NEC Section 810-21) Ground Clamps Power Service Grounding Electrode System (NEC ART 250, part H) Lightning Protection For added protection of the TV during a lightning storm or when it could fall into such power lines or circuits. Remember, the screen of the coaxial cable is intended to be... sure that the antenna or cable system is left unattended or unused for long periods of time, unplug the TV from the wall outlet and disconnect the antenna or cable system. Television Antenna Connection Protection If an outside antenna/satellite dish or cable system...

E420-A0 User Manual
Page 7
...19 Resetting the Picture Settings 19 Adjusting the Audio Settings 19 Adjusting the Advanced Audio Settings 20 Resetting the Audio Settings 21 Changing the TV Settings 21 Changing the Input Source 21 Setting the Tuner Mode 22 Scanning for Channels 22 Adding New Channels 22 Skipping Channels 23 Changing...27 Setting the Time Zone 27 Adjusting the CEC Settings 28 Using the Help Menu 28 Displaying System Information 29 Resetting the TV Settings 29 Restoring the TV to Factory Default Settings 29 Using the Setup Wizard 30 Using the Info Window 31 Using USB Photo Slideshow 32 Using ...
...19 Resetting the Picture Settings 19 Adjusting the Audio Settings 19 Adjusting the Advanced Audio Settings 20 Resetting the Audio Settings 21 Changing the TV Settings 21 Changing the Input Source 21 Setting the Tuner Mode 22 Scanning for Channels 22 Adding New Channels 22 Skipping Channels 23 Changing...27 Setting the Time Zone 27 Adjusting the CEC Settings 28 Using the Help Menu 28 Displaying System Information 29 Resetting the TV Settings 29 Restoring the TV to Factory Default Settings 29 Using the Setup Wizard 30 Using the Info Window 31 Using USB Photo Slideshow 32 Using ...
E420-A0 User Manual
Page 8
Connecting a USB Thumb Drive to the TV 32 Playing USB Media 32 Troubleshooting & Technical Support 34 Specifications 37 Limited Warranty 38 Legal & Compliance 39 2
Connecting a USB Thumb Drive to the TV 32 Playing USB Media 32 Troubleshooting & Technical Support 34 Specifications 37 Limited Warranty 38 Legal & Compliance 39 2
E420-A0 User Manual
Page 9
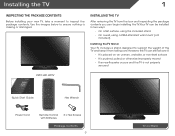
...the box and inspecting the package contents you can begin installing the TV. Installing the TV 1 Inspecting the Package Contents Before installing your new TV, take a moment to ensure nothing is not properly secured VIZIO LED HDTV Quick Start Guide Hex Wrench Power Cord Remote Control with... Batteries 3 x Hex Screws Package Contents 3 TV on Stand Installing the TV After removing the TV from falling over if:...
...the box and inspecting the package contents you can begin installing the TV. Installing the TV 1 Inspecting the Package Contents Before installing your new TV, take a moment to ensure nothing is not properly secured VIZIO LED HDTV Quick Start Guide Hex Wrench Power Cord Remote Control with... Batteries 3 x Hex Screws Package Contents 3 TV on Stand Installing the TV After removing the TV from falling over if:...

E420-A0 User Manual
Page 10
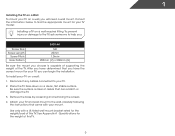
Step 2 To install the TV stand: 1. Align the base with the TV and tighten the hex screw into the base with attached stand into an upright position and place on a flat, level, and stable surface. 4. Place the TV screen-down on a soft surface, such as carpet, rug, or blanket. 2. To ensure proper ventilation, leave at least 1" of space between the back of the TV and any other objects (walls, etc). 4 1 Step 3 To prevent scratches or damage to the screen, place the TV on a clean, flat surface. Move the TV with the included hex wrench. 3.
Step 2 To install the TV stand: 1. Align the base with the TV and tighten the hex screw into the base with attached stand into an upright position and place on a flat, level, and stable surface. 4. Place the TV screen-down on a soft surface, such as carpet, rug, or blanket. 2. To ensure proper ventilation, leave at least 1" of space between the back of the TV and any other objects (walls, etc). 4 1 Step 3 To prevent scratches or damage to the screen, place the TV on a clean, flat surface. Move the TV with the included hex wrench. 3.
E420-A0 User Manual
Page 11
...: E420-A0 M6 20mm 1.0mm 200mm (V) x 200mm (H) Be sure the mount you . Remove the base by loosening and removing the screws. 4. Use only with your mount. See Appendix A - Consult the information below to the wall, carefully following the instructions that can begin the installation. To install yovur TV on...for the weight/load of this TV. 5 To prevent injury or damage to the TV, ask someone to your TV. 2. After you have the correct mount for the weight of this TV. Place the TV face-down on a wall: 1. 1 Installing the TV on a Wall To mount your TV on a wall, you have...
...: E420-A0 M6 20mm 1.0mm 200mm (V) x 200mm (H) Be sure the mount you . Remove the base by loosening and removing the screws. 4. Use only with your mount. See Appendix A - Consult the information below to the wall, carefully following the instructions that can begin the installation. To install yovur TV on...for the weight/load of this TV. 5 To prevent injury or damage to the TV, ask someone to your TV. 2. After you have the correct mount for the weight of this TV. Place the TV face-down on a wall: 1. 1 Installing the TV on a Wall To mount your TV on a wall, you have...
E420-A0 User Manual
Page 14
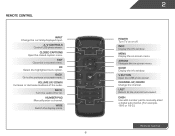
... window. Menu Display the on -screen menu. Channel Up/Down Change the channel. Mute Turn the audio off . WIDE Switch the display mode. 8 2 Power Turn TV on or off or on -screen menu. Remote Control Input Change the currently-displayed input. Volume Up/Down Increase or decrease loudness of the audio...
... window. Menu Display the on -screen menu. Channel Up/Down Change the channel. Mute Turn the audio off . WIDE Switch the display mode. 8 2 Power Turn TV on or off or on -screen menu. Remote Control Input Change the currently-displayed input. Volume Up/Down Increase or decrease loudness of the audio...
E420-A0 User Manual
Page 16
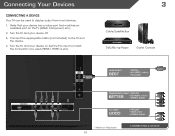
..., Component, etc). 2. Connect the appropriate cable (not included) to display output from most devices. 1. Set the TV's input to match the connection you used to the TV and the device. 4. Connecting Your Devices Connecting A Device Your TV can be used (HDMI-1, HDM1-2, etc). 3 Cable/Satellite Box DVD/Blu-ray Player Game Console HDMI...
..., Component, etc). 2. Connect the appropriate cable (not included) to display output from most devices. 1. Set the TV's input to match the connection you used to the TV and the device. 4. Connecting Your Devices Connecting A Device Your TV can be used (HDMI-1, HDM1-2, etc). 3 Cable/Satellite Box DVD/Blu-ray Player Game Console HDMI...
E420-A0 User Manual
Page 17
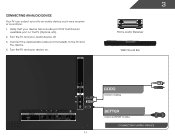
Turn the TV and your device on the TV (Optical, etc). 2. Connect the appropriate cable (not included) to an audio device, such as a receiver or sound bar. 1. Verify that matches an available port on . 3 Home Audio Receiver VIZIO Sound Bar GOOD 3.5mm Cable BETTER Optical/SPDIF Cable CONNECTING AUDIO DEVICE 11 Turn the TV and your device has a audio port that your audio device off. 3. Connecting an audio device Your TV can output sound to the TV and the device. 4.
Turn the TV and your device on the TV (Optical, etc). 2. Connect the appropriate cable (not included) to an audio device, such as a receiver or sound bar. 1. Verify that matches an available port on . 3 Home Audio Receiver VIZIO Sound Bar GOOD 3.5mm Cable BETTER Optical/SPDIF Cable CONNECTING AUDIO DEVICE 11 Turn the TV and your device has a audio port that your audio device off. 3. Connecting an audio device Your TV can output sound to the TV and the device. 4.

E420-A0 User Manual
Page 18
... OK and Arrow Up/ Down Buttons on and the Setup App starts. 4. Use the OK and Arrow Up/ Down buttons on the remote to Live TV and press OK. Before you have finished the channel scan, highlight Exit to highlight your time zone and press OK. 5. Use the OK and Arrow... On or Off. 2. Use the Up/Down Arrow buttons on the remote. 3. To complete the first-time setup: 1. Answer the on-screen questions about your TV connection using the Arrow and OK buttons on the remote to highlight Start the Channel Scan and press OK. 8.
... OK and Arrow Up/ Down Buttons on and the Setup App starts. 4. Use the OK and Arrow Up/ Down buttons on the remote to Live TV and press OK. Before you have finished the channel scan, highlight Exit to highlight your time zone and press OK. 5. Use the OK and Arrow... On or Off. 2. Use the Up/Down Arrow buttons on the remote. 3. To complete the first-time setup: 1. Answer the on-screen questions about your TV connection using the Arrow and OK buttons on the remote to highlight Start the Channel Scan and press OK. 8.
E420-A0 User Manual
Page 19
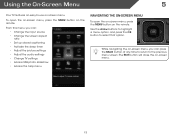
... ratio • Set up closed captioning • Activate the sleep timer • Adjust the picture settings • Adjust the audio settings • Change TV settings • Access USB photo slideshow • Access the help menu Navigating the On-Screen MCeCnu To open the on-screen menu, press the MENU...Use the Arrow buttons to highlight a menu option, and press the OK button to the previous menu screen. Using the On-Screen Menu 5 Your TV features an easy-to-use on -screen menu. BACK OK INFO MENU GUIDE While navigating the on-screen menu, you can press the BACK button...
... ratio • Set up closed captioning • Activate the sleep timer • Adjust the picture settings • Adjust the audio settings • Change TV settings • Access USB photo slideshow • Access the help menu Navigating the On-Screen MCeCnu To open the on-screen menu, press the MENU...Use the Arrow buttons to highlight a menu option, and press the OK button to the previous menu screen. Using the On-Screen Menu 5 Your TV features an easy-to-use on -screen menu. BACK OK INFO MENU GUIDE While navigating the on-screen menu, you can press the BACK button...
E420-A0 User Manual
Page 20
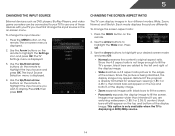
...screen. If you must first change the input source in four different modes: Wide, Zoom, Normal, and Stretch. This option is only available when the TV is displayed. 3. Use the Arrow buttons on the remote to the edges of these devices with your desired screen mode and press OK: • ...Normal preserves the content's original aspect ratio. Press OK, then press EXIT. If the program is not large enough to fill the TV's screen, black bars are watching widescreen (1.85:1 or 2.35:1) content, black bars will still appear on the top and bottom of the display image. &#...
...screen. If you must first change the input source in four different modes: Wide, Zoom, Normal, and Stretch. This option is only available when the TV is displayed. 3. Use the Arrow buttons on the remote to the edges of these devices with your desired screen mode and press OK: • ...Normal preserves the content's original aspect ratio. Press OK, then press EXIT. If the program is not large enough to fill the TV's screen, black bars are watching widescreen (1.85:1 or 2.35:1) content, black bars will still appear on the top and bottom of the display image. &#...
E420-A0 User Manual
Page 21
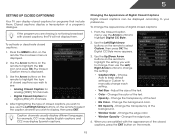
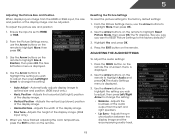
...caption channel you wish to your preference. Change the background color. • BG Opacity - To activate or deactivate closed captions for digital (ATSC) TV channels. 4. To change each setting. • Text Size - Adjust the size of the closed captions: 1. When you are viewing is not being...of the background. • Window Color - Change the transparency of the text. • BG Color - Change the color of closed captions, the TV will not display them . Use the Arrow buttons on the remote to highlight the setting you wish to see : • Analog Closed Caption for ...
...caption channel you wish to your preference. Change the background color. • BG Opacity - To activate or deactivate closed captions for digital (ATSC) TV channels. 4. To change each setting. • Text Size - Adjust the size of the closed captions: 1. When you are viewing is not being...of the background. • Window Color - Change the transparency of the text. • BG Color - Change the color of closed captions, the TV will not display them . Use the Arrow buttons on the remote to highlight the setting you wish to see : • Analog Closed Caption for ...
E420-A0 User Manual
Page 22
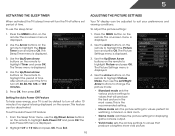
...in a dark room. • Game mode optimizes the picture settings for displaying game console output. • Vivid mode sets the picture settings to turn the TV off : 30, 60, 90, 120, or 180 minutes. 5. The on the remote to values that produce a brighter, more vivid picture. 16 The...energy, your preferences and viewing conditions. The Picture Settings menu is displayed. 3. Use the Up/Down Arrow buttons on the remote to suit your TV is displayed. 2. This feature can be deactivated. Highlight Off or 10 min and press OK. The on the remote to highlight Picture and ...
...in a dark room. • Game mode optimizes the picture settings for displaying game console output. • Vivid mode sets the picture settings to turn the TV off : 30, 60, 90, 120, or 180 minutes. 5. The on the remote to values that produce a brighter, more vivid picture. 16 The...energy, your preferences and viewing conditions. The Picture Settings menu is displayed. 3. Use the Up/Down Arrow buttons on the remote to suit your TV is displayed. 2. This feature can be deactivated. Highlight Off or 10 min and press OK. The on the remote to highlight Picture and ...
E420-A0 User Manual
Page 25
... picture size and position: 1. Use the Arrow buttons to highlight the setting you want to RESET Picture Settings to change the setting: • Balance - The TV displays, "Are you sure you wish to adjust, then press Left/Right Arrow to the factory defaults?" 3. Use the Arrow buttons on the remote to...
... picture size and position: 1. Use the Arrow buttons to highlight the setting you want to RESET Picture Settings to change the setting: • Balance - The TV displays, "Are you sure you wish to adjust, then press Left/Right Arrow to the factory defaults?" 3. Use the Arrow buttons on the remote to...
E420-A0 User Manual
Page 26
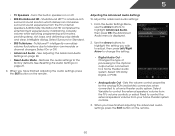
... an immersive surround sound experience from your home theater system controls. 3. Select Variable to control the external speakers' volume from the TV's volume controls, or select Fixed to a home theater audio system. See Resetting the Audio Settings on page 20. • ... home theater audio system. When you have finished adjusting the audio settings, press the EXIT button on the remote. 5 • TV Speakers - Additionally, StudioSound HD completes the entertainment experience by maintaining a steady volume while watching programming and movies, providing deep, rich ...
... an immersive surround sound experience from your home theater system controls. 3. Select Variable to control the external speakers' volume from the TV's volume controls, or select Fixed to a home theater audio system. See Resetting the Audio Settings on page 20. • ... home theater audio system. When you have finished adjusting the audio settings, press the EXIT button on the remote. 5 • TV Speakers - Additionally, StudioSound HD completes the entertainment experience by maintaining a steady volume while watching programming and movies, providing deep, rich ...


