
E420-A0 User Manual
Page 1
USER GUIDE MMOODDEELLS // E3D320VX // E3ED44220V0X -A0 // E3D470VX Installing your new tv CONTROLS & CONNECTIONS connecting your devices using the on-screen menu using the usb media player TROUBLESHOOTING & SUPPORT Help, SPECs, warranty & LEGAL
USER GUIDE MMOODDEELLS // E3D320VX // E3ED44220V0X -A0 // E3D470VX Installing your new tv CONTROLS & CONNECTIONS connecting your devices using the on-screen menu using the usb media player TROUBLESHOOTING & SUPPORT Help, SPECs, warranty & LEGAL
E420-A0 User Manual
Page 5
... fire or electric shock. • Do not use by qualified service personnel only. Incorrect polarities may cause the batteries to leak which can damage the remote control or injure the operator. Your TV is exposed to rain or other hazards. Do not try to repair your TV. Unplug the power cord immediately and contact your TV will not...
... fire or electric shock. • Do not use by qualified service personnel only. Incorrect polarities may cause the batteries to leak which can damage the remote control or injure the operator. Your TV is exposed to rain or other hazards. Do not try to repair your TV. Unplug the power cord immediately and contact your TV will not...
E420-A0 User Manual
Page 6
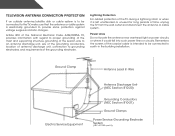
... such power lines or circuits. Article 810 of the National Electrical Code, ANSI/NFPSA 70, provides information with regard to proper grounding of the mast and supporting structure, grounding of the lead-in the building installation. Remember, the screen of the coaxial cable is intended to be connected to the TV, make sure that the antenna or cable system...
... such power lines or circuits. Article 810 of the National Electrical Code, ANSI/NFPSA 70, provides information with regard to proper grounding of the mast and supporting structure, grounding of the lead-in the building installation. Remember, the screen of the coaxial cable is intended to be connected to the TV, make sure that the antenna or cable system...

E420-A0 User Manual
Page 7
...3 Installing the TV Stand 3 Installing the TV on a Wall 5 Controls and Connections 6 Rear Panel 6 Front Panel 7 Remote Control 8 Replacing the Batteries 9 Connecting Your Devices 10 Connecting A Device 10 Connecting an audio device 11 Completing the First-Time Setup 12 Using the On-Screen Menu 13 Navigating the On-Screen Menu 13 Changing the Input Source 14 Changing the Screen Aspect Ratio 14 Setting Up Closed Captioning 15 Changing the Appearance of Digital Closed Captions.. 15 Activating the Sleep Timer 16 Setting the Auto Power Off Feature 16 Adjusting the Picture Settings...
...3 Installing the TV Stand 3 Installing the TV on a Wall 5 Controls and Connections 6 Rear Panel 6 Front Panel 7 Remote Control 8 Replacing the Batteries 9 Connecting Your Devices 10 Connecting A Device 10 Connecting an audio device 11 Completing the First-Time Setup 12 Using the On-Screen Menu 13 Navigating the On-Screen Menu 13 Changing the Input Source 14 Changing the Screen Aspect Ratio 14 Setting Up Closed Captioning 15 Changing the Appearance of Digital Closed Captions.. 15 Activating the Sleep Timer 16 Setting the Auto Power Off Feature 16 Adjusting the Picture Settings...
E420-A0 User Manual
Page 11
..., flat, stable surface. Remove the base by loosening and removing the screws. 4. Specifications for your TV on a wall, you will need a wall mount. Screw Size: Screw Length: Screw Pitch: Hole Pattern: E420-A0 M6 20mm 1.0mm 200mm (V) x 200mm (H) Be sure the mount you choose is clear of the TV. Disconnect any cables connected to the wall, carefully following the instructions that can begin the installation. Attach your TV and wall mount to your TV model: Installing a TV...
..., flat, stable surface. Remove the base by loosening and removing the screws. 4. Specifications for your TV on a wall, you will need a wall mount. Screw Size: Screw Length: Screw Pitch: Hole Pattern: E420-A0 M6 20mm 1.0mm 200mm (V) x 200mm (H) Be sure the mount you choose is clear of the TV. Disconnect any cables connected to the wall, carefully following the instructions that can begin the installation. Attach your TV and wall mount to your TV model: Installing a TV...
E420-A0 User Manual
Page 14
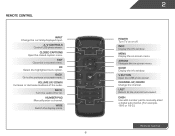
...-5.) Remote Control Exit Close the on . Number Pad Manually enter a channel. Menu Display the on -screen menu. V Button Open the USB photo viewer. Dash Use with number pad to the channel last viewed. Ok Select the highlighted menu option. Back Go to the previous on -screen menu. Arrow Navigate the on or off or on -screen menu. Remote Control Input Change the currently-displayed input. A/V Controls Control USB photo viewer. Volume Up/Down Increase or decrease loudness of the audio. WIDE Switch the display mode. 8 2 Power Turn...
...-5.) Remote Control Exit Close the on . Number Pad Manually enter a channel. Menu Display the on -screen menu. V Button Open the USB photo viewer. Dash Use with number pad to the channel last viewed. Ok Select the highlighted menu option. Back Go to the previous on -screen menu. Arrow Navigate the on or off or on -screen menu. Remote Control Input Change the currently-displayed input. A/V Controls Control USB photo viewer. Volume Up/Down Increase or decrease loudness of the audio. WIDE Switch the display mode. 8 2 Power Turn...
E420-A0 User Manual
Page 16
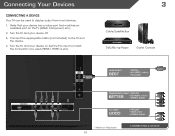
Turn the TV and your device off. 3. Connecting Your Devices Connecting A Device Your TV can be used to match the connection you used (HDMI-1, HDM1-2, etc). 3 Cable/Satellite Box DVD/Blu-ray Player Game Console HDMI CABLE BEST • DIGITAL • HD VIDEO (1080p)* • HD AUDIO COMPONENT CABLE • ANALOG BETTER • HD VIDEO (1080i)* • STEREO AUDIO AV CABLE GOOD • ANALOG • VIDEO (480i)* • STEREO AUDIO * Maximum Resolution 10 CONNECTING A DEVICE Set the TV's input to display output from most...
Turn the TV and your device off. 3. Connecting Your Devices Connecting A Device Your TV can be used to match the connection you used (HDMI-1, HDM1-2, etc). 3 Cable/Satellite Box DVD/Blu-ray Player Game Console HDMI CABLE BEST • DIGITAL • HD VIDEO (1080p)* • HD AUDIO COMPONENT CABLE • ANALOG BETTER • HD VIDEO (1080i)* • STEREO AUDIO AV CABLE GOOD • ANALOG • VIDEO (480i)* • STEREO AUDIO * Maximum Resolution 10 CONNECTING A DEVICE Set the TV's input to display output from most...
E420-A0 User Manual
Page 23
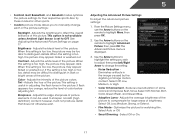
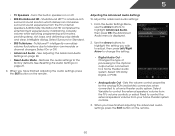
... Extend. • Film Mode - Select Off or On. 17 Tint - From the Picture Settings menu, use the Arrow buttons on the remote to distinguish details. Select Off, Normal, Rich Color, Green/Flesh, and Green/Blue. • Adaptive Luma - Adjusts the brightness to manually change the setting: • Noise Reduction Diminishes artifacts in the picture. When this setting is too high, the picture may be used to OFF. When this...
... Extend. • Film Mode - Select Off or On. 17 Tint - From the Picture Settings menu, use the Arrow buttons on the remote to distinguish details. Select Off, Normal, Rich Color, Green/Flesh, and Green/Blue. • Adaptive Luma - Adjusts the brightness to manually change the setting: • Noise Reduction Diminishes artifacts in the picture. When this setting is too high, the picture may be used to OFF. When this...
E420-A0 User Manual
Page 25
... right speakers. • Lip Sync - Adjusting the Audio Settings To adjust the audio settings: 1. Ensure the input is displayed. 2. When you want to RESET Picture Settings to optimal size and position. (RGB input only.) • Horiz. The Size & Position menu is displayed. 3. Press the EXIT button on the remote. Press the MENU button on the remote. Automatically adjusts display image to the factory defaults?" 3. The Audio Settings menu is displayed. 4. Position - Adjusts the loudness of the audio output from the HDMI or RGB input, the size...
... right speakers. • Lip Sync - Adjusting the Audio Settings To adjust the audio settings: 1. Ensure the input is displayed. 2. When you want to RESET Picture Settings to optimal size and position. (RGB input only.) • Horiz. The Size & Position menu is displayed. 3. Press the EXIT button on the remote. Press the MENU button on the remote. Automatically adjusts display image to the factory defaults?" 3. The Audio Settings menu is displayed. 4. Position - Adjusts the loudness of the audio output from the HDMI or RGB input, the size...
E420-A0 User Manual
Page 26
... control the external speakers' volume from the TV's volume controls, or select Fixed to a home theater audio system. Use the Arrow buttons to highlight the setting you wish to adjust, then press Left/Right Arrow to change the setting: • Digital Audio Out Changes the type of processing for the analog RCA (red/white) connectors when connected to the factory defaults. See Adjusting the Advanced Audio Settings on page 21. 4. Select Off, Dolby Digital, or PCM. • Analog Audio Out - Turns...
... control the external speakers' volume from the TV's volume controls, or select Fixed to a home theater audio system. Use the Arrow buttons to highlight the setting you wish to adjust, then press Left/Right Arrow to change the setting: • Digital Audio Out Changes the type of processing for the analog RCA (red/white) connectors when connected to the factory defaults. See Adjusting the Advanced Audio Settings on page 21. 4. Select Off, Dolby Digital, or PCM. • Analog Audio Out - Turns...
E420-A0 User Manual
Page 27
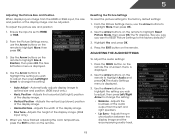
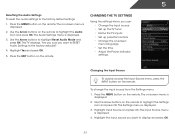
... the TV inputs • Set up parental controls • Change the on the remote to the factory defaults?" 4. Highlight Input Source and press OK. The on the remote to display and press OK. 21 Use the Arrow buttons on -screen menu is displayed. 3. To change the input source from the Settings menu: 1. Highlight the input source you want to highlight the Settings icon and press OK. The Audio Settings menu is displayed. 2. Changing the Input Source To quickly access the Input Source menu, press the INPUT button on the remote.
... the TV inputs • Set up parental controls • Change the on the remote to the factory defaults?" 4. Highlight Input Source and press OK. The on the remote to display and press OK. 21 Use the Arrow buttons on -screen menu is displayed. 3. To change the input source from the Settings menu: 1. Highlight the input source you want to highlight the Settings icon and press OK. The Audio Settings menu is displayed. 2. Changing the Input Source To quickly access the Input Source menu, press the INPUT button on the remote.
E420-A0 User Manual
Page 28
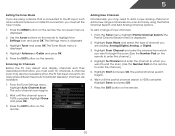
... different free-to enter the channel.) 4. Highlight Antenna or Cable and press OK. 5. From the Tuner Settings menu, highlight Auto Channel Scan. The auto channel scan begins. 2. A channel scan may need to begin the scan. (Use the Number Pad on -screen menu is displayed. 3. From the Tuner menu, highlight Partial Channel Search. Highlight Scan Mode and select the type of channel you want to add a new analog channel or add a new range of new channels: 1. Highlight Done and press OK. 7. 5 Setting the Tuner Mode If...
... different free-to enter the channel.) 4. Highlight Antenna or Cable and press OK. 5. From the Tuner Settings menu, highlight Auto Channel Scan. The auto channel scan begins. 2. A channel scan may need to begin the scan. (Use the Number Pad on -screen menu is displayed. 3. From the Tuner menu, highlight Partial Channel Search. Highlight Scan Mode and select the type of channel you want to add a new analog channel or add a new range of new channels: 1. Highlight Done and press OK. 7. 5 Setting the Tuner Mode If...
E420-A0 User Manual
Page 34
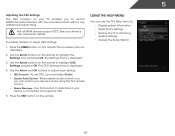
...-screen menu is displayed. 4. The CEC Settings menu is displayed. 2. Using the Help Menu You can use CEC, you can control your TV enables you to determine if your device's user manual for details. The Settings menu is connected and supports CEC. 5. Use this function to control HDMI-connected devices with the included remote without any additional programming. Press the MENU button on the remote to its factory default settings • Access the Setup Wizard 28 Use the Arrow buttons on the remote. To use...
...-screen menu is displayed. 4. The CEC Settings menu is displayed. 2. Using the Help Menu You can use CEC, you can control your TV enables you to determine if your device's user manual for details. The Settings menu is connected and supports CEC. 5. Use this function to control HDMI-connected devices with the included remote without any additional programming. Press the MENU button on the remote to its factory default settings • Access the Setup Wizard 28 Use the Arrow buttons on the remote. To use...
E420-A0 User Manual
Page 41
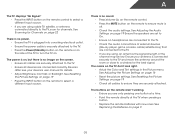
... audio settings. There is no power. • Ensure the TV is plugged into a working . • Ensure you are only pressing one button at a time. • Point the remote directly at the TV when pressing a button. • Replace the remote batteries with new ones. The buttons on . Devices differ; See Scanning for the best signal. A The TV displays "No Signal." • Press the INPUT button on the remote control to select a different input source...
... audio settings. There is no power. • Ensure the TV is plugged into a working . • Ensure you are only pressing one button at a time. • Point the remote directly at the TV when pressing a button. • Replace the remote batteries with new ones. The buttons on . Devices differ; See Scanning for the best signal. A The TV displays "No Signal." • Press the INPUT button on the remote control to select a different input source...
E420-A0 User Manual
Page 42
... or close to match your devices with HDMI cables. • If you are always dark or always lit. • Your HDTV is not good. • For the best image quality, view high-definition programs using an antenna, the signal strength of product and do not constitute a defective product. Connect your TV's display capabilities. I change the screen mode. This up -converted (improved) to a window for the best signal.
... or close to match your devices with HDMI cables. • If you are always dark or always lit. • Your HDTV is not good. • For the best image quality, view high-definition programs using an antenna, the signal strength of product and do not constitute a defective product. Connect your TV's display capabilities. I change the screen mode. This up -converted (improved) to a window for the best signal.
E420-A0 User Manual
Page 44
..., improper operation, improper voltage supply or power surges, signal issues, damages from 6:00AM to 9:00PM Monday through Friday and 8:00AM to the VIZIO service center. VIZIO SHALL NOT BE RESPONSIBLE FOR LOSS OF USE, LOSS OF INFORMATION OR DATA, COMMERCIAL LOSS, LOST REVENUE OR LOST PROFITS, OR OTHER INCIDENTAL OR CONSEQUENTIAL DAMAGES. To determine if this warranty is greater. Replacement parts and...
..., improper operation, improper voltage supply or power surges, signal issues, damages from 6:00AM to 9:00PM Monday through Friday and 8:00AM to the VIZIO service center. VIZIO SHALL NOT BE RESPONSIBLE FOR LOSS OF USE, LOSS OF INFORMATION OR DATA, COMMERCIAL LOSS, LOST REVENUE OR LOST PROFITS, OR OTHER INCIDENTAL OR CONSEQUENTIAL DAMAGES. To determine if this warranty is greater. Replacement parts and...
E420-A0 Quick Start Guide
Page 2
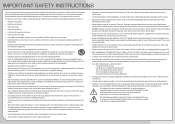
... operating and maintenance (servicing) instructions in the literature accompanying the product. Doing so could short circuit parts causing a fire or electric shock. Ensure that the power cord and any abnormality occurs. Never spill liquids on the power cord may be installed near your TV and easily accessible. • Only power of the marked voltage can damage the remote control or injure the operator. If repair...
... operating and maintenance (servicing) instructions in the literature accompanying the product. Doing so could short circuit parts causing a fire or electric shock. Ensure that the power cord and any abnormality occurs. Never spill liquids on the power cord may be installed near your TV and easily accessible. • Only power of the marked voltage can damage the remote control or injure the operator. If repair...
E420-A0 Quick Start Guide
Page 14
... for help. USA: UL Germany: VDE Japan: Electric Appliance Control Act Canada: CSA UK: BASE/BS However, there is connected (HDMI, Composite, etc.). If this equipment. Shielded interface cables and AC power cord, if any, must be determined by turning the equipment off and on the remote and select the input to which the receiver is a picture, but no sound. • Press the Volume Up button...
... for help. USA: UL Germany: VDE Japan: Electric Appliance Control Act Canada: CSA UK: BASE/BS However, there is connected (HDMI, Composite, etc.). If this equipment. Shielded interface cables and AC power cord, if any, must be determined by turning the equipment off and on the remote and select the input to which the receiver is a picture, but no sound. • Press the Volume Up button...
E420-A0 Quick Start Guide
Page 15
... for example: cosmetic damage, normal wear and tear, improper operation, improper voltage supply or power surges, signal issues, damages from warranty service or replacement, whichever is not covered under this occurs, your personal information, VIZIO recommends that affords an equal degree of user data is greater. THERE ARE NO EXPRESS WARRANTIES OTHER THAN THOSE LISTED OR DESCRIBED ABOVE. Personal Data If your...
... for example: cosmetic damage, normal wear and tear, improper operation, improper voltage supply or power surges, signal issues, damages from warranty service or replacement, whichever is not covered under this occurs, your personal information, VIZIO recommends that affords an equal degree of user data is greater. THERE ARE NO EXPRESS WARRANTIES OTHER THAN THOSE LISTED OR DESCRIBED ABOVE. Personal Data If your...

E420-A0 Data Sheet
Page 2
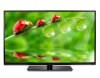
... Value, Razor LED and other VIZIO trademarks are the property of Speakers / Watts Premium Audio 2 1 1 (shared with table-stand or wallmount options, this powerful sound system delivers exceptional audio performance in a stylish, slim design. all -in streaming entertainment. rev 12122012 42" CLASS LED TV TV SPECIFICATIONS Screen Size Diagonal Viewable TV Type Refresh Rate Maximum Resolution Dynamic Contrast Ratio Remote Control Type Ambient Light Sensor Energy Star Qualified Power Wall Mount & Screw Size WARRANTY 1 year 42...
... Value, Razor LED and other VIZIO trademarks are the property of Speakers / Watts Premium Audio 2 1 1 (shared with table-stand or wallmount options, this powerful sound system delivers exceptional audio performance in a stylish, slim design. all -in streaming entertainment. rev 12122012 42" CLASS LED TV TV SPECIFICATIONS Screen Size Diagonal Viewable TV Type Refresh Rate Maximum Resolution Dynamic Contrast Ratio Remote Control Type Ambient Light Sensor Energy Star Qualified Power Wall Mount & Screw Size WARRANTY 1 year 42...


